1. Introduction
Thank you for choosing the Multi-function Cryolipolysis Fat Freezing Machine. This device is designed for body sculpting, fat reduction, and cellulite removal through advanced cryotherapy technology. It is suitable for various body parts including the abdomen, arms, thighs, shins, and hips, catering to both men and women.
The machine utilizes new improved working heads that operate at 360°, enhancing the efficiency of each session. It integrates multiple functions to help manage body aesthetics and promote a sculpted appearance.
2. Safety Information and Precautions
Please read all safety instructions carefully before operating the device.
- Cleaning: After each use, clean the device thoroughly with a saline solution or a neutral detergent and a clean cloth. Do not discard randomly.
- Storage: Store the machine in a dry place. Avoid humid environments.
- Electromagnetic Interference: When using the machine, avoid operating high-frequency electrical appliances nearby, as they may cause interference.
- Treatment Duration: The maximum freezing time for each body part is 30 minutes. For temperatures of -14°C, do not exceed 20 minutes.
- Anti-freeze Film: A disposable anti-freeze film must be used for each treatment session.
- Repeated Treatment: Do not use the freezing machine on the same area repeatedly in a short period. Allow adequate time between sessions for the same body part.
- Applicable Users: This machine is specifically designed for individuals with higher body weight who wish to target specific body parts. Consult a healthcare professional if you have underlying health conditions.
3. Product Overview
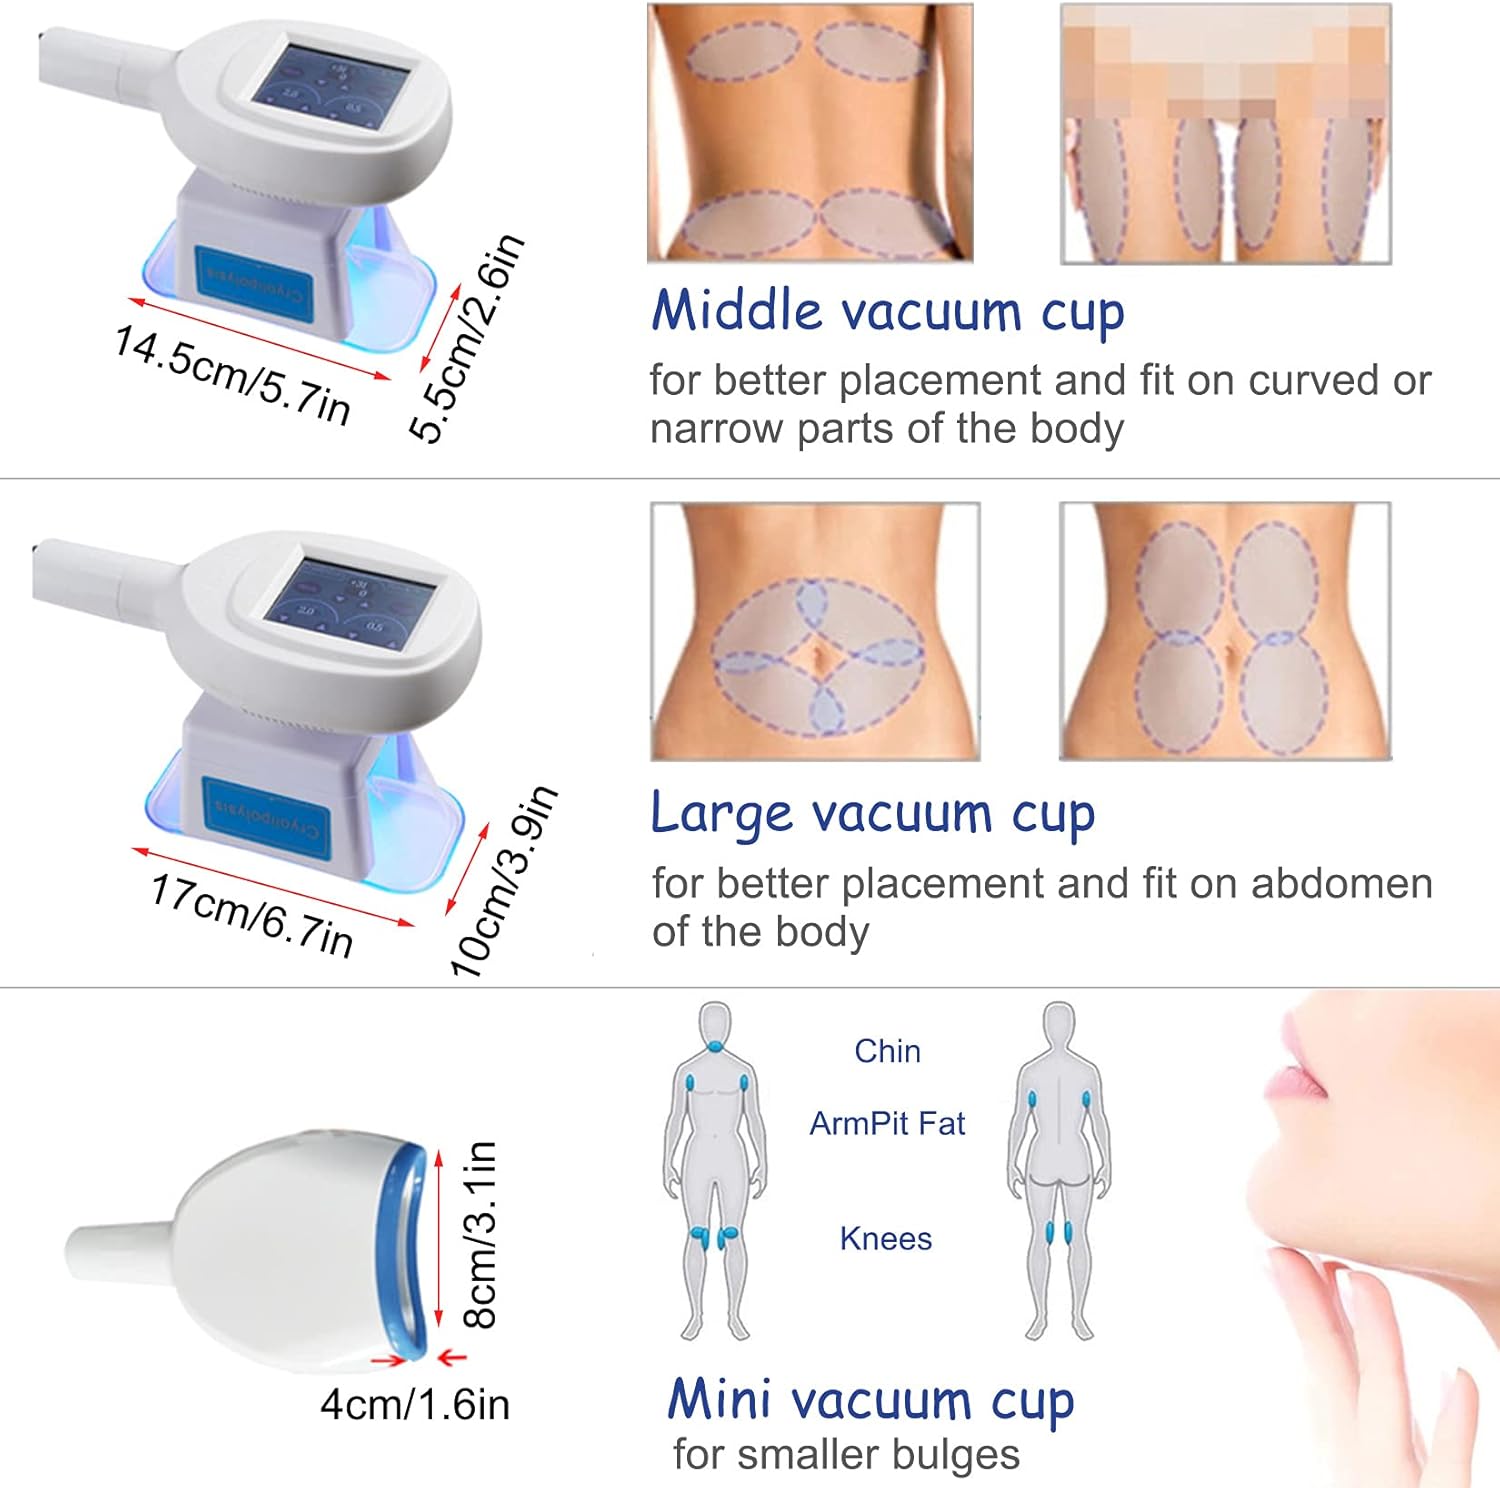
The Cryolipolysis Fat Freezing Machine comes with a main unit and three different sized handles for versatile application on various body areas.


4. Setup
- Unpacking: Carefully remove all components from the packaging.
- Placement: Place the main unit on a stable, flat, and dry surface. Ensure adequate ventilation around the machine.
- Power Connection: Connect the power cord to the machine and then to a compatible electrical outlet. The machine supports a voltage range of 110V-240V.
- Handle Attachment: Securely attach the desired treatment handle to the corresponding port on the main unit. Ensure a firm connection.
5. Operating Instructions
Follow these steps for safe and effective operation of your cryolipolysis machine:
- Preparation: Ensure the treatment area on the body is clean and dry.
- Apply Anti-freeze Film: Place a disposable anti-freeze film over the target treatment area. This film is crucial for protecting the skin during the freezing process.
- Position Handle: Carefully place the chosen handle over the anti-freeze film on the target area. Ensure a good seal for optimal vacuum suction.
- Power On: Turn on the main power switch of the machine.
- Set Parameters: Using the control interface, set the desired temperature and treatment duration. Refer to the safety guidelines for recommended times (max 30 minutes per area, max 20 minutes for -14°C).
- Start Treatment: Press the 'Work' or 'Start' button on the interface to begin the cryolipolysis process. The handle will initiate suction and cooling.
- Monitor: During the session, the machine will cool the fat cells to a target temperature, causing them to crystallize and eventually be eliminated by the body's metabolic process.
- End Treatment: Once the set time expires, the machine will automatically stop. Gently remove the handle from the skin.
- Post-Treatment: After removing the handle, gently massage the treated area to help break up the crystallized fat cells and improve circulation.


6. Maintenance
Proper maintenance ensures the longevity and optimal performance of your device.
- Cleaning: After each use, disconnect the power and clean the handles and the main unit thoroughly. Use a soft cloth dampened with saline solution or a neutral detergent. Do not use abrasive cleaners or solvents.
- Storage: Store the machine in a cool, dry place, away from direct sunlight and excessive humidity.
- Inspection: Periodically inspect the power cord and handles for any signs of damage. If any damage is found, discontinue use and contact customer support.
7. Troubleshooting
If you encounter any issues with your device, please refer to the following common troubleshooting tips:
- Machine Not Powering On:
- Ensure the power cord is securely plugged into both the machine and a working electrical outlet.
- Check the power switch on the machine. - No Cooling/Suction:
- Verify that the handle is correctly attached to the main unit.
- Check if the anti-freeze film is properly applied and creating a good seal with the handle.
- Ensure the treatment parameters (temperature, time) are correctly set on the interface. - Unusual Noises:
- Turn off the machine immediately and inspect for any visible obstructions or loose parts. If the noise persists, contact customer support. - Error Messages:
- If an error code appears on the display, refer to the specific error code section (if available in a more detailed manual) or contact customer support with the error code.
For issues not covered here, please contact customer support.
8. Specifications
| Attribute | Detail |
|---|---|
| Brand | Generic |
| Model Number | MSXJ09235523018 |
| ASIN | B0DHS9Z191 |
| Manufacturer | Generic |
| Voltage | 110V-240V |
| Service | Other |
| Spare Parts Availability | Information unavailable |
9. Warranty and Support
For any inquiries, technical support, or warranty information, please contact the seller or manufacturer directly. Please have your model number (MSXJ09235523018) and ASIN (B0DHS9Z191) ready when contacting support.
Information regarding spare parts availability is currently unavailable.