1. Introduction
Thank you for choosing the Sarsumir Digital Alarm Clock U80Y002. This manual provides detailed instructions for setting up, operating, and maintaining your new alarm clock. Please read this manual thoroughly before use to ensure proper functionality and to maximize your product experience.

Figure 1.1: Sarsumir Digital Alarm Clock. This image displays the front view of the digital alarm clock with a clear white LED display showing the time 12:00.
2. Package Contents
Upon opening the package, please verify that all the following items are included:
- 1 x Sarsumir Digital Alarm Clock (Model U80Y002)
- 1 x USB Data Cable
- 1 x Instruction Manual (this document)
3. Product Overview
The Sarsumir Digital Alarm Clock features a large 6.7-inch LED display for clear visibility. The control buttons are located on the back of the unit for a sleek front appearance.
3.1. Display Features
- Time Display: Shows current time in 12-hour or 24-hour format.
- Date Display: Shows current date.
- Temperature Display: Shows ambient temperature.
- Night Mode Indicator: Indicates when night mode is active.
- Alarm Mode Indicator: Indicates active alarms.
3.2. Control Buttons
The clock features five control buttons on its rear panel:
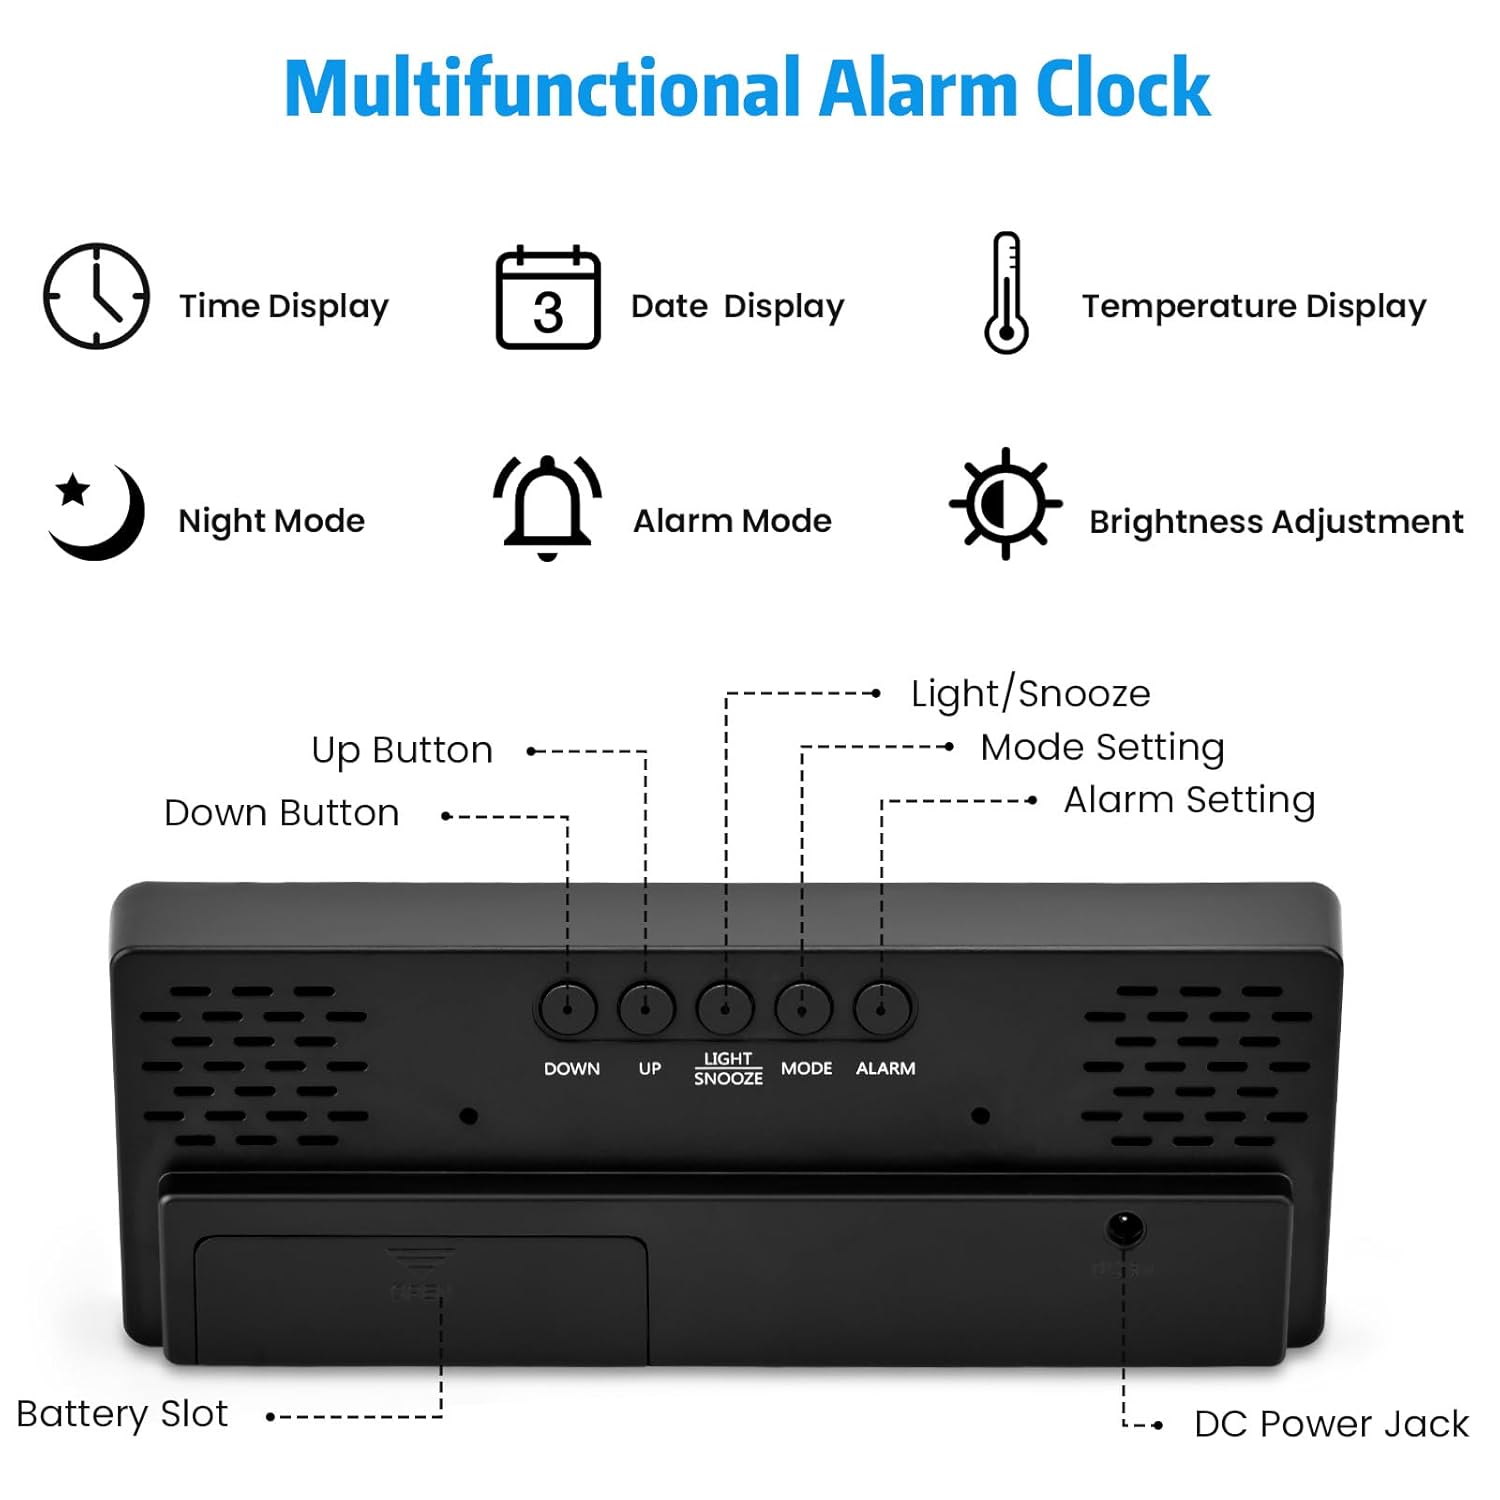
Figure 3.1: Rear Panel Controls. This image shows the back of the alarm clock, highlighting the 'DOWN', 'UP', 'LIGHT/SNOOZE', 'MODE', and 'ALARM' buttons, along with the battery slot and DC Power Jack.
- DOWN Button: Used to decrease values or navigate menus.
- UP Button: Used to increase values or navigate menus.
- LIGHT/SNOOZE Button: Activates snooze during an alarm; adjusts brightness in normal mode.
- MODE Button: Cycles through display modes (Time, Date, Temperature) and enters setting modes.
- ALARM Button: Enters alarm setting mode.
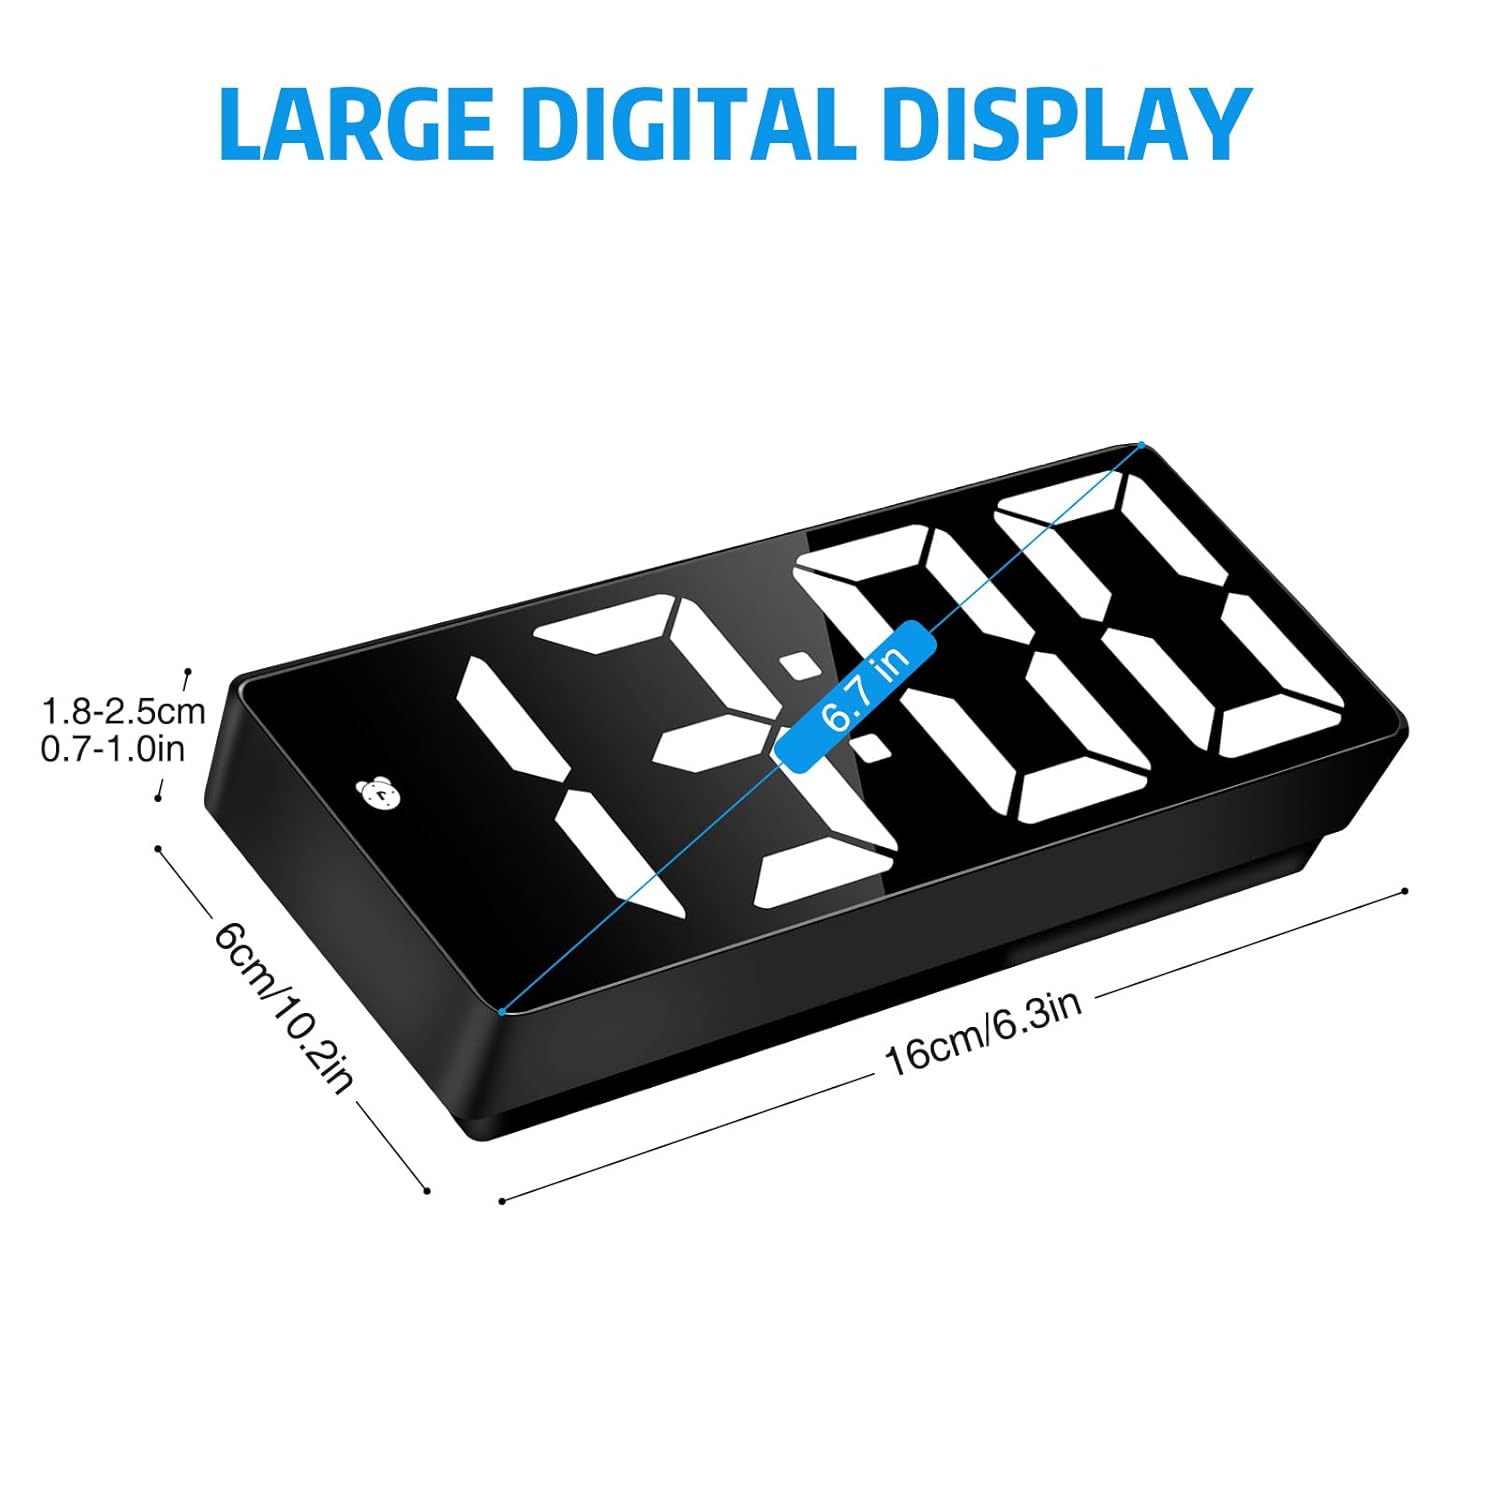
Figure 3.2: Product Dimensions. This diagram illustrates the physical dimensions of the alarm clock, including its 6.7-inch display size and overall width and height.
4. Powering the Device
The Sarsumir Digital Alarm Clock can be powered in two ways: via AAA batteries or through a USB connection.
4.1. Battery Power (3 x AAA Batteries, Not Included)
For portable use or as a backup power source, the clock can operate on three AAA batteries. When powered by batteries, the display will automatically turn off after 16 seconds to conserve power. To reactivate the display, you can make a sound (e.g., clap) or press any button.

Figure 4.1: Battery Installation. This image shows the open battery compartment on the back of the clock, indicating where to insert three AAA batteries.
4.2. USB Power (Mains Powered)
For continuous display and primary operation, connect the clock using the provided USB data cable to a USB power source (e.g., power bank, laptop, or a USB wall charger, not included).

Figure 4.2: USB Power Connection. This image demonstrates various ways to power the clock via USB, such as connecting it to a power bank, laptop, or a wall charger.
5. Initial Setup: Time and Date
Follow these steps to set the current time and date:
- Enter Time Setting Mode: Press and hold the MODE button for 3 seconds. The hour digits will start flashing.
- Set Hour: Use the UP or DOWN buttons to adjust the hour.
- Set Minute: Press the MODE button again. The minute digits will flash. Use the UP or DOWN buttons to adjust the minutes.
- Select 12/24-Hour Format: Press the MODE button again. The display will show '12H' or '24H'. Use the UP or DOWN buttons to select your preferred format.
- Set Year: Press the MODE button again. The year digits will flash. Use the UP or DOWN buttons to adjust the year.
- Set Month: Press the MODE button again. The month digits will flash. Use the UP or DOWN buttons to adjust the month.
- Set Day: Press the MODE button again. The day digits will flash. Use the UP or DOWN buttons to adjust the day.
- Exit Setting Mode: Press the MODE button one last time, or wait for 10 seconds without pressing any button, and the clock will automatically exit the setting mode.
6. Setting the Alarm
The clock supports three alarm modes: Monday-Friday, Monday-Saturday, and Monday-Sunday.

Figure 6.1: Alarm Modes. This image visually explains the three available alarm frequency settings: 1-5 (Monday to Friday), 1-6 (Monday to Saturday), and 1-7 (Everyday).
- Enter Alarm Setting Mode: Press and hold the ALARM button for 3 seconds. The hour digits of the alarm will start flashing.
- Set Alarm Hour: Use the UP or DOWN buttons to adjust the alarm hour.
- Set Alarm Minute: Press the ALARM button again. The minute digits will flash. Use the UP or DOWN buttons to adjust the alarm minutes.
- Select Alarm Mode: Press the ALARM button again. The display will show '1-5' (Mon-Fri), '1-6' (Mon-Sat), or '1-7' (Mon-Sun). Use the UP or DOWN buttons to select your desired alarm frequency.
- Exit Alarm Setting Mode: Press the ALARM button one last time, or wait for 10 seconds without pressing any button, and the clock will automatically exit the alarm setting mode.
6.1. Activating/Deactivating Alarm
In normal time display mode, press the ALARM button briefly to toggle the alarm on or off. An alarm icon will appear on the display when the alarm is active.
7. Brightness and Night Mode
The clock offers adjustable brightness levels and a night mode feature to optimize visibility and comfort.
7.1. Adjusting Brightness
In normal time display mode, press the UP or DOWN buttons to cycle through three brightness levels: BRIGHT, MEDIUM, and LOW.

Figure 7.1: Brightness Levels. This image illustrates the visual difference between the Bright, Medium, and Low display settings of the alarm clock.
7.2. Night Mode
Night mode automatically dims the display during a set period (default 18:00 to 6:00) to prevent disturbance during sleep. You can customize this period.
- Activate/Deactivate Night Mode: In normal time display mode, press the MODE button briefly until the night mode indicator appears/disappears.
- Set Night Mode Period: When night mode is active, press and hold the MODE button for 3 seconds. The start hour will flash.
- Adjust Start Hour: Use the UP or DOWN buttons to set the desired start hour for night mode.
- Adjust Start Minute: Press the MODE button. The start minute will flash. Use the UP or DOWN buttons to set the start minute.
- Adjust End Hour: Press the MODE button. The end hour will flash. Use the UP or DOWN buttons to set the desired end hour for night mode.
- Adjust End Minute: Press the MODE button. The end minute will flash. Use the UP or DOWN buttons to set the end minute.
- Exit Setting: Press the MODE button again, or wait for 10 seconds, to save settings and exit.
8. Snooze Function
When the alarm sounds, you can activate the snooze function for additional sleep time.
- Activate Snooze: When the alarm is sounding, press the LIGHT/SNOOZE button. The alarm will pause and sound again after the set snooze duration.
- Set Snooze Duration: The default snooze time is 5 minutes. To adjust, press and hold the LIGHT/SNOOZE button for 3 seconds while the alarm is sounding. Use the UP or DOWN buttons to set the snooze duration from 1 to 60 minutes. Press LIGHT/SNOOZE again to confirm.
- Cancel Alarm: To completely turn off the alarm, press any button other than LIGHT/SNOOZE when the alarm is sounding.
9. General Operation
The Sarsumir Digital Alarm Clock is designed for versatile use in various indoor environments.

Figure 9.1: Versatile Placement. This image showcases the alarm clock in different home and office settings, demonstrating its adaptability as a desk or bedside clock.
9.1. Display Modes
Briefly press the MODE button to cycle through the following display modes:
- Time
- Date
- Temperature
9.2. Silent Operation
The clock operates silently without any ticking sound, ensuring an undisturbed environment.
10. Troubleshooting
If you encounter any issues with your Sarsumir Digital Alarm Clock, please refer to the following common problems and solutions:
| Problem | Possible Cause | Solution |
|---|---|---|
| Display is off or intermittent (on battery power) | Power-saving mode active; low batteries. | Make a sound or press any button to activate display. Replace AAA batteries or connect to USB power. |
| Clock not keeping accurate time | Incorrect initial time setting; power interruption. | Re-set the time following Section 5. Ensure stable power supply. |
| Alarm not sounding | Alarm not activated; incorrect alarm time; volume too low (if applicable). | Ensure alarm icon is visible on display (Section 6.1). Verify alarm time setting (Section 6). This model does not have adjustable volume. |
| Display too dim or too bright | Brightness level needs adjustment; night mode active. | Adjust brightness using UP/DOWN buttons (Section 7.1). Check night mode settings (Section 7.2). |
| Buttons unresponsive | Temporary software glitch; low power. | Remove batteries and disconnect USB power for a few minutes, then reconnect. Ensure fresh batteries or stable USB power. |
11. Specifications
Detailed technical specifications for the Sarsumir Digital Alarm Clock U80Y002:
- Brand: Sarsumir
- Model Number: U80Y002
- Colour: White
- Display Type: Digital LED
- Special Features: Adjustable Brightness, Snooze, Time, Date, Temperature Display, Night Mode
- Product Dimensions: 40W x 170H Millimeters
- Power Source: 3 x AAA Batteries (not included) or USB (DC 5V)
- Indoor/Outdoor Usage: Indoor
- Frame Material: Plastic
- Mounting Type: Tabletop
- Item Weight: 150 g
12. Safety Information
Please observe the following safety precautions:
- Do not expose the device to extreme temperatures, direct sunlight, or high humidity.
- Avoid dropping or subjecting the device to strong impacts.
- Do not attempt to disassemble or repair the device yourself. Contact qualified personnel for service.
- Keep out of reach of children.
- Dispose of used batteries responsibly according to local regulations.
- Use only the provided USB cable or a compatible cable for power.
13. Warranty and Support
For warranty information and customer support, please refer to the documentation provided with your purchase or contact the manufacturer directly. Keep your proof of purchase for warranty claims.