1. Introduction
This manual provides detailed instructions for the installation, maintenance, and specifications of the cvking Upgraded Metal Front and Rear Shock Brackets for SCY 1/16 series RC cars. Please read this manual thoroughly before installation to ensure proper use and longevity of the product.
2. Product Overview
The cvking Upgraded Metal Front and Rear Shock Brackets are designed to enhance the durability and performance of your SCY 1/16 scale remote control car. Constructed from high-quality metal, these brackets offer improved wear resistance and stable characteristics for high reliability.
2.1. Key Features
- Material: Made of durable metal for enhanced wear resistance and long-term use.
- Performance: Provides stable performance and high reliability for demanding RC car operations.
- Compatibility: Specifically designed for SCY 1/16 RC car models including 16101, 16102, 16103, 16106, 16201, 16101PRO, 16102PRO, 16103PRO, and 16106PRO.
3. Package Contents
Verify that all components are present and undamaged upon opening the package.

Figure 1: Package contents showing two blue metal shock brackets (one front, one rear) and accompanying mounting screws.
- Front Shock Bracket (1x)
- Rear Shock Bracket (1x)
- Mounting Screws (Various sizes, as pictured)
4. Setup and Installation
The installation process is designed to be straightforward and typically requires no specialized tools. It can be completed in a few minutes.
- Preparation: Ensure your RC car is powered off and the battery is disconnected. Place the car on a stable, clean surface.
- Remove Existing Brackets: Carefully remove the screws securing the original front and rear shock brackets on your SCY 1/16 RC car. Keep track of the screws as some may be reused or replaced by the provided ones.
- Install Front Shock Bracket:

Figure 2: Front shock bracket installation showing attachment points to the chassis and shock absorbers.
Position the new metal front shock bracket in place of the old one. Align the screw holes and secure it using the appropriate screws provided or the original screws if compatible. Do not overtighten.
Figure 3: Detailed view of the front shock bracket mounted, highlighting its integration with the RC car's suspension.
- Install Rear Shock Bracket:
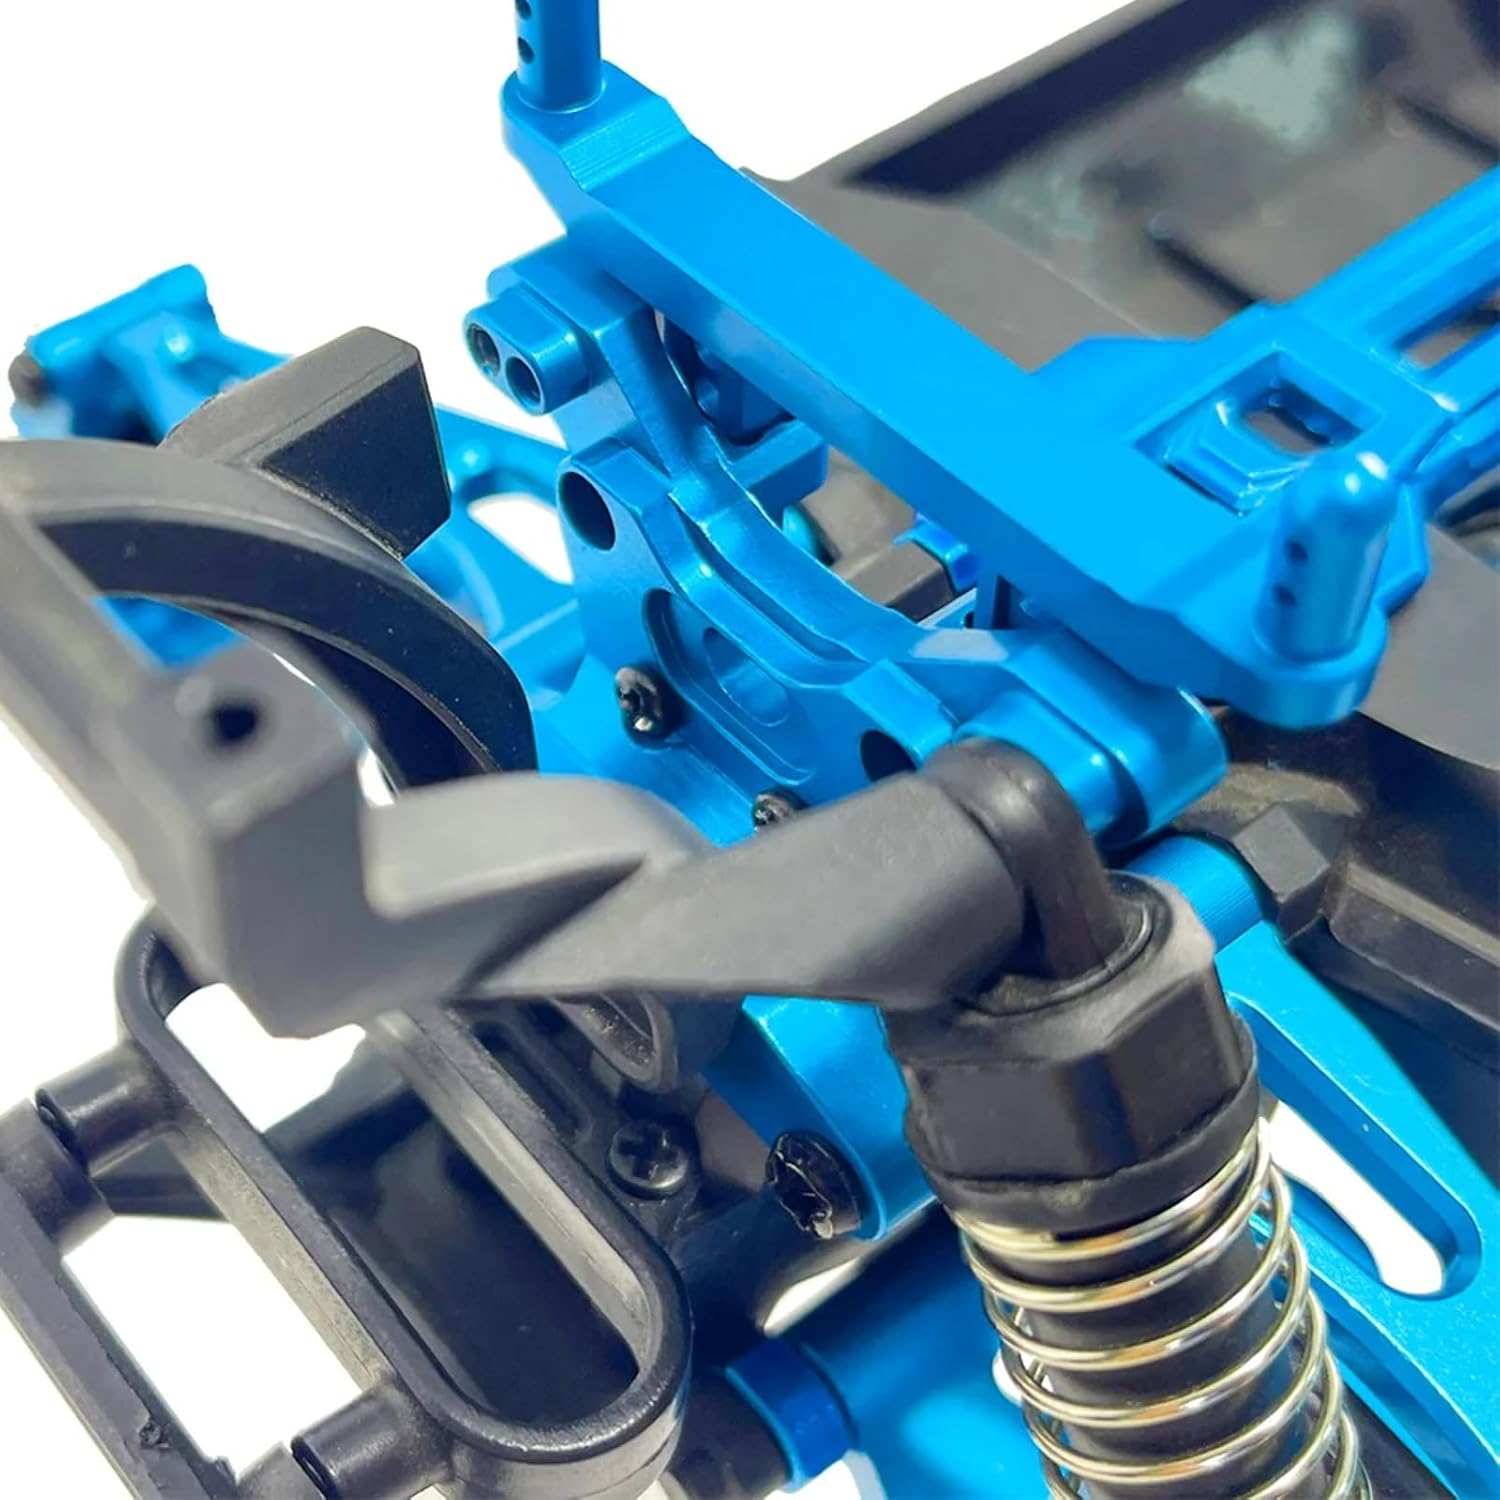
Figure 4: Rear shock bracket installation, showing its position relative to the rear suspension arms.
Similarly, position the new metal rear shock bracket. Align the screw holes and fasten it securely. Ensure all connections are firm but avoid excessive force.
Figure 5: Detailed view of the rear shock bracket mounted, illustrating its secure fit and connection to the chassis.
- Final Check: After installation, gently test the movement of the suspension to ensure there is no binding and all parts move freely.
5. Operating Considerations
While these are replacement parts, proper operation of your RC car contributes to their longevity. Always operate your RC car within its intended limits and avoid excessive impacts that could damage suspension components.
6. Maintenance
Regular maintenance will help extend the life of your upgraded shock brackets and your RC car's suspension system.
- Cleaning: Periodically clean the brackets and surrounding areas to remove dirt, dust, and debris that can accumulate during use. Use a soft brush or cloth.
- Inspection: Regularly inspect the brackets for any signs of wear, bending, or damage. Check that all screws remain tight.
- Lubrication: Ensure that any moving parts connected to the brackets (e.g., shock shafts) are properly lubricated according to your RC car's main instruction manual.
7. Troubleshooting
If you encounter issues after installing the shock brackets, consider the following:
- Loose Fit: If the brackets feel loose, ensure all mounting screws are properly tightened. Avoid overtightening, which can strip threads.
- Restricted Movement: If the suspension feels stiff or restricted, check for any misaligned parts or debris caught between components. Re-check the installation steps.
- Unusual Noise: Investigate any new noises coming from the suspension area. This could indicate a loose part or interference.
For persistent issues, refer to your RC car's original instruction manual or contact customer support.
8. Specifications
| Material | Metal |
| Compatibility | SCY 1/16 RC Car Models: 16101, 16102, 16103, 16106, 16201, 16101PRO, 16102PRO, 16103PRO, 16106PRO |
| Package Dimensions | 1.18 x 0.79 x 0.39 inches |
| Item Weight | 4.2 ounces |
| Manufacturer | jingmai (Brand: cvking) |
| Recommended Age | 36 months - 18 years |
9. Warranty and Support
cvking is committed to customer satisfaction. If you have any questions about our products or encounter any issues, please do not hesitate to contact our customer service team. We aim to respond within 24 hours and assist you in resolving any concerns.
For support, please refer to the contact information provided with your purchase or visit the official cvking website.