1. Introduction
Thank you for choosing the Melelink 14-in-1 USB-C Docking Station. This device is designed to expand the connectivity of your USB-C enabled laptop, transforming a single USB-C port into 14 versatile ports. This manual provides detailed instructions for setup, operation, and troubleshooting to ensure optimal performance.
2. Product Overview
The Melelink 14-in-1 USB-C Docking Station offers a comprehensive solution for expanding your laptop's capabilities. It features multiple display outputs, high-speed data transfer ports, network connectivity, and power delivery.

Image 2.1: Overview of the Melelink 14-in-1 USB-C Docking Station with labeled ports.
Key Features:
- Video Outputs: 1x HDMI 1 (4K@60Hz), 1x HDMI 2 (4K@30Hz), 1x DisplayPort (4K@60Hz)
- Power Delivery: 1x USB-C PD port (up to 100W input, 87W safe charging output)
- Data Ports: 2x USB-C 3.0 (5Gbps), 2x USB-A 3.0 (5Gbps), 2x USB 2.0 (480Mbps)
- Network: 1x Gigabit Ethernet (10/100/1000Mbps)
- Card Readers: 1x SD card reader, 1x Micro SD card reader (up to 104MB/s)
- Audio: 1x 3.5mm Mic/Audio port
3. Setup Instructions
Follow these steps to connect your Melelink 14-in-1 USB-C Docking Station to your laptop and external devices.
- Connect to Laptop: Plug the integrated USB-C cable from the docking station into a full-featured USB-C port on your laptop. Ensure your laptop's USB-C port supports video output (DisplayPort Alt Mode) and Power Delivery for full functionality.
- Connect Power Adapter (Optional but Recommended): For stable operation and laptop charging, connect your laptop's original power adapter (or a compatible USB-C PD charger, minimum 65W) to the USB-C PD port on the docking station. The docking station supports up to 100W input, providing up to 87W for laptop charging.
- Connect External Monitors: Use HDMI or DisplayPort cables to connect your monitors to the corresponding ports on the docking station. Refer to the 'Operating Instructions - Display Modes' section for specific configurations.
- Connect Peripherals: Plug in your USB devices (keyboard, mouse, external drives) into the available USB-A or USB-C data ports. Insert SD or Micro SD cards into the card reader slots as needed.
- Connect Ethernet: For a stable wired network connection, plug an Ethernet cable into the Gigabit Ethernet port on the docking station.
- Connect Audio: If desired, connect headphones or speakers to the 3.5mm audio/mic port.
4. Operating Instructions
4.1 Display Modes (Windows)
The docking station supports dual and triple monitor setups for Windows laptops, allowing for extended desktop modes.
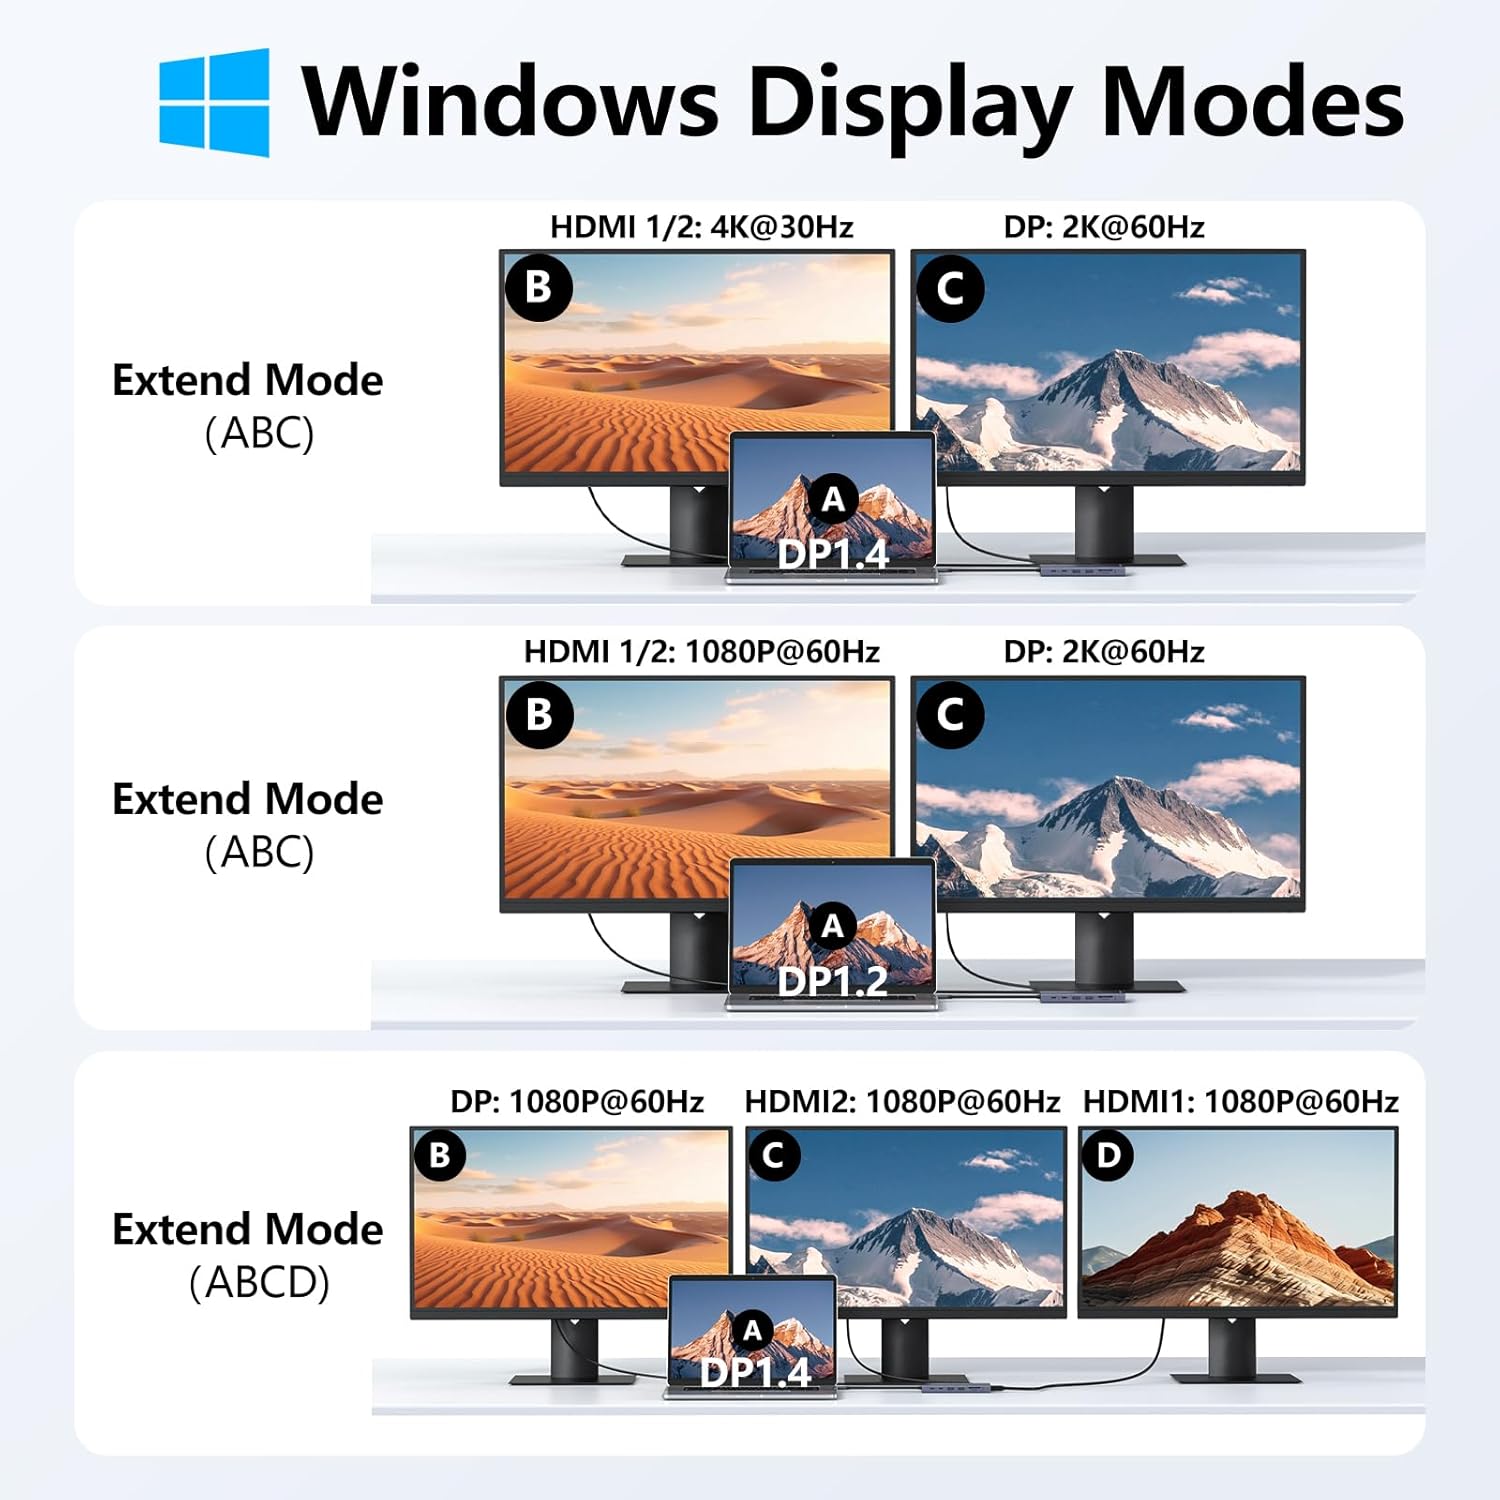
Image 4.1.1: Illustration of various display modes for Windows operating systems.
- Single Monitor:
- HDMI 1 or DisplayPort: Up to 4K@60Hz
- HDMI 2: Up to 4K@30Hz
- Dual Monitors (Extended Mode):

Image 4.1.2: Dual monitor extended display setup for Windows.
- HDMI 1 + HDMI 2: 4K@30Hz + 1080P@60Hz (DP1.4)
- HDMI 1 + DisplayPort: 4K@30Hz + 1080P@60Hz (DP1.4)
- HDMI 2 + DisplayPort: 4K@30Hz + 1080P@60Hz (DP1.4)
- Triple Monitors (Extended Mode):

Image 4.1.3: Triple monitor extended display setup for Windows.
- HDMI 1 + HDMI 2 + DisplayPort: All 1080P (DP1.4)
4.2 Display Modes (macOS)
macOS laptops only support mirroring (same image) across external monitors due to MST (Multi-Stream Transport) limitations. The laptop screen can be extended, but external monitors will display identical content.

Image 4.2.1: Illustration of display modes for macOS operating systems, highlighting MST limitations.
- Dual Monitors (Extended Mode - SST):

Image 4.2.2: Dual monitor setup for macOS, showing mirrored external displays.
- HDMI 1/2: 4K@30Hz
- DisplayPort: 2K@60Hz
- Triple Monitors: Not supported for extended mode on external displays. All external monitors will mirror each other.
4.3 Power Delivery
The USB-C PD port supports up to 100W power input. Approximately 13W is reserved for the docking station's operation, allowing up to 87W for laptop charging. Ensure your laptop's USB-C port supports Power Delivery and use a power adapter of at least 65W for effective charging.

Image 4.3.1: Power Delivery and Gigabit Ethernet functionality.
4.4 Data Transfer
The docking station includes various USB ports and card readers for efficient data transfer.
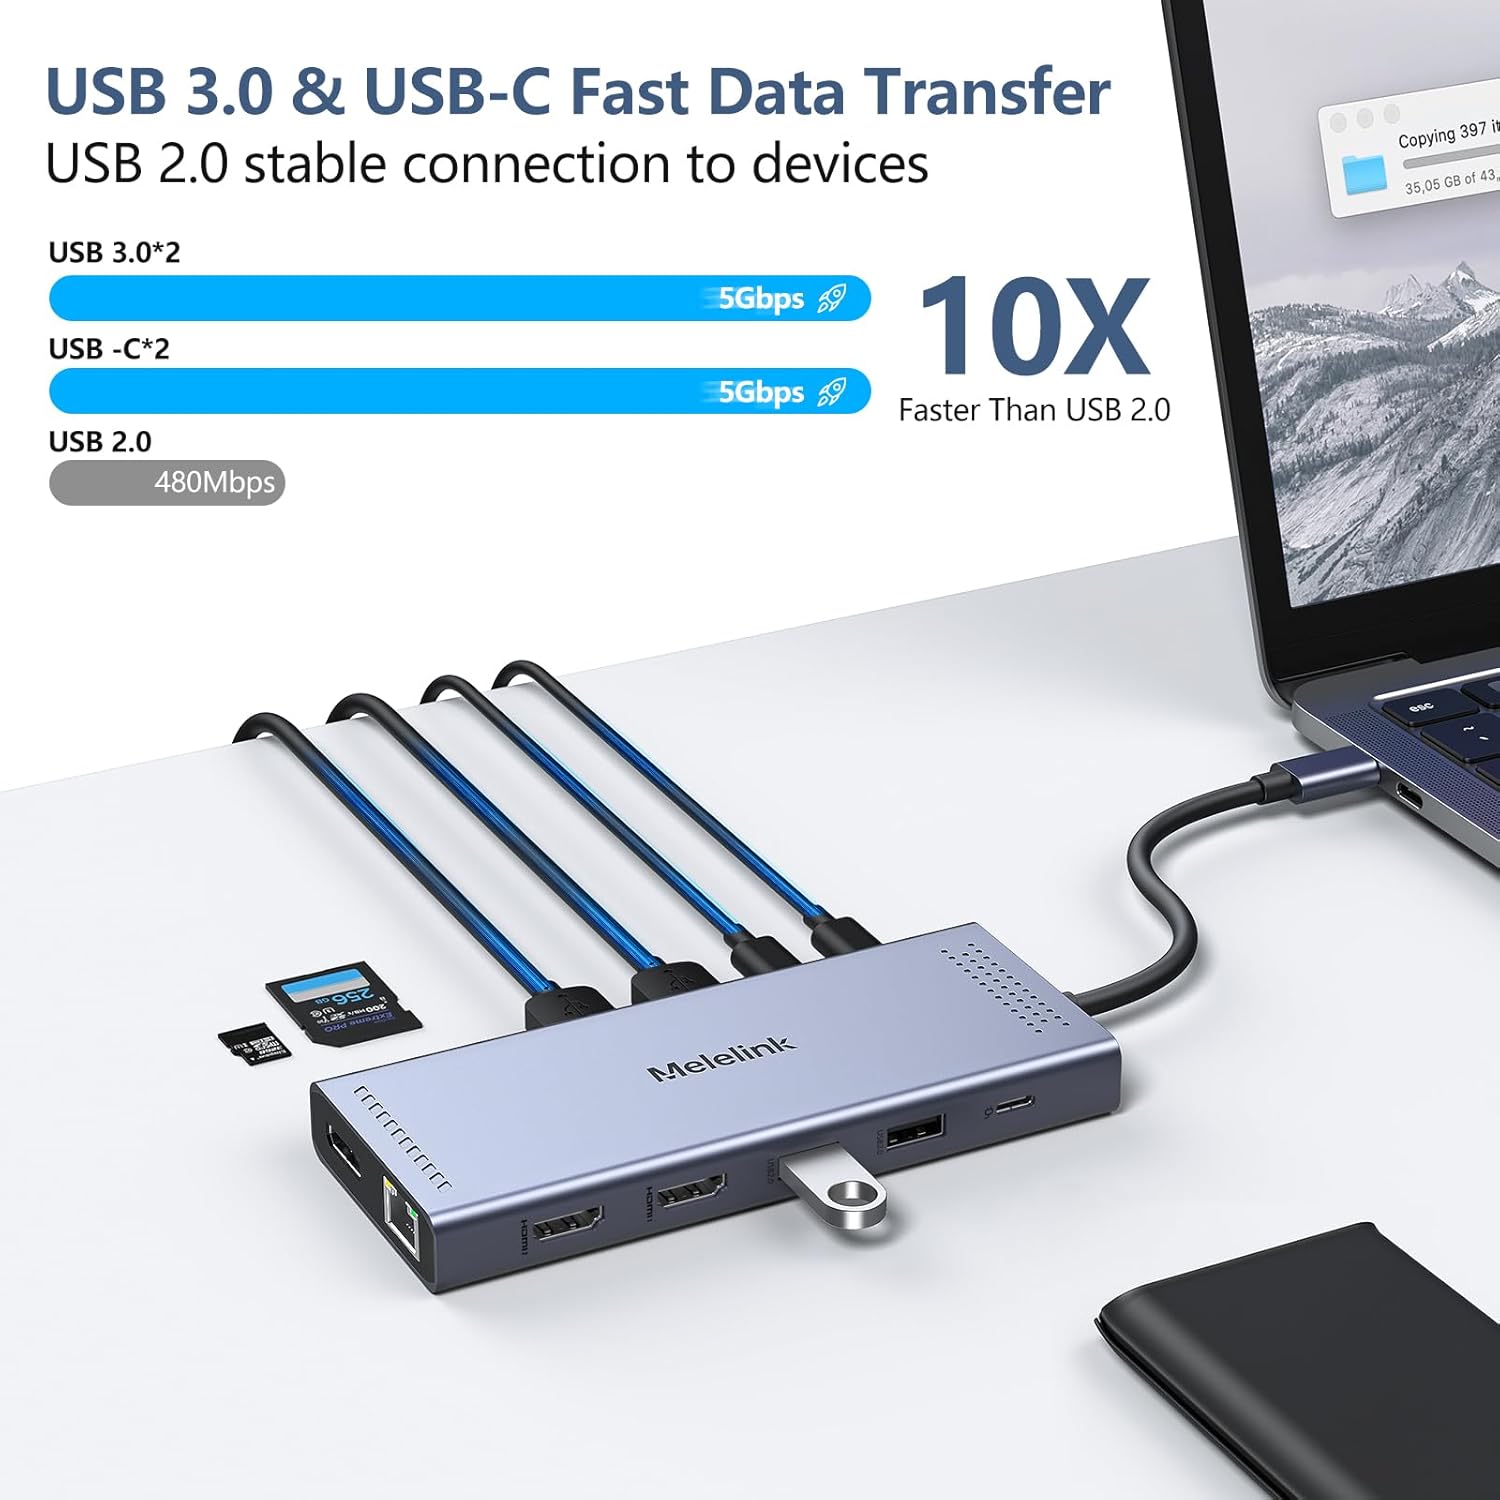
Image 4.4.1: High-speed USB 3.0 and USB-C data transfer.
- USB 3.0 Ports (2x USB-A, 2x USB-C): Offer data transfer speeds up to 5Gbps. Ideal for external hard drives, SSDs, and other high-bandwidth devices.
- USB 2.0 Ports (2x USB-A): Offer data transfer speeds up to 480Mbps. Recommended for connecting mouse, keyboard, and other low-bandwidth peripherals to avoid interference with high-speed data transfers.
- SD/Micro SD Card Readers: Support transfer speeds up to 104MB/s for quick access to photos and files from memory cards.
4.5 Gigabit Ethernet
The integrated Gigabit Ethernet port provides a stable and fast wired network connection (10/100/1000Mbps), which is often more reliable than Wi-Fi, especially for large file transfers or online gaming.

Image 4.5.1: Gigabit Ethernet port for stable network connection.
4.6 Audio Port
The 3.5mm audio/mic 2-in-1 jack allows you to connect wired headphones, speakers, or microphones for audio input and output.
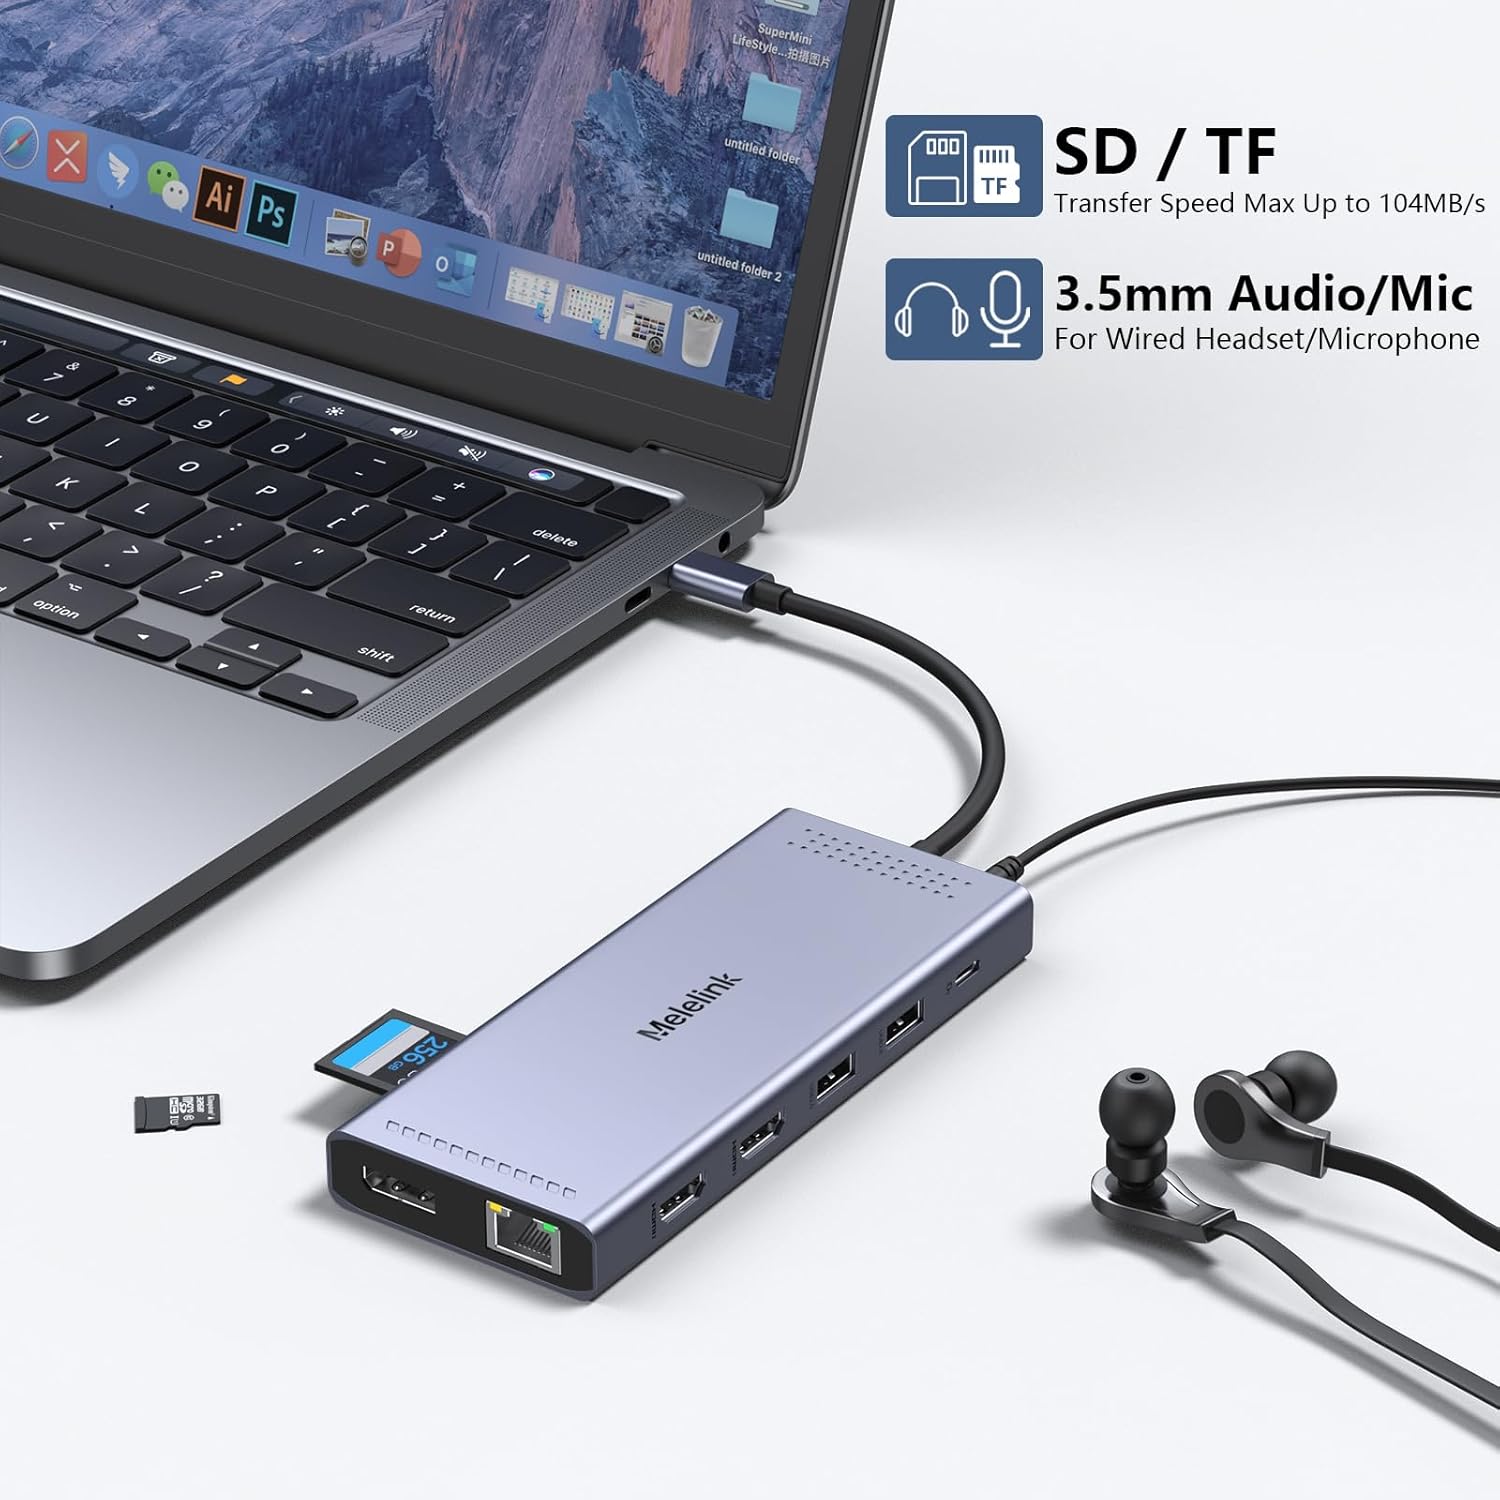
Image 4.6.1: SD/TF card readers and 3.5mm audio/mic port.
5. Compatibility
The Melelink 14-in-1 USB-C Docking Station is designed for laptops with a full-featured USB Type-C port that supports Thunderbolt 3/4, USB-C 3.1 Gen1/Gen2 (with DP), or USB-C 3.2 Gen 1/Gen2 (with DP).

Image 5.1: Check your laptop's USB-C port for full functionality.
Compatible Devices (Partial List):

Image 5.2: Broad compatibility across various laptop brands and operating systems.
- Dell: XPS 13/15/17, Latitude 5420/7420, Alienware series, etc.
- HP: EliteBook 840, HP Envy, Spectre series, etc.
- Lenovo: ThinkPad, Yoga series, etc.
- Microsoft Surface: Surface Pro 7/8, Surface Laptop, etc.
- Apple: MacBook Pro/Air (Note: macOS only supports mirrored external displays).
- Other: Acer, Asus, etc.
Supported Operating Systems: macOS, Windows, Android, iPad OS, Linux.
6. Troubleshooting
If you encounter issues, please refer to the following common problems and solutions.

Image 6.1: Important notes regarding display setup, power supply, and compatibility.
| Problem | Solution |
|---|---|
| No display on external monitor(s) |
|
| Laptop not charging or charging slowly |
|
| USB devices not recognized |
|
| Ethernet connection unstable or not working |
|
| Audio issues (static, no sound) |
|
7. Specifications
| Feature | Detail |
|---|---|
| Model | 14-in-1 USB-C Docking Station |
| Input Port | USB-C (Host Connection) |
| HDMI 1 Output | Up to 4K@60Hz |
| HDMI 2 Output | Up to 4K@30Hz |
| DisplayPort Output | Up to 4K@60Hz |
| USB-C PD Port | 100W Input (87W Charging Output) |
| USB-C 3.0 Data Ports | 2x, up to 5Gbps |
| USB-A 3.0 Data Ports | 2x, up to 5Gbps |
| USB-A 2.0 Data Ports | 2x, up to 480Mbps |
| Ethernet Port | Gigabit (10/100/1000Mbps) |
| SD/Micro SD Card Reader | 1x SD, 1x Micro SD, up to 104MB/s |
| Audio Port | 3.5mm Mic/Audio 2-in-1 Jack |
| Material | Aluminum Alloy |
| Dimensions | 6.22 x 3.19 x 0.75 inches |
| Weight | 6.4 ounces |
8. Warranty and Support
Melelink is committed to providing high-quality products and customer satisfaction.


Image 8.1: Melelink's service commitment and protection details.
- Warranty: This product comes with a 1-year warranty service.
- Technical Support: Lifetime technical support is provided.
- Customer Service: 7x24 customer service is available.
- Contact Us:
- Through your Amazon order page: Go to 'Your Orders', find the product, and click 'Ask Product Questions'.
- Email: Melelink@outlook.com
- Maintenance: We provide maintenance points to exchange or repair Melelink products during the warranty period.