EnhanBili CMS130
CMS130 LED Screen All-in-One Video Controller User Manual
Brand: EnhanBili | Model: CMS130
1. Introduction
The EnhanBili CMS130 all-in-one controller is a pure hardware device designed for ease of operation. It features various high-definition input connectors and integrates professional LED screen control technologies with advanced video processing capabilities, simplifying on-site installations. Built with an industrial-grade casing, the CMS130 is robust and suitable for complex operational environments. It is widely applicable in diverse settings such as shopping malls, hotels, exhibition sites, and TV studios.
2. Product Overview
2.1 Key Features
- Input Voltage: AC 100-240V
- Operating Temperature: -20℃ to 70℃
- Overall Consumption: 12W
- Net Weight: 2.8Kg
- Gross Weight: 6Kg
- Certifications: CE, FCC, RoHS
- Integrated video processing and LED screen control.
- Multiple high-definition input connectors (HDMI, DVI, VGA, USB, CVBS).
- Industrial-grade casing for durability.
2.2 Component Identification

Figure 2.2.1: Front Panel View
This image displays the front panel of the CMS130 controller. Key elements include the power ON/OFF switch, a rotary encoder for navigation, an ESC button, and input selection buttons for SCALE, HDMI, DVI, VGA, USB, EXT, and CVBS. The model number "CMS130" is visible on the right side.

Figure 2.2.2: Rear Panel View
This image shows the rear panel of the CMS130 controller, detailing its various input and output ports. From left to right, it includes RS232 (CTRL) ports, USB IN/OUT ports, Audio IN/OUT, CVBS, USB, HDMI, and DVI input ports. On the right, there are two RJ45 output ports (Output 1 and 2) for connecting to the LED screen, and a standard AC power input (100-240V AC).
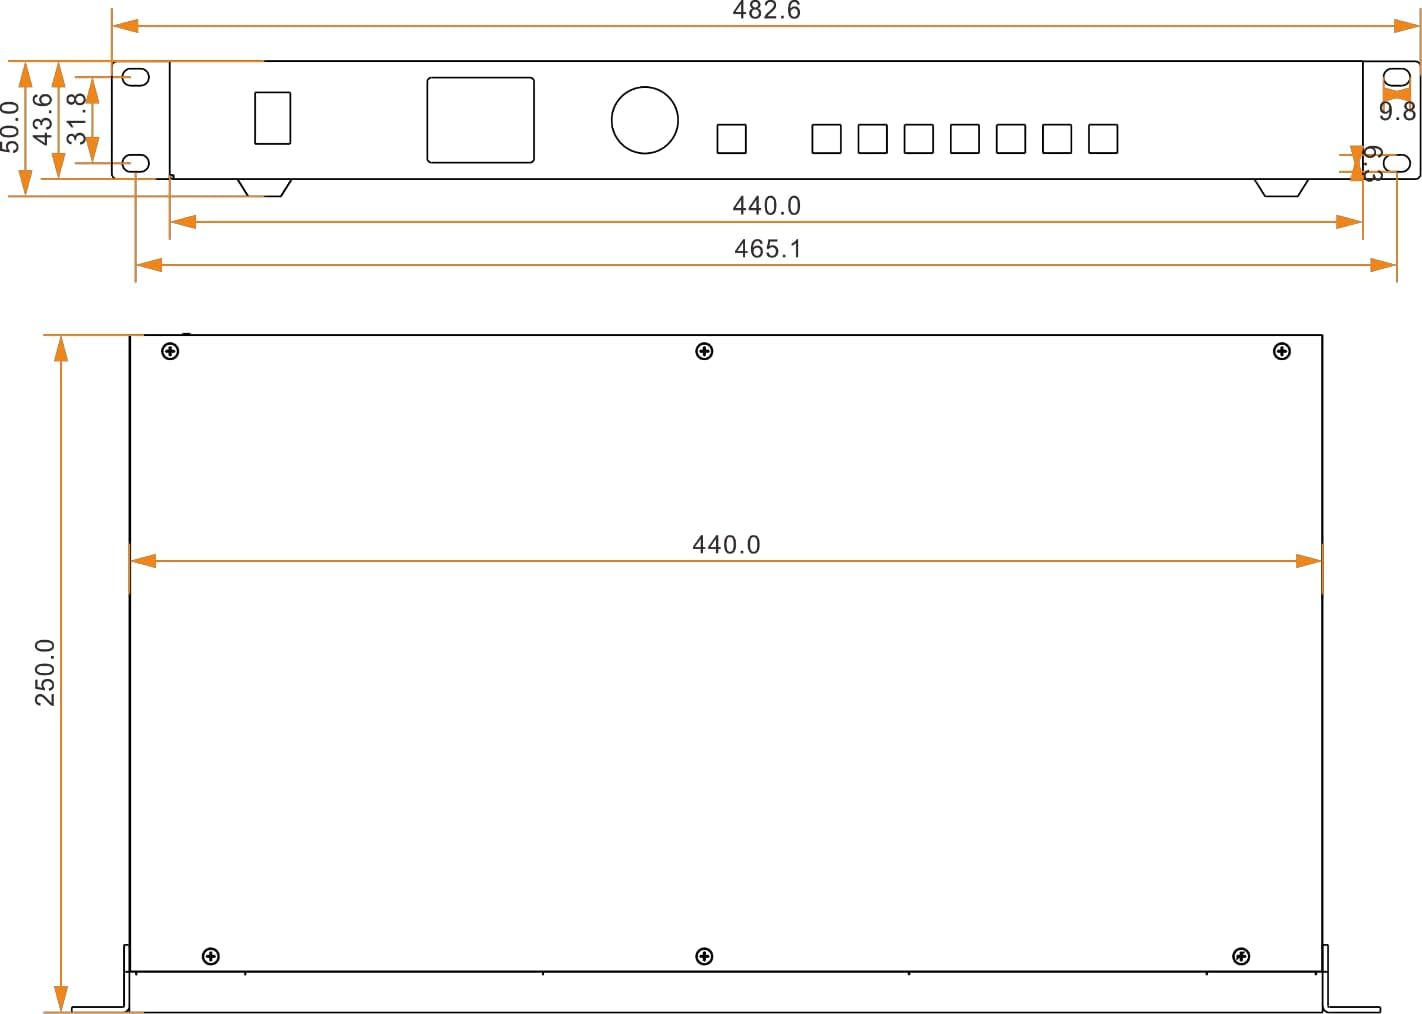
Figure 2.2.3: Dimensional Drawing
This diagram provides the precise dimensions of the CMS130 controller in millimeters. It illustrates the length, width, and height of the device, crucial for installation planning and rack mounting. The overall length is 482.6mm, width is 250.0mm, and height is 50.0mm.
3. Setup
Proper setup ensures optimal performance of your CMS130 controller. Follow these steps for a successful installation:
- Power Connection: Connect the provided power cord to the "100-240V AC" input on the rear panel of the CMS130 and then to a suitable power outlet.
- LED Screen Connection: Use standard RJ45 cables to connect the "OUTPUT 1" and/or "OUTPUT 2" ports on the CMS130 to the input ports of your LED display screen. Ensure secure connections.
- Input Source Connection: Connect your desired video sources (e.g., laptop, PC, media player) to the corresponding input ports on the rear panel of the CMS130.
- For HDMI sources, use the HDMI input.
- For DVI sources, use the DVI input.
- For VGA sources, use the VGA input.
- For USB media, insert a USB drive into the USB input port.
- For composite video, use the CVBS input.
- Control PC Connection (Optional): If using a control PC for advanced configuration, connect it to the "RS232" or "USB" control ports on the rear panel.
- Audio Connection (Optional): If audio is required, connect your audio source to the "AUDIO IN" port and your audio output device to the "AUDIO OUT" port.

Figure 3.1: Typical Connection Diagram
This diagram illustrates a typical setup for the CMS130 controller. It shows how various input sources (Control PC via USB, USB Drive, HDMI Source, DVI Source, VGA Source, CVBS Source) connect to the rear panel of the CMS130. The power supply connects to the unit, and the CMS130 outputs via RJ45 to an LED display screen.
4. Operating Instructions
Once the CMS130 is set up, follow these instructions to operate the device:
- Power On: Flip the "ON/OFF" switch on the front panel to the "ON" position. The device will power up and initialize.
- Input Selection: Use the input selection buttons on the front panel (HDMI, DVI, VGA, USB, CVBS, EXT) to choose your desired video source. The selected input will be displayed on the connected LED screen.
- Navigation and Settings:
- Use the rotary encoder knob to navigate through menus and adjust parameters.
- Press the rotary encoder knob to confirm selections.
- Press the "ESC" button to go back to the previous menu or exit a setting.
- Scaling (if applicable): If your input source resolution does not match the LED screen's native resolution, the CMS130 can perform scaling. Use the "SCALE" button or menu option to adjust scaling settings as needed.
- Power Off: To turn off the device, flip the "ON/OFF" switch on the front panel to the "OFF" position.
5. Maintenance
Regular maintenance helps ensure the longevity and reliable operation of your CMS130 controller.
- Cleaning: Regularly clean the exterior of the device with a soft, dry cloth. Do not use liquid cleaners or aerosols directly on the unit.
- Ventilation: Ensure that the ventilation openings are clear and not obstructed to prevent overheating. Do not place the device in an enclosed space without adequate airflow.
- Cable Connections: Periodically check all cable connections (power, input, output, control) to ensure they are secure and free from damage.
- Firmware Updates: Check the manufacturer's website for any available firmware updates. Follow the instructions provided by the manufacturer for updating firmware to ensure optimal performance and access to new features.
- Storage: If storing the device for an extended period, ensure it is powered off, disconnected from all cables, and stored in a cool, dry place away from direct sunlight and extreme temperatures.
6. Troubleshooting
This section provides solutions to common issues you might encounter with the CMS130 controller.
| Problem | Possible Cause | Solution |
|---|---|---|
| No display on LED screen. |
|
|
| Input source not detected. |
|
|
| Image distorted or flickering. |
|
|
| Device not responding to controls. |
|
|
7. Specifications
| Attribute | Detail |
|---|---|
| Product Dimensions (L x W x H) | 19.09 x 9.84 x 1.97 inches (48.5 x 25.0 x 5.0 cm) |
| Item Weight | 6.16 pounds (2.8 Kilograms) |
| Manufacturer | EnhanBili |
| ASIN | B0DHMYYQYV |
| Country of Origin | China |
| Item Model Number | CMS130 |
| Date First Available | January 1, 2024 |
| Brand | EnhanBili |
| Compatible Devices | Laptop (and other video sources) |
| Connector Type | DVI, HDMI, VGA, USB, CVBS, RS232, RJ45 |
| Output Wattage | 28W (Max) |
| Input Voltage | AC 100-240V |
| Operating Temperature | -20℃ to 70℃ |
| Overall Consumption | 12W |
8. Warranty and Support
For specific warranty information regarding your EnhanBili CMS130 LED Screen All-in-One Video Controller, please refer to the documentation included with your purchase or visit the official EnhanBili website. Warranty terms and conditions may vary.
If you require technical support, assistance with troubleshooting, or have questions about the product, please contact EnhanBili customer service through their official channels. Details for contacting support are typically available on the manufacturer's website or in the product packaging.
Note: This manual provides general guidance. For detailed technical specifications or advanced configurations, consult the manufacturer's official resources.
Ask a question about this manual
Ask about setup, troubleshooting, compatibility, parts, safety, or missing instructions. Manuals+ will review the question and use this page’s manual context to help answer it.