YRGGWB bhhbtrgfgvr
Microwave Oven Computer Board Instruction Manual
Model: bhhbtrgfgvr | Compatible with Galanz G70F20CN1L-DG(B0) & MEL651-lc17
1. Introduction
This manual provides essential information for the installation, operation, maintenance, and troubleshooting of the YRGGWB Microwave Oven Computer Board. This replacement motherboard is designed to restore functionality to compatible microwave ovens, specifically those using Galanz G70F20CN1L-DG(B0) and MEL651-lc17 circuit boards.
Replacing a faulty motherboard can resolve issues such as failure to start, display problems, or malfunctioning buttons, extending the service life of your microwave oven and offering a cost-effective alternative to purchasing a new appliance.
2. Product Overview & Components
The YRGGWB Microwave Oven Computer Board is a critical component for controlling your microwave's functions. Familiarize yourself with the board's layout and key components before installation.
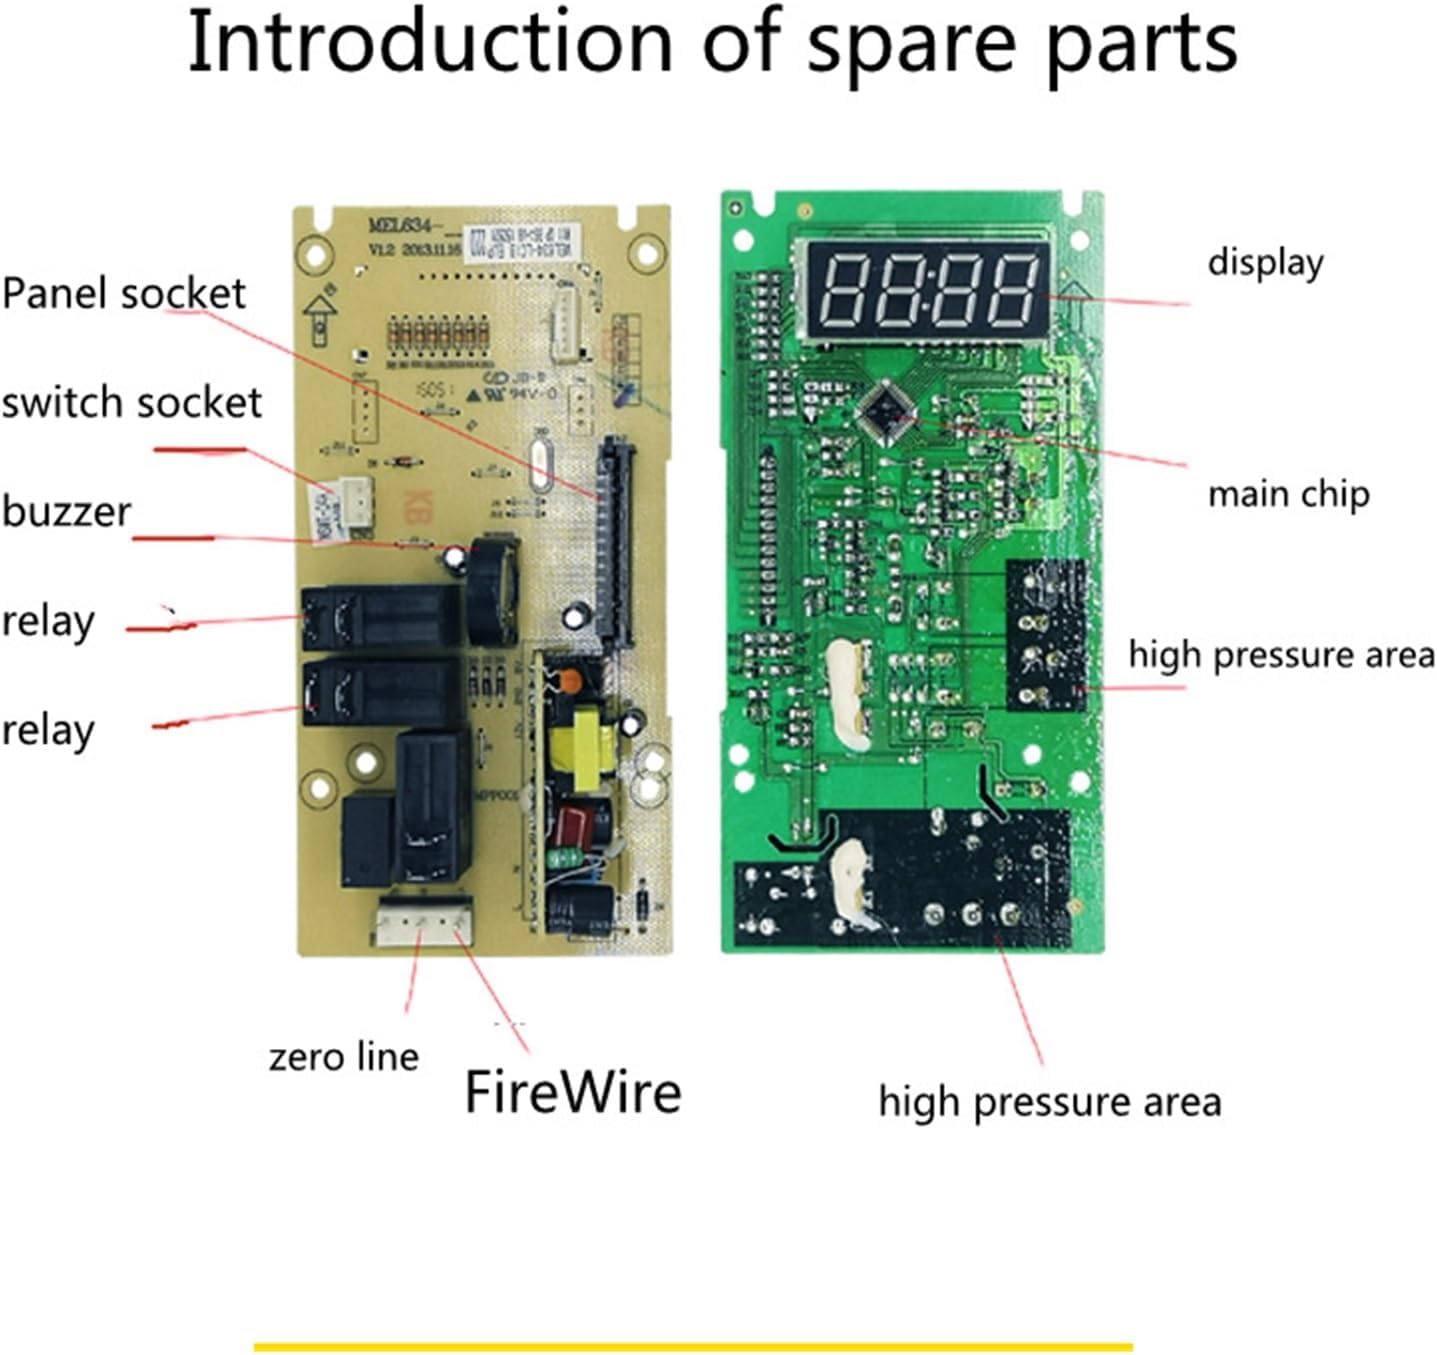
Figure 2.1: Labeled diagram illustrating the main components of the microwave oven computer board, including the display, main chip, high pressure areas, relays, panel socket, switch socket, buzzer, zero line, and FireWire connection points.

Figure 2.2: General view of the microwave oven computer board, showing the overall design and layout of the electronic components on both sides of the circuit board.
3. Specifications
| Attribute | Value |
|---|---|
| Brand | YRGGWB |
| Model Name | bhhbtrgfgvr |
| Compatible Part Numbers | Galanz G70F20CN1L-DG(B0), MEL651-lc17 |
| Package Dimensions | 1.18 x 0.79 x 0.39 inches |
| Item Weight | 1.76 ounces |
| ASIN | B0DHLC3S68 |
| Date First Available | September 20, 2024 |
4. Installation / Setup
WARNING: Before attempting any installation or repair, ensure the microwave oven is completely disconnected from the power supply. Failure to do so can result in electric shock, injury, or death. If you are unsure about any step, consult a qualified technician.
- Disconnect Power: Unplug the microwave oven from the wall outlet.
- Access the Control Panel: Carefully remove the outer casing or access panel of the microwave to expose the existing control board. Refer to your specific microwave model's service manual for exact instructions on accessing internal components.
- Document Connections: Before disconnecting any wires, take clear photos or make a diagram of all wire connections to the old motherboard. This will be crucial for correct reassembly.
- Remove Old Board: Disconnect all wires and mounting screws securing the old motherboard. Carefully remove it from the microwave.
- Install New Board: Position the new YRGGWB computer board in the same location as the old one. Secure it with the appropriate screws.
- Reconnect Wires: Using your photos or diagram, carefully reconnect all wires to the corresponding terminals on the new motherboard. Ensure all connections are secure and correctly seated.
- Reassemble Microwave: Once all connections are verified, reattach the control panel and outer casing of the microwave.
- Test Functionality: Plug the microwave oven back into the power outlet and test its functions (e.g., power on, display, heating, button response) to ensure the new board is working correctly.
5. Operation
The YRGGWB Microwave Oven Computer Board is a replacement component designed to restore the original operational capabilities of your microwave oven. Once correctly installed, the microwave should function as intended by its manufacturer. There are no specific operational steps for the computer board itself, as its role is to enable the microwave's standard functions.
Refer to your microwave oven's original user manual for instructions on how to operate its various cooking modes, settings, and features.
6. Maintenance
The computer board itself requires minimal maintenance. However, following these general guidelines can help ensure its longevity and the continued proper functioning of your microwave oven:
- Keep Dry: Ensure the microwave oven's internal components, including the computer board, remain dry. Moisture can cause short circuits and damage.
- Clean Vents: Regularly clean the microwave's ventilation openings to prevent overheating, which can stress electronic components.
- Avoid Physical Shock: Protect the microwave from impacts or drops that could damage internal circuitry.
- Professional Cleaning: If internal cleaning of the electronic components is required, it is recommended to seek professional service to avoid damaging sensitive parts.
7. Troubleshooting
If your microwave oven continues to experience issues after replacing the motherboard, consider the following common problems and potential solutions:
- Microwave Does Not Power On:
- Check power outlet and circuit breaker.
- Verify all wire connections to the new board are secure and correct.
- Ensure the microwave door is properly latched.
- Display Problems (Blank, Flickering, Incorrect Characters):
- Confirm the display ribbon cable is securely connected to the motherboard.
- Ensure the new board is fully compatible with your microwave's display unit.
- Buttons Not Responding / Malfunctioning:
- Check the connection of the control panel membrane or button array to the motherboard.
- Inspect the control panel for physical damage or stuck buttons.
- Microwave Powers On but Does Not Heat:
- While the motherboard controls heating functions, this issue can also be caused by other components (e.g., magnetron, diode, capacitor). If the board is confirmed to be working, further diagnosis by a qualified technician may be necessary.
If troubleshooting steps do not resolve the issue, it is recommended to contact the seller or a professional appliance repair service.
8. Warranty Information
Specific warranty details for this replacement computer board are typically provided by the seller at the time of purchase. Please refer to your purchase documentation or contact the seller directly for information regarding warranty coverage, terms, and conditions.
Extended protection plans may be available for purchase separately and are not part of the standard product warranty.
9. Customer Support
For technical assistance, questions regarding compatibility, or support related to your YRGGWB Microwave Oven Computer Board, please contact the seller through the platform where the purchase was made.
When contacting support, please have your product model number (bhhbtrgfgvr), ASIN (B0DHLC3S68), and a detailed description of your issue ready.