1. Introduction
This manual provides detailed instructions for the installation, operation, and maintenance of your BUNGPUNG 4K@30Hz HDMI Multiviewer 4x1. This device allows you to connect up to four HDMI source devices and display them simultaneously on a single HDMI display, offering various display modes and control options.

Image 1: Front view of the BUNGPUNG 4K@30Hz HDMI Multiviewer 4x1.
2. Safety Information
- Ensure proper ventilation around the device.
- Do not expose the device to water, moisture, or extreme temperatures.
- Use only the provided power adapter.
- Avoid disassembling the unit; refer servicing to qualified personnel.
- Keep out of reach of children.
3. Package Contents
Please verify that all items are present in your package:
- BUNGPUNG 4K@30Hz HDMI Multiviewer 4x1 Unit
- 5V DC Power Adapter
- IR Remote Control
- IR Receiver Cable
- User Manual (this document)
4. Product Overview
4.1. Device Features
- Supports up to 4K@30Hz resolution for combined HDMI sources.
- Offers 8 multi-view display modes, including full-screen, Picture-by-Picture (PBP), Picture-in-Picture (PIP), and Quad views.
- Compatible with HDMI 1.4 and HDCP 1.4, supporting HDR.
- Features L/R analog audio output for external audio distribution.
- Control options include front panel buttons, IR remote, and RS-232 commands.
- Durable metal body with built-in ESD protection.
4.2. Front Panel Description
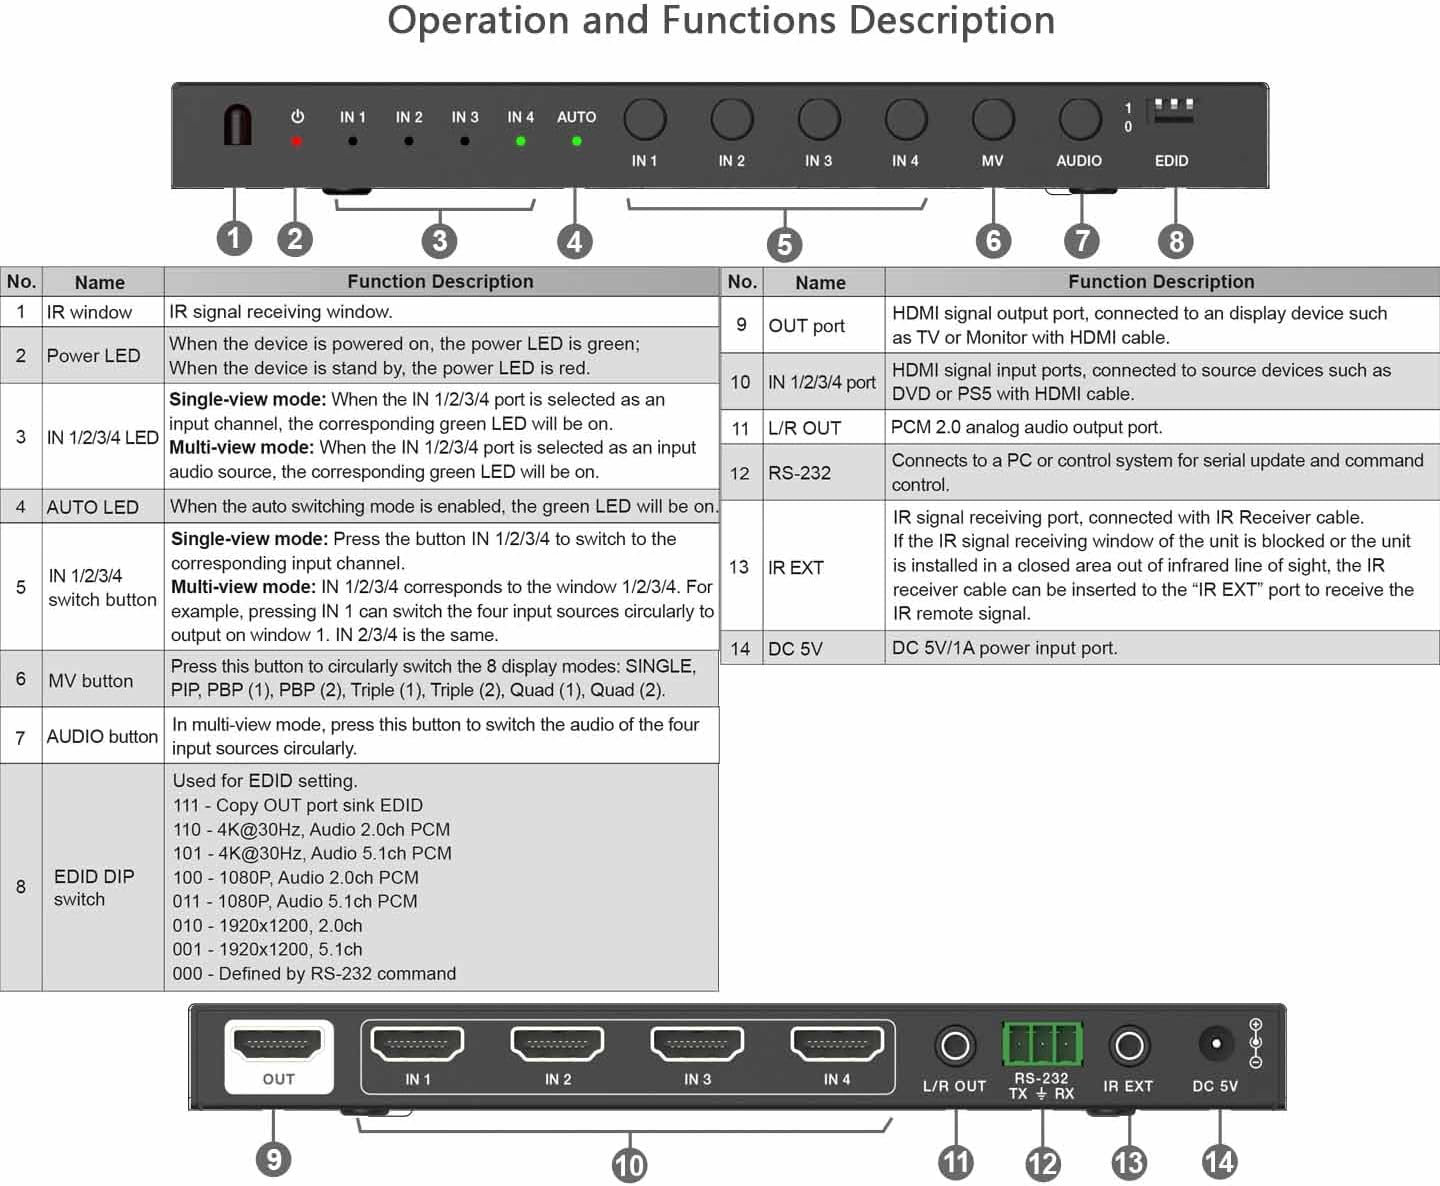
Image 2: Front panel layout and functions.
| No. | Name | Function Description |
|---|---|---|
| 1 | IR Window | Receives IR signals from the remote control. |
| 2 | Power LED | Illuminates green when the device is powered on. |
| 3 | IN 1/2/3/4 LED | Indicates the currently selected input in single-view mode (green). In multi-view mode, indicates the active audio source. |
| 4 | AUTO LED | Illuminates when auto-switching mode is enabled. |
| 5 | IN 1/2/3/4 Switch Button | Press to switch between HDMI inputs 1-4 in single-view mode. In multi-view mode, cycles through audio sources. |
| 6 | MV Button | Press to cycle through the 8 display modes: SINGLE, PBP (1), PBP (2), Triple (1), Triple (2), Quad (1), Quad (2). |
| 7 | AUDIO Button | In multi-view mode, press this button to switch the audio of the four input sources circularly. |
| 8 | EDID DIP Switch | Used for EDID settings. Refer to the table on the device for specific configurations (e.g., 111 = Copy OUT port sink EDID, 110 = 4K@30Hz Audio 2.0ch PCM). |
4.3. Rear Panel Description
The rear panel contains all input and output ports:
- OUT Port (HDMI): HDMI output port, connects to your display (TV, monitor, projector).
- IN 1/2/3/4 Ports (HDMI): HDMI input ports, connect to your source devices (Blu-ray player, game console, PC, etc.).
- L/R OUT: 3.5mm analog audio output for connecting to external audio systems.
- RS-232 (TX + RX): Serial port for control via RS-232 commands.
- IR EXT: Port for connecting the external IR receiver cable.
- DC 5V: Power input port for the 5V DC power adapter.
5. Setup
Follow these steps to connect your HDMI Multiviewer:
- Power Off Devices: Ensure all HDMI source devices and your display are powered off before making connections.
- Connect HDMI Sources: Connect up to four HDMI source devices (e.g., Blu-ray player, game console, PC) to the HDMI IN 1, IN 2, IN 3, and IN 4 ports on the multiviewer using HDMI cables.
- Connect Display: Connect your HDMI display (TV, monitor, projector) to the HDMI OUT port on the multiviewer using an HDMI cable.
- Connect Audio (Optional): If you wish to extract analog audio, connect external speakers or an audio system to the L/R OUT port using a 3.5mm audio cable.
- Connect IR Receiver (Optional): If using the external IR receiver, plug the IR EXT cable into the IR EXT port on the multiviewer and place the receiver in a location where it can receive signals from the remote control.
- Connect Power: Plug the 5V DC power adapter into the DC 5V port on the multiviewer, then plug the adapter into a power outlet.
- Power On: Power on your display, then power on your HDMI source devices. The multiviewer will power on automatically when connected to power.
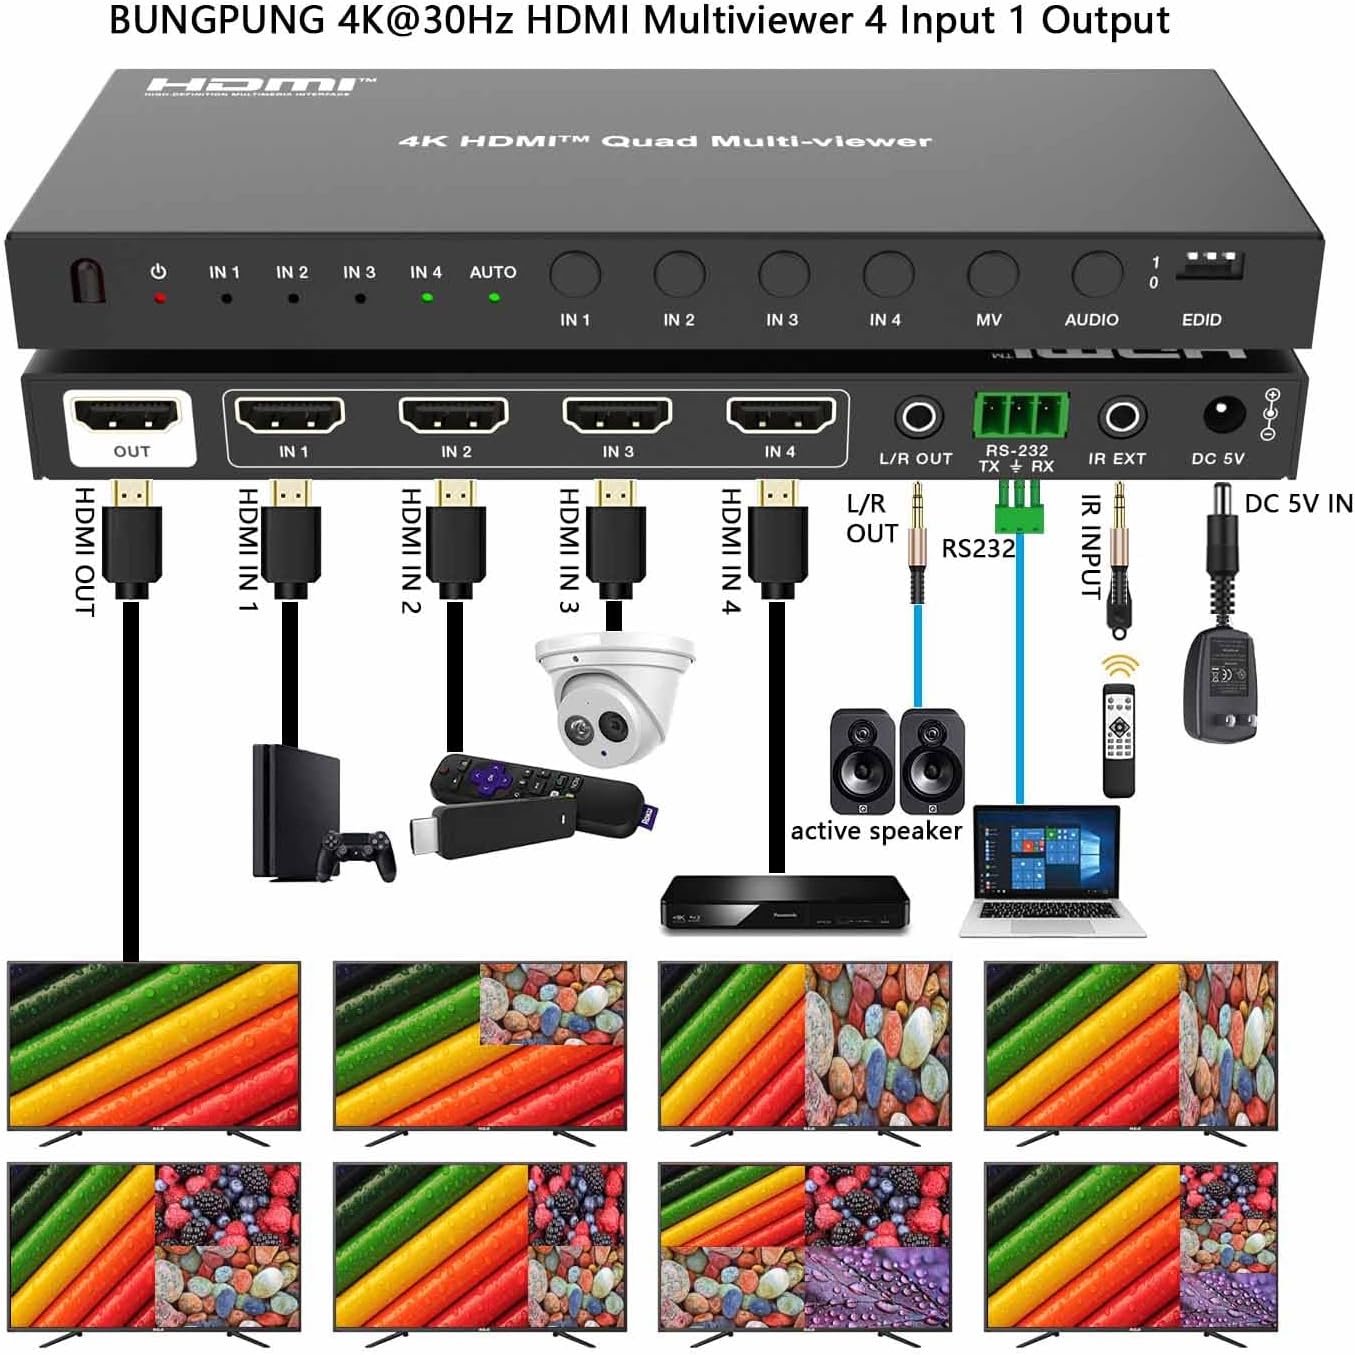
Image 3: Connection diagram illustrating typical setup.
6. Operating Instructions
6.1. Power On/Off
The device powers on automatically when the 5V DC power adapter is connected. There is no dedicated power button on the unit. Disconnect the power adapter to power off the device.
6.2. Input Selection (Single-View Mode)
In single-view mode, you can switch between the four HDMI inputs using the front panel buttons or the IR remote control.
- Front Panel: Press the IN 1/2/3/4 Switch Button (No. 5 in Image 2) repeatedly to cycle through inputs IN 1, IN 2, IN 3, and IN 4. The corresponding IN LED will illuminate green.
- IR Remote: Use the dedicated input buttons (IN1, IN2, IN3, IN4) on the IR remote control to directly select an input.
6.3. Display Mode Selection (Multi-View Modes)
The multiviewer supports 8 display modes. Press the MV Button (No. 6 in Image 2) on the front panel or the "MV" button on the IR remote to cycle through these modes:
- Single-View Mode: Displays one HDMI input in full screen.
- Left-Right Split PBP (1): Displays two inputs side-by-side.
- Left-Right Split PBP (2): Another variation of two inputs side-by-side.
- PIP (Picture-in-Picture): Displays one main input with a smaller secondary input window.
- 3-Screen Split (Triple 1): Displays three inputs simultaneously.
- 3-Screen Split (Triple 2): Another variation of three inputs simultaneously.
- 4-Screen Split (Quad 1): Displays all four inputs in a quad layout.
- 4-Screen Split (Quad 2): Another variation of four inputs in a quad layout.
6.4. Audio Selection in Multi-View Mode
When in any multi-view display mode, you can select which input's audio is outputted:
- Front Panel: Press the AUDIO Button (No. 7 in Image 2) to cycle through the audio sources of the four inputs. The corresponding IN LED will indicate the active audio source.
- IR Remote: Use the dedicated audio selection buttons on the IR remote.
6.5. EDID Management
The EDID DIP switch (No. 8 in Image 2) allows you to manage the Extended Display Identification Data (EDID) settings. This helps ensure compatibility between your source devices and display. Refer to the label on the device for specific DIP switch configurations. For example:
- 111: Copies EDID from the OUT port sink (connected display).
- 110: Sets EDID to 4K@30Hz, Audio 2.0ch PCM.
- 011: Sets EDID to 1080P, Audio 5.1ch PCM.
- 010: Sets EDID to 1920x1200, 2.0ch.
- 001: Sets EDID to 1920x1200, 5.1ch.
- 000: Defined by RS-232 command.
Note: After changing EDID settings, it is recommended to power cycle the multiviewer and connected devices for the changes to take effect.
6.6. RS-232 Control
The device can be controlled via RS-232 commands for integration into professional control systems. Consult the separate RS-232 command protocol document (if provided by the manufacturer) for detailed commands and syntax.
7. Maintenance
- Cleaning: Use a soft, dry cloth to clean the device. Do not use liquid or aerosol cleaners.
- Storage: Store the device in a cool, dry place away from direct sunlight and extreme temperatures when not in use for extended periods.
- Cable Management: Ensure HDMI cables are not excessively bent or strained to prevent damage.
8. Troubleshooting
| Problem | Possible Cause | Solution |
|---|---|---|
| No image on display. | No power to multiviewer. Loose HDMI connections. Incorrect input selected. EDID incompatibility. |
Check power adapter connection and power outlet. Ensure all HDMI cables are securely connected. Verify the correct input is selected on the multiviewer and display. Adjust EDID settings using the DIP switch (Section 6.5). Try power cycling all devices. |
| No audio. | Audio not selected in multi-view mode. Loose audio cable. Display/speaker volume too low. |
Press the AUDIO button to select the desired audio source. Check the 3.5mm audio cable connection to L/R OUT and external speakers. Increase volume on your display or external audio system. |
| Image flickering or distorted. | Poor quality HDMI cable. Resolution incompatibility. EDID issue. |
Use high-quality HDMI 1.4 or higher cables. Ensure source device output resolution is compatible with the display and multiviewer (up to 4K@30Hz). Adjust EDID settings (Section 6.5). |
| IR remote not working. | Batteries depleted. Obstruction to IR sensor. IR receiver cable not connected. |
Replace CR2 batteries in the remote. Ensure a clear line of sight to the IR window or external IR receiver. Verify the IR EXT cable is securely connected. |
9. Specifications

Image 4: Device dimensions and key features.
| Feature | Detail |
|---|---|
| Product Dimensions | 2.68 x 6.93 x 0.71 inches (68 x 176 x 18 mm) |
| Item Weight | 0.021 ounces (approx. 0.6 grams) - Note: This weight seems incorrect, actual device weight is closer to 300g as per Image 4. |
| HDMI Compliance | HDMI 1.4 |
| HDCP Compliance | HDCP 1.4 |
| Supported Resolutions | Up to 4K@30Hz RGB 4:4:4, backward compatible with 480i/p, 720p, 1080i/p@60Hz. |
| HDR Support | Yes |
| Audio Output | L/R Analog Audio (3.5mm jack) |
| Control Methods | Front Panel Buttons, IR Remote, RS-232 |
| Power Supply | DC 5V |
| Batteries (for remote) | 1 CR2 battery (included) |
10. Warranty and Support
This BUNGPUNG product is guaranteed for one year from the date of purchase. This warranty covers defects in materials and workmanship under normal use.
If you encounter any issues with compatibility, initial defects, or require technical assistance, please contact BUNGPUNG customer support. Please have your purchase details and product model number (BP-HDC-SW941MV) ready when contacting support.