RUIX OV502
RUIX OV502 M-ATX Mini-Tower PC Case User Manual
Model: OV502
Introduction
This manual provides comprehensive instructions for the installation, operation, and maintenance of your RUIX OV502 M-ATX Mini-Tower PC Case. Please read this manual thoroughly before beginning assembly or use to ensure proper functionality and safety.

Figure 1: RUIX OV502 M-ATX Mini-Tower PC Case, showcasing its compact design, panoramic tempered glass panels, and pre-installed ARGB PWM fans.
Product Features
- Compact Design: Measures 13.39 x 10.87 x 12.4 inches, optimizing space while providing full functionality.
- Broad Compatibility: Supports GPUs up to 330mm, CPU coolers up to 160mm, M-ATX or ITX motherboards, and both 3.5-inch and 2.5-inch drives.
- Pre-Installed Cooling: Equipped with three high-performance 120mm ARGB PWM prism gaming fans for efficient thermal management.
- Panoramic Tempered Glass: Features two sides of tempered glass for clear internal visibility, protected by a plastic film for durability and shatter resistance.
- Optimized Ventilation: Capable of supporting up to 7 fans or a 240mm AIO liquid cooler. Includes magnetic dust filters on the top and bottom for dust prevention.
- Front I/O Ports: Includes 2x USB 3.0 ports and HD Audio for convenient connectivity.
Setup and Installation
1. Unpacking and Inspection
Carefully remove the PC case from its packaging. Inspect the case for any signs of damage during transit. Retain all packaging materials for future transport or warranty claims.
2. Component Compatibility
Ensure your components are compatible with the RUIX OV502 case dimensions:
- Motherboard: Micro ATX (M-ATX) or Mini ITX (ITX)
- GPU Length: Up to 330mm
- CPU Cooler Height: Up to 160mm
- Storage: 1x 3.5-inch HDD, 1x 2.5-inch SSD
- Power Supply: ATX (Bottom Mount)

Figure 2: Internal component clearance and compatibility diagram.
3. Removing Panels
The RUIX OV502 features panoramic tempered glass panels. Carefully remove the side panels by unscrewing the thumb screws at the rear of the case and gently sliding them off. Handle glass panels with care to prevent damage.

Figure 3: Exploded view illustrating the removal of tempered glass panels and magnetic dust filters.
4. Motherboard Installation
Align your M-ATX or ITX motherboard with the standoffs inside the case. Secure the motherboard using the provided screws. Ensure all I/O ports align correctly with the rear I/O shield opening.
5. Power Supply Installation
Install your ATX power supply into the bottom mount compartment. Secure it with screws from the rear of the case. Route power cables through the designated cutouts for cable management.
6. Storage Drive Installation
Install your 3.5-inch HDD and 2.5-inch SSD into their respective mounting locations. Secure them with screws.
7. Graphics Card (GPU) Installation
Insert your GPU into the appropriate PCIe slot on your motherboard. Secure it with the retention clip and screw at the rear of the case.
8. Fan and Radiator Installation (Optional)
The case comes with three pre-installed 120mm ARGB PWM fans. Additional fans or a 240mm AIO liquid cooler can be installed as per the compatibility diagram.
- Top: Up to 2x 120mm fans or 1x 240mm radiator
- Rear: 1x 120mm fan (pre-installed)
- Side: 2x 120mm fans (pre-installed)
- Bottom: Up to 2x 120mm fans or 1x 240mm radiator

Figure 4: Fan and AIO liquid cooler compatibility.
9. Cable Management
Utilize the cable routing cutouts and tie-down points behind the motherboard tray to manage cables neatly. This improves airflow and aesthetics.
10. Connecting Front I/O Cables
Connect the front panel cables (USB 3.0, HD Audio, Power LED, Power Switch, Reset Switch) to the corresponding headers on your motherboard. Refer to your motherboard manual for specific header locations.
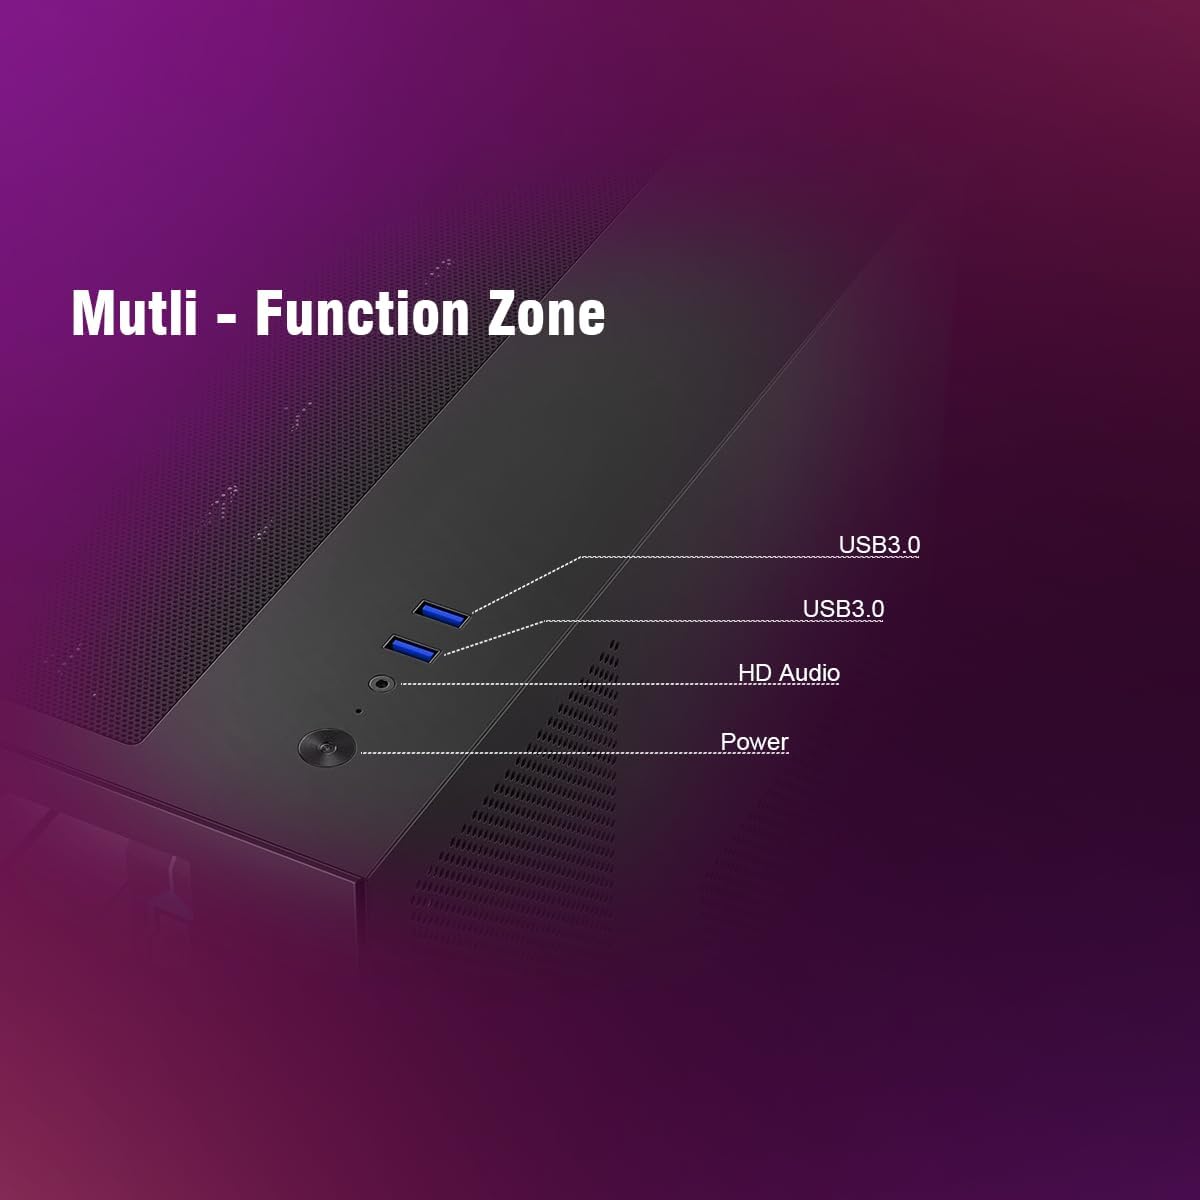
Figure 5: Front I/O Panel with USB 3.0 and HD Audio ports.
Operating Instructions
Powering On
Once all components are installed and cables are connected, replace the side panels. Connect your power cable to the power supply and a wall outlet. Press the power button on the front I/O panel to turn on your system.
Fan Control and ARGB Lighting
The pre-installed ARGB PWM fans can be controlled via your motherboard's fan headers and ARGB headers. Use your motherboard's software or BIOS settings to adjust fan speeds and customize lighting effects.

Figure 6: Pre-installed 120mm ARGB Fans.
Airflow Optimization
The RUIX OV502 is designed for high airflow. Ensure proper fan orientation (intake/exhaust) to maximize cooling efficiency. The magnetic dust filters help maintain clean airflow paths.

Figure 7: Airflow path within the RUIX OV502 case.
Maintenance
Dust Filter Cleaning
The RUIX OV502 features magnetic dust filters on the top and bottom panels. Regularly remove and clean these filters to prevent dust buildup and maintain optimal airflow. Clean with a soft brush or rinse with water and allow to dry completely before reattaching.
Case Cleaning
Wipe the exterior of the case, including the tempered glass panels, with a soft, damp cloth. Avoid abrasive cleaners or solvents that could damage the finish or glass.
Internal Dust Removal
Periodically open the case and use compressed air to remove dust from internal components such as fans, heatsinks, and circuit boards. Ensure the system is powered off and unplugged before performing internal cleaning.
Troubleshooting
System Not Powering On
- Check if the power cable is securely connected to both the power supply and the wall outlet.
- Ensure the power supply switch is in the 'ON' position.
- Verify that the front panel power switch cable is correctly connected to the motherboard header.
- Confirm that all internal power connections (24-pin ATX, CPU, GPU) are seated properly.
Fans Not Spinning or ARGB Not Lighting Up
- Check fan power cables are securely connected to motherboard fan headers or a fan controller.
- Verify ARGB cables are connected to compatible motherboard ARGB headers (5V 3-pin).
- Ensure fan control software or BIOS settings are configured correctly.
Overheating Issues
- Clean dust filters and internal components as described in the Maintenance section.
- Verify fan orientation for optimal airflow (intake/exhaust).
- Ensure CPU cooler and GPU fans are functioning correctly.
- Check thermal paste application on CPU.
Specifications
| Feature | Specification |
|---|---|
| Model Name | OV502 |
| Case Type | Mini-Tower |
| Dimensions (L x W x H) | 13.4 x 10.9 x 12.4 inches (340 x 276 x 315 mm) |
| Material | Metal, Tempered Glass |
| Color | Black |
| Motherboard Compatibility | Micro ATX (M-ATX), Mini ITX (ITX) |
| GPU Length Clearance | Up to 330mm |
| CPU Cooler Height Clearance | Up to 160mm |
| Storage Drive Bays | 1x 3.5" HDD, 1x 2.5" SSD |
| Pre-installed Fans | 3x 120mm ARGB PWM Prism Fans |
| Fan Support | Top: 2x 120mm; Rear: 1x 120mm; Side: 2x 120mm; Bottom: 2x 120mm |
| Radiator Support | Top: 1x 240mm; Bottom: 1x 240mm |
| Front I/O Ports | 2x USB 3.0, HD Audio |
| Power Supply Mounting | Bottom Mount (ATX) |
| Item Weight | 11.14 pounds (5.06 kg) |
Warranty Information
RUIX products are covered by a limited warranty. For specific warranty terms and conditions, please refer to the warranty card included with your product or visit the official RUIX website. Keep your proof of purchase for warranty claims.
Customer Support
For technical assistance, troubleshooting, or product inquiries, please contact RUIX customer support through the following channels:
- Website: Visit the RUIX Store on Amazon (for general inquiries and product information)
- Email: Refer to your product packaging or the RUIX official website for direct support email.
- Phone: Refer to your product packaging or the RUIX official website for direct support phone number.
When contacting support, please have your product model (OV502) and purchase information ready.
Ask a question about this manual
Ask about setup, troubleshooting, compatibility, parts, safety, or missing instructions. Manuals+ will review the question and use this page’s manual context to help answer it.