
Safety Information
Please read all instructions carefully before assembly and use. Keep this manual for future reference.
- Always follow the assembly instructions carefully.
- Keep fingers and body parts away from moving parts when adjusting the chair.
- Do not exceed the maximum weight recommendation of 300 pounds.
- Ensure all screws are tightened securely before use.
- Do not stand on the chair or use it as a step stool.
- Avoid exposing the chair to direct sunlight or extreme temperatures.
Product Overview
The VENTUVIBE VV-PU-V1 Gaming Chair is designed for comfort and durability, featuring ergonomic support and versatile adjustments for extended use.

Figure 1: VENTUVIBE Gaming Chair VV-PU-V1 (Black01)
Key Features:
- Superior Comfort: High-density foam cushioning and memory foam headrest for prolonged sessions.
- Built to Endure: Robust metal frame and premium fabric for long-term reliability.
- Versatile Functionality: Multi-directional wheels and 150-degree reclining function.
- 4D Adjustable Armrests: Customizable armrest positions for optimal support.
- Ergonomic Design: Supports back and neck to reduce fatigue.
Specifications
| Feature | Detail |
|---|---|
| Brand | VENTUVIBE |
| Model Name | Ventuvibe Gaming Chair (VV-PU-V1) |
| Color | Black01 |
| Product Dimensions | 22"D x 21.6"W x 53.9"H |
| Maximum Weight Recommendation | 300 Pounds |
| Back Style | High-back |
| Arm Style | 4D Adjustable Armrests |
| Reclining Position Count | 2 (up to 150 degrees) |
| Fill Material | Foam, Memory Foam |
| Item Weight | 56 pounds |
| Manufacturer | VENTUVIBE |
Setup and Assembly
Follow these steps to assemble your VENTUVIBE Gaming Chair. For a visual guide, please refer to the assembly video below.
Video 1: VENTUVIBE Gaming Chair Assembly Guide. This video provides a step-by-step visual demonstration of the chair assembly process.
Assembly Steps:
- Unpack Components: Carefully open the package and remove all components. Verify that all parts listed in the instruction manual are present.
- Attach Tilt Mechanism to Seat Base: Flip the seat base upside down. Place the butterfly tilt mechanism underneath the seat, ensuring the 'FRONT' arrow on the mechanism points towards the front of the seat. Secure it with the provided M8 screws using the hex key.
- Assemble Wheelbase: Flip the wheelbase over. Insert the casters into the ends of each leg of the wheelbase and press firmly until they click into place.
- Install Hydraulic Piston: Insert the hydraulic piston into the center hole of the assembled wheelbase. Place the aesthetic sleeve over the hydraulic piston.
- Connect Seat to Piston: Align the top of the hydraulic piston with the hole in the tilt mechanism attached to the seat base. Carefully lower the seat base onto the piston and press down firmly to secure it.
- Attach Backrest: Remove the pre-installed screws from both sides of the backrest. Place the backrest vertically onto the seat cushion, aligning the recline level with the seat. Secure the backrest to the seat base using the screws provided on both sides. WARNING: Do not place your hands near the backrest holder to avoid injury during this step.
- Install Aesthetic Covers: Place the aesthetic covers over the backrest holders and screw them into place using the M5 screws.
- Attach Cushions: Place the memory foam headrest and lumbar support cushion onto the chair as desired.

Figure 2: All components included for assembly.
Operating Instructions
Chair Height Adjustment:
To adjust the chair's height, locate the lever on the right side, beneath the seat. Pull the lever upwards while seated to lower the chair, or while standing to raise it. Release the lever at your desired height.
Reclining Function:
The chair features a 150-degree recline. To recline, pull the lever on the left side of the seat upwards and lean back. Release the lever to lock the backrest in your preferred position. To return to an upright position, pull the lever and lean forward.
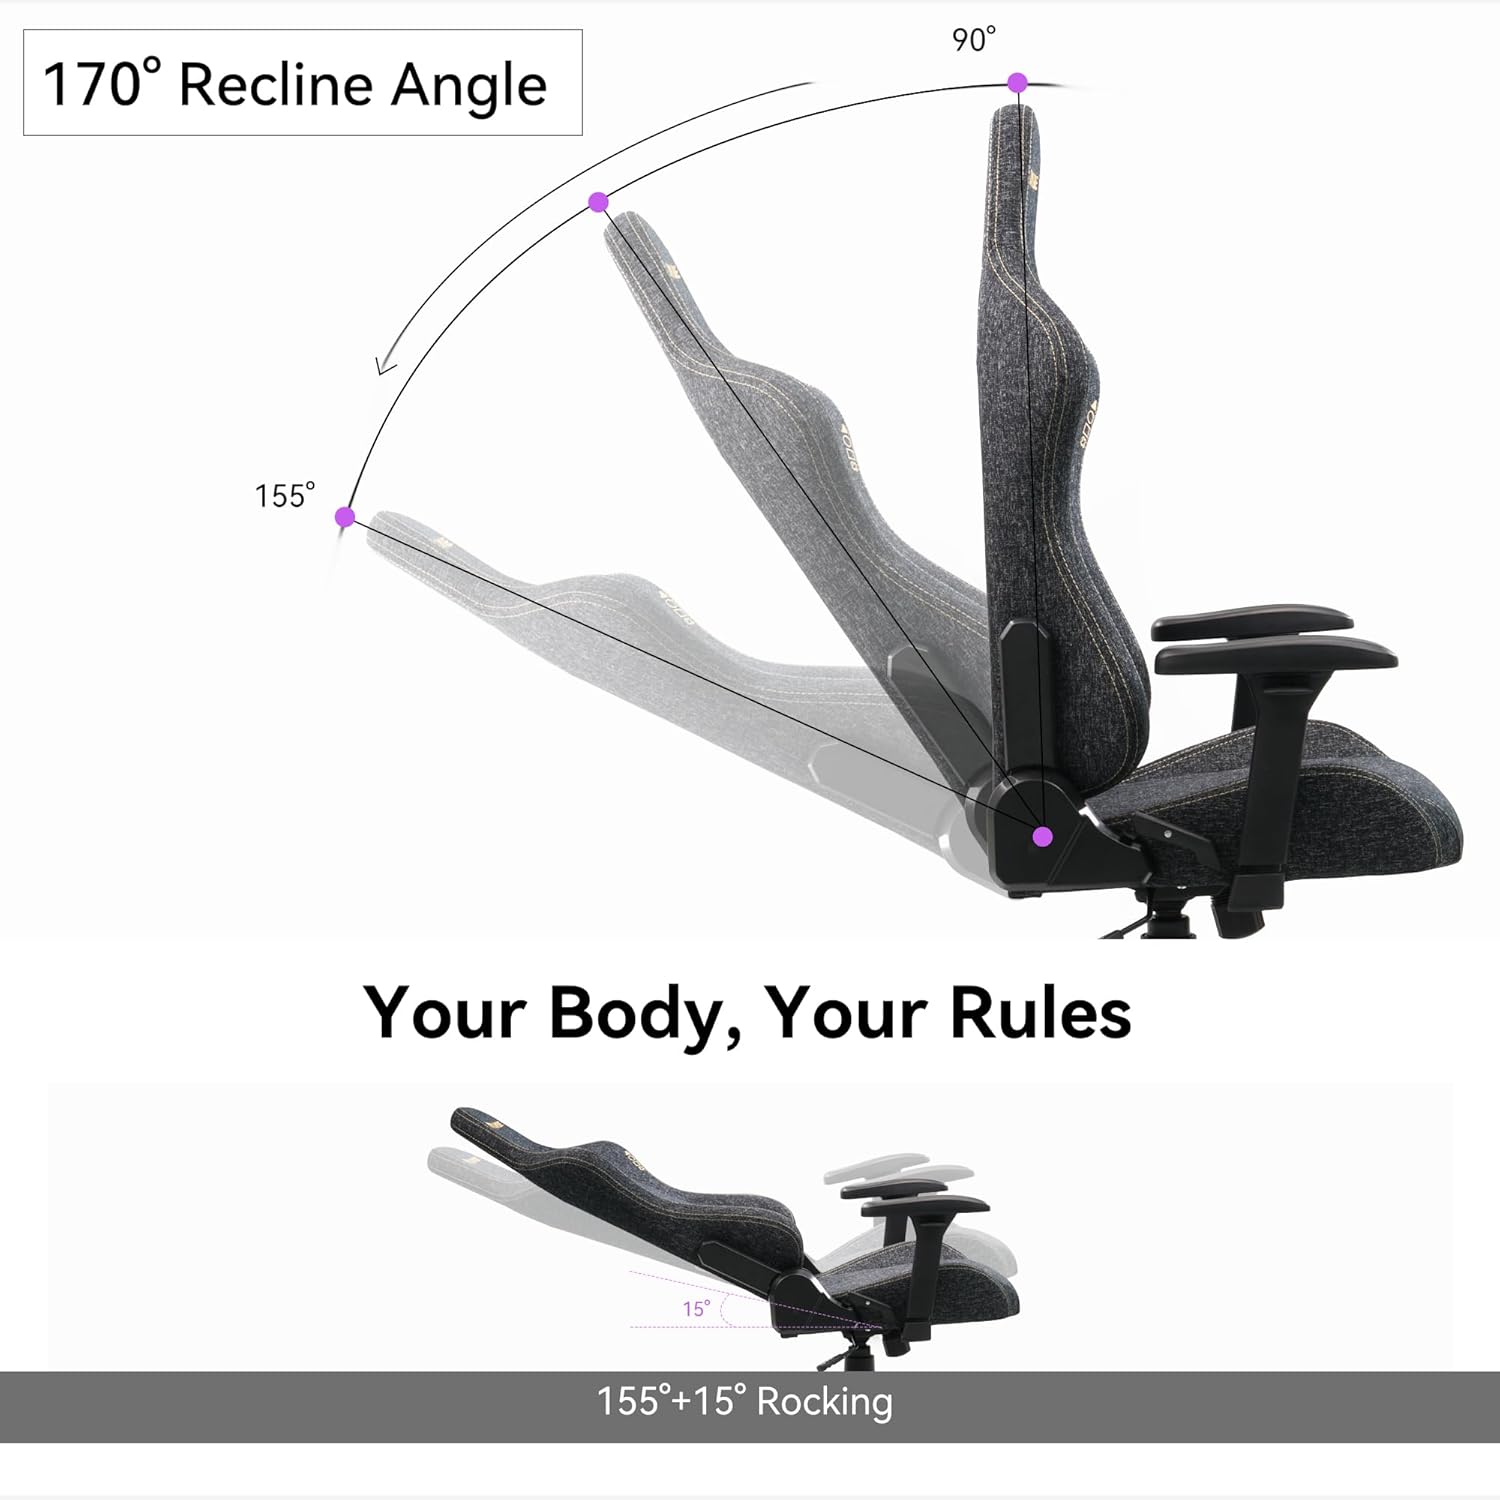
Figure 3: Chair recline angles from 90° to 155° with additional rocking.
4D Adjustable Armrests:
The armrests can be adjusted in four dimensions: height (up/down), forward/backward, left/right, and rotation (30 degrees). Use the buttons and levers located on the armrests to customize their position for optimal comfort and support.

Figure 4: Demonstrates the four-dimensional adjustments of the armrests.
Maintenance
Cleaning:
- For general cleaning, wipe the chair with a soft, damp cloth.
- Avoid using harsh chemicals or abrasive cleaners, as these may damage the fabric or finish.
- For spills, blot immediately with a clean, dry cloth.
General Care:
- Periodically check all screws and bolts to ensure they are tight. Retighten if necessary.
- Avoid placing heavy objects on the armrests or backrest.
- Keep the chair away from sharp objects to prevent damage to the fabric.
Troubleshooting
Chair Squeaks:
If the chair squeaks, check all bolts and screws for tightness. Apply a small amount of lubricant (e.g., silicone spray) to moving parts, such as the tilt mechanism or gas lift, if necessary.
Gas Lift Not Functioning:
Ensure the height adjustment lever is fully engaged or disengaged. If the issue persists, the gas lift may need replacement. Contact customer support for assistance.
Casters Not Rolling Smoothly:
Check for any debris (hair, dust) caught in the casters. Clean them thoroughly. If damaged, casters can be replaced.
Warranty and Support
VENTUVIBE products come with a standard manufacturer's warranty. For specific warranty details, claims, or technical support, please refer to the warranty card included with your product or visit the official VENTUVIBE website.
For customer support, please contact Ventuvibe directly via their official channels.


