1. Introduction
This manual provides essential instructions for the safe and effective use of your Tilta Electronic Suction Cup (4.5 inch) with NATO Mounting Bracket. Please read this manual thoroughly before operation and retain it for future reference.
The Tilta Electronic Suction Cup is designed to provide a secure mounting solution for camera equipment and accessories on smooth, non-porous surfaces. Its electronic air pressure monitoring system ensures consistent suction, enhancing safety and reliability during use.
2. Product Overview
2.1 Components
- Electronic Suction Cup (4.5 inch)
- NATO Mounting Bracket
- USB-C Charging Cable
2.2 Key Features
- Electronic Suction: Automatically maintains optimal vacuum pressure, eliminating manual pumping.
- Integrated Battery: 2000mAh battery provides 8-12 hours of continuous operation, extendable to 24 hours with external USB-C power.
- Air Pressure Monitoring: Real-time monitoring via an LCD display ensures secure attachment.
- Versatile Mounting: Includes NATO mounting bracket, compatible with M25 and universal multi-mount options.
- Durable Construction: Made from aluminum for robust performance.
2.3 Product Diagram

Figure 1: Tilta Electronic Suction Cup (4.5 inch) with NATO Mounting Bracket attached.

Figure 2: Tilta Electronic Suction Cup (4.5 inch) base unit.

Figure 3: Detached NATO Mounting Bracket.
3. Setup and Installation
3.1 Charging the Battery
Before initial use, fully charge the integrated 2000mAh battery. Connect a USB-C cable to the charging port on the suction cup and to a 5V/1A USB-C power source. The LCD display will indicate charging status.
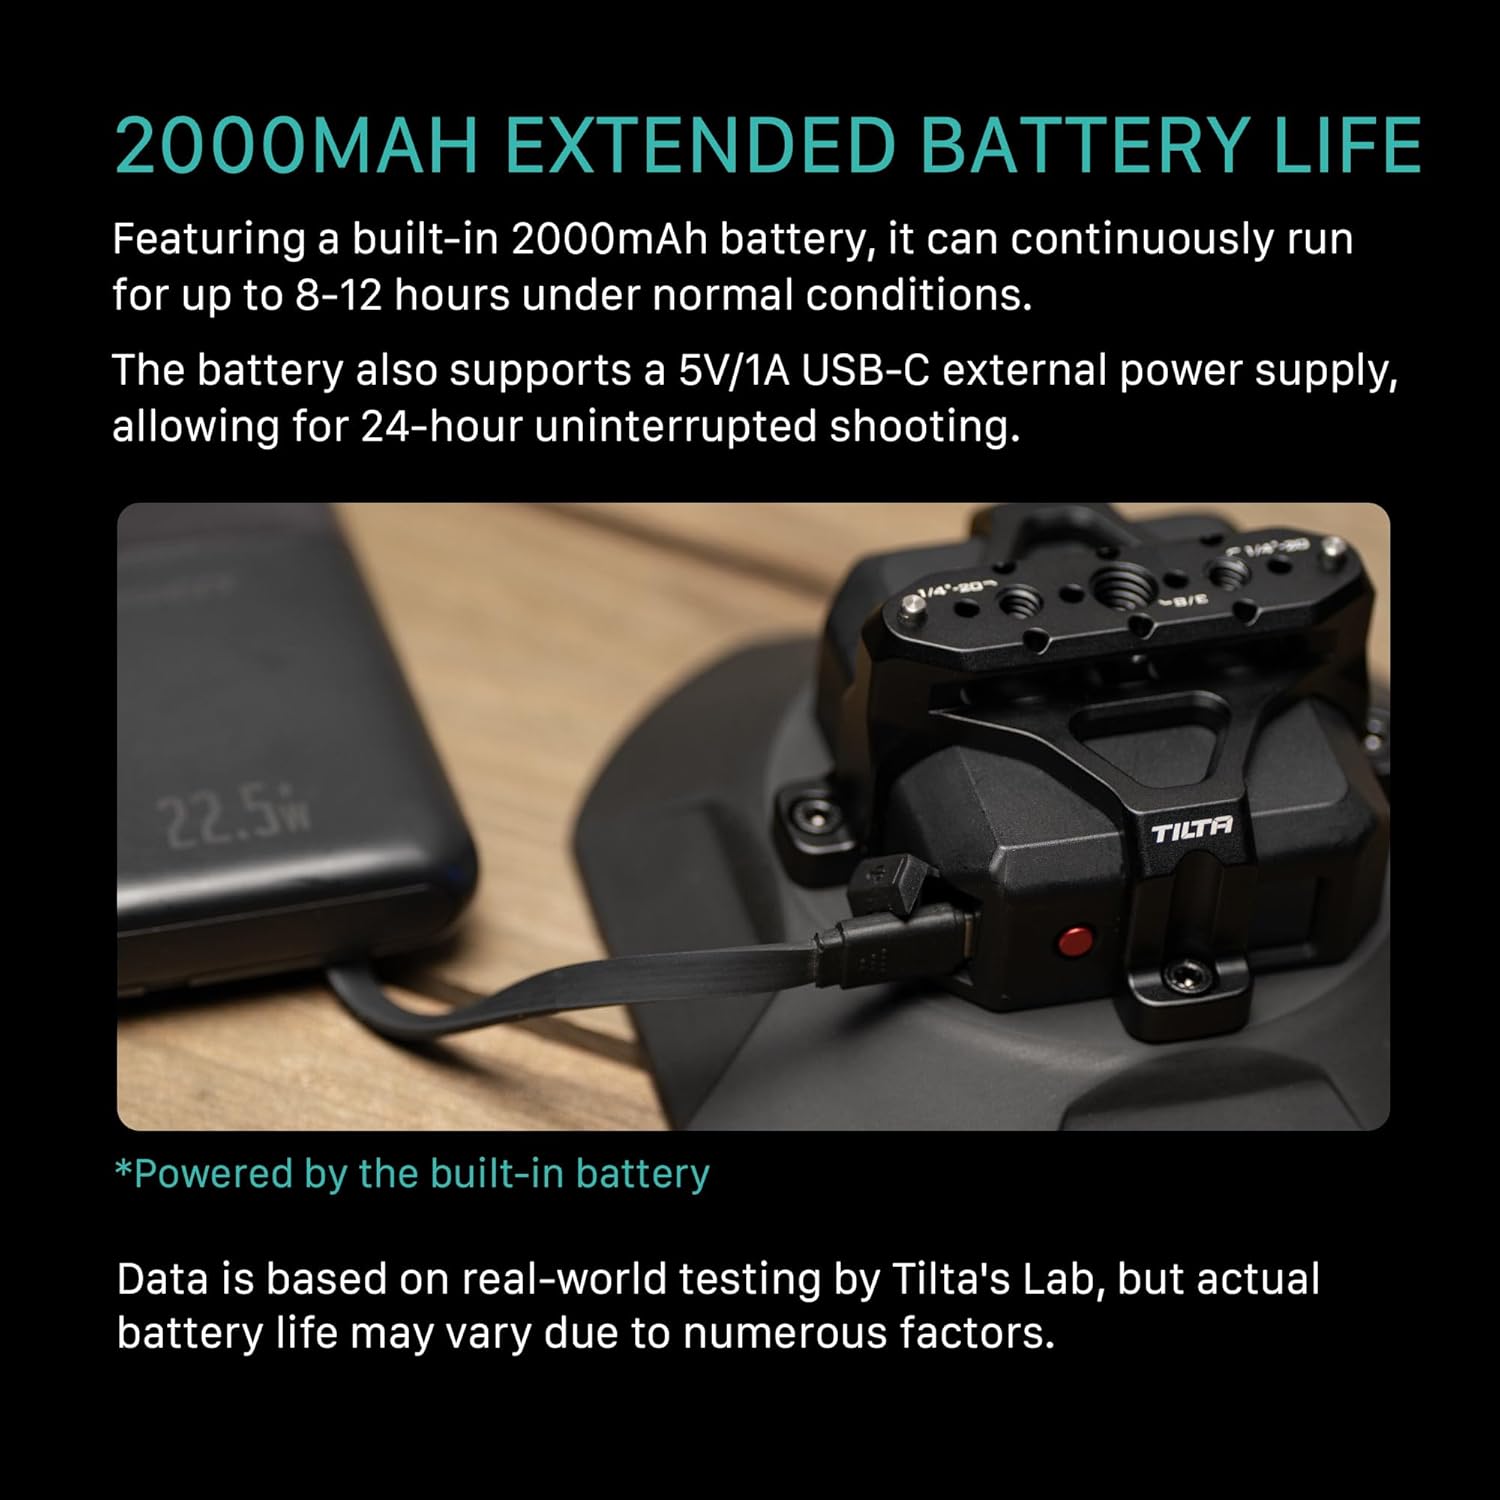
Figure 4: Charging the suction cup via USB-C. The integrated battery provides extended operation.
Video 1: Illustration of the USB-C charging process.
3.2 Attaching the Suction Cup
- Prepare the Surface: Ensure the mounting surface is clean, dry, and smooth. Avoid porous or textured surfaces.
- Position the Suction Cup: Place the suction cup firmly against the desired surface.
- Activate Suction: Press the power button (usually indicated by a red button or a clear activation switch) to initiate the electronic suction. The device will automatically pump air to create a vacuum.
- Verify Suction: Observe the LCD display for air pressure readings. A stable reading indicates secure attachment. The device will continuously monitor and adjust pressure.

Figure 5: Activating electronic suction with a single touch.
Video 2: Demonstration of the suction cup attaching to a surface and displaying pressure.
3.3 Attaching the NATO Mounting Bracket
The NATO Mounting Bracket can be attached to the top of the electronic suction cup using the provided screws. Ensure it is securely fastened before mounting any equipment.

Figure 6: Tilta Electronic Suction Cup with NATO bracket mounted on a car window.

Figure 7: Example of modular expansion with a camera rig attached to the NATO bracket.
4. Operating Instructions
4.1 Monitoring Suction Pressure
The integrated LCD display provides real-time feedback on the suction pressure. The device will automatically re-pump if it detects a drop in pressure, ensuring continuous security. Regularly check the display, especially during extended use or in changing environmental conditions.
Video 3: The LCD display showing battery and pressure status.
4.2 Releasing the Suction Cup
To release the suction cup, locate the release tab or button (typically a small lever on the side of the suction cup base). Gently lift or press it to break the vacuum seal. Do not force the removal; allow the air to equalize naturally.
5. Maintenance
- Cleaning: Regularly clean the suction cup surface and the mounting surface with a soft, damp cloth. Ensure no dust, dirt, or debris is present on the rubber seal.
- Storage: Store the suction cup in a clean, dry environment away from direct sunlight and extreme temperatures. Avoid placing heavy objects on the rubber seal to prevent deformation.
- Battery Care: For optimal battery life, charge the device regularly, even if not in frequent use. Avoid fully discharging the battery for extended periods.

Figure 8: Internal design for powerful and reliable suction. Proper maintenance ensures its effectiveness.
6. Troubleshooting
| Problem | Possible Cause | Solution |
|---|---|---|
| Suction cup does not attach securely. |
|
|
| Device loses suction frequently. |
|
|
| LCD display is not working. |
|
|
7. Specifications
| Feature | Detail |
|---|---|
| Model Number | HDA-ESC-NMB-45-AMZ |
| Dimensions | 9.84 x 7.09 x 3.94 inches |
| Weight | 2.2 pounds |
| Battery Capacity | 2000mAh (Integrated) |
| Operating Time | 8-12 hours (continuous), 24 hours with external USB-C power |
| Material | Aluminum |
| Mounting Type | Suction |
| Compatible Devices | M25, NATO, Universal Multi-Mount Option |
8. Warranty and Support
8.1 Warranty Information
For specific warranty details, please refer to the warranty card included with your product or visit the official Tilta website. Keep your proof of purchase for warranty claims.
8.2 Customer Support
If you encounter any issues not covered in this manual or require further assistance, please contact Tilta customer support. Contact information can be found on the official Tilta website or your product packaging.
Tilta Official Website: www.tilta.com