WAVE External Heater Replacement
WAVE Hot Tub Replacement Heater Unit User Manual
Model: External Heater Replacement
Brand: WAVE
Introduction
This manual provides essential information for the safe and effective use of your WAVE Hot Tub Replacement Heater Unit. This external heating unit is specifically designed for older WAVE spas. Please note that this unit is compatible ONLY with WAVE hot tubs that utilize external heaters and will NOT fit any newer models with integrated heating systems.
Before installation and operation, please read this manual thoroughly and retain it for future reference.
Important Safety Information
WARNING: Failure to follow these instructions can result in electric shock, fire, or serious injury.
- Always disconnect the power supply before performing any maintenance or installation.
- Ensure the heater unit is installed by a qualified professional if you are unsure of the process.
- Do not operate the heater if the power cord or plug is damaged.
- Keep all electrical connections dry and away from water.
- This unit is designed for outdoor use with compatible hot tubs. Do not use indoors.
- Ensure proper grounding of the electrical supply.
- Do not attempt to modify or repair the heater unit yourself. Contact qualified service personnel.
- Keep children and pets away from the heater unit during operation.
Package Contents
Please check the package contents to ensure all parts are present and undamaged:
- WAVE Hot Tub Replacement Heater Unit (External)
- Power Cord (attached)
- Connection Hoses/Fittings (if included, typically integrated with the unit)
- User Manual (this document)
If any parts are missing or damaged, please contact WAVE customer support immediately.
Setup and Installation
This section outlines the steps for installing your WAVE Hot Tub Replacement Heater Unit. Ensure your hot tub is drained and disconnected from power before beginning installation.
1. Prepare the Hot Tub
- Ensure the hot tub is completely drained of water.
- Disconnect the hot tub from its main power supply.
- Locate the existing external heater connections on your hot tub.
2. Connect the Heater Unit
The replacement heater unit connects to the hot tub via specific inlet and outlet ports. Refer to the diagram below for visual guidance.
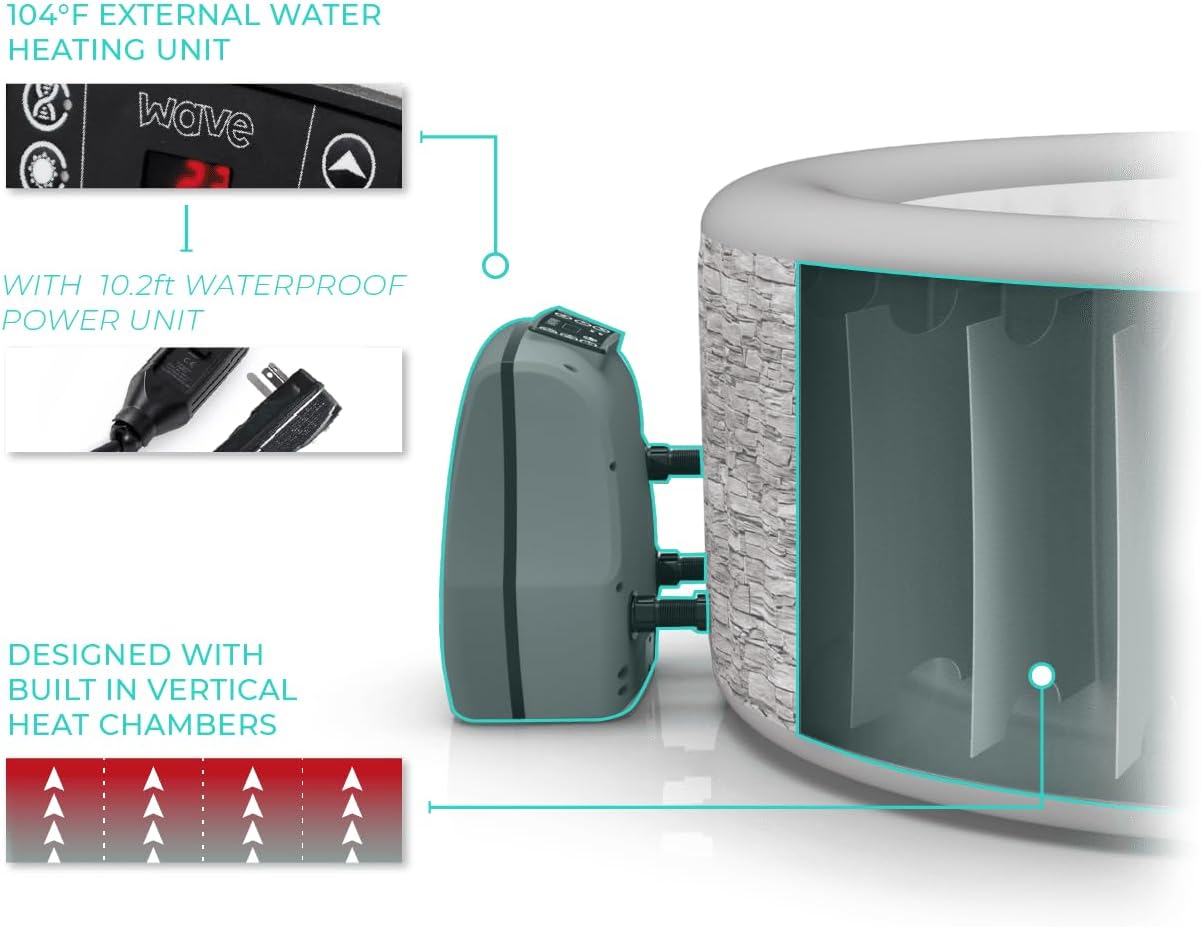
Figure 1: Connection Diagram. This image illustrates how the external heater unit connects to the hot tub, highlighting the power unit and the internal heat chambers within the hot tub structure.
- Carefully align the inlet and outlet ports of the new heater unit with the corresponding connections on your hot tub.
- Securely attach the connections, ensuring a watertight seal. Use appropriate tools if necessary, but do not overtighten.
- Position the heater unit on a stable, level surface near the hot tub, ensuring adequate ventilation.
3. Power Connection
- Once the heater unit is securely connected to the hot tub, you may begin refilling the hot tub with water.
- Ensure the hot tub is filled to the recommended level before connecting power.
- Plug the heater unit's power cord into a suitable, grounded electrical outlet. Ensure the outlet meets the power requirements specified in the 'Specifications' section.

Figure 2: WAVE External Heater Unit. This image provides a side view of the replacement heater unit, showcasing its design and the location of its connection ports.
Operating Instructions
After successful installation and filling the hot tub, you can begin operating the heater unit.
- Power On: Once plugged in, the unit should power on. The control panel (if present on the unit or integrated with the hot tub's main control) will illuminate.
- Set Temperature: Use the temperature control buttons (usually up/down arrows) to set your desired water temperature. The maximum temperature for most hot tubs is 104°F (40°C).
- Heating Cycle: The heater will automatically begin heating the water to the set temperature. The time required to reach the desired temperature will vary depending on the initial water temperature, ambient temperature, and hot tub volume.
- Filter Cycle: The heater unit often works in conjunction with the hot tub's filtration system. Ensure your hot tub's filter pump is operating correctly for efficient heating and water circulation.
- Power Off: To turn off the heater, either use the power button on the control panel or disconnect the unit from the main power supply.
For detailed operation of your specific hot tub's control panel, refer to your hot tub's original user manual.
Maintenance
Regular maintenance ensures the longevity and efficient operation of your heater unit.
- Keep Connections Clean: Periodically inspect the hose connections for any debris or mineral buildup. Clean as necessary.
- Check for Leaks: Regularly check all connections for any signs of water leaks. Address any leaks immediately to prevent damage.
- Clean Exterior: Wipe down the exterior of the heater unit with a damp cloth to remove dust and dirt. Do not use harsh chemicals or abrasive cleaners.
- Winterization: If you are winterizing your hot tub, ensure the heater unit is completely drained of water to prevent freezing and damage. Store the unit in a dry, protected area if removed from the hot tub.
- Filter Maintenance: While not directly part of the heater unit, a clean hot tub filter is crucial for efficient water flow through the heater. Follow your hot tub's instructions for filter cleaning and replacement.
Troubleshooting
This section provides solutions to common issues you might encounter with your heater unit.
| Problem | Possible Cause | Solution |
|---|---|---|
| Heater not turning on. | No power supply; tripped circuit breaker; faulty power cord. | Check power outlet and circuit breaker. Ensure power cord is securely plugged in. |
| Water not heating. | Low water flow; dirty filter; air lock; heater element failure. | Ensure hot tub is filled to correct level. Clean or replace filter. Bleed air from system. If problem persists, contact support. |
| Error code displayed. | Specific system fault (e.g., low flow, overheating). | Refer to your hot tub's main manual for specific error code meanings and solutions. Disconnect power, wait 5 minutes, and reconnect. |
| Water leaking from connections. | Loose connections; damaged O-rings/seals. | Tighten connections. Inspect and replace O-rings/seals if damaged. |
If you are unable to resolve an issue using the troubleshooting guide, please contact WAVE customer support.
Specifications
Technical specifications for the WAVE Hot Tub Replacement Heater Unit:
- Product Dimensions: 30 x 10 x 30 inches
- Item Weight: 30 pounds
- Manufacturer: Wave
- Model Number: External Heater Replacement
- ASIN: B0DHD8FHT6
- Compatibility: Older WAVE hot tubs with external heater units ONLY. Not compatible with new integrated heater hot tubs.
- Power Requirements: Please refer to the label on the unit for exact electrical requirements.
Warranty and Support
WAVE products are manufactured to high-quality standards. For information regarding the warranty period and terms for your specific heater unit, please refer to the warranty card included with your purchase or visit the official WAVE website.
For technical support, troubleshooting assistance beyond this manual, or to inquire about replacement parts, please contact WAVE customer service:
- Website: Visit the WAVE Store on Amazon (for general brand information)
- Contact Information: Please refer to the official WAVE website or product packaging for direct customer support contact details (phone, email).
Official Product Videos
No official product videos from the seller are available for this specific heater unit at this time.
Related Documents - External Heater Replacement
 |
Wave Como 4-6 Person Spa Installation Manual & Guide Comprehensive installation manual and guide for the Wave Como 4-6 Person Inflatable Spa. Learn how to set up, operate, maintain, and troubleshoot your hot tub. |
 |
Wave Eco Foam Spa User Manual (UK) - Installation, Operation & Maintenance Guide Comprehensive user manual for the Wave Eco Foam Spa (UK). Includes safety instructions, parts checklist, product specifications, installation guidance, filling and operating instructions, water maintenance, cleaning, troubleshooting, and warranty information. |
 |
Wave Inflatable Spa User Manual (UK) Comprehensive user manual for the Wave Inflatable Spa (UK), covering safety instructions, installation, operation, maintenance, troubleshooting, and warranty information. |
 |
Wave Foam Spa User Manual: Installation, Operation, and Safety Guide Comprehensive user manual for Wave Foam Spas (Garda, Tahoe, Como) covering installation, operation, safety, maintenance, troubleshooting, and warranty information. |
 |
Wave Eco Inflatable Spa User Manual: Setup, Operation, and Maintenance Comprehensive user manual for the Wave Eco Inflatable Spa, covering setup, operation, maintenance, safety, troubleshooting, and warranty. Includes detailed instructions and specifications for various models. |
 |
Wave Eco Inflatable Spa User Manual - Setup, Operation, and Maintenance Guide Comprehensive user manual for Wave Eco Inflatable Spas, covering safety instructions, parts checklist, product specifications, installation guidance, operation, water maintenance, cleaning, storing, troubleshooting, error codes, and warranty information. |
Ask a question about this manual
Ask about setup, troubleshooting, compatibility, parts, safety, or missing instructions. Manuals+ will review the question and use this page’s manual context to help answer it.