1. Introduction
Thank you for choosing the GinoCaco 50FT Borescope Camera. This device is designed for visual inspection in hard-to-reach areas, providing clear images and video on its integrated 4.3-inch screen. Its robust design and versatile features make it suitable for various professional and DIY applications, including automotive, plumbing, HVAC, and home inspections. Please read this manual thoroughly before use to ensure proper operation and to maximize the product's lifespan.
2. Product Overview
2.1 What's in the Box
- 4.3-inch Handheld Borescope Camera with Light
- 50FT Semi-Rigid Cable
- Hook Attachment
- Magnet Attachment
- Side Mirror Attachment
- USB Charging Cable (charging plug not included)
- User Manual
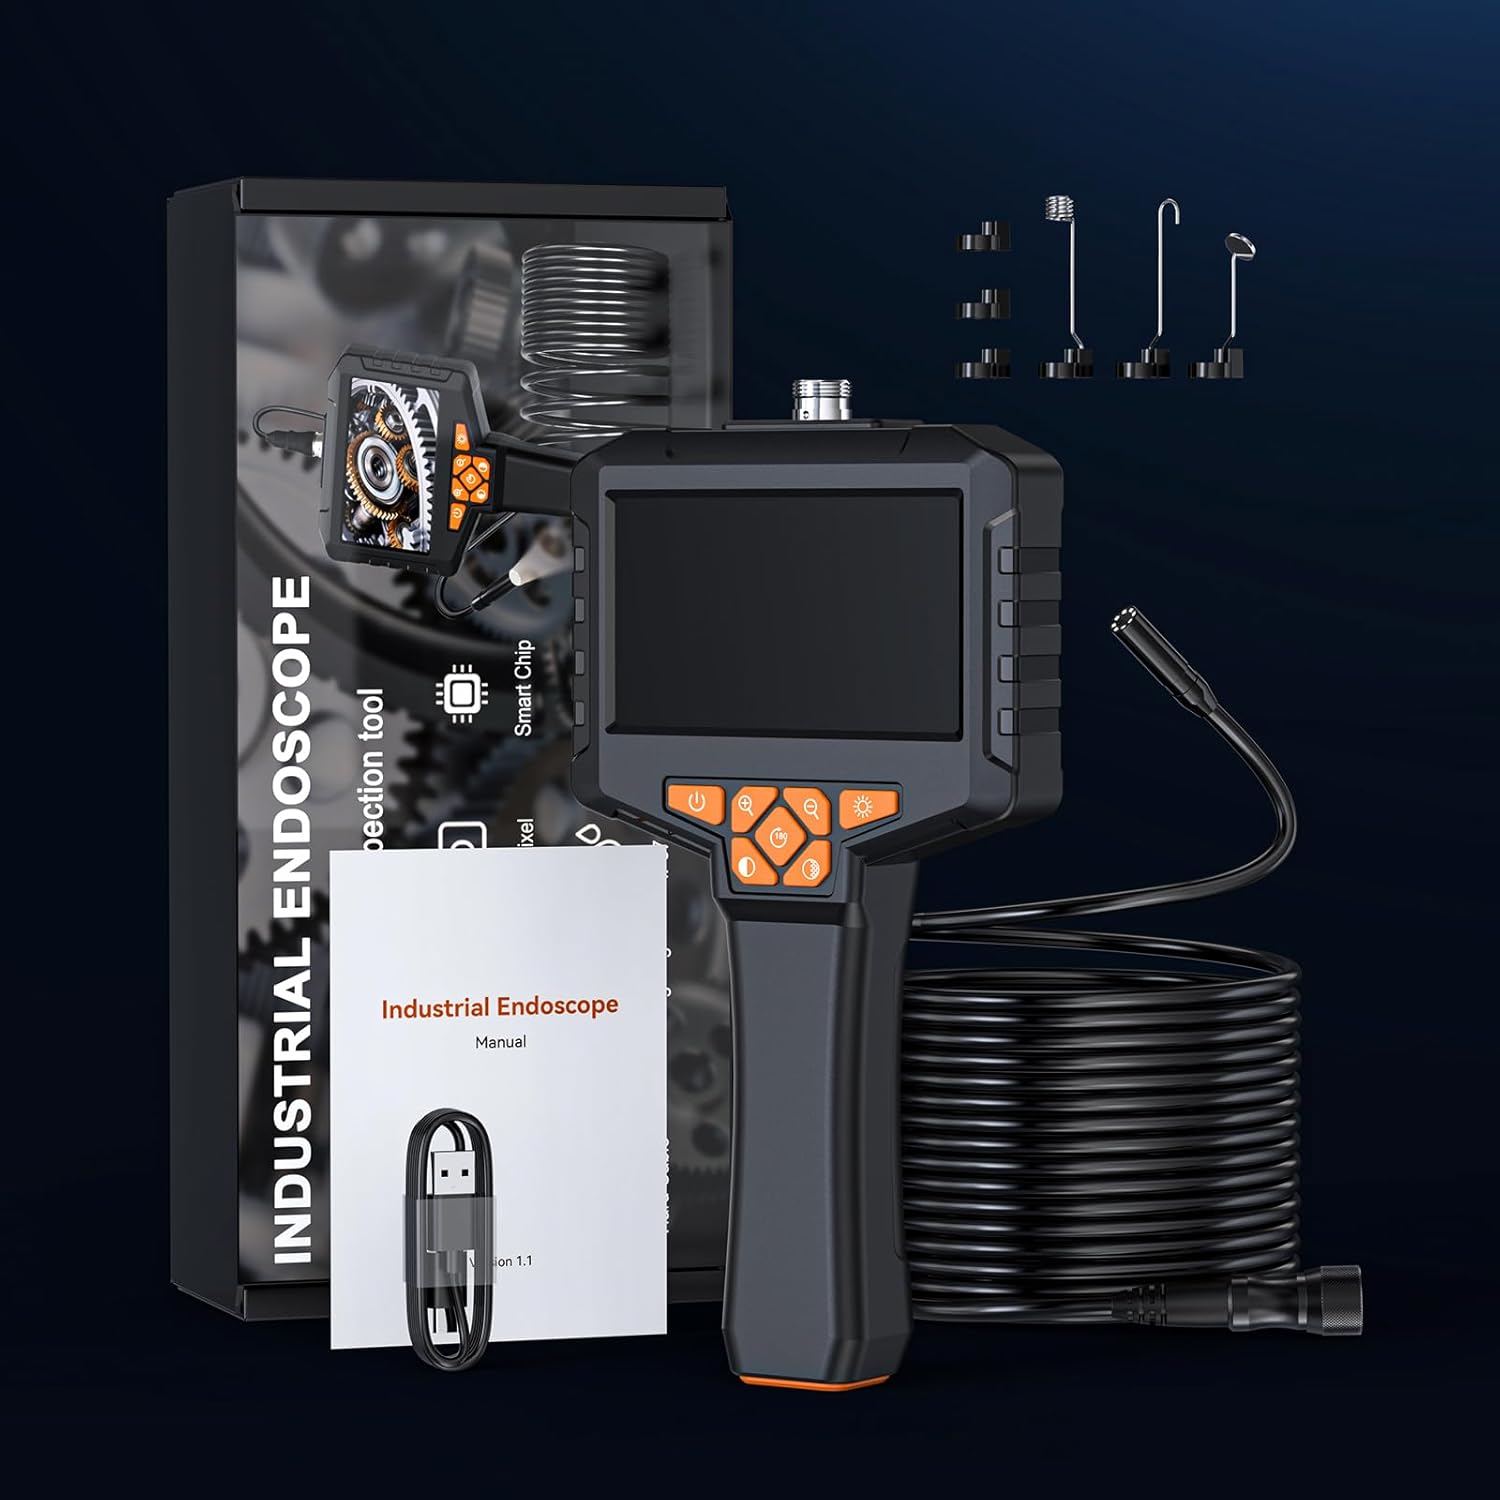
Figure 1: Borescope Camera, 50FT cable, and accessories as packaged.
2.2 Key Features
- 4.3-inch IPS Screen: Provides real-time, vivid 1080P imaging with a 178° viewing angle.
- 50FT Semi-Rigid Cable: Detachable and bendable for navigating narrow and complex spaces.
- 8 Adjustable LED Lights: Ensures clear visibility in dark environments.
- IP67 Waterproof Probe: Withstands submersion up to 1 meter for 60 minutes, suitable for wet conditions.
- Plug-and-Play Design: No app or Wi-Fi required for operation.
- Integrated Controls: Easy adjustment of brightness, screen rotation, and magnification.
- Long Battery Life: 2200mAh battery provides 3-4 hours of continuous operation.

Figure 2: Advanced CMOS sensor for sharp 1080P images.
2.3 Component Identification
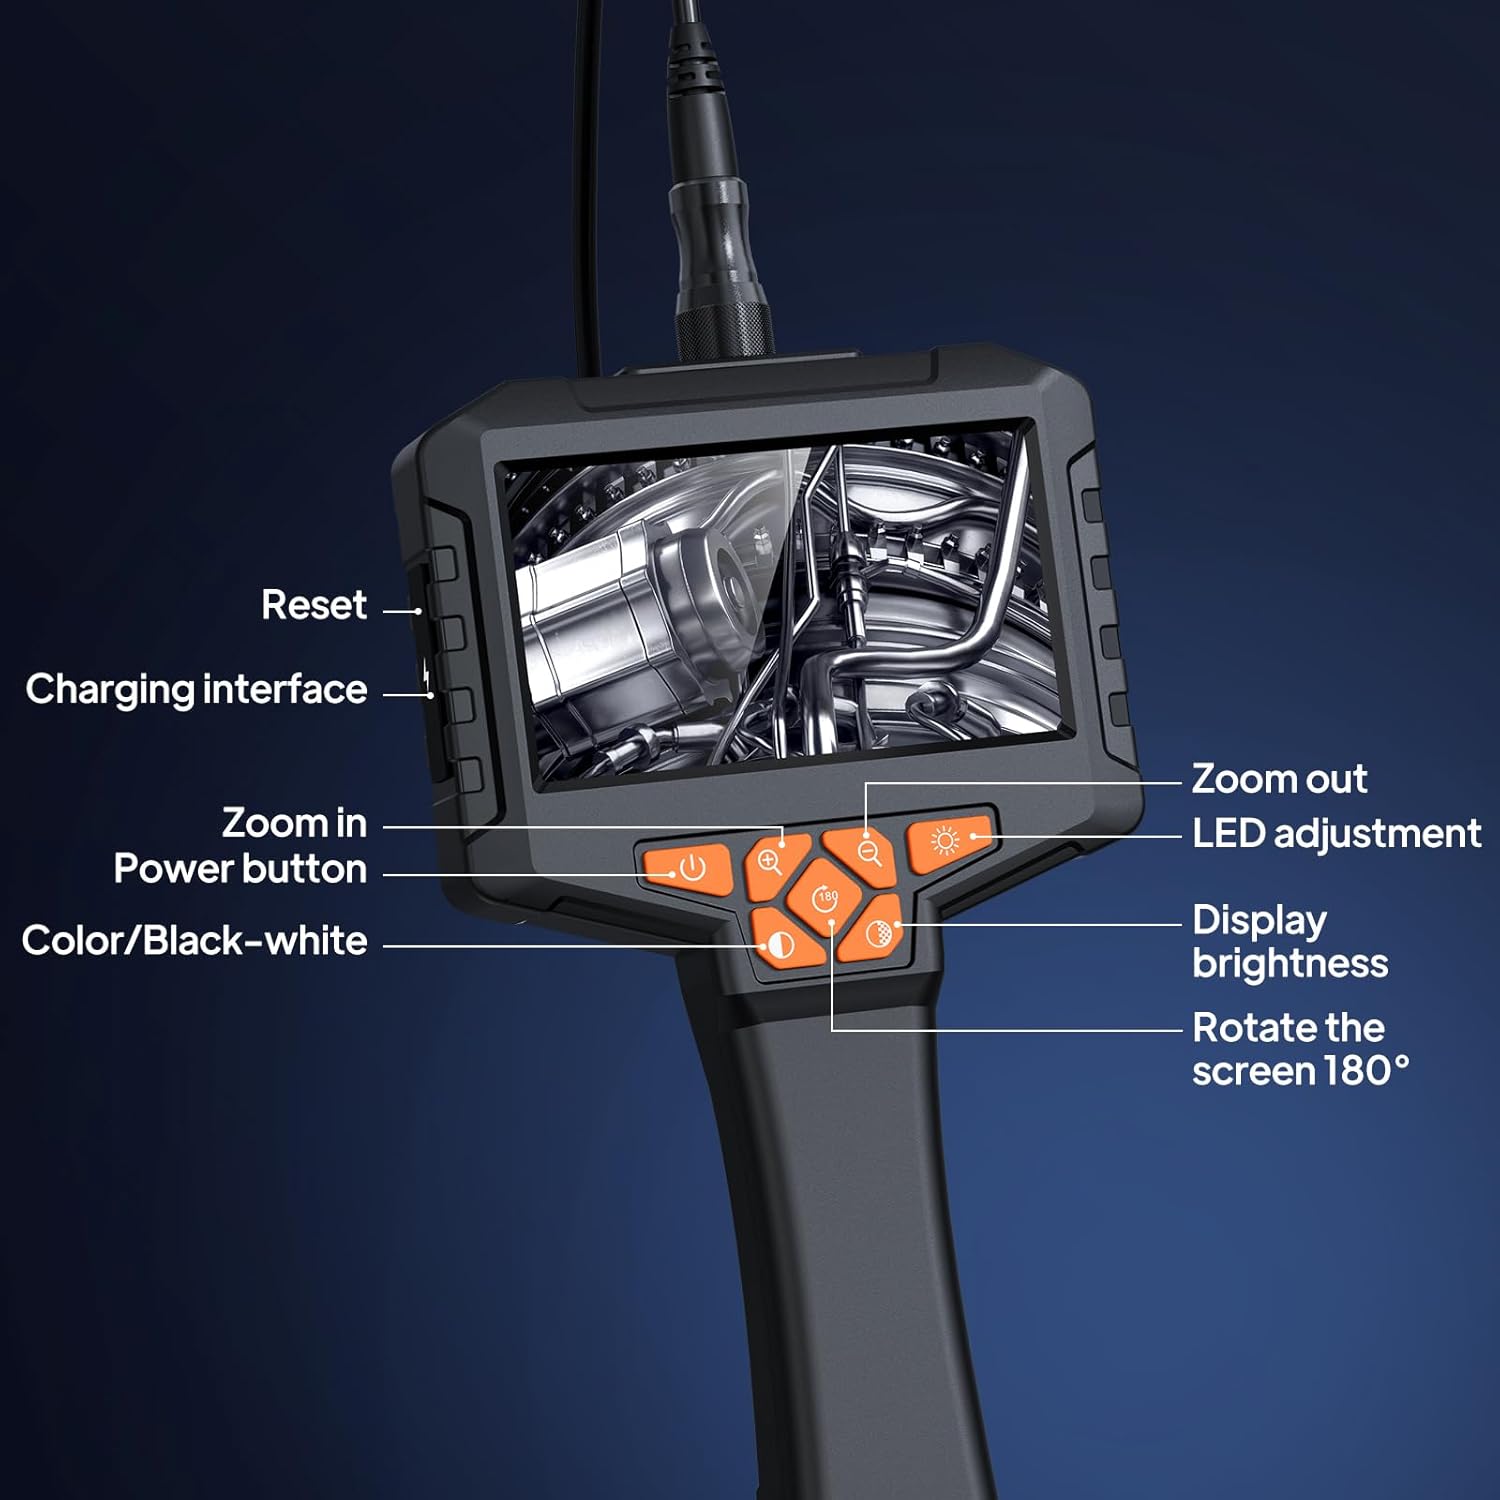
Figure 3: Control Panel Layout
- Power Button: Press and hold to turn the device On/Off.
- Zoom In Button: Increases magnification.
- Zoom Out Button: Decreases magnification.
- LED Adjustment Button: Cycles through LED brightness levels.
- Display Brightness Button: Adjusts screen brightness.
- Rotate 180° Button: Flips the screen display 180 degrees.
- Color/Black-white Button: Toggles between color and black & white display modes.
- Reset Button: Resets the device (located on the side).
- Charging Interface: USB port for charging.
3. Setup
3.1 Connecting the Camera Cable
- Locate the connector on the end of the 50FT semi-rigid cable.
- Align the connector with the port on the top of the borescope camera unit.
- Gently push and twist the connector clockwise until it is securely fastened. Ensure a tight connection to maintain waterproofing.
3.2 Charging the Device
The borescope camera is powered by an internal 2200mAh rechargeable battery. Before first use, fully charge the device.
- Connect the provided USB charging cable to the charging interface on the side of the borescope unit.
- Connect the other end of the USB cable to a standard USB power adapter (not included) or a computer USB port.
- The charging indicator light will illuminate. A full charge typically takes approximately 2.5 hours and provides 3-4 hours of operation.
3.3 Powering On/Off
To power on the device, press and hold the Power Button (refer to Figure 3) for a few seconds until the screen illuminates. To power off, press and hold the Power Button again until the screen turns off.
4. Operating Instructions
4.1 Basic Operation

Figure 4: Borescope in use, displaying live feed on the 4.3-inch screen.
- Adjusting LED Lights: Press the LED Adjustment Button to cycle through different brightness levels for the camera's built-in lights. This helps illuminate dark inspection areas.
- Screen Rotation: Press the Rotate 180° Button to flip the image on the screen 180 degrees, which is useful when the camera probe is oriented upside down.
- Zoom Function: Use the Zoom In and Zoom Out Buttons to adjust the magnification of the image on the screen. The device supports 3 magnification levels.
- Color Mode: Press the Color/Black-white Button to switch between full-color and black & white display modes.

Figure 5: Example of zoom levels (1.0X, 1.3X, 1.5X).
4.2 Photo and Video Capture
The GinoCaco borescope camera supports photo and video capture directly to an inserted SD card (not included). No external app or Wi-Fi connection is required.
- Insert SD Card: Ensure a compatible micro SD card (up to 32GB, Class 10 recommended) is inserted into the SD card slot (usually on the side of the unit).
- Take Photo: While viewing the live feed, briefly press the Photo/Video Button (often indicated by a camera icon) to capture a still image.
- Record Video: Press and hold the Photo/Video Button to start recording video. Press and hold again to stop recording.
- Playback: Access the menu (usually by pressing the 'M' or Menu button) to view captured photos and videos.
4.3 Using Attachments
The borescope comes with several useful attachments to enhance its functionality:
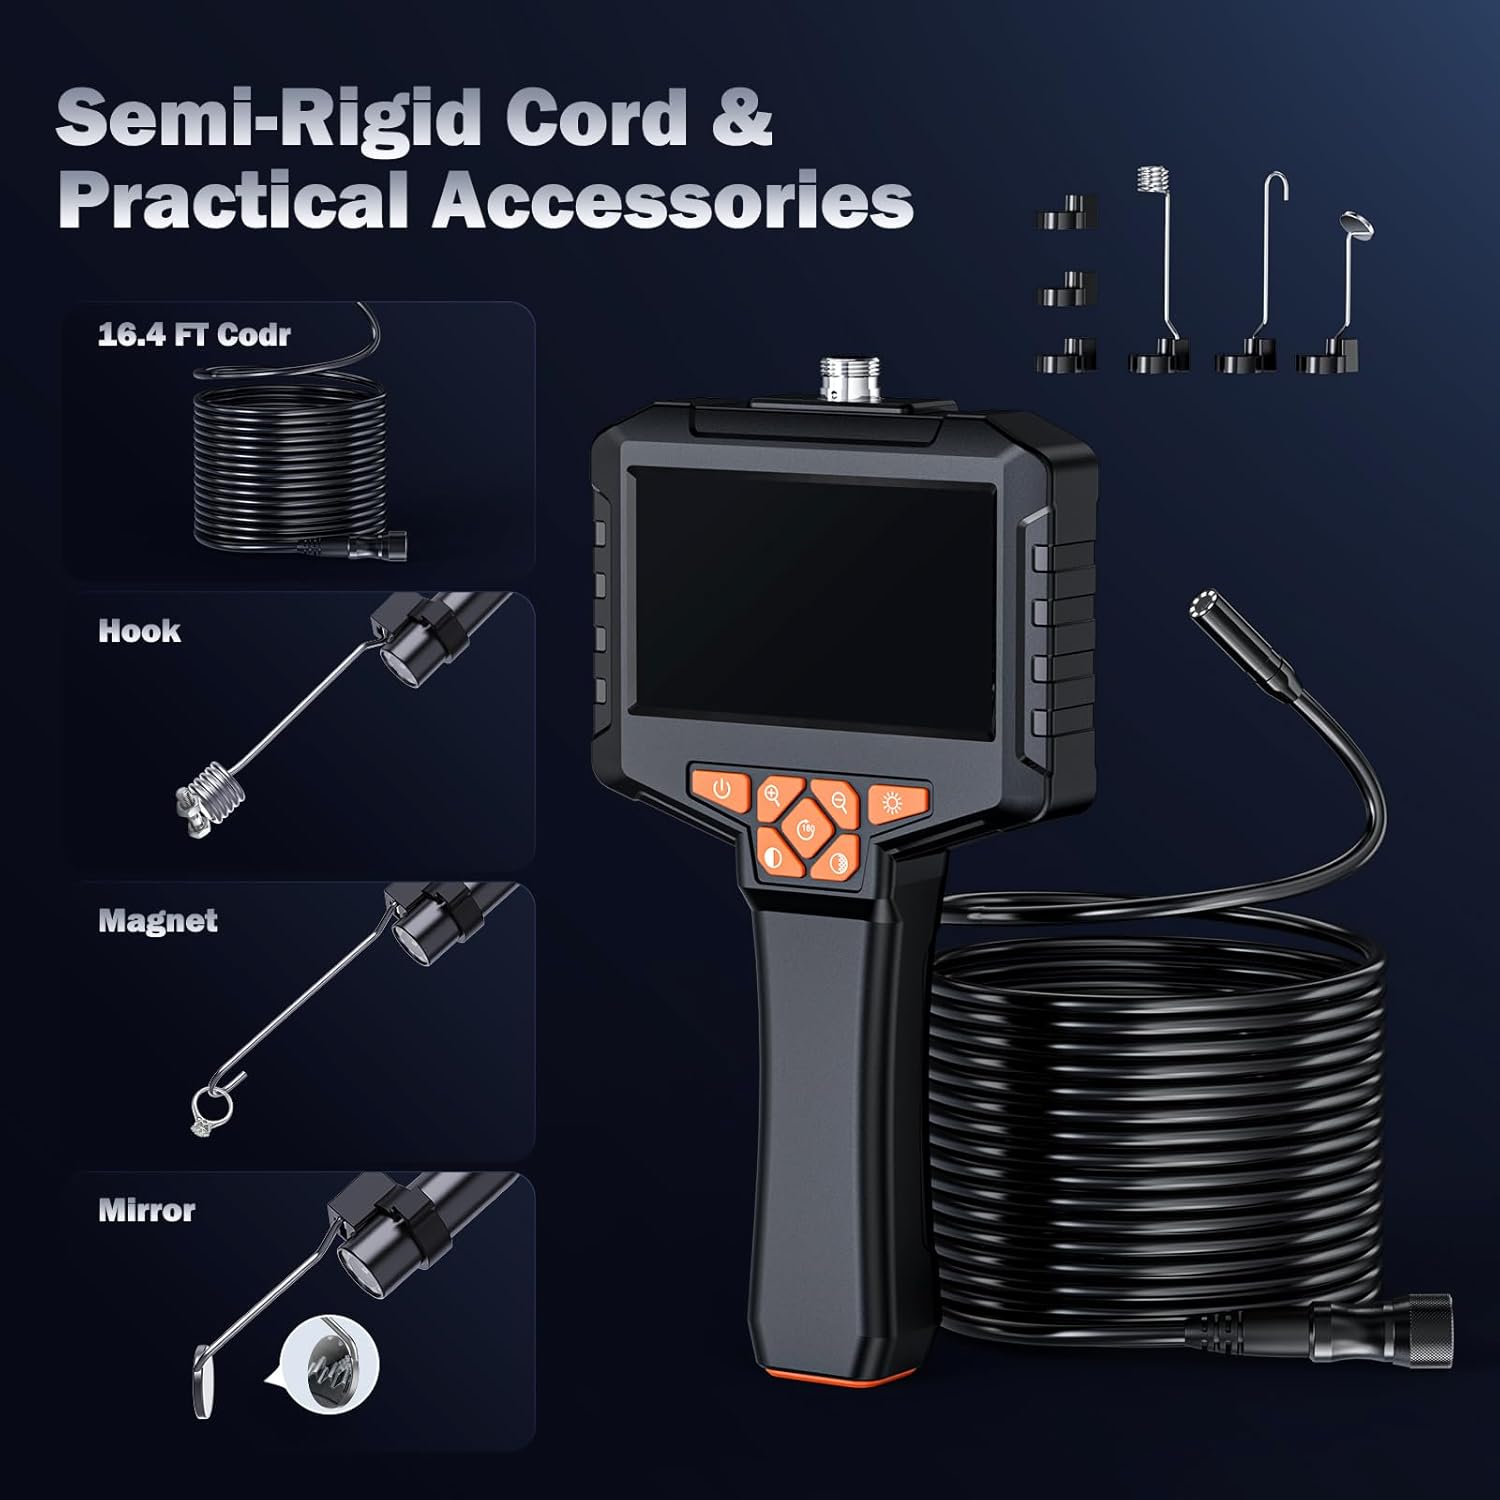
Figure 6: Semi-rigid cable and included accessories.
- Hook: Useful for retrieving small objects from tight spaces.
- Magnet: Ideal for picking up metallic items like screws or nuts.
- Side Mirror: Attaches to the camera tip to provide a side view, allowing inspection of walls or surfaces perpendicular to the camera's direction.
To attach, carefully screw the desired accessory onto the threaded tip of the camera probe.
5. Maintenance
5.1 Cleaning the Camera Lens and Probe
After each use, especially in dirty or wet environments, clean the camera lens and probe.
- Wipe the camera lens with a soft, lint-free cloth. For stubborn dirt, use a small amount of lens cleaning solution.
- Clean the probe cable with a damp cloth. Avoid harsh chemicals that could damage the cable material.
- Ensure the probe and connectors are dry before storage.
5.2 Water Resistance
The camera probe is IP67 waterproof. This means it can be submerged in fresh water up to 1 meter (3.3 feet) for up to 30 minutes. However, the main unit (screen and controls) is NOT waterproof. Do not submerge the main unit or expose it to heavy rain.

Figure 7: IP67 waterproof probe with adjustable LEDs.
5.3 Battery Care
- Charge the battery regularly, even if the device is not used frequently, to maintain battery health.
- Avoid fully discharging the battery for extended periods.
- Store the device in a cool, dry place away from extreme temperatures.
6. Troubleshooting
If you encounter issues with your GinoCaco borescope camera, please refer to the following common problems and solutions:
| Problem | Possible Cause | Solution |
|---|---|---|
| Device does not power on | Low battery; Loose cable connection | Charge the device fully; Ensure camera cable is securely connected. |
| No image on screen | Cable not connected; Camera lens obstructed; Incorrect mode | Check cable connection; Clean camera lens; Ensure device is in live view mode. |
| Image is blurry or unclear | Lens is dirty; Object too close/far; Insufficient lighting | Clean the camera lens; Adjust distance to object (optimal 3-10cm); Increase LED brightness. |
| Cable is difficult to maneuver | Natural flexibility of semi-rigid cable | The cable is designed to be semi-rigid. For very complex paths, gentle manipulation and patience are required. |
| Cannot save photos/videos | No SD card; SD card full or faulty | Insert a compatible micro SD card; Delete old files or replace SD card. |
7. Specifications
| Feature | Specification |
|---|---|
| Model Number | NES431-15M |
| Screen Size | 4.3 inches |
| Cable Length | 50 feet (15 meters) |
| Camera Diameter | 8mm |
| Resolution | 1080P |
| Waterproof Rating | IP67 (probe only) |
| Adjustable Lights | 8 LEDs |
| Battery Capacity | 2200mAh |
| Battery Life | 3-4 hours |
| Charging Time | Approx. 2.5 hours |
| Macro Focus Range | 3-10 Centimeters |
| Media Type | Not Include SD Card |
| Item Weight | 2.23 pounds |
| Color | Black |
8. Warranty and Support
For warranty information and customer support, please refer to the documentation included with your purchase or contact GinoCaco customer service through the retailer where the product was purchased. Please retain your proof of purchase for warranty claims.