TESSAN CH-EV201W-GR-A002
TESSAN Level 2 EV Charger Instruction Manual
Model: CH-EV201W-GR-A002 | Brand: TESSAN

The TESSAN Level 2 EV Charger, featuring a hardwired design, 48A/240V capacity, and smart app control via Wi-Fi and Bluetooth, is designed for fast and convenient electric vehicle charging at home.
1. Safety Information
Before installation and operation, please read this manual thoroughly and retain it for future reference. Adhere to all local electrical codes and regulations. Installation should only be performed by a qualified electrician.
General Safety Precautions:
- Professional Installation Required: This is a hardwired unit. Incorrect installation can lead to electric shock, fire, or other hazards.
- Grounding: Ensure the charger is properly grounded to prevent electric shock.
- Environmental Conditions: The charger is IP65 water resistant, suitable for indoor and outdoor use. However, avoid submerging the unit in water.
- Cable Integrity: Regularly inspect the charging cable and connector for any signs of damage, fraying, or wear. Do not use if damaged.
- Children and Pets: Keep the charger and cable out of reach of children and pets during operation and storage.
- Emergency Stop: Familiarize yourself with the location of your circuit breaker and how to shut off power to the charger in an emergency.

The TESSAN EV Charger is built with multiple protection mechanisms to ensure stable and safe operation under various conditions.
2. Package Contents
Verify that all items are present and undamaged upon opening the package:
- TESSAN Level 2 EV Charger Unit
- 25ft Charging Cable with J1772 Connector
- Wall-Mounting Template
- Mounting Hardware (screws, expansion tubes)
- Plug Holder (two parts for charger and connector)
- User Manual (this document)
3. Setup & Installation
Important: Electrical installation must be performed by a licensed electrician in accordance with all applicable local and national electrical codes.
3.1 Physical Mounting
- Choose Location: Select a suitable indoor or outdoor location near your parking area, ensuring it is within reach of the 25ft charging cable.
- Use Mounting Template: Place the provided wall-mounting drilling reference drawing on the desired wall position.
- Drill Holes: Drill holes according to the marks on the template.
- Secure Charger: Fix the charger unit to the wall using the provided screws and expansion tubes.
- Install Plug Holder: Mount the two-part plug holder next to the charger unit for convenient storage of the J1772 connector.

The 25ft cable provides flexibility for charging your EV wherever it's parked.
3.2 Electrical Connection (Hardwired)
- Power Off: Ensure the main power supply to the installation area is completely shut off at the circuit breaker.
- Wire Connection: Connect the charger's hardwired input wires (typically L1, L2, and Ground) to the appropriate terminals in your electrical panel or junction box. This unit requires a 240V/48A circuit.
- Verify Connections: Double-check all connections for tightness and correct polarity.
- Restore Power: Once all connections are secure and verified, restore power to the circuit.

The hardwired connection ensures a stable and high-power supply for fast charging.
3.3 App Installation & Connection
- Download App: Search for the "eTrip+" app on your smartphone's app store (iOS/Android).
- Register/Login: Create an account or log in if you already have one.
- Add Device: Follow the in-app instructions to add your TESSAN EV Charger. This typically involves scanning a QR code on the charger unit (use the top QR code on the silver label, not the white label) and connecting via Bluetooth or Wi-Fi (2.4GHz only).
- Network Setup: Configure the charger to connect to your home 2.4GHz Wi-Fi network for remote control and smart features.
4. Operating Instructions
4.1 Starting a Charge
- Plug In: Connect the J1772 connector to your electric vehicle's charging port.
- Initiate Charge:
- Via App: Open the eTrip+ app, select your charger, and tap "Start Charging".
- RFID Card: Swipe an authorized RFID card over the designated area on the charger unit.
- Plug and Charge (Optional): If enabled in the app (via Bluetooth connection), the charger will automatically begin charging when plugged into the vehicle.
4.2 Smart App Features
The eTrip+ app provides advanced control and monitoring capabilities:
- Schedule Charging: Set specific times for charging, ideal for utilizing off-peak electricity rates.
- Adjust Current: Modify the charging current (up to 48A) to suit your needs or vehicle's capacity.
- Real-time Data: View live charging data, including power consumption, voltage, current, and charging duration.
- Remote Control: Start or stop charging remotely from anywhere with an internet connection.

The intelligent charging app allows for personalized and efficient charging management.
5. Maintenance
Regular maintenance ensures optimal performance and longevity of your TESSAN EV Charger.
- Cleaning: Wipe the charger unit and cable with a soft, damp cloth. Avoid using harsh chemicals or abrasive cleaners.
- Cable and Connector Inspection: Periodically check the charging cable and J1772 connector for any signs of damage, cracks, or discoloration. Ensure the connector cap is used when not in use to protect from dust and moisture.
- Unit Inspection: Inspect the charger unit for any physical damage or loose connections.
- Software Updates: Keep the eTrip+ app updated to the latest version for new features and bug fixes.

The charger's robust design allows it to withstand various weather conditions, but regular cleaning is recommended.
6. Troubleshooting
If you encounter issues with your TESSAN EV Charger, refer to the following common problems and solutions:
| Problem | Possible Cause | Solution |
|---|---|---|
| Charger not powering on | No power from circuit breaker; loose wiring. | Check circuit breaker; ensure proper hardwired connection (consult electrician). |
| Charging not starting via app | App connectivity issue; incorrect settings; server issues. | Ensure charger is connected to 2.4GHz Wi-Fi; restart app/charger; check app for server status. |
| Charging not starting with RFID card | Card not authorized; incorrect swipe. | Ensure RFID card is registered in the app; try swiping again. |
| Slow charging speed | Current limit set in app; vehicle limitation. | Check and adjust current settings in the eTrip+ app; consult vehicle manual for charging limits. |
| App shows network error | Temporary server issue; unstable Wi-Fi. | Wait and try again later; ensure strong 2.4GHz Wi-Fi signal. |
For persistent issues not covered here, please contact TESSAN customer support.
7. Specifications
| Feature | Specification |
|---|---|
| Model Number | CH-EV201W-GR-A002 |
| Input/Output Voltage | 240V (AC) |
| Current Rating | 48 Amps |
| Max Power Output | 11.5 kW/h |
| Charging Cable Length | 25 feet |
| Connector Type | SAE J1772 |
| Wi-Fi Connectivity | 2.4GHz Only |
| Water Resistance Rating | IP65 |
| Certifications | FCC, ETL, ENERGY STAR |
| Item Weight | 19.46 pounds |
| Package Dimensions | 19.5 x 18 x 10 inches |
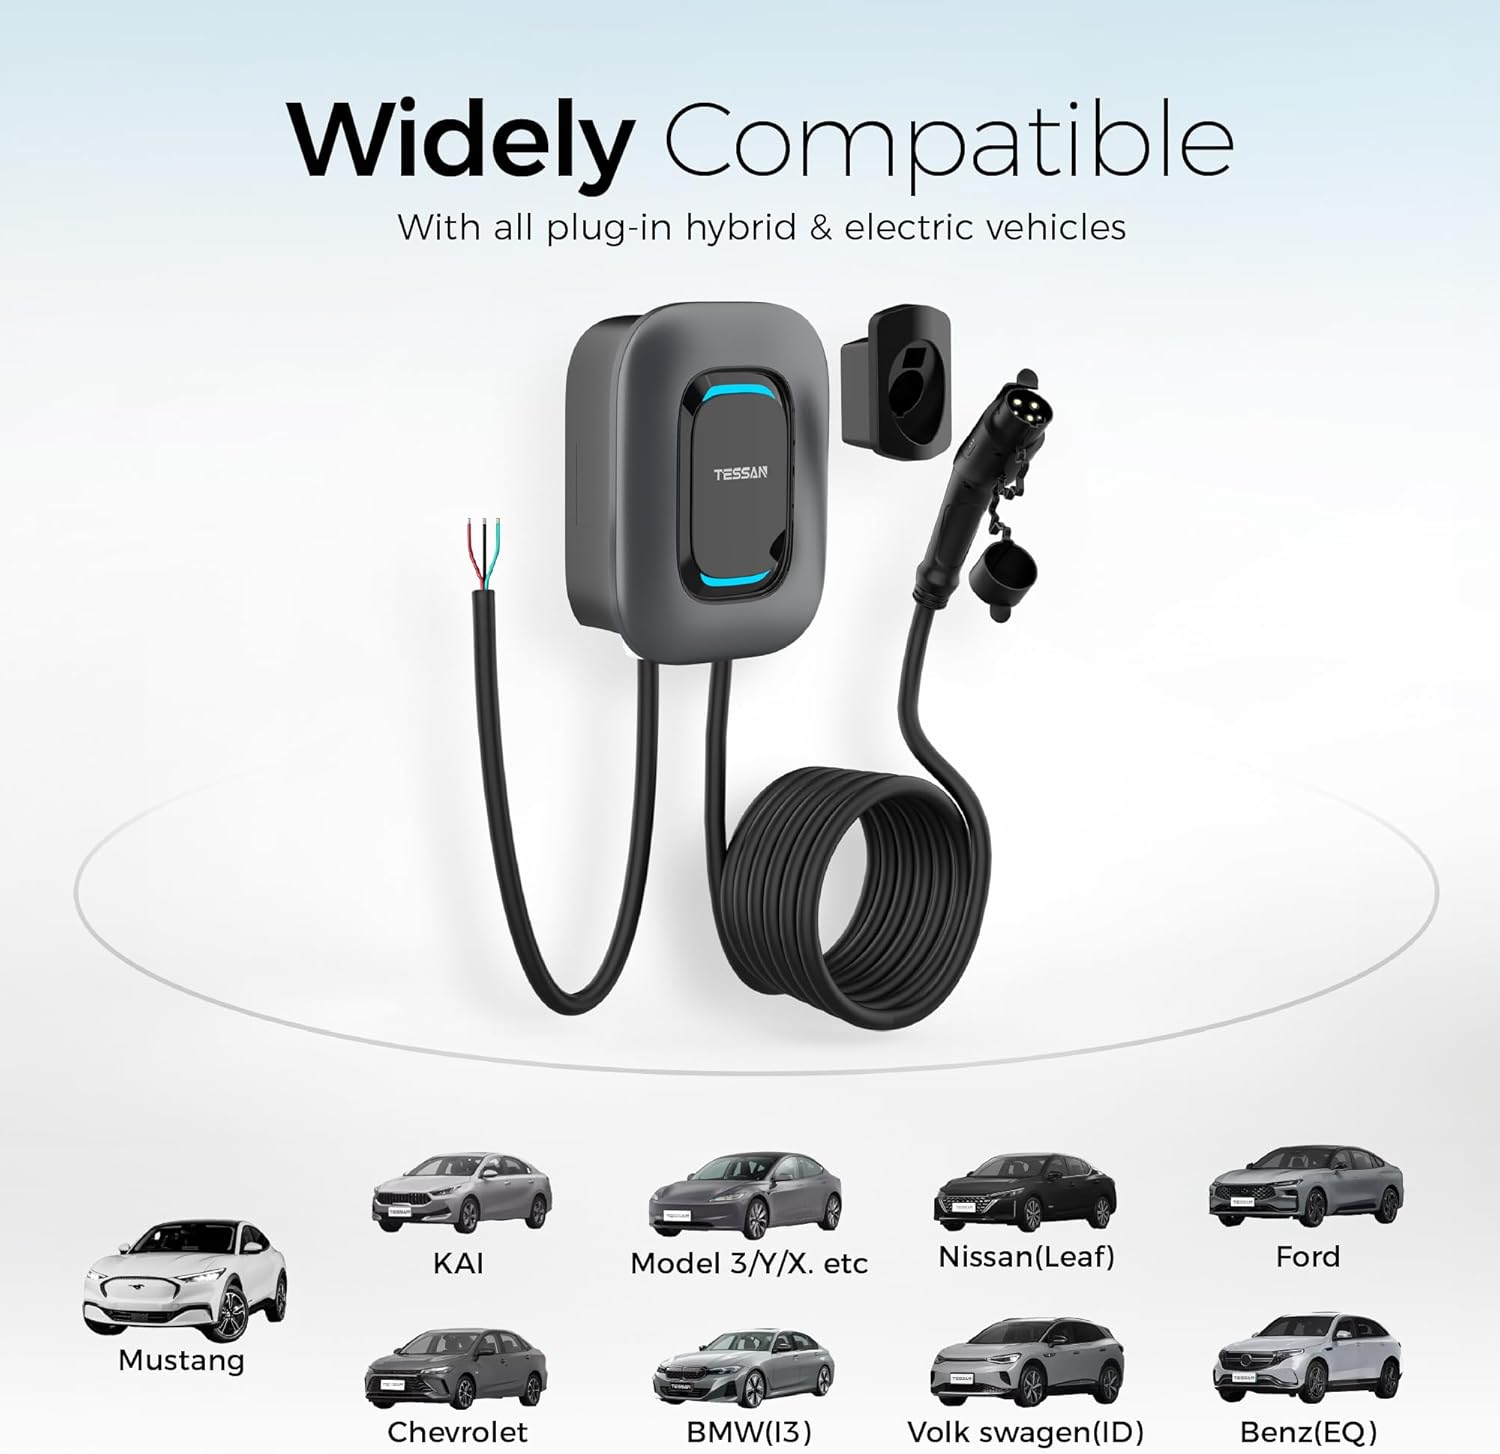
The J1772 connector ensures wide compatibility with most electric and plug-in hybrid vehicles in North America (Tesla requires a separate adapter).
8. Warranty & Support
TESSAN provides a 2-year guarantee for this EV charger, ensuring peace of mind regarding product quality and performance.
For technical support, warranty claims, or any questions regarding your TESSAN Level 2 EV Charger, please contact TESSAN customer service through their official channels or the eTrip+ app support section.
Additional protection plans may be available for purchase from your retailer.
Ask a question about this manual
Ask about setup, troubleshooting, compatibility, parts, safety, or missing instructions. Manuals+ will review the question and use this page’s manual context to help answer it.