HUANANZHI X99-PD4
HUANANZHI X99-PD4 Premium ATX Motherboard User Manual
Model: X99-PD4
1. Introduction
Thank you for choosing the HUANANZHI X99-PD4 Premium ATX Motherboard. This motherboard is engineered to provide a robust and high-performance platform for both gaming and server operations, supporting a wide range of Intel LGA2011-3 processors. It features dual-channel DDR4 memory support up to 128GB, multiple PCIe 3.0 slots for advanced graphics, and dual M.2 NVMe slots for high-speed storage solutions. This manual provides essential information for the proper installation, operation, and maintenance of your motherboard.

2. Setup and Installation
2.1 Component Overview
Familiarize yourself with the various components and connectors on your X99-PD4 motherboard before beginning installation.
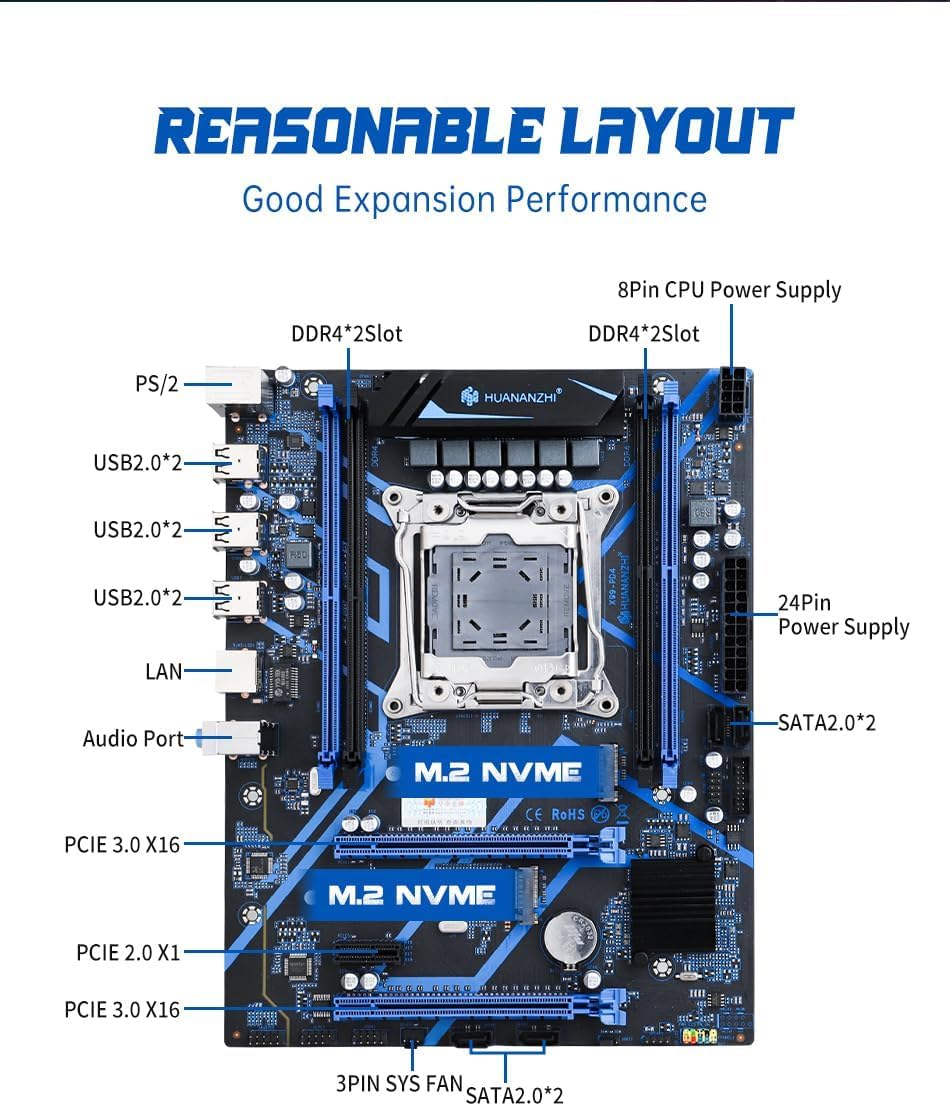
2.2 CPU Installation (LGA2011-3)
- Locate the LGA2011-3 CPU socket on the motherboard.
- Open the CPU retention mechanism by pushing down and out on the lever(s).
- Carefully align the triangular marker on your Intel LGA2011-3 processor with the corresponding marker on the socket. Gently place the CPU into the socket without forcing it.
- Close the retention mechanism, ensuring the CPU is securely seated.
- Apply a thin, even layer of thermal paste to the top of the CPU.
- Install the CPU cooler according to its manufacturer's instructions.
2.3 RAM Installation (DDR4)
The X99-PD4 supports dual-channel DDR4 memory. For optimal performance, install memory modules in matched pairs.

- Open the clips at both ends of the DDR4 memory slots.
- Align the notch on the DDR4 memory module with the key in the memory slot.
- Press down firmly on both ends of the memory module until the clips snap into place, securing the module.
2.4 Storage Installation (M.2 NVMe & SATA)
The motherboard features two M.2 2280 NVMe PCIe 3.0 x4 slots and four SATA 2.0 3Gbps interfaces.

- M.2 NVMe SSD: Insert the M.2 SSD into the slot at a slight angle, then gently push down and secure it with the provided screw.
- SATA Devices: Connect your SATA hard drives or SSDs to the SATA 2.0 ports using SATA data cables. Ensure your power supply provides power to these devices.
2.5 Graphics Card Installation (PCIe 3.0 x16)
The X99-PD4 includes two PCIe 3.0 x16 slots for graphics cards.
- Open the retention clip at the end of the PCIe x16 slot.
- Align your graphics card with the slot and press down firmly until it clicks into place and the retention clip closes.
- Secure the graphics card to your PC case with screws.
2.6 Power Supply and Case Connections
- Connect the 24-pin ATX power connector from your power supply to the main power socket on the motherboard.
- Connect the 8-pin CPU power connector to the corresponding socket near the CPU.
- Connect front panel headers (power button, reset button, HDD LED, power LED) to the appropriate pins on the motherboard. Refer to the motherboard's silkscreen labels for correct orientation.
- Connect USB 2.0 headers from your case to the motherboard's USB 2.0 headers.
- Connect case fan cables to the CPU_FAN and SYS_FAN headers.

3. Operating Instructions
3.1 First Boot Checklist
- Ensure all power cables are securely connected.
- Verify all components (CPU, RAM, GPU, storage) are properly seated.
- Connect a monitor to your graphics card's output.
- Power on your system.
3.2 BIOS/UEFI Setup
Upon first boot, or if you need to configure system settings, you can access the BIOS/UEFI setup utility. Typically, this is done by pressing the DEL or F2 key repeatedly during the initial boot sequence.
3.3 Operating System and Driver Installation
After configuring the BIOS/UEFI, proceed with installing your preferred operating system (e.g., Windows, Linux). Once the OS is installed, install the necessary drivers for the motherboard's chipset, audio, LAN, and any other integrated components. These drivers are typically provided on a disc with the motherboard or can be downloaded from the HUANANZHI official website.
4. Maintenance
4.1 Cleaning
Regular cleaning helps maintain optimal performance and extends the lifespan of your motherboard. Use compressed air to remove dust from components, especially heatsinks and fan blades. Ensure the system is powered off and unplugged before cleaning.
4.2 BIOS Updates
Periodically check the HUANANZHI website for BIOS/UEFI updates. Updates can improve system stability, add support for new hardware, or fix bugs. Follow the instructions provided with the BIOS update file carefully to avoid damaging the motherboard.
5. Troubleshooting
This section addresses common issues you might encounter.
- No Display Output:
- Ensure your monitor is connected to the graphics card, not the motherboard (as this motherboard does not have integrated graphics output).
- Verify the graphics card is fully seated in its PCIe slot and has all necessary power cables connected.
- Reseat the CPU and RAM modules.
- Try clearing the CMOS (Complementary Metal-Oxide-Semiconductor) by removing the CMOS battery for a few minutes or using the clear CMOS jumper if available.
- Test with a different known-working graphics card, CPU, or RAM if possible.
- System Fails to Boot:
- Check all power connections (24-pin ATX, 8-pin CPU, GPU power).
- Ensure the CPU and RAM are correctly installed.
- Disconnect all non-essential peripherals and try booting with only the CPU, one RAM stick, and the graphics card.
- Component Not Detected (e.g., SSD, RAM):
- Reseat the component.
- Check cable connections for SATA devices.
- Ensure the component is compatible with the motherboard (e.g., DDR4 RAM, NVMe M.2 SSD).
- Check BIOS settings to ensure the port or slot is enabled.
- Onboard Speaker Beeps:
- The onboard speaker provides POST (Power-On Self-Test) error codes via beeps. Consult online resources for common BIOS beep codes to diagnose the issue.
- Physical Limitations (e.g., I/O shield, PCIe x1 slot):
- Some users have noted the I/O shield is plastic and may have non-functional LEDs, or that the PCIe x1 slot can be obstructed by the I/O cover. These are design characteristics of the product. Ensure proper alignment and gentle force when installing components near these areas.
6. Specifications
Below are the detailed specifications for the HUANANZHI X99-PD4 Motherboard.

| Feature | Specification |
|---|---|
| Model | HUANANZHI X99-PD4 Motherboard |
| CPU Socket | LGA 2011-3 |
| Main Chipset | Intel X99 |
| Memory Socket | 2*DDR4 Memory Slot |
| Memory Standard | Support Dual channels DDR4 2400/2133/1866MHz |
| Max Memory Capacity | 128 GB |
| SATA Interface | 4*SATA 2.0 3Gbps |
| Extended Interface | 2*M.2 2280 NVMe PCIe X4 3.0 32Gb/s |
| Expansion Slots | 2*PCIe 3.0 x16, 1*PCIe 2.0 x1 |
| Sound Track | Realtek High Fidelity Audio |
| Network Interface | Gigabit Ethernet |
| Power Interface | 24Pin + 8Pin |
| Fan Interface | 1*CPU_FAN + 1*SYS_FAN |
| PCB Layer | 6Layer PCB, 6Phases Power Supply |
| Dimension | 255*195MM (M-ATX) |
| Item Weight | 2.33 pounds |
| Platform | Windows |

7. Warranty and Support
For warranty information and technical support, please refer to the official HUANANZHI website or contact their customer service. Keep your purchase receipt as proof of purchase for any warranty claims.
Visit the official HUANANZHI Store for more information and support: HUANANZHI Store
Related Documents - X99-PD4
 |
HUANANZHI X99-AD4 Motherboard User Manual User manual for the HUANANZHI X99-AD4 motherboard, detailing safety precautions, packing, features, motherboard layout, I/O panel, installation steps for CPU, RAM, M.2, graphics card, driver installation, and BIOS settings. |
 |
HUANANZHI X99-F8D Dual Motherboard User Manual Comprehensive user manual for the HUANANZHI X99-F8D Dual Motherboard, covering safety precautions, package contents, motherboard layout, installation, driver installation, and BIOS settings. |
 |
HUANANZHI X99-8M-F User Manual This user manual provides comprehensive instructions for the HUANANZHI X99-8M-F motherboard, covering safety precautions, package contents, motherboard layout, installation, driver setup, and BIOS settings. |
 |
HUANANZHI X99-MTF Motherboard User Manual This user manual provides comprehensive instructions for the HUANANZHI X99-MTF motherboard, covering safety precautions, installation guides for CPU, RAM, M.2, and graphics cards, driver installation procedures, and BIOS setup details. It supports Intel LGA2011-3 processors and features DDR4/DDR3 memory support, multiple expansion slots, and essential I/O connectivity. |
 |
HUANANZHI X99-T8D Dual Motherboard User Manual This user manual provides detailed information and instructions for the HUANANZHI X99-T8D Dual Motherboard, covering safety precautions, component identification, installation, driver setup, and BIOS settings. |
 |
HUANANZHI X99-TF Gaming Motherboard User Manual Comprehensive user manual for the HUANANZHI X99-TF Gaming Motherboard, detailing installation, setup, driver installation, and BIOS settings. |
Ask a question about this manual
Ask about setup, troubleshooting, compatibility, parts, safety, or missing instructions. Manuals+ will review the question and use this page’s manual context to help answer it.