Introduction
This manual provides comprehensive instructions for the installation and use of your HOME VISION HV1402 No-Stud TV Wall Mount. Designed for ease of installation and secure mounting, this bracket supports a wide range of television sizes and wall types.
Key Features:
- Stud-Free Installation: Securely mounts TVs up to 200 lbs without requiring wall studs. Suitable for drywall over 3/8" (9.5mm).
- Slim Low-Profile Design: Positions your TV just 1.18 inches from the wall for a clean, modern appearance.
- Renter-Friendly: Installation requires only a hammer and screwdriver, minimizing wall damage for easy removal.
- Anti-Tilt Stability: Features cone bumpers and rubber spacers to prevent tilting or wobbling, ensuring TV stability.
- Universal Compatibility: Supports most flat/curved TVs from 26 to 100 inches, with VESA patterns from 100x100 and above.
- Versatile Mounting: Compatible with drywall, wood, concrete, and brick surfaces.
Package Contents
Verify that all components listed below are present in your package before beginning installation.
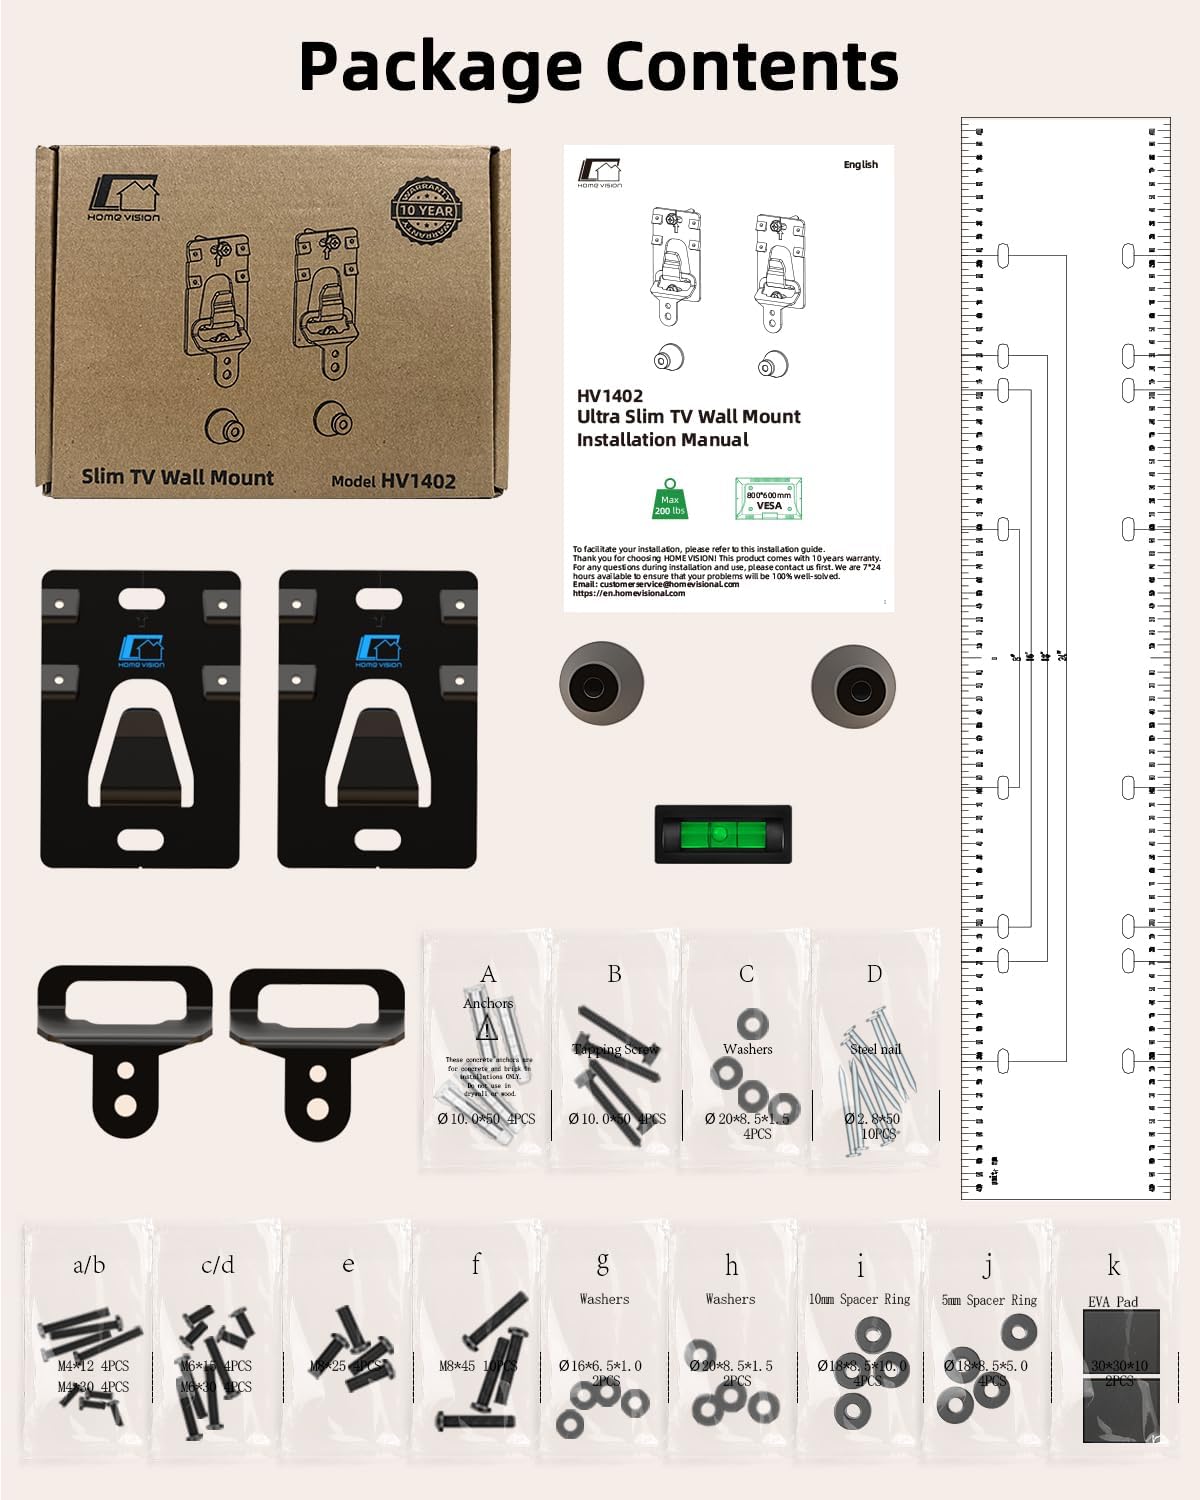
Image: Detailed view of all items included in the HOME VISION HV1402 TV Wall Mount package, including wall panels, hooks, raised gaskets, levels, paper ruler, and various screws, anchors, washers, spacer rings, and EVA pads.
Main Parts:
- Wall Panel x2
- Hook x2
- Raised Gasket x2
- Level x2
- Paper Ruler x1
Accessories (Screws, Anchors, Washers, Spacers):
- Anchors (Φ10*50) x4
- Tapping Screws (M7*55) x4
- Washers (Φ20*8.5*1.5) x4
- Steel nails (Φ2.8*50) x10
- Screws (M4*12) x4
- Screws (M4*30) x4
- Screws (M6*15) x4
- Screws (M6*35) x4
- Screws (M8*25) x4
- Screws (M8*45) x4
- Washers (Φ16*6.5*1.0) x2
- Washers (Φ20*8.5*1.5) x2
- 10mm Spacer Rings (Φ18*8.5*10.0) x2
- 10mm Spacer Rings (Φ18*8.5*5.0) x2
- EVA Pads (30*30*10) x2
Tools Needed
The following tools are recommended for a smooth installation process:
- Tape Measure
- Pencil
- Screwdriver
- Electric Drill (for wood/concrete/brick)
- Socket Wrench (for wood/concrete/brick)
- Stud Finder (optional, if mounting on studs)
- Hammer (for drywall installation)
Specifications
| Brand: | HOME VISION |
| Model Number: | HV1402 |
| Item Weight: | 1.03 pounds |
| Product Dimensions: | 4.65 x 2.76 x 0.63 inches |
| Material: | Alloy Steel |
| Mounting Type: | Wall Mount |
| Movement Type: | Fixed |
| Compatible Devices: | Television |
| TV Size Compatibility: | 26-100 inches |
| Weight Capacity: | Up to 200 lbs |
| VESA Compatibility: | 100x100 and above |

Image: Diagram showing the precise dimensions of the HOME VISION HV1402 wall mount components, including the wall panel and hooks, with measurements in inches and millimeters.
Installation Guide
Follow these steps carefully to ensure a secure and proper installation of your TV wall mount.
Step 1: Attach Hooks to TV
- Place your TV face down on a soft, clean surface to prevent scratches.
- Identify the VESA mounting holes on the back of your TV.
- Use the provided paper ruler to mark the correct positions for the hooks based on your TV's VESA pattern.
- Attach the two hooks to the upper VESA holes on the back of your TV using the appropriate screws and washers from the accessory kit. Ensure they are securely fastened.
- Attach the two raised gaskets to the lower VESA holes on the back of your TV using the appropriate screws and washers. These gaskets help maintain the slim profile and prevent tilting.

Image: A visual guide illustrating the three main steps of installation: installing hooks on the TV, installing the wall panel, and hanging the TV onto the wall panel.
Video: A short demonstration of attaching the hooks and rubber pads to the back of a TV, preparing it for wall mounting.
Step 2: Install Wall Panel
- Determine the desired height and center position for your TV on the wall.
- Use the paper ruler and pencil to mark the installation points for the wall panels. Ensure the ruler is level using the provided bubble level.
- For Drywall Installation (No Stud):
- Position the wall panels over your marked points.
- Using a hammer, gently tap the steel nails through the designated holes in the wall panels into the drywall. Ensure the nails are angled correctly for maximum hold.
- Verify the wall panels are securely attached and level.
- For Wood, Concrete, or Brick Wall Installation (with Studs/Anchors):
- Use a stud finder to locate wall studs if mounting on wood. For concrete/brick, select your desired mounting location.
- Mark the drill points through the wall panels.
- Drill pilot holes at the marked points using an electric drill.
- Insert the appropriate anchors (for concrete/brick) or tapping screws (for wood studs) into the pilot holes.
- Secure the wall panels to the wall using the tapping screws and a socket wrench or screwdriver.

Image: Illustration demonstrating the drywall installation method using a hammer to secure the wall panels with nails, highlighting the "no drill, no studs, no problem" feature.
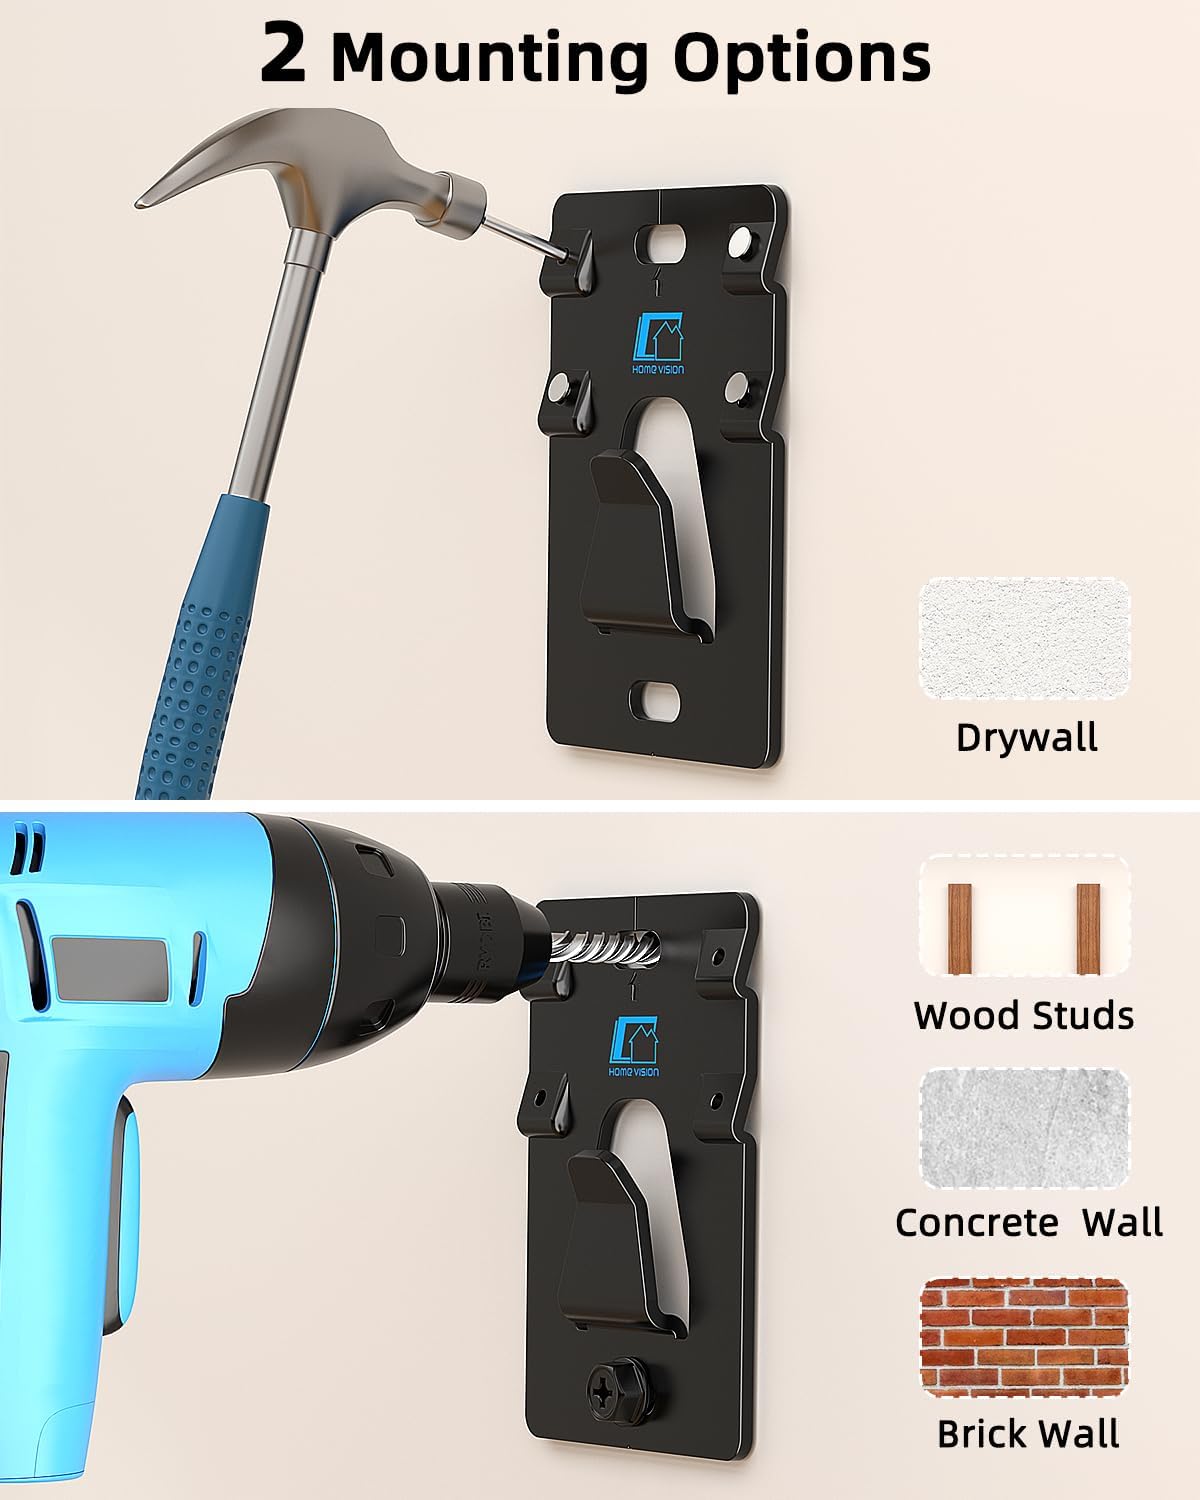
Image: Visual comparison of two mounting options: hammer-in for drywall and drill/screw for wood studs, concrete, or brick walls.
Video: A comprehensive installation guide for the HV1402 TV Wall Mount, demonstrating how to install the wall panel on various wall types including drywall, wood studs, concrete, and brick.
Step 3: Hang the TV
- Carefully lift your TV, ensuring a firm grip on both sides.
- Align the hooks on the back of your TV with the wall panels installed on the wall.
- Gently lower the TV, allowing the hooks to engage with the wall panels. The TV should slide down and lock into place.
- Once the TV is securely hung, push the bottom of the TV towards the wall to ensure the raised gaskets make contact, providing anti-tilt stability.
Video: A demonstration of hanging a TV onto the installed wall mount, showcasing the ease of securing the TV to the wall panels.
Operating Instructions
The HOME VISION HV1402 is a fixed TV wall mount designed for a stable, low-profile display. Once installed, your TV will remain in a fixed position.
- Viewing Angle: Ensure the TV is mounted at an optimal viewing height and angle during installation, as it cannot be adjusted after mounting.
- Cable Management: Plan for cable routing before hanging the TV to maintain a clean aesthetic. The slim profile leaves minimal space behind the TV.
Maintenance
To ensure the longevity and safety of your TV wall mount, follow these maintenance guidelines:
- Regular Inspection: Periodically check all screws and connections to ensure they remain tight and secure.
- Cleaning: Wipe the mount with a soft, dry cloth to remove dust. Avoid using abrasive cleaners or solvents.
- Weight Limit: Do not exceed the maximum weight capacity of 200 lbs.
Troubleshooting
If you encounter any issues during or after installation, refer to the following common solutions:
- TV is not level: Ensure the wall panels were installed perfectly level using the bubble level. If not, carefully remove and re-install.
- TV feels unstable/wobbles: Double-check that all screws are tightened, and the anti-tilt cone bumpers and rubber spacers are correctly positioned and making contact with the wall. Ensure the wall can support 5 times the TV and mount's weight.
- Difficulty hanging TV: Ensure the hooks on the TV are correctly aligned with the wall panels. You may need assistance to lift and guide the TV into place.
- Wall damage during installation: For drywall, ensure nails are hammered at a steep angle. For other wall types, ensure correct pilot hole size and appropriate anchors/screws are used.
Warranty and Support
For warranty information or technical support, please refer to the contact details provided with your product packaging or visit the official HOME VISION website. Keep your purchase receipt for warranty claims.