1. Product Overview
The Canglan Technology Manual Watch Dial Pad Printing Machine is a precision instrument designed for high-quality, accurate printing on watch dials. This manual-operation device offers complete control over the printing process, making it ideal for both professional watchmaking environments and small-scale operations requiring precise and consistent results. Its compact design ensures it fits efficiently into various workspaces.

Image 1.1: Front view of the Manual Watch Dial Pad Printing Machine.
2. Safety Instructions
- Always operate the machine on a stable, level surface to prevent tipping or movement during use.
- Keep hands and fingers clear of moving parts, especially the printing pad and plate area, during operation.
- Use appropriate personal protective equipment (PPE) such as gloves when handling inks and cleaning solvents.
- Ensure adequate ventilation when working with inks and solvents to avoid inhaling fumes.
- Do not attempt to modify the machine. Use only original or approved replacement parts.
- Store the machine in a clean, dry environment away from direct sunlight and extreme temperatures.
3. Package Contents
Upon unpacking, please verify that all components are present and undamaged. The package typically includes:
- Manual Watch Dial Pad Printing Machine (main unit)
- Printing Pad (pre-installed or separate)
- Ink Plate(s) (typically 45x45mm and/or 50x50mm)
- Operating Handle
- Basic Tool Kit (for assembly/adjustments)
- User Manual
If any items are missing or damaged, please contact Canglan Technology customer support immediately.
4. Setup
- Unpack the Machine: Carefully remove all packaging materials. Retain packaging for future transport or storage.
- Choose a Location: Place the machine on a sturdy, level workbench or table capable of supporting its weight (approximately 17kg). Ensure sufficient space around the machine for operation and maintenance.
- Assemble Handle: Attach the operating handle to the designated lever mechanism, securing it firmly.
- Install Ink Plate: Position the desired ink plate (e.g., 45x45mm or 50x50mm) onto the machine's plate holder. Ensure it is seated correctly and securely.
- Adjust Printing Pad: Verify the printing pad is securely attached to the pad arm. Adjust its height and angle if necessary to ensure proper contact with both the ink plate and the watch dial.

Image 4.1: Side view of the assembled machine, showing the handle and base.
5. Operating Instructions
Follow these steps for precise watch dial printing:
- Prepare the Ink: Apply a small amount of specialized pad printing ink onto the ink plate, covering the etched design area.
- Position the Watch Dial: Place the watch dial onto the adjustable worktable. Use the alignment guides or fixtures to ensure the dial is perfectly centered and stable for printing.
- Ink Transfer: Lower the printing pad using the operating handle. The pad will first press onto the ink plate, picking up the ink from the etched design.
- Print Application: Lift the pad slightly, then move the worktable to position the watch dial directly beneath the inked pad. Lower the pad again to transfer the ink onto the watch dial. Apply even pressure for a clear print.
- Retrieve Dial: Carefully lift the pad and remove the printed watch dial. Allow the ink to dry according to the ink manufacturer's instructions.
- Repeat: Clean the ink plate and pad as needed between prints, especially when changing colors or designs.

Image 5.1: The machine during the ink transfer phase, showing the ink plate.
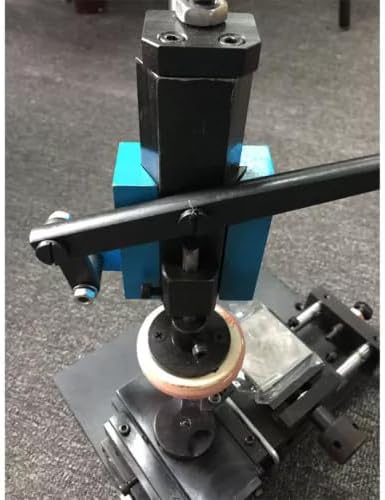
Image 5.2: Close-up of the printing pad making contact with the ink plate.

Image 5.3: Detailed view of the printing pad and its mounting.
6. Maintenance
- Cleaning the Ink Plate: After each use or when changing colors, thoroughly clean the ink plate with an appropriate solvent to remove all ink residue. This prevents ink from drying and clogging the etched design.
- Cleaning the Printing Pad: Gently clean the printing pad with a soft, lint-free cloth and a mild solvent. Avoid abrasive materials that could damage the pad's surface. Ensure the pad is completely dry before next use.
- General Cleaning: Wipe down the machine's frame and moving parts regularly to remove dust and ink splashes.
- Lubrication: Periodically apply a small amount of light machine oil to the sliding mechanisms and pivot points to ensure smooth operation. Avoid over-lubrication.
- Storage: When not in use, store the machine in a clean, dry, and dust-free environment.
7. Troubleshooting
| Problem | Possible Cause | Solution |
|---|---|---|
| Poor print quality / Faded image | Insufficient ink on plate; Ink too thick/thin; Worn printing pad; Uneven pressure. | Apply more ink; Adjust ink viscosity; Replace pad; Ensure even pressure during transfer. |
| Image smudging / Blurring | Excessive ink; Pad not clean; Dial moved during printing; Incorrect pad pressure. | Reduce ink amount; Clean pad thoroughly; Secure dial firmly; Adjust pad pressure. |
| Incomplete image transfer | Ink dried on plate; Insufficient pad contact; Incorrect pad material for ink. | Clean ink plate; Adjust pad height/angle; Consult ink supplier for pad compatibility. |
| Machine movement is stiff | Lack of lubrication; Dust/debris in moving parts. | Lubricate sliding mechanisms; Clean moving parts. |
8. Specifications
- Steel Plate Size: 45x45mm / 50x50mm
- Machine Dimensions (L x W x H): 300mm x 180mm x 400mm
- Weight: 17 kg
- Operation: Manual
- Manufacturer: Canglan Technology
9. Warranty and Support
For warranty information, technical support, or to inquire about replacement parts, please contact Canglan Technology directly. Refer to your purchase documentation for specific warranty terms and contact details.
Canglan Technology Customer Support:
- Please refer to the contact information provided at the point of purchase or on the official Canglan Technology website.