1. Introduction
This manual provides detailed instructions for the installation, operation, and maintenance of your WINFREE HC-R1-8545 Smart Door Lock Set. Please read this manual thoroughly before installation and use to ensure proper function and safety. Keep this manual for future reference.

Image 1.1: WINFREE HC-R1-8545 Smart Door Lock Set. This image displays the complete smart door lock set, featuring the exterior handle with an integrated fingerprint sensor and digital keypad, alongside the interior deadbolt component.
2. Safety Information
- Do not attempt to disassemble or repair the lock yourself. Contact customer support for assistance.
- Use only specified batteries (4 AAA/1.5V alkaline batteries). Do not mix old and new batteries or different types of batteries.
- Avoid exposing the lock to direct sunlight, rain, or extreme temperatures for prolonged periods.
- Ensure all components are securely installed before use.
- Keep physical keys in a safe location outside the property.
3. Package Contents
Verify that all items are present in your package:
- Smart Door Lock Handle (Exterior)
- Deadbolt Assembly (Interior)
- Mounting Hardware (Screws, Spindle, etc.)
- Physical Keys (2-3)
- RFID Cards (2-3)
- Installation Template
- User Manual (This document)
4. Specifications
| Feature | Detail |
|---|---|
| Brand | WINFREE |
| Model Name | HC-R1-8545 |
| Lock Type | Biometric, Deadbolt, Keypad |
| Unlocking Methods | Fingerprint, Passcode, RFID Card, Physical Key, App Control |
| Material | Aluminum |
| Dimensions (L x W x H) | 9.1 x 5.9 x 4 inches |
| Item Weight | 3 Pounds |
| Power Source | 4 AAA/1.5V Alkaline Batteries (not included) |
| Special Features | Anti-Peeping Password, Auto-Lock, Low Battery Alert, Emergency Power Supply, Backlit Keypad |
| Door Thickness Compatibility | 35-55mm (1.38-2.17 inches) |

Image 4.1: Dimensional Diagram. This image provides detailed measurements of the lock components and specifies the compatible door thickness range of 35-55mm, indicating it can be adjusted for left or right-hand opening.
5. Installation
5.1 Pre-Installation Checklist
- Ensure your door thickness is between 35-55mm.
- Confirm door handing (left or right) and adjust the lock handle if necessary.
- Gather necessary tools: screwdriver, drill (if new holes are needed), measuring tape.
5.2 Step-by-Step Installation
- Prepare the Door: Use the provided template to mark and drill holes if installing on a new door. For existing doors, ensure the current holes align with the lock's requirements.
- Install the Latch/Deadbolt: Insert the deadbolt mechanism into the door edge. Secure it with screws. Ensure the latch bolt operates smoothly.
- Install the Exterior Handle: Feed the spindle and connecting cables through the door. Position the exterior handle assembly.
- Install the Interior Assembly: Connect the cables from the exterior handle to the interior assembly. Secure the interior assembly to the door using the provided screws.
- Insert Batteries: Open the battery cover on the interior assembly. Insert 4 AAA/1.5V alkaline batteries, ensuring correct polarity. Close the battery cover.
- Test Operation: After installation, test the lock with a physical key and ensure the handle operates correctly.
6. Operating Instructions
The WINFREE Smart Door Lock offers multiple convenient ways to unlock your door.

Image 6.1: Multiple Unlocking Methods. This image illustrates the five primary methods for unlocking the WINFREE Smart Door Lock: fingerprint, RFID card, digital password, physical key, and control via the TUYA app.
6.1 Fingerprint Unlock
The lock features an advanced fingerprint sensor for quick access.
- Enroll Fingerprints: Refer to the app instructions for adding new fingerprints.
- Unlock: Place your registered finger on the fingerprint sensor. The lock will unlock in approximately 0.1 seconds if the fingerprint is recognized.

Image 6.2: Fingerprint Unlock Feature. This image highlights the lock's fingerprint recognition capabilities, including 360-degree support and a fast 0.1-second unlocking speed.
6.2 Passcode Unlock
Use the digital touchscreen keypad to enter your passcode.
- Set Passcode: Follow the app or lock programming instructions to set up user passcodes.
- Unlock: Enter your registered passcode on the keypad, then press '#'.
- Anti-Peeping Feature: To prevent others from guessing your code, you can enter random digits before or after your actual passcode. For example, if your passcode is 123456, you can enter 789123456012#.
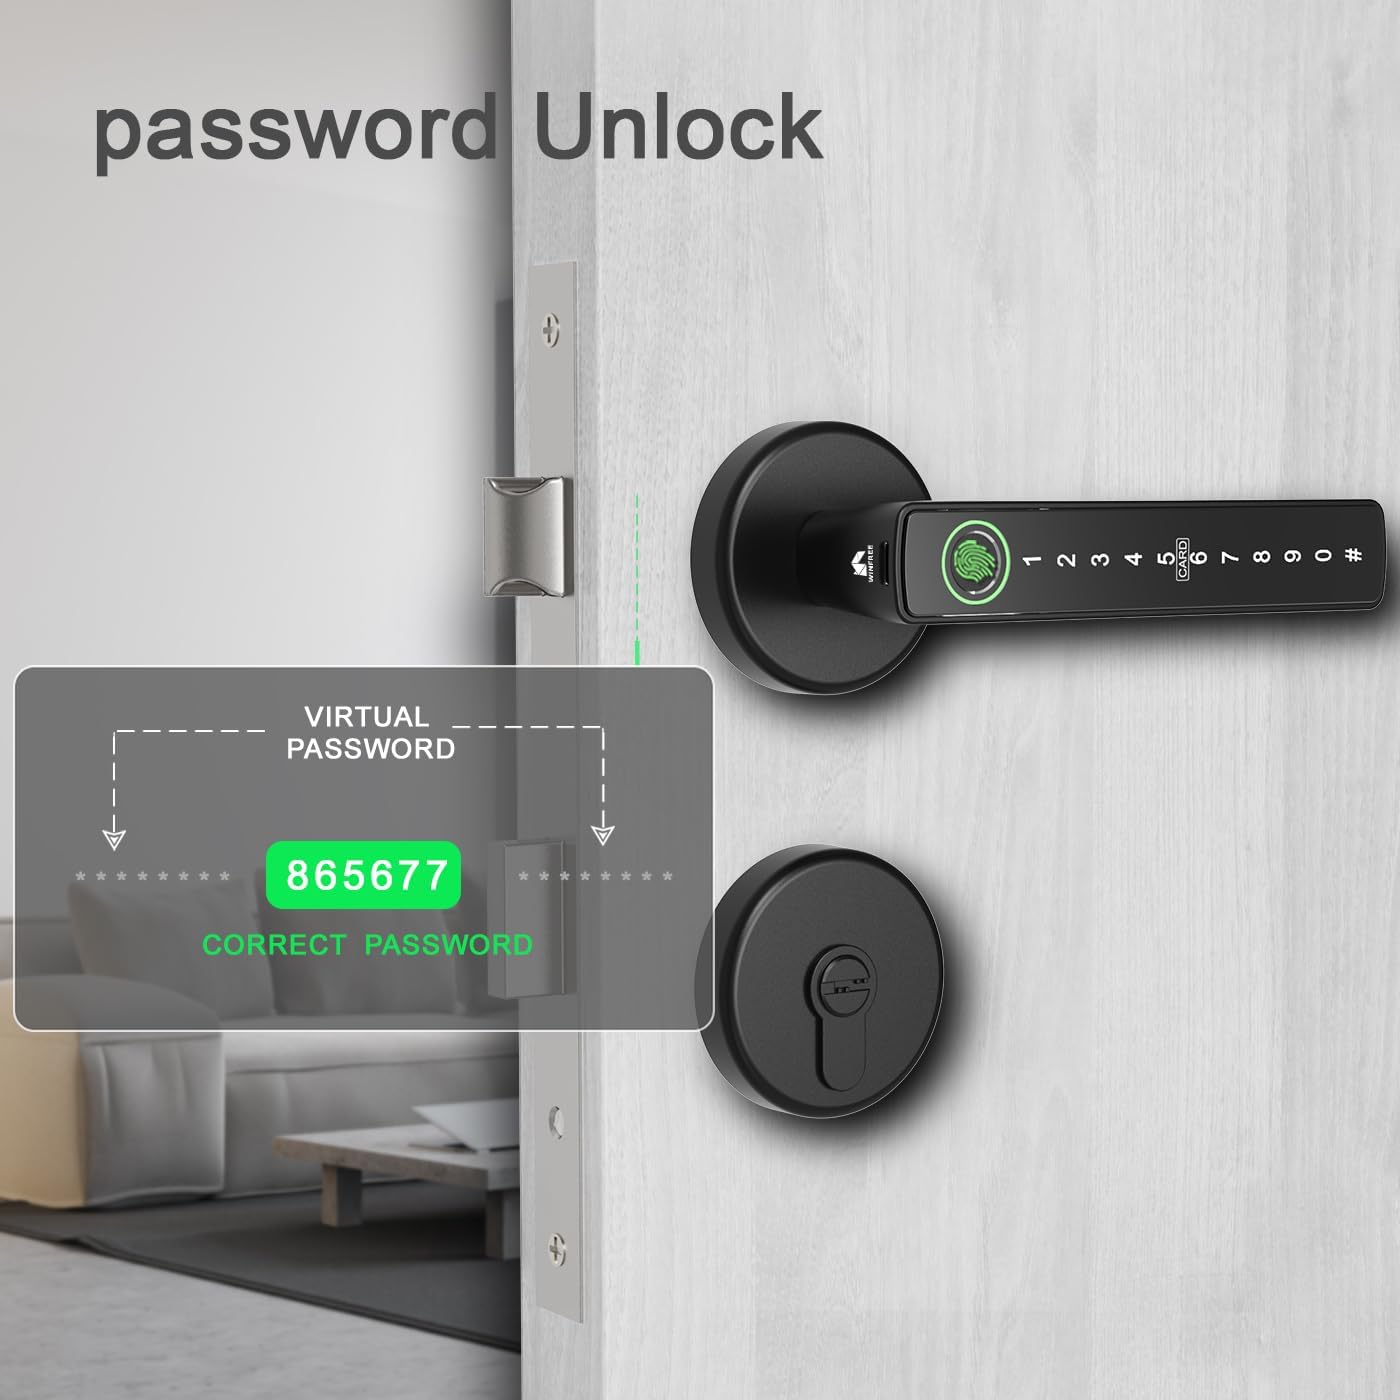
Image 6.3: Passcode Unlock with Anti-Peeping. This image demonstrates the virtual password feature, allowing users to input random digits before and after their actual passcode to enhance security against observation.
6.3 RFID Card Unlock
Register the provided RFID cards for convenient tap-to-unlock access.
- Register Cards: Use the app or lock programming menu to add RFID cards.
- Unlock: Present a registered RFID card to the 'CARD' area on the lock's keypad.
6.4 Physical Key Unlock
In case of emergency or battery depletion, use the physical key.
- Unlock: Insert the physical key into the keyhole on the exterior deadbolt and turn to unlock.
6.5 App Control (TUYA App)
Manage your lock remotely using the TUYA Smart app.
- Download App: Download the 'TUYA Smart' app from your smartphone's app store.
- Pair Lock: Follow the in-app instructions to pair your WINFREE Smart Lock.
- Features: The app allows you to:
- Generate temporary passwords.
- View unlock history.
- Remotely unlock the door (requires a compatible gateway, sold separately).
- Manage users and access methods.

Image 6.4: TUYA App Control. This image illustrates the TUYA app interface on a smartphone, showcasing features such as generating temporary passwords, reviewing unlock history, and remote unlocking capabilities for the smart door lock.
6.6 Auto-Lock Feature
The lock is equipped with an auto-lock function that automatically secures the door after a set period (configurable via the app).
7. Maintenance
7.1 Battery Replacement
The lock is powered by 4 AAA/1.5V alkaline batteries, which typically last for approximately 9 months depending on usage.
- Low Battery Alert: The lock will provide an audible and/or visual alert when batteries are low. Replace them promptly.
- Replacement: Open the battery cover on the interior assembly, remove old batteries, and insert new 4 AAA/1.5V alkaline batteries, ensuring correct polarity.

Image 7.1: Battery Information. This image indicates that the smart lock requires 4 AAA/1.5V alkaline batteries and suggests a typical battery life of 9 months.
7.2 Emergency Power Supply
If the batteries completely drain, you can use a portable power bank to temporarily power the lock via the emergency USB port (usually located at the bottom of the exterior handle) to gain access.

Image 7.2: Key Features. This image highlights several important features of the smart lock, including a low battery alert system, an emergency power supply option via USB, and a convenient backlit keypad for visibility in low light.
7.3 Cleaning
Wipe the lock surface with a soft, dry cloth. Do not use abrasive cleaners or solvents, as these can damage the finish and electronic components.
8. Troubleshooting
| Problem | Possible Cause | Solution |
|---|---|---|
| Lock does not respond | Dead batteries, loose connection | Replace batteries. Check cable connections. Use emergency power. |
| Fingerprint not recognized | Finger not placed correctly, unregistered fingerprint, dirty sensor | Ensure finger covers the sensor completely. Re-enroll fingerprint. Clean sensor. |
| Passcode not working | Incorrect passcode, lock frozen | Verify passcode. Try resetting the lock (refer to app/manual for specific steps). |
| Auto-lock not engaging | Feature disabled, incorrect settings | Check auto-lock settings in the TUYA app. |
| App connection issues | Bluetooth/Wi-Fi off, lock out of range, app glitch | Ensure Bluetooth/Wi-Fi is on. Move closer to the lock. Restart app/phone. |
9. Warranty Information
WINFREE products are designed for reliability and performance. This product comes with a standard manufacturer's warranty against defects in materials and workmanship under normal use. Please retain your proof of purchase for warranty claims. For specific warranty terms and duration, refer to the warranty card included in your package or contact WINFREE customer support.
10. Support
If you encounter any issues or have questions not covered in this manual, please contact WINFREE customer support:
- Email: support@winfree.com (Example email, please refer to your product packaging for actual contact details)
- Website: Visit the official WINFREE website for FAQs and additional resources.