1. Introduction
This manual provides detailed instructions for the installation, operation, and maintenance of your Brilluxa Intelligent Rechargeable Electric Roller Blind Motor. Please read this manual thoroughly before installation and use to ensure proper function and safety. This motor is designed to automate roller blinds, offering convenience through remote, app, and voice control.
2. Safety Information
- Ensure all power connections are secure and correct before operation.
- Keep children and pets away from the motor and moving blinds during operation.
- Do not attempt to open or repair the motor yourself. Refer to qualified service personnel.
- Avoid exposing the motor to water or extreme temperatures.
- Ensure the blind is free from obstructions before operating the motor.
3. Package Contents
Verify that all items listed below are included in your package:
- 1 x Electric Roller Blind Motor (Model: M2805EGB)
- 2 x Mounting Bracket
- 1 x Remote Control
- 1 x Remote Control Bracket
- 1 x USB Power Cable
- 1 x Tail Plug
- 1 x Converter
- 2 x Screw
- 2 x Accessory
4. Specifications
| Item Type | Electric Roller Blind Motor |
| Material | Aluminium alloy |
| Model | M2805EGB |
| Rated Torsion | 1 N.m |
| Rated Power | 12 W |
| Maximum Load | 4.8 KG |
| Protection Level | IP20 |
| Rated Working Time | 4 min |
| Operating Speed | 16 rpm |
| Input Voltage | DC 7.4 V |
| Operating Noise | 30 dB |
| Control Mode | APP remote control, Voice control, Wall control, Light sensing, Timer lift |
| Remote Control Power Supply | 2 x AAA batteries (not included) |
| Suitable Tube Diameter | 38mm, 40mm (inner diameter) |
5. Setup and Installation
Follow these steps to install your electric roller blind motor:
- Prepare the Roller Blind Tube: Ensure your roller blind tube has an inner diameter of 38mm or 40mm. The motor is designed to fit snugly inside.
- Install the Motor: Insert the motor into one end of the roller blind tube. The crown and wheel components of the motor are designed for 38mm tubes.

Image: The motor's crown and wheel are suitable for a 38mm aluminum tube, ensuring a proper fit for installation.
- Mount the Brackets: Secure the mounting brackets to your window frame or wall according to your desired installation (inside mount or outside mount). Ensure they are level and spaced correctly to support the roller blind tube with the motor.
- Attach the Blind: Place the roller blind tube with the motor into the mounted brackets. Ensure it is securely seated and can rotate freely.
- Connect Power: Connect the USB power cable to the motor and a suitable DC 7.4V power source.
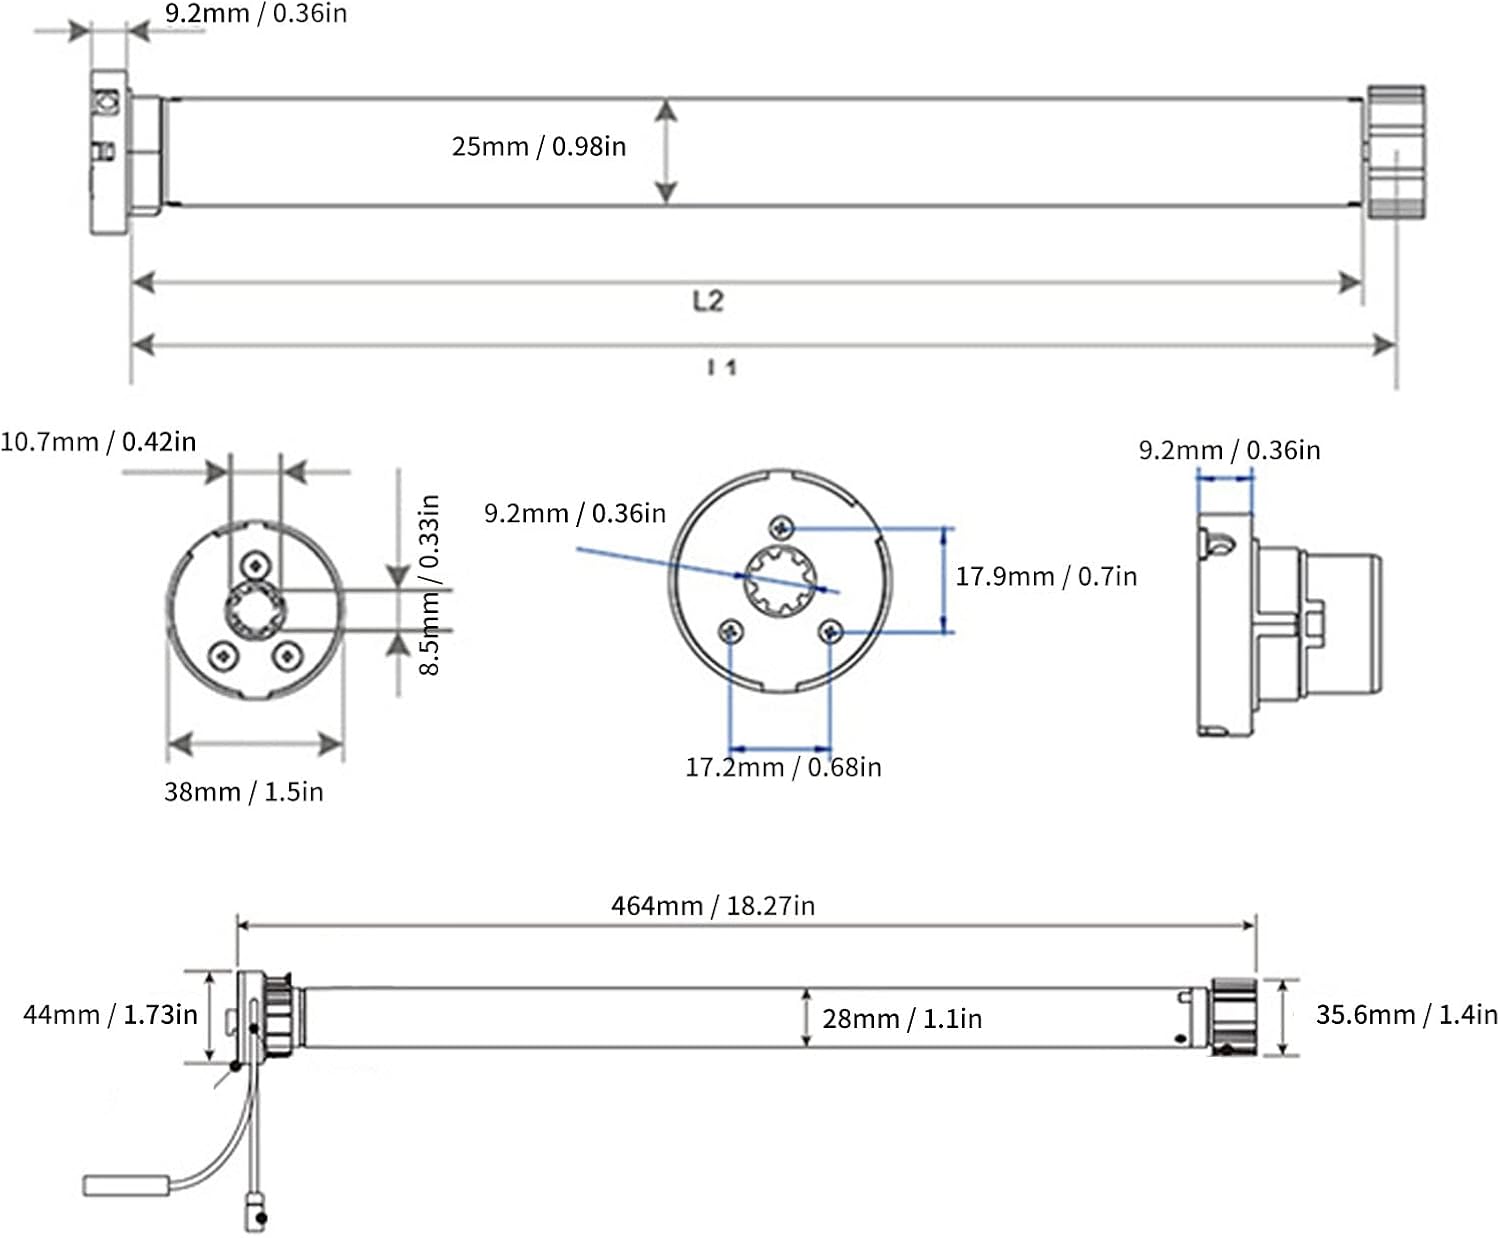
Image: Detailed technical dimensions of the motor, including length (L2, I1), diameter (25mm), and end cap measurements, crucial for precise installation and compatibility checks.
The motor is suitable for various applications, including floor-to-ceiling windows, balconies, dining rooms, high-rise duplexes, and offices.

Image: Visual examples of the electric roller blind motor installed in various settings such as floor-to-ceiling windows, balconies, dining rooms, high-rise duplexes, and offices, demonstrating its versatility.
6. Operating Instructions
The motor offers multiple control options for your convenience:
6.1. Remote Control Operation
Insert 2 x AAA batteries into the remote control. Use the remote to raise, lower, and stop the blinds. The remote can be handheld or wall-mounted using the provided bracket.

Image: A multi-channel remote control for electric roller blinds, shown in both handheld and wall-mounted configurations, indicating its dual-use functionality for convenient operation.
6.2. Smart App Control
Download the Tuya App on your smartphone. Follow the in-app instructions to pair your motor. This enables control via the app, as well as integration with smart home systems like Google Home and Siri for voice control.
6.3. Voice Control
Once integrated with Google Home or Siri via the Tuya App, you can use voice commands to operate your blinds. For example, "Hey Google, open the living room blinds" or "Hey Siri, close the bedroom shade."
6.4. Other Functions
- Light Sensing Control: The motor supports light sensing capabilities, allowing for automatic adjustment based on ambient light (requires compatible sensors, sold separately).
- Timer Lift: Schedule specific times for your blinds to open or close automatically through the app.
7. Charging
As a rechargeable motor, ensure it is charged regularly to maintain optimal performance. Use the provided USB power cable to connect the motor to a power source. The charging indicator (if present) will show the charging status. A full charge ensures extended operation.
8. Maintenance
- Cleaning: Wipe the motor casing with a soft, dry cloth. Do not use abrasive cleaners or solvents.
- Battery Care: For optimal battery life, avoid fully discharging the motor frequently. Charge it when the battery level is low.
- Inspection: Periodically check the mounting brackets and blind for any signs of wear or damage.
9. Troubleshooting
| Problem | Possible Cause | Solution |
|---|---|---|
| Motor does not respond to remote/app. | Low battery in remote or motor; remote not paired; app connection issue. | Replace remote batteries; charge motor; re-pair remote/app; check Wi-Fi connection. |
| Blind does not move smoothly. | Obstruction; incorrect installation; motor overload. | Check for obstructions; verify installation is level; ensure blind weight is within max load (4.8kg). |
| Motor makes unusual noise. | Internal issue; obstruction. | Check for obstructions. If noise persists, contact customer support. |
| Motor stops unexpectedly. | Overheating; low battery; limit settings incorrect. | Allow motor to cool; charge motor; reset limit settings. |
10. Warranty and Support
Brilluxa products are manufactured to high-quality standards. For warranty information, technical support, or service inquiries, please refer to the contact information provided with your purchase or visit the official Brilluxa website. Do not attempt to service the product yourself, as this may void your warranty.