1. Introduction
This manual provides comprehensive instructions for the installation, operation, and maintenance of your Huacaoe Tuya WiFi Smart Temperature Sensor Controller, Model TYTHWB4CH-B1RF. This device allows for remote monitoring and control of temperature-dependent appliances through the Tuya Smart Life app, and integrates with voice assistants like Amazon Alexa and Google Home.
Package Contents:
- 1 x Huacaoe Tuya WiFi Temperature Sensor Controller
- 1 x 1-meter DS18B20 Temperature Probe
- 1 x Instruction Manual (this document)
2. Product Overview
The Huacaoe Smart Temperature Sensor Controller is a versatile device designed for intelligent temperature management. It features four independent relay channels, allowing control over multiple appliances based on temperature thresholds or scheduled timings.

Figure 2.1: The Huacaoe Tuya WiFi Smart Temperature Sensor Controller, model TYTHWB4CH-B1RF, shown with its accompanying 1-meter temperature probe.
Component Identification:

Figure 2.2: Detailed wiring diagram illustrating connections for the sensor socket, USB 5V input, DC 7-32V input, manual switches, reset button, network/RF indicators, and the 4-channel dry contact relay outputs (NO, COM, NC).
- Sensor Socket: Port for connecting the temperature probe.
- Input (USB 5V / DC 7-32V): Power supply terminals for the controller.
- Manual Switches (K1-K4): Buttons for local control of each relay channel.
- Reset Button: Used for device reset and pairing mode activation.
- Network/RF Indicators: LEDs indicating network status and RF signal.
- Relay Outputs (NC, COM, NO): Terminals for connecting external appliances. NC (Normally Closed), COM (Common), NO (Normally Open).
3. Specifications
| Power Supply Input | USB 5V or DC 7-32V |
| Power Consumption | <1W (Quiescent current: 80mA) |
| Relay Output | Dry contact, passive output. Max 10A/Channel, Total 4 channels <16A |
| Working Temperature | -20°C to 80°C |
| Working Humidity | 5% to 90% RH |
| Wireless Standard | Wi-Fi 2.4GHz b/g/n |
| Security Mechanism | WEP/WPA-PSK/WPA2-PSK |
| Material | RF-ABS |
| Sensor Type | 1m DS18B20 Temperature Probe (Waterproof) |
| Sensor Measuring Range | -55°C to 125°C |
| Sensor Operating Voltage | 3.0-5.5V |
| Dimensions | 2.95 x 2.87 x 0.79 inches |
| Model Number | TYTHWB4CH-B1RF |
4. Setup
4.1 Power Connection
- Ensure the power source is off before making any connections.
- Connect a USB 5V power supply to the USB port or a DC 7-32V power supply to the designated DC input terminals.
4.2 Sensor Connection
- Carefully plug the 1-meter DS18B20 temperature probe into the sensor socket on the controller.
- Position the sensor in the area where temperature monitoring is required.
4.3 Relay Wiring
The controller features four dry contact relay outputs (NC, COM, NO) for each channel. These outputs act as switches for your external appliances.
- Identify the appropriate terminals (NC, COM, NO) for the appliance you wish to control.
- Connect your appliance's control circuit to the COM and either NO (Normally Open) or NC (Normally Closed) terminals, depending on your desired default state.
- Important: The maximum load current for each channel is 10A. If controlling appliances with higher power requirements, a contactor must be used to prevent damage to the controller.
4.4 App Installation
- Download the 'Tuya Smart Life' application from your smartphone's app store (available on iOS and Android).
- Register or log in to your Tuya Smart Life account.
4.5 Device Pairing
- Ensure your Wi-Fi router is operating on the 2.4GHz frequency band. This device does not support 5GHz Wi-Fi networks.
- For optimal pairing, place the controller close to your Wi-Fi router.
- Power on the controller. The network indicator LED should begin to flash, indicating it's in pairing mode. If not, press and hold the Reset button until it flashes.
- Open the Tuya Smart Life app, tap the '+' icon to add a device, and select the appropriate device type (e.g., 'Switch' or 'Temperature Controller').
- Follow the on-screen instructions in the app to complete the pairing process, including entering your Wi-Fi network credentials.
- Once successfully paired, the network indicator LED will stop flashing and remain solid.
- The device also supports Bluetooth for local control when offline (within range) and 433Mhz RF (fixed code) for additional remote control options.
5. Operating Instructions
5.1 App Interface Overview

Figure 5.1: A screenshot of the Tuya Smart Life application interface, showing options for renaming, offline notifications, device sharing, scheduling, delay off (inching), temperature calibration, sensitivity settings, and relay status.
After successful pairing, you can access the controller's functions through the Tuya Smart Life app. The interface provides options for:
- Remote ON/OFF: Manually switch each channel on or off.
- Rename: Customize the name of the device and individual channels.
- Schedule/Timing: Set up automated schedules, countdowns, and cycle timers.
- Temperature Calibration: Adjust sensor readings for accuracy.
- Temperature Sensitivity: Configure the responsiveness of temperature-based actions.
- Real-time Monitoring: View current temperature and historical data.
- Device Sharing: Share control of the device with other Tuya accounts.
5.2 Temperature-Based Automation
The core functionality of this controller is to automate appliances based on temperature. You can set specific temperature ranges to trigger the ON/OFF state of connected devices.
- In the app, navigate to the device settings or automation section.
- Create a new automation rule.
- Select the temperature sensor as the trigger condition.
- Define the temperature threshold (e.g., 'when temperature > 25°C').
- Choose the action (e.g., 'Switch 1 ON' or 'Switch 2 OFF').
- Save the automation rule.

Figure 5.2: An illustration demonstrating the app's capability for real-time temperature monitoring and remote control, allowing users to manage heating and cooling based on set temperature thresholds.
5.3 Scheduling and Timing Functions
The controller supports various timing functions to manage your devices.
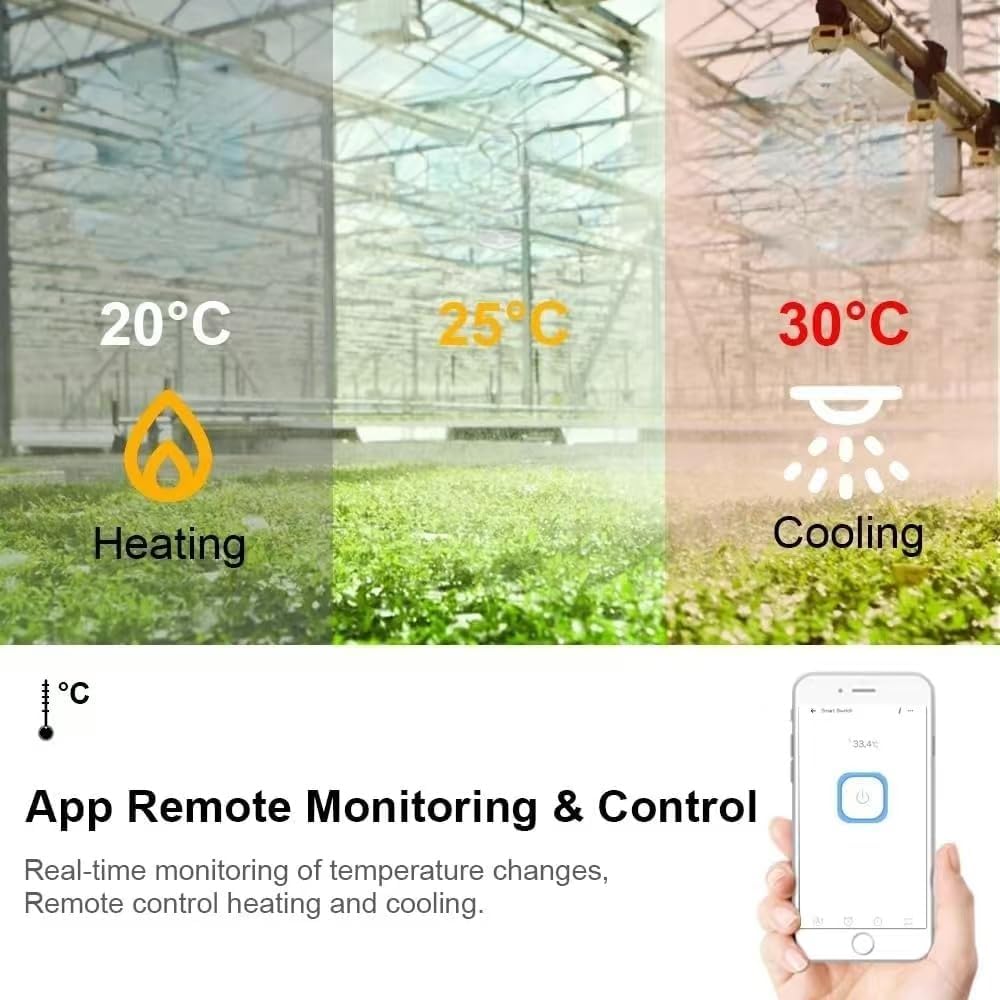
Figure 5.3: A visual representation of the timing function, demonstrating how the controller can schedule operations for devices like humidifiers, fish tanks, kettles, and lamps, with remote control via a smartphone app.
- Schedule: Set specific times for devices to turn ON or OFF daily or on selected days.
- Countdown: Set a timer for a device to turn ON or OFF after a specified duration.
- Cycle Timer: Configure devices to cycle ON and OFF repeatedly for set intervals.
- Inching (Delay Off): Set a device to automatically turn off after a brief period of being turned on.
5.4 Voice Control Integration
The controller is compatible with Amazon Alexa and Google Home for convenient voice control.
- Link your Tuya Smart Life account to your Amazon Alexa or Google Home app.
- Discover devices in your voice assistant app.
- Use voice commands such as:
- "Alexa, turn on [Device Name]."
- "Hey Google, what is the temperature of [Sensor Name]?"
5.5 Application Examples
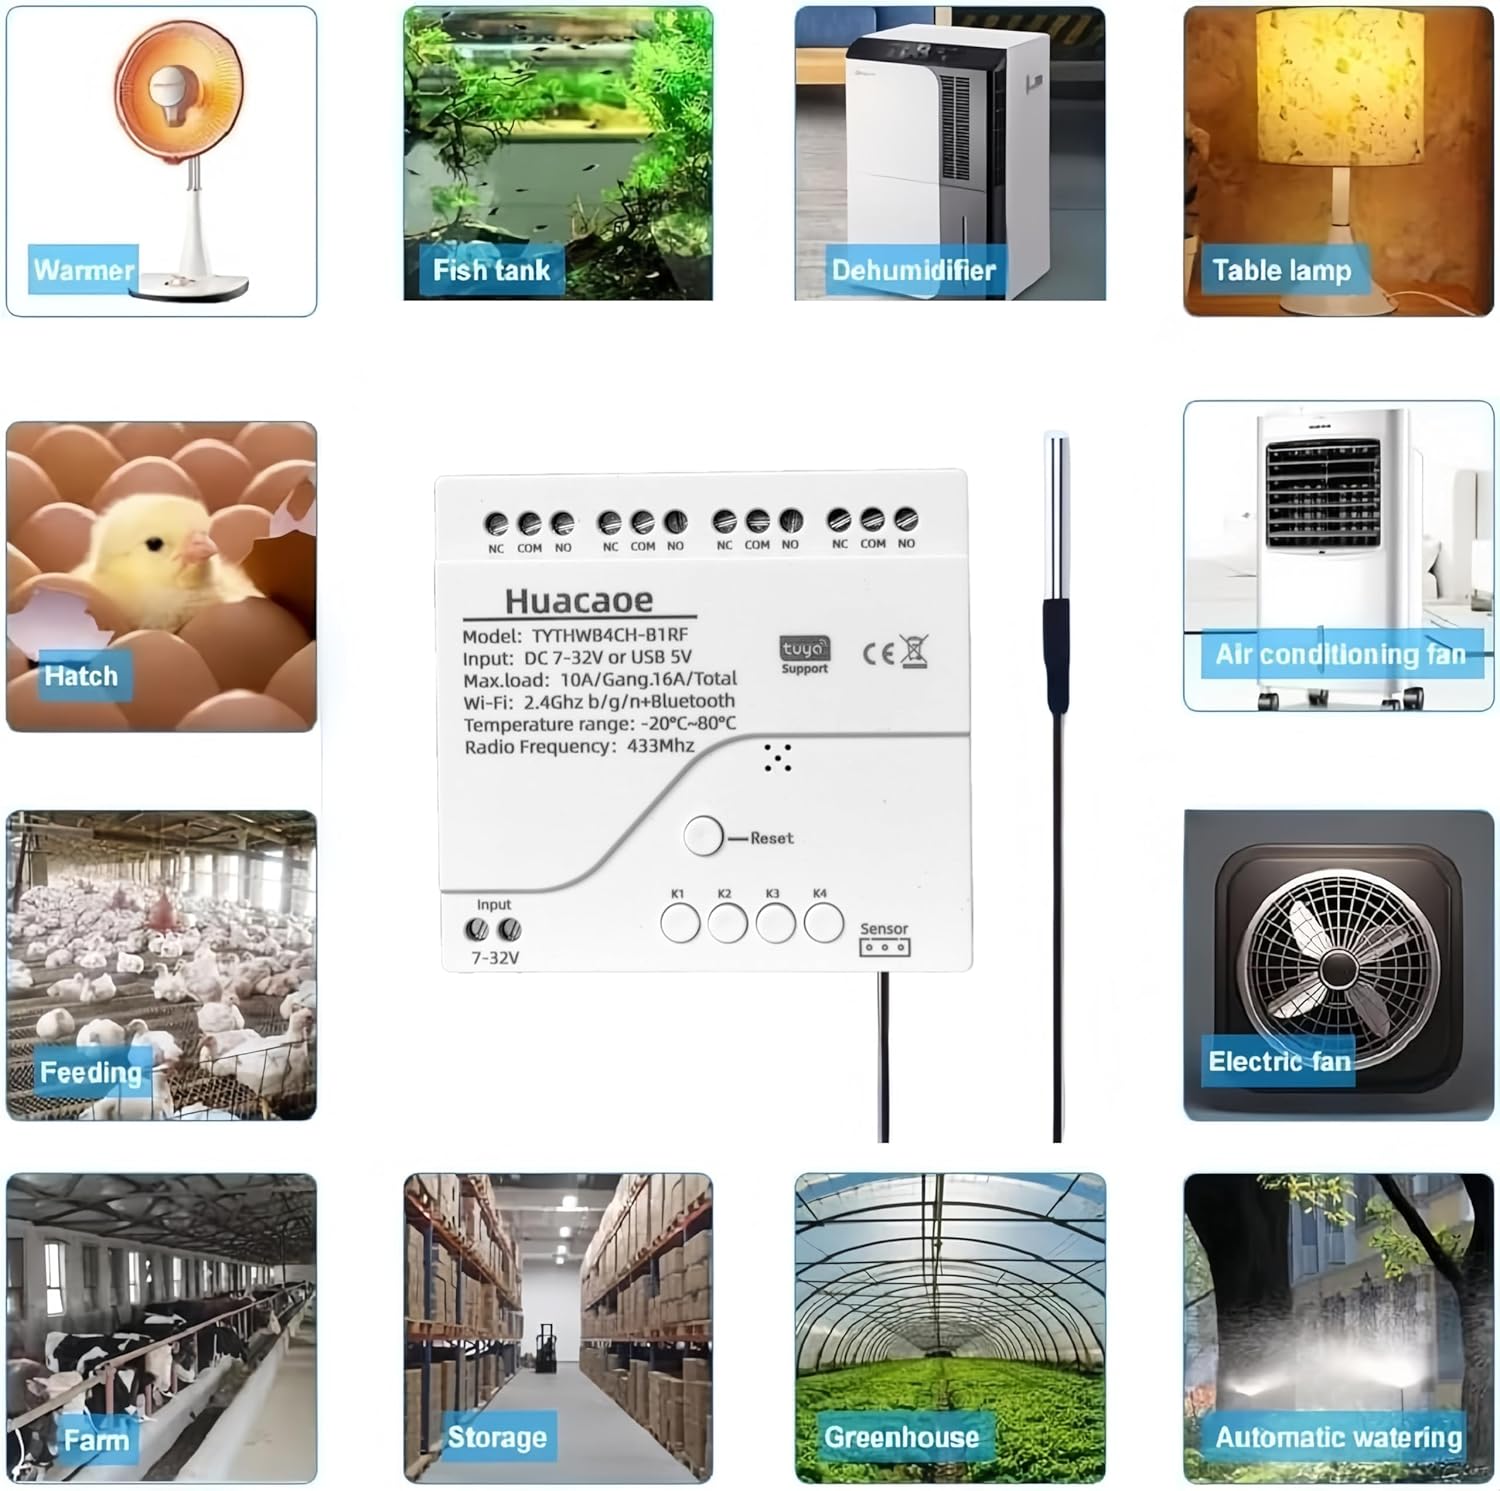
Figure 5.4: Illustrations of diverse applications for the smart temperature controller, such as controlling warmers, fish tank heaters, dehumidifiers, lighting, incubators, farm equipment, storage climate, greenhouse environments, and automatic watering systems.
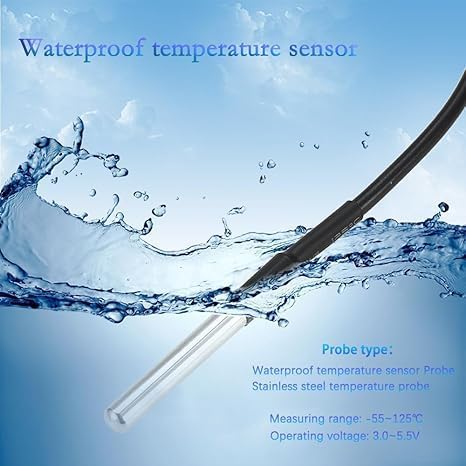
Figure 5.5: Images depicting various environments where the smart temperature controller can be utilized, such as heated swimming pools, home heating systems, fermentation rooms, reptile terrariums, greenhouse cultivation, and irrigation systems.
6. Maintenance
- Cleaning: Keep the device clean and free from dust. Use a dry, soft cloth for cleaning. Do not use liquid cleaners.
- Ventilation: Ensure the controller is placed in a location with adequate ventilation to prevent overheating.
- Firmware Updates: Periodically check the Tuya Smart Life app for available firmware updates to ensure optimal performance and access to new features.
- Sensor Care: The temperature sensor is waterproof. However, avoid unnecessary physical stress or damage to the cable.

Figure 6.1: A close-up image of the waterproof temperature sensor probe, highlighting its stainless steel construction and specifying its measuring range (-55~125°C) and operating voltage (3.0-5.5V).
7. Troubleshooting
- Device not connecting to Wi-Fi:
- Ensure your Wi-Fi network is 2.4GHz. 5GHz networks are not supported.
- Check the Wi-Fi signal strength at the device's location.
- Restart your Wi-Fi router and the controller.
- Verify that the correct Wi-Fi password has been entered during pairing.
- Try resetting the device to factory settings (press and hold the Reset button) and re-pairing.
- Device appears offline in the app:
- Check your internet connection and Wi-Fi router status.
- If within Bluetooth range, you may still be able to control the device locally via the Tuya app's Bluetooth function.
- Connected appliance not switching:
- Verify all wiring connections (NO, COM, NC) are secure and correct.
- Ensure the load current of the appliance does not exceed 10A per channel. For high-power devices, a contactor is required.
- Check the temperature automation rules or schedules in the Tuya app to ensure they are correctly configured and active.
- Inaccurate temperature readings:
- Ensure the temperature sensor is properly connected to the controller.
- Verify the sensor is placed in the desired monitoring environment and not exposed to direct heat sources or drafts that could skew readings.
- Use the temperature calibration feature in the Tuya app to fine-tune the sensor's readings if necessary.
8. Warranty and Support
For warranty information, technical assistance, or further support regarding your Huacaoe Tuya WiFi Smart Temperature Sensor Controller, please refer to the official Huacaoe website or contact your original retailer. Keep your purchase receipt as proof of purchase for any warranty claims.