1. Product Overview
Upgrade your cooling experience with this 4.4 Cu. Ft. One-Door Mini Fridge in sleek black stainless steel. This compact fridge offers a generous 4.4 cubic feet of storage space, perfect for keeping food and beverages fresh without the hassle of a freezer compartment. Its slim design allows for easy placement in smaller spaces, without sacrificing storage capacity.

Figure 1.1: Front view of the Mini Fridge.
2. Key Features
- Spacious Interior: Measuring 21.3" x 19.7" x 33.9", this mini fridge provides ample room to store your essentials. Ideal for dorm rooms, offices, game rooms, or anywhere you need extra refrigeration.
- Elegant Design: The black stainless steel look adds a modern touch to any room, complementing your decor while providing functionality.
- Versatile Storage: Inside, find adjustable glass shelves, a crisper drawer, and door bins to easily organize your items, ensuring everything is within reach.
- Energy-Efficient: Boasting an E-star rating, this fridge is energy efficient, helping you reduce electricity costs while being environmentally friendly.
- Compact and Slim Fit: Its slim design allows for easy placement in smaller spaces, without sacrificing storage capacity.
- Child Lock: Enhances safety by preventing unintended access.
- Reversible Door Hinges: Allows the door to be installed to open from either the right or left side, offering flexible placement options.
- Removable Shelves: For easy cleaning and flexible storage configurations.
- Adjustable Legs: Ensures stability and proper leveling on uneven surfaces.

Figure 2.1: Overview of key features.

Figure 2.2: Interior storage capacity with items.
3. What's in the Box
Upon unpacking, ensure all components are present:
- Mini Fridge Unit
4. Setup Instructions
4.1 Unpacking
Carefully remove all packaging materials, including tape and protective films. Keep packaging for future transport if needed.
4.2 Placement
Place the mini fridge on a firm, level floor that is strong enough to support the unit when fully loaded. Allow at least 4 inches (10 cm) of space between the back and sides of the fridge and any adjacent walls or cabinets for proper air circulation.
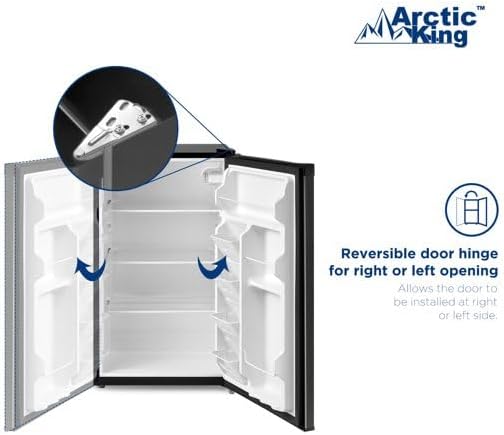
Figure 4.1: Product Dimensions for placement planning.
4.3 Leveling the Unit
The mini fridge is equipped with adjustable legs to help level the unit. Turn the leveling legs clockwise to raise the fridge or counter-clockwise to lower it. Ensure the fridge is level to prevent vibrations and ensure proper door sealing.
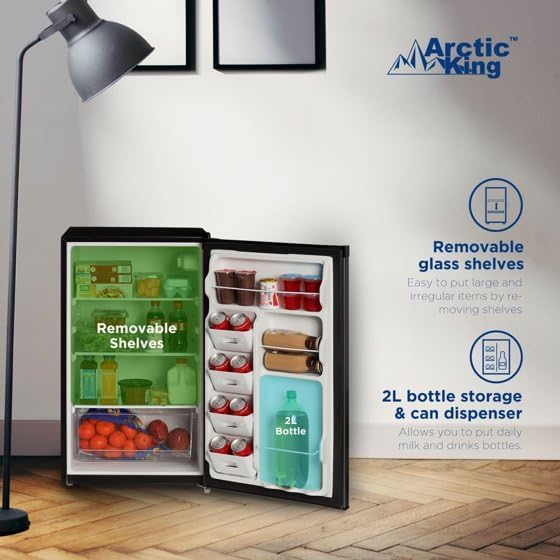
Figure 4.2: Adjustable Legs for leveling.
4.4 Reversible Door Installation
The door hinges can be reversed to allow the door to open from either the right or left side, depending on your space requirements. Refer to the detailed instructions provided in the separate installation guide for this procedure.
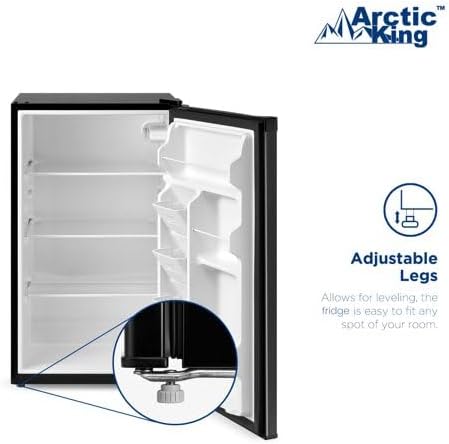
Figure 4.3: Reversible Door Hinge mechanism.
4.5 Power Connection
Plug the appliance into a dedicated 120 Volt, 60 Hz, 15 Amp AC outlet. Do not use extension cords or adapter plugs. Allow the fridge to stand upright for at least 2-4 hours before plugging it in to allow the refrigerant to settle.
5. Operating Instructions
5.1 Temperature Control
The temperature inside the mini fridge is controlled by a thermostat dial located inside the unit. Turn the dial to adjust the cooling intensity. Higher numbers indicate colder temperatures. For initial cooling, set the dial to the coldest setting for a few hours, then adjust to your desired level.
5.2 Storage Optimization
Utilize the adjustable glass shelves, crisper drawer, and door bins to organize your food and beverages efficiently. The removable shelves allow for customization to accommodate taller items.
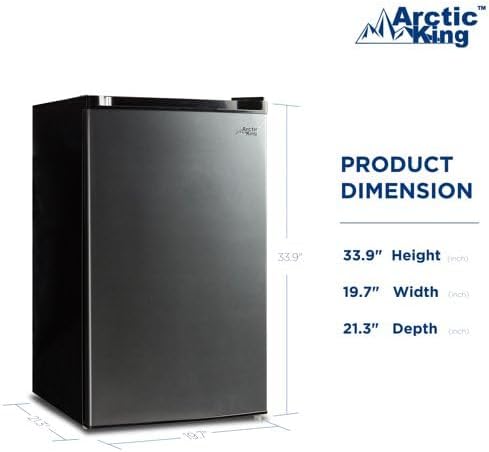
Figure 5.1: Empty interior showing adjustable shelves.
6. Maintenance
6.1 Cleaning
Regularly clean the interior and exterior of the mini fridge. Unplug the unit before cleaning. Use a soft cloth with a mild detergent and warm water. Do not use abrasive cleaners or harsh chemicals. Dry thoroughly after cleaning.
6.2 Manual Defrosting
This mini fridge features a manual defrost system. Frost will accumulate on the cooling plate. When the frost layer becomes about 1/4 inch (6 mm) thick, it is time to defrost. Unplug the unit, remove all contents, and allow the frost to melt naturally. Place a towel at the bottom to absorb water. Do not use sharp objects to remove frost.
7. Troubleshooting
| Problem | Possible Cause | Solution |
|---|---|---|
| Fridge does not operate | Not plugged in; Circuit breaker tripped/fuse blown; Temperature control set to "OFF" | Ensure plug is secure; Reset circuit breaker/replace fuse; Turn temperature control to desired setting |
| Temperature is too warm | Temperature control set too low; Door opened too frequently; Door not closed completely; Large amount of warm food added; Poor air circulation | Adjust temperature control to a colder setting; Minimize door openings; Ensure door is sealed; Allow warm food to cool before placing in fridge; Ensure adequate space around unit |
| Excessive frost buildup | Door not sealed properly; High humidity; Frequent door openings | Check door gasket for proper seal; Defrost unit as per instructions; Minimize door openings |
| Vibrations or noises | Unit not level; Contact with wall/cabinet; Loose parts | Adjust leveling legs; Move unit away from contact points; Check for and tighten any loose parts |
8. Specifications
| Attribute | Value |
|---|---|
| Brand Name | Generic |
| Model Info | 4515417415 |
| Item Weight | 49 pounds |
| Product Dimensions | 21.3 x 19.7 x 34 inches |
| Capacity | 4.4 Cubic Feet |
| Annual Energy Consumption | 250 Kilowatt Hours |
| Refrigerator Fresh Food Capacity | 3 Cubic Feet |
| Installation Type | Freestanding |
| Part Number | 287456812 |
| Form Factor | Compact |
| Special Features | Child Lock |
| Color | Black |
| Voltage | 120 Volts |
| Racks | 3 |
| Crispers/Drawers | 1 |
| Defrost System | Manual |
| Door Hinges | Reversible |
| Shelves | 3 |
| Number Of Doors | 1 |
| Configuration | Freezerless |
| BEE Star Rating | 5 Star |
9. Warranty and Support
For warranty information and customer support, please refer to the documentation included with your purchase or contact the manufacturer directly. Keep your proof of purchase for any warranty claims.