1. Introduction and Overview
This manual provides essential information for the safe and effective operation of your VEVOR Endoscope Model 5003. Please read this manual thoroughly before use and retain it for future reference. This industrial borescope is designed for detailed visual inspection in hard-to-reach areas, ideal for automotive, plumbing, HVAC, and industrial applications.

Figure 1: VEVOR Endoscope Model 5003 main unit and cable.
2. Product Features
- Triple Lens System: Equipped with one front camera and two side cameras for comprehensive inspection from multiple angles. Features 8 main LED lights and 2 side LED lights with 3 adjustable brightness levels for optimal illumination in dark environments.
- Extended Semi-Rigid Cable: A 49.2FT (approximately 15 meters) semi-rigid cable with an 8mm slim IP67 waterproof lens allows for deep and flexible access into confined spaces.
- 5-inch IPS Screen: A large 5-inch IPS screen provides clear, high-definition images and videos with true colors. Supports 1x, 1.5x, and 2x digital zoom for detailed viewing.
- User-Friendly Functions: Easily capture photos and videos, rotate images 180 degrees, and utilize the high-capacity 2000mAh battery with Type-C fast charging. Includes a 32GB SD card for storage.
- Versatile Accessories: Comes with useful accessories including a hook, magnet, and protective cap to assist in various inspection scenarios.

Figure 2: Illustration of the triple lens system for multi-angle viewing.
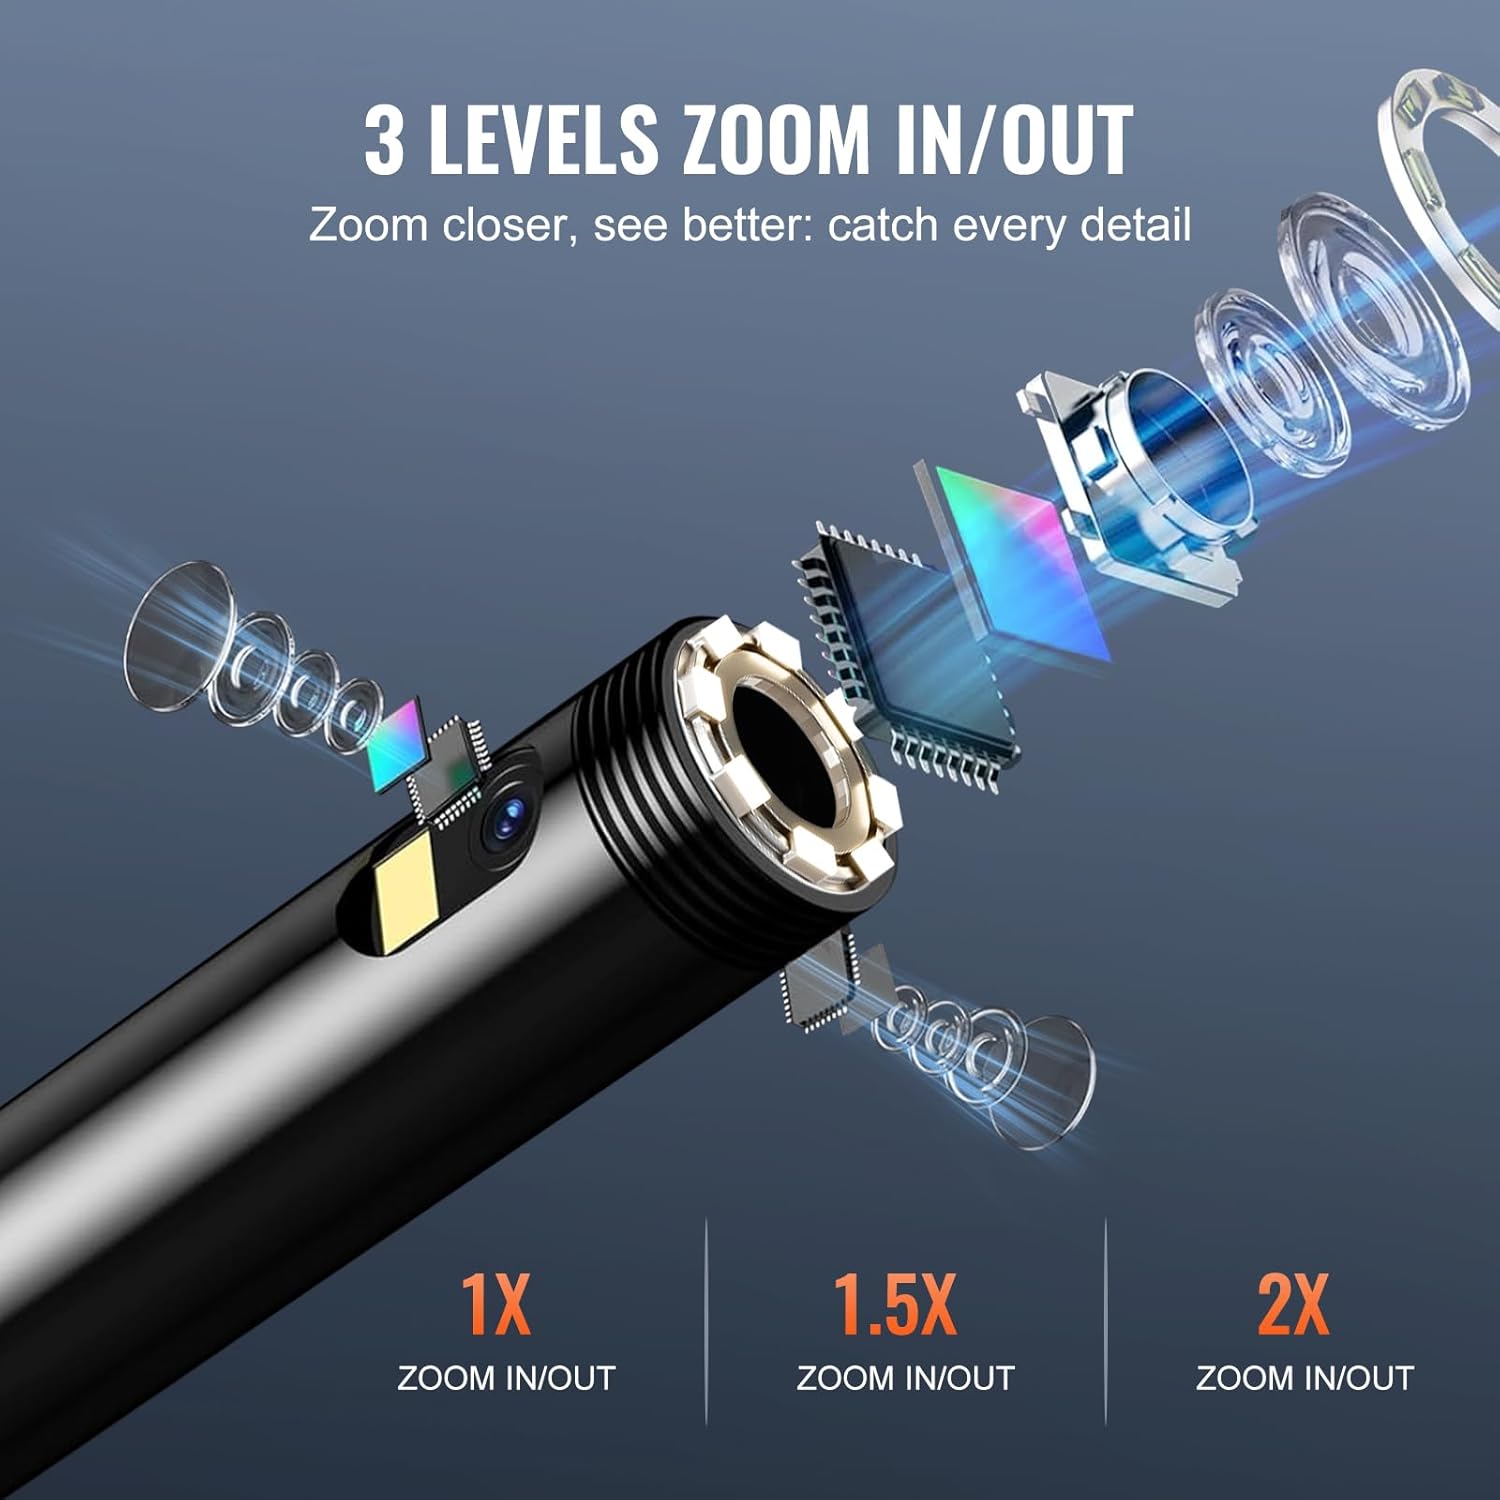
Figure 3: The 5-inch IPS display unit showing an inspection view.

Figure 4: The hook, magnet, and protective cap accessories.
3. Setup
- Charging the Device: Connect the endoscope unit to a power source using the provided Type-C USB cable. The device requires approximately 3 hours for a full charge, providing up to 5 hours of battery life.
- Insert SD Card: Ensure the 32GB SD card is properly inserted into the designated slot on the main unit for photo and video storage.
- Attach Probe: Securely connect the semi-rigid cable probe to the main display unit.
- Power On: Press and hold the power button on the main unit to turn on the device. The display will activate, showing the live camera feed.
4. Operating Instructions
- Adjusting LED Brightness: Use the dedicated brightness control buttons on the main unit to cycle through the 3 adjustable LED light levels on the camera probe.
- Switching Lenses: The triple-lens system allows switching between the front and side cameras. Refer to the on-screen indicators or specific buttons for lens selection.
- Zoom Function: Utilize the zoom buttons to magnify the image on the screen by 1x, 1.5x, or 2x.
- Capturing Photos/Videos: Press the photo button to take a still image or the video button to start/stop recording. Files are saved to the inserted 32GB SD card.
- Image Rotation: If the image orientation is incorrect, use the 180° image rotation function to adjust the view.
- Using Accessories: Attach the hook to retrieve dropped items, the magnet for metallic objects, or the protective cap for lens protection in harsh environments.

Figure 5: The zoom functionality for detailed inspection.

Figure 6: Practical application of the endoscope for plumbing inspection.
5. Maintenance
- Cleaning the Lens: After each use, especially in dirty or wet conditions, gently clean the camera lens with a soft, dry cloth. For stubborn grime, use a small amount of lens cleaning solution.
- Storage: Store the endoscope in a cool, dry place away from direct sunlight and extreme temperatures. Ensure the cable is neatly coiled to prevent damage.
- Battery Care: To prolong battery life, avoid fully discharging the device frequently. Charge the battery regularly, even if not in use for extended periods.
- Water Resistance: The probe is IP67 waterproof, meaning it can withstand immersion in water up to 1 meter for 30 minutes. Ensure the main unit is not exposed to water.

Figure 7: The IP67 waterproof probe in action.
6. Troubleshooting
- No Power: Ensure the device is fully charged. If the issue persists, try using a different Type-C charging cable and adapter.
- No Image on Screen: Check if the camera probe is securely connected to the main unit. Restart the device.
- Blurred Image: Ensure the camera lens is clean. Adjust the distance between the lens and the object within the macro focus range (8mm).
- Cannot Record/Save: Verify that the 32GB SD card is correctly inserted and has sufficient free space. The card may need to be formatted (refer to device settings).
- LED Lights Not Working: Check the brightness settings. If the lights are still off, contact customer support.
7. Specifications
| Feature | Specification |
|---|---|
| Model Number | 5003 |
| Brand | VEVOR |
| Lens Quantity | 3 (Triple Lens) |
| Cable Length | 49.2 FT / 15 m |
| Resolution | 1920*1080 (1080P) |
| Screen Size | 5" IPS |
| Battery Capacity | 2000mAh Lithium Ion |
| Charging Time | Approx. 3 hours |
| Battery Life | Approx. 5 hours |
| Waterproof Grade | IP67 (probe only) |
| Connectivity | USB-C |
| Storage | 32GB SD Card (included) |
| Product Dimensions | 15.9 x 8.8 x 2.8 cm |
| Weight | 997.9 g |
8. Warranty and Support
For warranty information, technical support, or service inquiries, please refer to the official VEVOR website or contact their customer service directly. Keep your purchase receipt and product model number (5003) handy when contacting support.