Introduction
This manual provides essential instructions for the installation, operation, maintenance, and troubleshooting of your Jumplushion Electric Bicycle Scooter Brakes (models XD-H800 and XD-H880). These brake levers are designed for electric bicycles and scooters, featuring a power-off function for enhanced safety. Please read this manual thoroughly before installation and use to ensure proper function and safety.

Image: A pair of black Jumplushion electric bicycle scooter brake levers, showing their design and the attached cables.
Safety Information
- Professional Installation Recommended: If you are unsure about any installation steps, seek assistance from a qualified bicycle mechanic.
- Regular Inspection: Periodically check brake levers, cables, and connections for wear, damage, or looseness. Ensure all components are securely fastened.
- Proper Adjustment: Ensure brake levers are correctly adjusted for comfortable reach and effective braking. Brake cables must have appropriate tension.
- Test Brakes: Always test the brakes and the power-off function in a safe area before riding.
- Waterproof Connector: While designed to be waterproof, avoid submerging the connector in water. Ensure the connection is clean and dry before mating.
Product Overview
The Jumplushion Electric Bicycle Scooter Brakes are constructed from durable aluminum alloy, designed for reliable performance. They feature an integrated power-off function that cuts motor power when the brakes are applied, enhancing safety for electric bikes and scooters. The brake levers come with a waterproof connector for the electrical power-off signal.
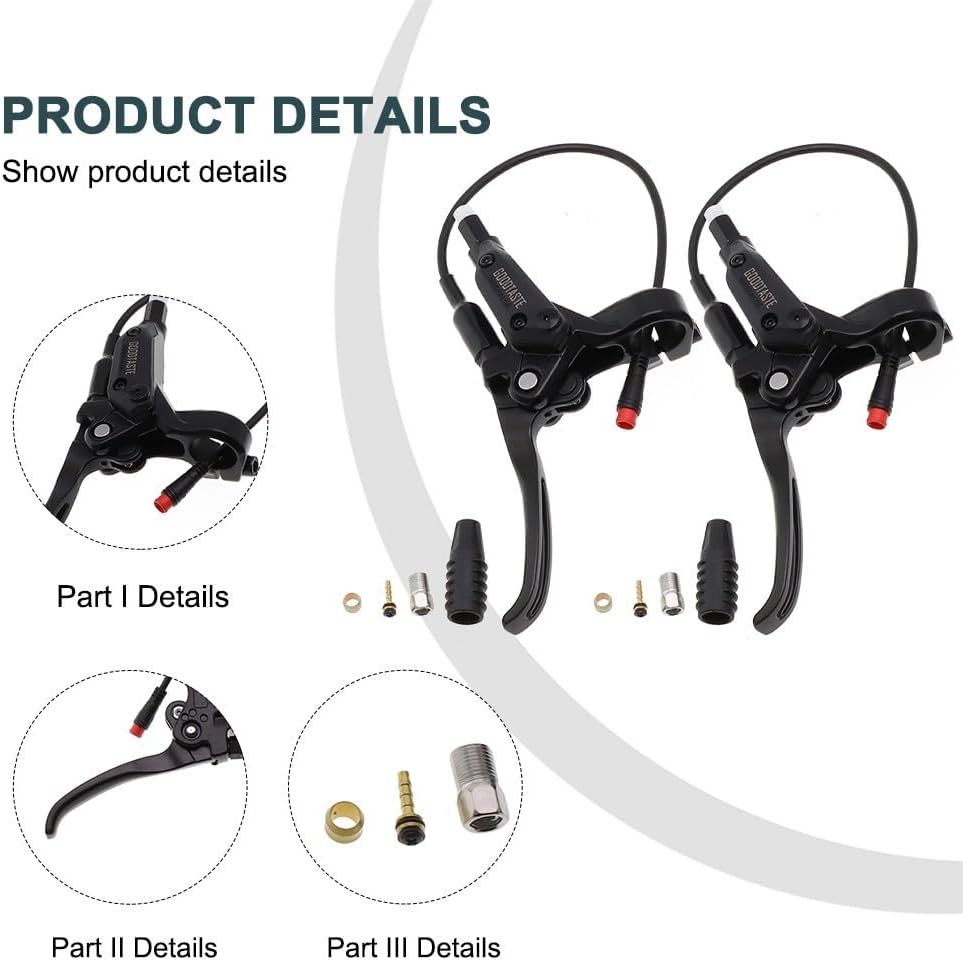
Image: Close-up view of the brake levers, showing the main body, lever, cable entry points, and the small parts included for installation such as cable ends and adjusters.
Package Contents:
- Left Brake Lever (with power-off cable)
- Right Brake Lever (with power-off cable)
- Small installation accessories (e.g., cable ferrules, adjusters)
Note: The package may include a single left or right lever, or a pair, depending on your purchase.
Setup and Installation
Follow these steps for proper installation of the brake levers on your electric bicycle or scooter.
- Identify Levers: Determine the left (front brake) and right (rear brake) levers.
- Prepare Handlebars: Ensure the handlebar area where the levers will be mounted is clean and free of obstructions. The installation aperture is 22.2mm.
- Mount Levers: Loosen the clamp bolts on the brake levers. Slide the levers onto the handlebars to your desired ergonomic position. Do not fully tighten yet.
- Connect Mechanical Brake Cables: Insert the brake cable head into the lever mechanism. Route the cable through the adjuster and connect it to your bicycle's brake caliper or V-brake system.
- Connect Electrical Power-Off Cable: Locate the waterproof connector on the brake lever's electrical cable. Connect this to the corresponding power-off input on your electric bike's controller or wiring harness. Ensure the connection is secure and fully seated. The cable length is 350cm, providing flexibility for routing.
- Adjust Lever Position: Once all cables are connected, adjust the angle and position of the brake levers on the handlebars for comfortable reach and optimal control.
- Tighten Clamps: Securely tighten the clamp bolts on the brake levers. Do not overtighten.
- Adjust Brake Cable Tension: Adjust the mechanical brake cable tension at the caliper/V-brake and/or using the barrel adjuster on the brake lever until the brakes engage firmly without excessive lever travel.
- Test Functionality: Before riding, test both the mechanical braking action and the power-off function. When the brake lever is pulled, the motor should disengage immediately.

Image: A pair of Jumplushion brake levers shown installed on an electric bicycle, with riders on a trail in the background, illustrating a typical usage scenario.
Operating Instructions
These brake levers operate like standard bicycle brake levers with the added safety feature of a power-off function.
- Normal Braking: Squeeze the brake levers to engage the mechanical brakes, slowing or stopping your bicycle/scooter.
- Power-Off Function: When the brake lever is pulled, an internal switch activates, sending a signal to your electric bike's controller to cut power to the motor. This ensures that the motor does not continue to propel the vehicle while braking, providing a safer stopping experience.
Maintenance
Regular maintenance helps ensure the longevity and safe operation of your brake levers.
- Cleaning: Wipe the brake levers and surrounding areas with a damp cloth to remove dirt and grime. Avoid using harsh chemicals.
- Cable Inspection: Periodically check the mechanical brake cables for fraying, rust, or kinks. Replace damaged cables immediately.
- Lever Pivot Points: Apply a small amount of light lubricant to the lever pivot points if movement becomes stiff.
- Electrical Connection: Ensure the waterproof electrical connector remains clean, dry, and securely connected.
- Tightness Check: Regularly check that the brake lever clamp bolts are tight and the levers do not rotate on the handlebars.
Troubleshooting
| Problem | Possible Cause | Solution |
|---|---|---|
| Brake lever feels spongy or has too much travel. | Loose brake cable; worn brake pads; air in hydraulic system (if applicable). | Adjust brake cable tension; inspect and replace brake pads; consult a mechanic for hydraulic systems. |
| Brakes not engaging fully. | Insufficient cable tension; misaligned brake caliper/V-brake. | Increase cable tension; adjust brake caliper/V-brake alignment. |
| Power-off function not working. | Loose or disconnected electrical cable; faulty internal switch; incompatible e-bike controller. | Check electrical connections; ensure waterproof connector is fully seated; consult e-bike manufacturer for compatibility; replace brake lever if switch is faulty. |
| Brake lever is loose on handlebar. | Clamp bolt is loose. | Tighten the clamp bolt securely. |
Specifications
- Model Numbers: XD-H800, XD-H880
- Material: Aluminum alloy
- Color: Black
- Weight: Approximately 220g per piece
- Cable Length (Electrical): 350 cm
- Installation Aperture: 22.2 mm
- Connector Type: Waterproof connector
- Function: Power-off brake lever for electric bicycles/scooters
Warranty and Support
For warranty information or technical support, please refer to the documentation provided at the time of purchase or contact your retailer. Keep your purchase receipt as proof of purchase.