1. Introduction
This manual provides detailed instructions for the installation, operation, and maintenance of your Sinjet H6 9.66-inch 2K Rear View Mirror Dash Cam. Please read this manual thoroughly before using the product to ensure proper function and safety. Keep this manual for future reference.
2. Product Overview and Components
The Sinjet H6 is a comprehensive vehicle recording system designed to enhance driving safety and provide reliable video evidence. It features a 9.66-inch IPS touchscreen display, 2K front camera, and FHD rear camera with advanced night vision capabilities.
Package Contents:
- Sinjet H6 Rearview Mirror Screen
- Front Camera (SmartSens 200AI)
- Rear Camera (IMX307, IP67 waterproof)
- Mounting Type-1 Bracket
- Power Cable
- Rear Camera Extension Cable
- 64GB SD Card
- User Manual

Image 2.1: Overview of the Sinjet H6 Rear View Mirror Dash Cam and its included accessories.

Image 2.2: Detailed view of all product accessories provided with the Sinjet H6 system.
3. Setup and Installation
The Sinjet H6 is designed for a secure, OEM-style installation, replacing your vehicle's original rearview mirror. This ensures stability and a clean appearance without visible wires.
3.1 Choosing the Correct Mounting Bracket
The package includes a universal mounting bracket (#1) by default. However, some vehicle models may require a specific bracket for optimal fit and stability. Ensure you have the correct bracket for your vehicle. Incorrect installation may lead to loosening or angle deviation.

Image 3.1: The Sinjet H6 requires a vehicle-specific mount for proper installation. The default bracket is included, but other vehicle models may need a different one.

Image 3.2: A selection of custom mounting brackets available for different car models. Contact support if the included bracket is not suitable.
3.2 Installation Steps:
- Detach OEM Mirror: Carefully remove your vehicle's original rearview mirror.
- Mount Streaming Mirror: Attach the Sinjet H6 rearview mirror screen to the vehicle's mounting base using the appropriate bracket.
- Mount Front Camera: Secure the front camera in its designated position, typically integrated with the mirror unit or mounted separately near the windshield.
- Non-Destructive Power Connection: Connect the power cable to the vehicle's ACC circuit, usually via the fuse box. This enables intelligent low-voltage protection and parking mode functionality.
- Cable Routing: Route all cables neatly along the vehicle's interior trim to ensure a clean, hidden installation and prevent obstruction.
- Stick-On Rear Camera: Install the IP67 waterproof rear camera at the rear of the vehicle, typically above the license plate or on the rear glass. No drilling is required for installation.

Image 3.3: Visual guide for the installation process of the Sinjet H6 system.
3.3 Power Connection
The system is powered via the vehicle's ACC circuit, which provides intelligent low-voltage protection. This ensures the dash cam operates reliably without draining your car battery. For parking mode functionality, ensure the power cable is correctly connected to the fuse box. If parking mode is inactive or time resets, verify the wiring connections.

Image 3.4: Wiring diagram for direct fuse-slot connection, ensuring proper power supply and parking mode activation.
4. Operating Instructions
The Sinjet H6 features an intuitive touch screen interface for easy control and access to various functions.
4.1 Display Modes
The 9.66-inch IPS display offers multiple viewing options to suit your preferences:
- Front View: Displays live feed from the front camera.
- Rear View: Displays live feed from the rear camera, useful for reversing and monitoring traffic behind.
- Split Screen: Shows both front and rear camera feeds simultaneously.
- Screen Saver: Turns off the display while recording continues in the background.

Image 4.1: Various display modes available on the Sinjet H6 for customized viewing.
4.2 WiFi and App Control
The built-in WiFi allows for convenient management of your recordings via a dedicated smartphone application. You can:
- Live View: Stream real-time footage from the dash cam to your phone.
- Download: Transfer recorded videos and images directly to your phone without removing the SD card.
- Share: Easily share footage to social media or other platforms.
- Settings: Adjust dash cam settings through the app.

Image 4.2: Manage your dash cam recordings and settings wirelessly using the Sinjet app.
4.3 Recording Functions
- Loop Recording: Continuously records video, overwriting the oldest files when the memory card is full. Essential events are protected from being overwritten.
- G-Sensor (Collision Lock): Automatically detects sudden impacts or collisions and locks the current video segment to prevent it from being overwritten.
- Parking Monitor: Provides 24/7 surveillance when the vehicle is parked. It can be activated by impact detection or configured for time-lapse recording.
- Time-Lapse Recording: Records video at a lower frame rate (e.g., 1 frame per second) to conserve storage space while providing continuous monitoring during parking.

Image 4.3: The Sinjet H6 offers comprehensive parking surveillance features.
5. Key Features
5.1 High-Brightness IPS Display
The 9.66-inch IPS touchscreen display boasts a brightness of 1600 cd/m², ensuring clear visibility even under direct sunlight. Its high color accuracy and clarity provide an optimal viewing experience, and the adaptive brightness adjustment feature enhances readability in various lighting conditions.

Image 5.1: The IPS display offers high brightness and wide viewing angles for clear visibility.
5.2 Advanced Camera System
- Front Camera: Equipped with a SmartSens 200AI sensor, a 108° wide-angle lens, and an F1.8 aperture, the front camera captures detailed 2K resolution recordings in various lighting conditions.
- Rear Camera: Features an IMX307 sensor, providing clear and detailed FHD footage, especially in low-light environments. It is IP67 waterproof, ensuring durability and reliable performance in adverse weather.
- Night Vision: Both cameras utilize advanced night vision technology, including Wide Dynamic Range (WDR), white balance compensation, multi-exposure, and variable shutter speed, to deliver clear images in low-light and challenging conditions, reducing glare from headlights.

Image 5.2: The SONY CMOS sensor enhances night vision capabilities for clear recordings in challenging light.
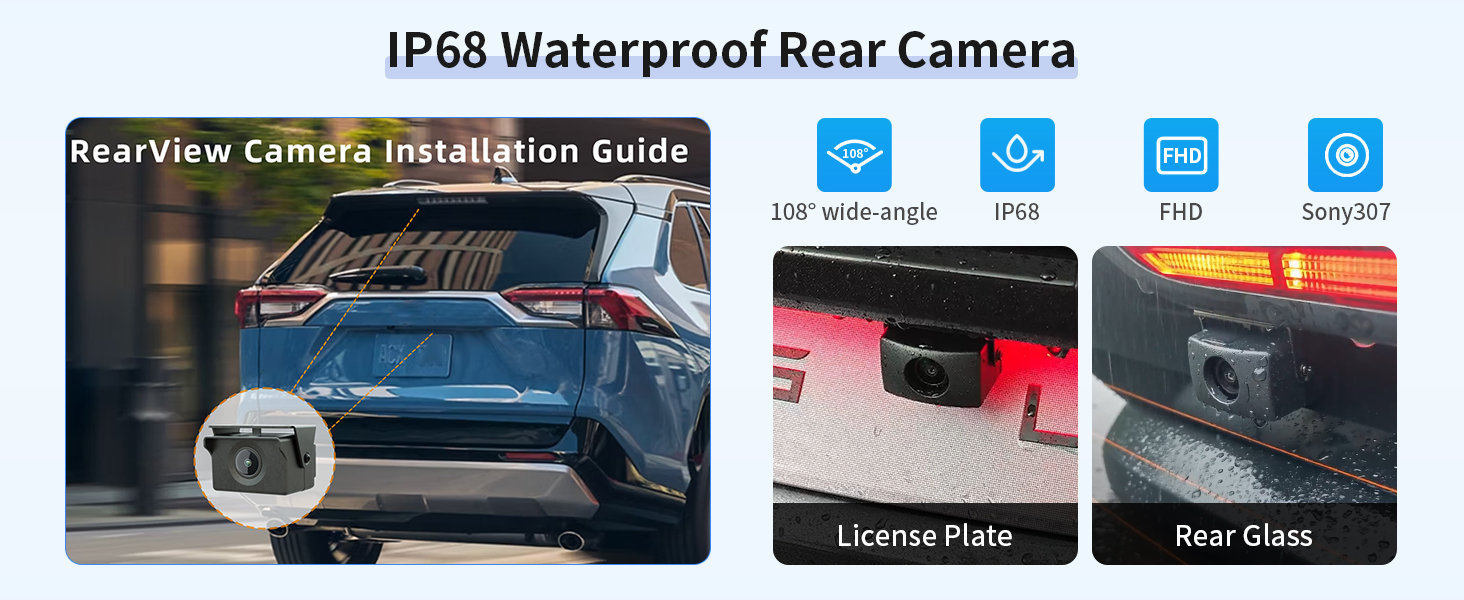
Image 5.3: The IP68 waterproof rear camera ensures reliable performance in all weather conditions.
5.3 Efficient Cooling System
The Sinjet H6 incorporates an advanced aluminum cooling system with a layered vent design, providing 30% more heat dissipation. This military-grade cooling ensures stable performance even in extreme temperatures, preventing overheating and extending the device's lifespan.

Image 5.4: The advanced cooling system ensures optimal performance and durability.
6. Maintenance
To ensure the longevity and optimal performance of your Sinjet H6 dash cam, follow these maintenance guidelines:
- Cleaning the Display: Use a soft, lint-free cloth to gently wipe the IPS touchscreen. Avoid abrasive materials or harsh chemical cleaners that could damage the screen.
- Cleaning Camera Lenses: Keep the front and rear camera lenses clean for clear recordings. Use a lens cleaning solution and a microfiber cloth.
- Memory Card Management: Periodically format the SD card (at least once a month) through the device settings to maintain optimal recording performance and prevent data corruption. Back up important files before formatting.
- Cable Inspection: Regularly check all cables for any signs of wear or damage. Ensure connections are secure.
- Software Updates: Check the Sinjet official website or app for any available firmware updates to ensure your device has the latest features and bug fixes.
7. Troubleshooting
If you encounter issues with your Sinjet H6, refer to the following common problems and solutions:
| Problem | Possible Cause | Solution |
|---|---|---|
| Device does not power on. | Loose power connection, vehicle power issue, faulty cable. | Check power cable connection to the device and vehicle's fuse box. Ensure vehicle's ACC circuit is active. Try a different power source if available. |
| Recording stops or files are corrupted. | Faulty SD card, full SD card, incorrect SD card format. | Format the SD card within the device settings. Replace the SD card if the issue persists (use a high-speed Class 10 or U3 card). |
| Parking mode is not working. | Incorrect power connection for parking mode, parking mode setting disabled. | Verify the power cable is correctly wired to the vehicle's fuse box (BAT+ and ACC). Ensure parking mode is enabled in the device settings. |
| Mirror wobbles after installation. | Mounting bracket not securely tightened, incorrect bracket for vehicle. | Ensure all screws on the mounting bracket are tightened. Confirm you are using the correct vehicle-specific bracket. |
| Display is dim or difficult to see in sunlight. | Brightness setting too low, direct glare. | Adjust the display brightness settings. The H6 features 1600 cd/m² brightness for optimal visibility. |
| Wi-Fi connection issues. | Incorrect password, device out of range, app issues. | Ensure correct Wi-Fi password. Keep your smartphone close to the dash cam. Restart the app and the dash cam. |
8. Specifications
| Feature | Detail |
|---|---|
| Model Name | Sinjet-Streaming Rearview Mirror (H6) |
| Display | 9.66-inch IPS Touch Screen, 1600 nits brightness |
| Front Camera | SmartSens 200AI, 2K Video Capture Resolution, 108° Field Of View, F1.8 Aperture |
| Rear Camera | IMX307 Sensor, FHD Video Capture Resolution, 95° Field Of View, IP67 Waterproof |
| Special Features | Built-In Display, G-Sensor, Loop Recording, Parking Monitor, Time-Lapse Recording, Night Vision, Smart Voltage Protection, Split Design |
| Connectivity Technology | Built-in WiFi, Powerline (for power connection) |
| Expandable Memory | 32GB-128GB (32GB SD Card included) |
| Mounting Type | Direct Replacement for OEM Mount |
| Product Dimensions | 13 x 7 x 4 inches |
| Item Weight | 2.49 pounds |
| Manufacturer | Sinjet |
9. Warranty and Support
For warranty information, please refer to the documentation included with your product or contact Sinjet customer support. Protection plans are available for purchase separately to extend coverage for your device.
If you require technical assistance or have questions regarding your Sinjet H6, please contact Sinjet customer support through their official website or the contact information provided in your product packaging.