1. Introduction
Thank you for choosing the EXREIZST Cold Press Juicer MP-802E. This manual provides essential information for the safe and efficient operation, maintenance, and troubleshooting of your new juicer. This appliance is designed to extract juice from various fruits and vegetables using a slow masticating process, preserving nutrients and flavor. It features a 4.2-inch large feed chute, a 250W motor, and is constructed from BPA-free materials for your health and safety.

Image 1: The EXREIZST Cold Press Juicer MP-802E, fully assembled with juice and pulp containers.
2. Important Safety Instructions
Please read all instructions carefully before using the appliance to prevent injury or damage. Keep this manual for future reference.
- Always ensure the juicer is properly assembled and the safety lock is engaged before operation.
- Do not insert fingers or other objects into the feed chute while the juicer is operating. Use the provided food pusher.
- Unplug the juicer from the power outlet before cleaning, disassembling, or when not in use.
- Do not immerse the motor base in water or any other liquid.
- This appliance is equipped with overheating protection. If the motor stops due to overheating, allow it to cool for at least 30 minutes before restarting.
- The juicer will automatically stop if the cover is opened during operation, enhancing safety, especially around children.
- Keep the appliance out of reach of children.
- Do not operate the juicer with a damaged cord or plug. Contact customer service for assistance.
- Only use accessories and parts recommended by the manufacturer.
3. Product Components
Familiarize yourself with the parts of your EXREIZST Cold Press Juicer MP-802E:
- Motor Base: Contains the motor and control dial.
- Juicing Bowl: Collects the juice and separates pulp.
- Auger: The spiral component that crushes and presses produce.
- Filters (Grey & Black): Two interchangeable filters for different types of produce.
- Feed Chute Assembly: The top part where fruits and vegetables are inserted, with a 4.2-inch opening.
- Pulp Outlet: Where the dry pulp is expelled.
- Juice Outlet: Where the extracted juice flows out.
- Juice Cup: For collecting extracted juice.
- Pulp Container: For collecting expelled pulp.
- Cleaning Brush: For easy cleaning of components.

Image 2: Exploded view of the juicer's main components.
4. Setup and Assembly
Follow these steps to assemble your juicer before first use:
- Place the motor base on a stable, flat surface.
- Install the juicing bowl onto the motor base, ensuring it is securely seated.
- Insert the auger into the center of the juicing bowl.
- Select the appropriate filter (grey for soft produce, black for hard produce) and place it over the auger, aligning the orange and white dots.
- Place the feed chute assembly on top, aligning the white dot on the feed chute with the white dot on the juicing bowl. Rotate the feed chute clockwise until it locks into place. You should hear a click or feel it secure.
- Position the juice cup under the juice outlet and the pulp container under the pulp outlet.
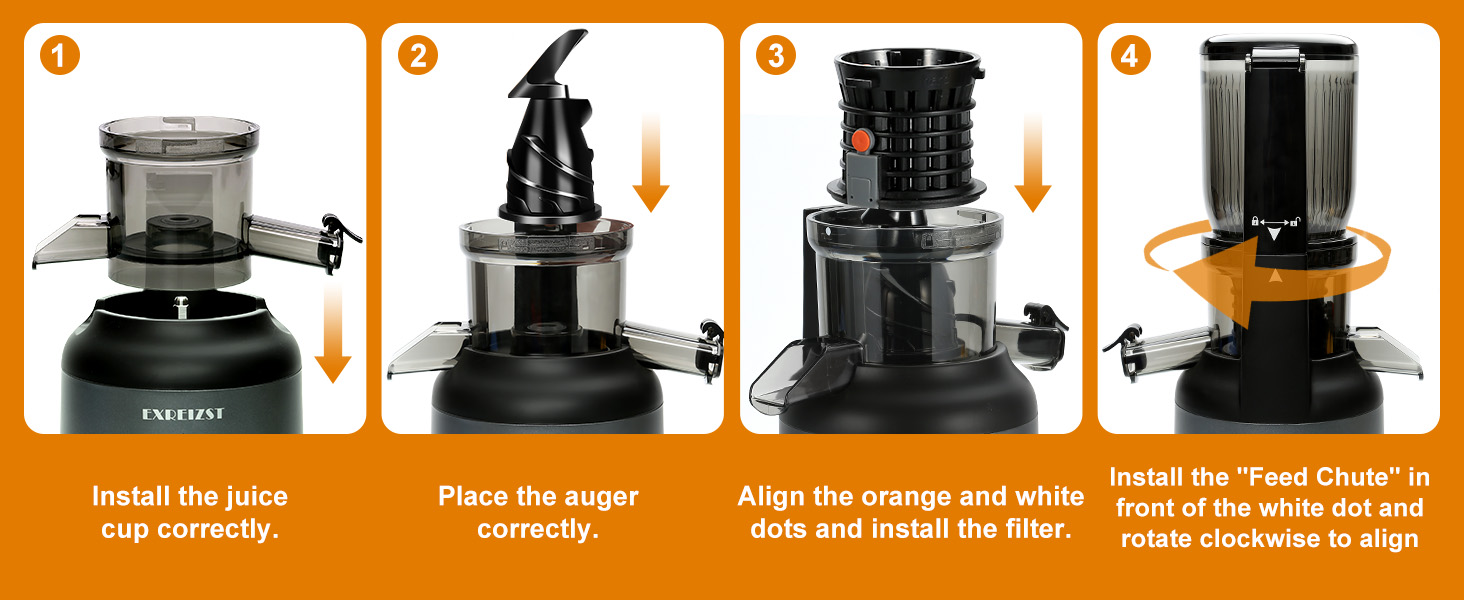
Image 3: Step-by-step visual guide for juicer assembly.
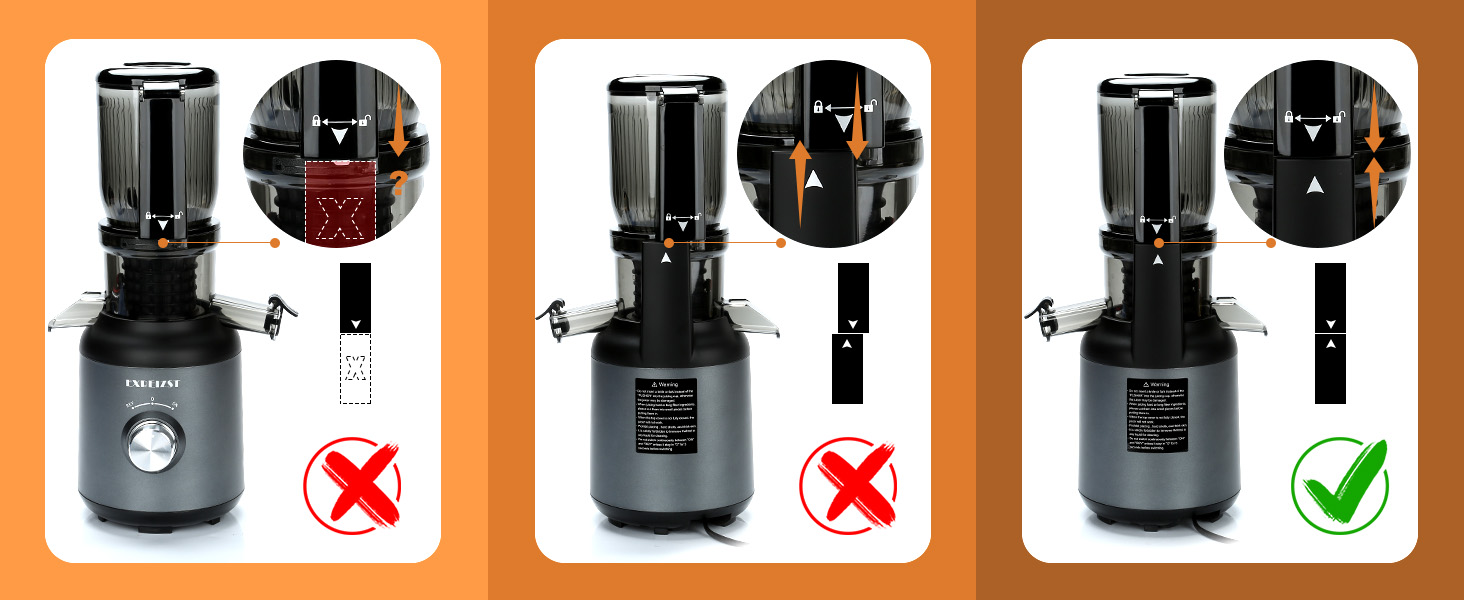
Image 4: Correct alignment for secure assembly.
5. Operation
5.1 Preparing Produce
- Wash all fruits and vegetables thoroughly.
- For optimal juicing and to prevent blockages, cut produce into smaller pieces, especially fibrous vegetables like celery or hard fruits like apples.
- Remove large seeds, pits, or hard skins from fruits like peaches, mangoes, or citrus before juicing.

Image 5: The 4.2-inch large feed chute accommodates whole or large pieces of produce.
5.2 Selecting the Correct Filter
- Grey Filter (Larger Aperture): Ideal for softer, high-moisture fruits and vegetables such as oranges, watermelon, grapes, tomatoes, kiwi, and strawberries.
- Black Filter (Fine Mesh): Suitable for harder, low-moisture produce like carrots, apples, pears, celery, and ginger to achieve a higher juice yield.

Image 6: Guide to selecting the appropriate filter for different produce types.
5.3 Juicing Process
- Plug the juicer into a power outlet.
- Turn the control dial to the "ON" position to start the motor.
- Gradually feed the prepared fruits and vegetables into the feed chute. Use the food pusher if necessary, but do not force produce down.
- The juicer will extract juice, which flows into the juice cup, and expel pulp into the pulp container.
- When finished, turn the control dial to the "OFF" position and unplug the appliance.

Image 7: One-button operation for ease of use.
5.4 Reverse Function
If the juicer becomes clogged or stops during operation, turn the control dial to the "REV" (Reverse) position for a few seconds. This will help dislodge any stuck produce. Then, switch back to "ON" to resume juicing. If clogging persists, turn off the juicer, unplug it, and disassemble to clear the blockage.
6. Maintenance and Cleaning
Regular cleaning ensures optimal performance and longevity of your juicer. It is recommended to clean the juicer immediately after each use.
- Turn the juicer off and unplug it from the power outlet.
- Disassemble all removable parts: feed chute, filter, auger, juicing bowl, juice cup, and pulp container.
- Rinse all removable parts under running water. Use the provided cleaning brush to remove any pulp residue from the filter and other components.
- For stubborn residue, soak parts in warm, soapy water for a few minutes before scrubbing.
- Wipe the motor base with a damp cloth. Never immerse the motor base in water.
- Dry all parts thoroughly before reassembling or storing.

Image 8: The design ensures drier pulp, simplifying cleanup.
7. Troubleshooting
If you encounter issues with your juicer, refer to the following common problems and solutions:
| Problem | Possible Cause | Solution |
|---|---|---|
| Juicer does not turn on. | Not plugged in; improper assembly; safety lock not engaged. | Ensure power cord is securely plugged in. Check that all parts are correctly assembled and the feed chute is locked into place. |
| Motor stops during operation. | Overheating protection activated; blockage. | Turn off and unplug. Allow 30 minutes for the motor to cool down. If due to blockage, use reverse function or disassemble to clear. |
| Low juice yield or wet pulp. | Incorrect filter used; produce not cut properly; too much produce fed at once. | Ensure the correct filter (black for hard produce) is used. Cut produce into smaller pieces. Feed produce slowly and gradually. |
| Juicer is noisy. | Normal operation sound; improper assembly; hard produce. | Some noise is normal for masticating juicers (approx. 60dB). Check assembly for loose parts. Ensure produce is not excessively hard or large. |
| Juice leaks from the base. | Improper assembly of the juicing bowl or seals. | Disassemble and reassemble the juicing bowl, ensuring it is seated correctly and all seals are in place. |

Image 9: The juicer operates at approximately 60dB, comparable to a normal conversation.
8. Specifications
| Feature | Detail |
|---|---|
| Brand | EXREIZST |
| Model Name | Cold Press Juicer |
| Item Model Number | MP-802E |
| Power | 250W |
| Product Dimensions | 3"D x 3"W x 7.8"H |
| Item Weight | 6.56 pounds |
| Special Features | Efficient Physical Juicing, Overheat Protection, Quiet Motor, Whole Fruit Processing |
| Material | BPA-Free |
| Product Care Instructions | Hand Wash Only (removable parts) |
9. Warranty and Support
EXREIZST is committed to providing high-quality products and customer satisfaction. If you have any questions, concerns, or encounter any problems with your EXREIZST Cold Press Juicer MP-802E, please do not hesitate to contact our customer service team. We are dedicated to providing a satisfactory solution as quickly as possible.
Please refer to your purchase documentation for specific warranty details and contact information.