1. Introduction
This manual provides comprehensive instructions for the setup, operation, and maintenance of your Generic DVB T2 TV Terrestrial High Definition Digital Receiver. Please read this manual carefully before using the device to ensure proper functionality and to maximize your viewing experience.
Package Contents
Upon unpacking, please verify that all items listed below are present and in good condition:
- DVB T2 TV Terrestrial High Definition Digital Receiver
- Remote Control
- Power Adapter (DC 12V)
- User Manual (this document)
Note: Additional cables (e.g., HDMI, RCA) may be required for connection and are typically sold separately.
2. Product Overview
Familiarize yourself with the various ports and controls on your DVB T2 Receiver.
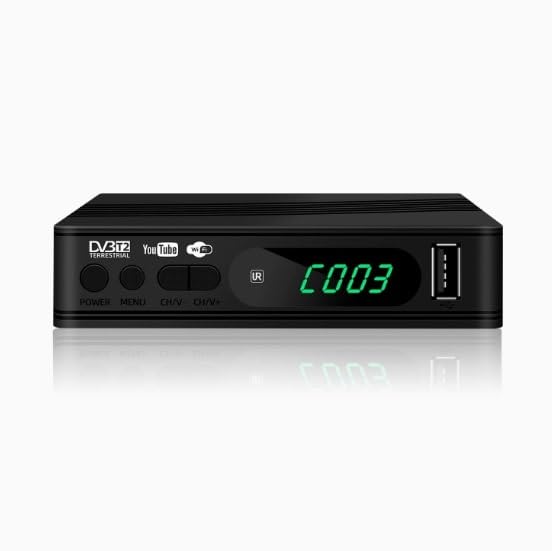
Figure 2.1: Front View of the Receiver. This image displays the front panel of the DVB T2 receiver, showing the power button, menu button, channel up/down buttons, a USB 2.0 port, and the LED display.
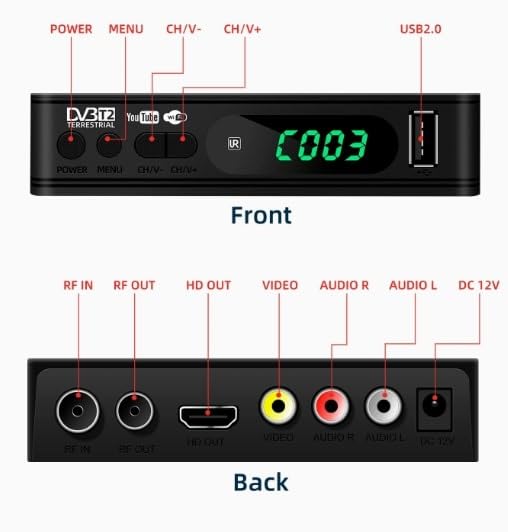
Figure 2.2: Front and Back Panel Connections. This image provides a detailed diagram of both the front and back panels, labeling all buttons and ports for easy identification. The front panel includes POWER, MENU, CH V-, CH V+, and USB 2.0. The back panel features RF IN, RF OUT, HD OUT (HDMI), VIDEO, AUDIO R, AUDIO L, and DC 12V power input.
Front Panel Controls and Ports
- POWER: Turns the receiver on or off.
- MENU: Accesses the main menu for settings and options.
- CH V-/CH V+: Navigates through channels or menu options.
- USB 2.0: For connecting USB storage devices for media playback or software updates.
- LED Display: Shows current channel number or status.
Rear Panel Connections
- RF IN: Connects to your terrestrial antenna for signal reception.
- RF OUT: Passes the RF signal to another device (e.g., another TV).
- HD OUT (HDMI): Connects to an HDMI-compatible display for high-definition video and audio.
- VIDEO: RCA video output (yellow) for standard definition video.
- AUDIO R/L: RCA audio outputs (red/white) for stereo audio.
- DC 12V: Power input for the receiver.
3. Setup
3.1 Connecting the Receiver
- Antenna Connection: Connect your terrestrial antenna cable to the RF IN port on the back of the receiver.
- TV Connection:
- For High Definition: Connect an HDMI cable from the HD OUT port on the receiver to an HDMI input on your television.
- For Standard Definition: Connect RCA cables (yellow for video, red for right audio, white for left audio) from the VIDEO, AUDIO R, and AUDIO L ports on the receiver to the corresponding inputs on your television.
- Power Connection: Connect the provided power adapter to the DC 12V port on the receiver, then plug the adapter into a power outlet.
3.2 Initial Power-On and Channel Scan
- Turn on your television and select the correct input source (HDMI or AV) that corresponds to your receiver connection.
- Press the POWER button on the receiver or its remote control to turn it on.
- The first time you power on the receiver, an initial setup wizard may appear. Follow the on-screen prompts to select your language and country.
- Proceed to the channel scanning process. You will typically have options for Auto Scan or Manual Scan.
- Auto Scan: Recommended for most users. The receiver will automatically search for and store all available DVB-T2/DVB-T terrestrial TV and radio channels. This process may take several minutes.
- Manual Scan: Allows you to specify frequency ranges or channel numbers for scanning. This is useful for advanced users or troubleshooting specific channels.
- Once the scan is complete, the receiver will display the first available channel.
4. Operating Instructions
4.1 Basic Remote Control Functions
The remote control allows you to navigate menus, change channels, adjust volume, and access various features.
- Power Button: Turns the receiver on/off.
- Menu Button: Opens the main menu.
- CH+/CH-: Changes channels up or down.
- VOL+/VOL-: Adjusts the volume level.
- OK Button: Confirms selections in menus.
- Arrow Buttons (Up/Down/Left/Right): Navigates through menu options.
- Exit/Back Button: Returns to the previous screen or exits the menu.
4.2 Channel Management and Viewing
- Channel List: Press the OK button to view the channel list. Use arrow keys to select a channel and press OK to switch.
- Parental Guidance Locking: Access the menu to set up parental controls, allowing you to restrict access to certain channels or programs based on ratings. A PIN code is typically required for this feature.
- Multi-language Support: The receiver supports multiple languages for the on-screen display (OSD) and audio tracks (if available on the broadcast). Adjust these settings in the system menu.
4.3 Media Playback and Recording (PVR Ready)
The receiver supports media playback via its USB 2.0 port and may offer PVR (Personal Video Recorder) functionality if a compatible USB storage device is connected.
- Supported Media Types: DVB-T2, DVB-T, MPEG-1, MPEG-2, MPEG-4, H.264.
- Audio Formats: Advanced audio processor supporting Dolby Digital and Dolby Digital Plus (optional).
- USB Media Playback: Insert a USB drive into the front USB 2.0 port. Navigate to the media player section in the menu to browse and play compatible audio, video, or image files.
- PVR Functionality: If supported and a USB storage device is connected, you can record live TV programs. Refer to the on-screen menu for recording options (e.g., instant record, scheduled record).
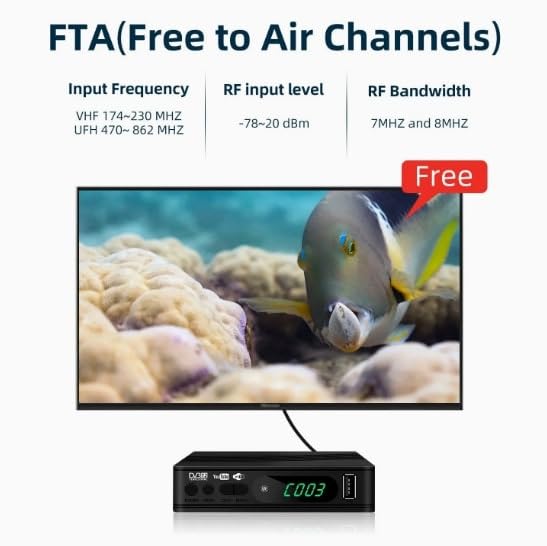
Figure 4.1: Free to Air (FTA) Channels. This image illustrates the DVB T2 receiver connected to a television, displaying a Free to Air channel. The receiver is capable of receiving unencrypted terrestrial broadcasts within specified frequency ranges (VHF 174-230 MHz, UHF 470-862 MHz) and RF bandwidths (7MHz and 8MHz).
5. Maintenance
5.1 Cleaning
- Ensure the receiver is powered off and unplugged before cleaning.
- Use a soft, dry cloth to wipe the exterior of the receiver.
- Do not use liquid cleaners, aerosols, or abrasive cleaning agents, as they may damage the finish or internal components.
5.2 Storage
- Store the receiver in a cool, dry place away from direct sunlight and extreme temperatures.
- Avoid placing heavy objects on top of the receiver.
6. Troubleshooting
If you encounter issues with your receiver, refer to the following common problems and solutions.
| Problem | Possible Cause | Solution |
|---|---|---|
| No Power | Power adapter not connected or faulty; power outlet not working. | Ensure the power adapter is securely connected to the receiver and a working power outlet. Test the outlet with another device. |
| No Signal / "No Channel" Message | Antenna not connected or positioned correctly; no channels scanned. | Check antenna connection to the RF IN port. Adjust antenna position. Perform an Auto Scan for channels (refer to Section 3.2). |
| No Picture / Black Screen | Incorrect TV input selected; loose HDMI/RCA cables. | Verify your TV is set to the correct HDMI or AV input. Ensure all video cables are securely connected. |
| No Audio | TV or receiver volume too low; incorrect audio settings; loose audio cables. | Increase volume on both the TV and receiver. Check audio settings in the receiver's menu. Ensure audio cables (HDMI or RCA) are properly connected. |
| Remote Control Not Working | Dead batteries; obstruction between remote and receiver; IR sensor blocked. | Replace batteries in the remote control. Ensure there are no obstructions. Point the remote directly at the receiver's front panel. |
7. Specifications
Detailed technical specifications for the Generic DVB T2 TV Terrestrial High Definition Digital Receiver.
| Feature | Detail |
|---|---|
| Brand | Generic |
| Model | DVB T2 TV Terrestrial Digital Receiver |
| Manufacturer | AK ENTERPRISES |
| Product Dimensions | 13 x 3 x 9 cm (130D x 30W x 90H Millimeters) |
| Item Weight | 400 g |
| Compatible Devices | Television |
| Connectivity Technology | USB |
| Compatible Media Type | DVB-T2, DVB-T, MPEG-1, MPEG-2, MPEG-4, H.264 |
| Media Format | MPEG |
| Video Formats Supported | 576i/576p/720p/1,080i/1080P |
| Aspect Ratio | 16:9 |
| Audio Output Mode | Dolby Digital |
| Supported Audio Formats | Dolby Digital, Dolby Digital Plus (optional) |
| Output Ports | HDMI, SCART (if available), Coaxial (if available), RF Out, RCA (Video, Audio R/L) |
| Input Ports | RF In, USB |
| Chipset Solution | Sunplus 1509C |
| Input Frequency (FTA) | VHF 174-230 MHz, UHF 470-862 MHz |
| RF Input Level (FTA) | -78~20 dBm |
| RF Bandwidth (FTA) | 7MHz and 8MHz |
8. Warranty and Support
Specific warranty information for this Generic product is not provided in the product details. For any warranty claims or technical support, please contact the seller or the manufacturer, AK ENTERPRISES, directly through your purchase platform or their official contact channels.
When contacting support, please have your product model (DVB T2 TV Terrestrial Digital Receiver) and purchase details readily available.