1. Introduction
This manual provides detailed instructions for the TORQ TCM-1011 Coreless Micro Servo. Designed for small-scale RC crawlers, this high-performance servo offers precise control and durability. Please read this manual thoroughly before installation and operation to ensure proper use and longevity of your product.
2. Safety Information
Warning:
- This product is not intended for use by children.
- Always ensure proper power connections to avoid damage to the servo or other electronic components.
- Do not attempt to disassemble or modify the servo, as this may void the warranty and cause malfunction.
- Keep the servo away from extreme temperatures and moisture unless explicitly stated as waterproof.
3. Product Features
- High Torque Output: Delivers powerful performance suitable for small-scale crawlers.
- Rear Exit Wires: Ensures suspension travel remains unhindered for optimal performance and clearance.
- Simplified Installation: Designed for easy mounting in various small-scale RC models.
- Enhanced Clearance: Optimized design for ultimate clearance around the servo, fitting snugly into tight spaces.
- Full CNC Case: Durable metal gear coreless servo with a robust CNC-machined case.

Image: Key features of the TORQ TCM-1011 servo, including high torque, rear exit wires, simplified installation, and enhanced clearance.

Image: The compact design of the TORQ TCM-1011 servo seamlessly integrated into a small-scale crawler setup, highlighting space efficiency.

Image: The TORQ TCM-1011 servo installed in an RC crawler, demonstrating its enhanced clearance for optimal suspension movement.
Video: Showcases the TORQ MLS series servos, highlighting their innovative direct mount feature and compact design, which is relevant to the TCM-1011's design principles.
4. Specifications
| Attribute | Value |
|---|---|
| Dead Bandwidth | 2µs |
| Working Frequency | 1520µs / 330Hz |
| Operating Voltage | 6.0V - 8.4V |
| Motor Type | Coreless Motor |
| Operating Speed (6.0V) | 0.1 sec/60° |
| Operating Speed (8.4V) | 0.07 sec/60° |
| Stall Torque (6.0V) | 8.2 kg-cm (113 oz-in) |
| Stall Torque (8.4V) | 11.5 kg-cm (160 oz-in) |
| Dimensions | 23 x 12 x 27.5 mm (0.91 x 0.47 x 1.08 inches) |
| Weight | 20.0 g (0.7 oz) |
| Connector Wire Length | JR 170 mm (6.7 inches) |
| Output Gear Spline | 25T |
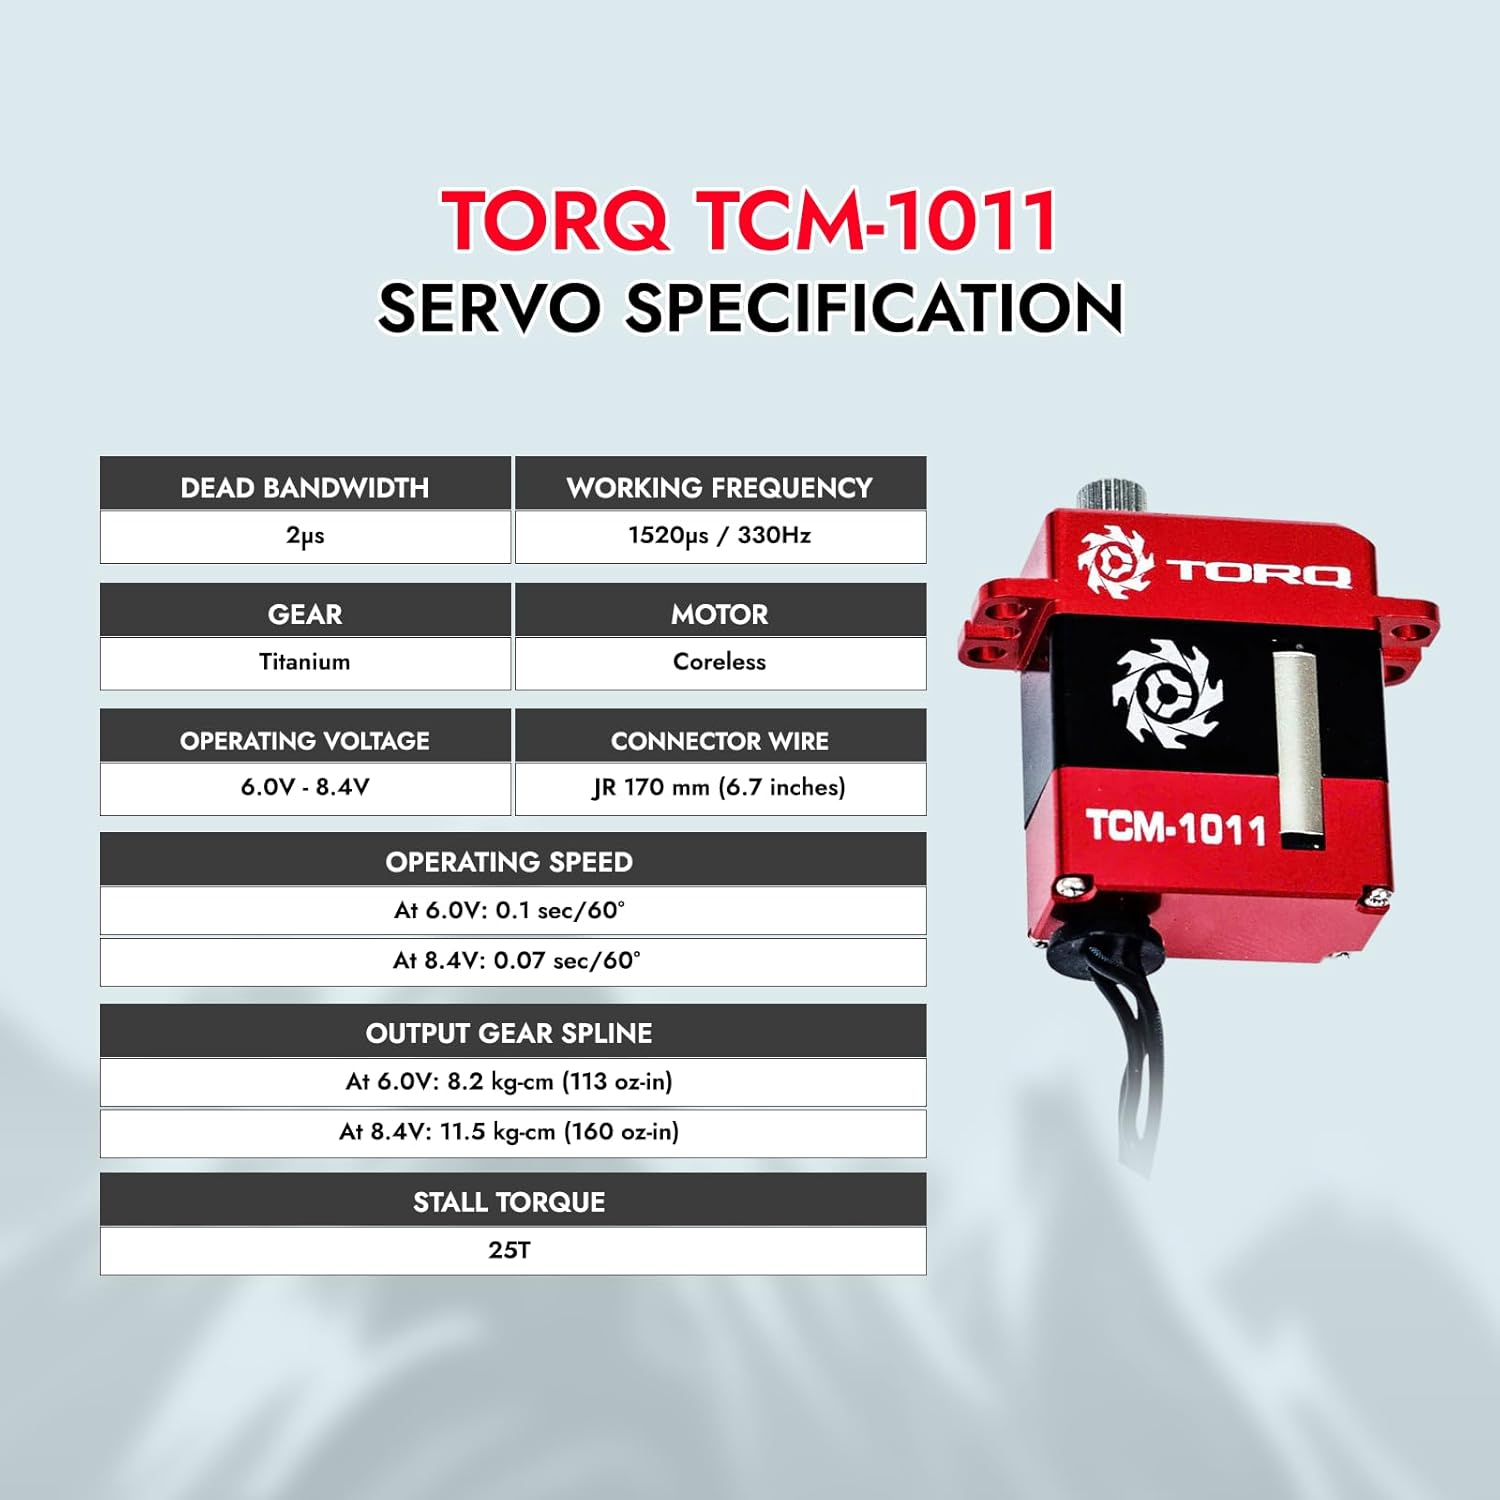
Image: A visual representation of the TORQ TCM-1011 servo's specifications, including dead bandwidth, working frequency, operating voltage, motor type, operating speed, stall torque, connector wire length, and output gear spline.

Image: Detailed dimensions of the TORQ TCM-1011 servo in inches and millimeters, along with its weight.

Image: The TORQ TCM-1011 servo highlighting its operating speed and stall torque at 8.4V.
5. Setup and Installation
The TORQ TCM-1011 servo is designed for simplified installation in various small-scale RC crawlers. It is compatible with models such as FX118, FMS, TRX-4M, and TRX-4MT. Specific kits may include additional components like servo extension cables or servo horns for these models.
- Prepare the Chassis: Ensure your RC crawler chassis is ready for servo installation. Remove any existing servo or components that might obstruct the new servo.
- Mount the Servo: The TCM-1011 servo bolts directly into compatible chassis. For models like the Axial SCX24 series (Bronco, C10, DODGE POWER WAGON, DEADBOLT, JEEP JT GLADIATOR), the servo is designed to fit. Note that for the Axial SCX24 JEEP JT GLADIATOR, using the edge hole and slight trimming of the shock mount may be required for optimal fit.
- Connect Wiring: Connect the servo's JR 170 mm (6.7 inches) connector wire to the appropriate channel on your receiver. The rear exit wires design helps keep suspension travel unhindered.
- Install Servo Horn: Attach the appropriate servo horn (e.g., TSP-1001 for TRX-4M & TRX-4MT, or other compatible horns for FX118/FMS) to the 25T output gear spline of the servo. Secure it with the provided screw.
- Test Functionality: Before final assembly, power on your RC system and test the servo's movement to ensure it operates correctly and without binding.

Image: The TORQ TCM-1011 servo shown with compatible RC models such as Furitek FX118, FCX24, FCX18, and FMT24, indicating its plug-and-play nature.
Video: Shows the installation process of a TORQ TCM-1001 servo, which is similar in design to the TCM-1011, into an RC vehicle. This provides a visual guide for mounting and connecting the servo.
6. Operating Instructions
Once the TORQ TCM-1011 servo is correctly installed and connected to your RC system, its operation is controlled via your remote transmitter.
- Power On: Turn on your remote control transmitter first, then power on your RC vehicle.
- Steering Control: Use the steering wheel or joystick on your transmitter to control the direction of your RC vehicle. The servo will translate these commands into precise wheel movements.
- Changing Modes (if applicable): For some RC systems, you may be able to change steering modes (e.g., 2-wheel steering, 4-wheel steering) using a specific channel on your transmitter. Refer to your RC vehicle's specific manual for mode change instructions.
- Observe Performance: Pay attention to the servo's response. The high torque and fast operating speed of the TCM-1011 ensure responsive and powerful steering, especially in challenging crawler conditions.
7. Maintenance
Regular maintenance ensures the optimal performance and extends the lifespan of your TORQ TCM-1011 servo.
- Keep Clean: Periodically clean the servo and its surrounding area to prevent dirt and debris from interfering with its operation. Use a soft brush or compressed air.
- Check Connections: Ensure all wiring connections are secure and free from damage. Loose connections can lead to intermittent performance or failure.
- Inspect Gears: Although the TCM-1011 features metal gears, inspect them occasionally for any signs of wear or damage. Replace if necessary.
- Lubrication: The internal gears are typically pre-lubricated. Avoid excessive lubrication unless specified by the manufacturer, as it can attract dirt.
- Storage: Store the servo in a dry, cool place away from direct sunlight and corrosive materials.
8. Troubleshooting
If you encounter issues with your TORQ TCM-1011 servo, refer to the following troubleshooting guide:
| Problem | Possible Cause | Solution |
|---|---|---|
| Servo not responding | Loose connection, no power, faulty receiver/transmitter. | Check all wiring connections. Ensure battery is charged and connected. Test with a different receiver/transmitter if possible. |
| Erratic movement or twitching | Interference, low voltage, damaged servo wire. | Ensure no other electronic devices are causing interference. Check battery voltage. Inspect servo wire for cuts or damage. |
| Weak or slow response | Low voltage, mechanical binding, worn gears. | Check battery voltage. Ensure no parts are physically obstructing servo movement. Inspect gears for wear. |
| Grinding noise | Damaged or worn gears. | Disassemble carefully and inspect gears. Replace any damaged gears. |
9. Warranty and Support
For warranty information and technical support, please contact Helidirect customer service. Keep your proof of purchase for any warranty claims.
For further assistance, visit the Helidirect Store on Amazon.