Introduction
This manual provides essential information for the safe and efficient operation, maintenance, and troubleshooting of your Tineco Floor ONE S7 PRO Cordless Wet Dry Vacuum Cleaner and Pure ONE Station 5. Please read this manual thoroughly before first use and retain it for future reference.
Important Safety Instructions
When using an electrical appliance, basic precautions should always be followed, including the following:
- Read all instructions before using the appliance.
- Do not use outdoors or on wet surfaces.
- Do not allow to be used as a toy. Close attention is necessary when used by or near children.
- Use only as described in this manual. Use only manufacturer's recommended attachments.
- Do not use with damaged cord or plug. If appliance is not working as it should, has been dropped, damaged, left outdoors, or dropped into water, return it to a service center.
- Do not pull or carry by cord, use cord as a handle, close a door on cord, or pull cord around sharp edges or corners. Do not run appliance over cord. Keep cord away from heated surfaces.
- Do not unplug by pulling on cord. To unplug, grasp the plug, not the cord.
- Do not handle plug or appliance with wet hands.
- Do not put any object into openings. Do not use with any opening blocked; keep free of dust, lint, hair, and anything that may reduce air flow.
- Keep hair, loose clothing, fingers, and all parts of body away from openings and moving parts.
- Turn off all controls before unplugging.
- Use extra care when cleaning on stairs.
- Do not use to pick up flammable or combustible liquids, such as gasoline, or use in areas where they may be present.
- Do not pick up anything that is burning or smoking, such as cigarettes, matches, or hot ashes.
- Use only Tineco cleaning solutions intended for use with this appliance.
- Do not use without filters in place.
Product Overview
The Tineco Floor ONE S7 PRO is a cordless wet dry vacuum cleaner designed for hard floors, offering simultaneous vacuuming and mopping. It is complemented by the Pure ONE Station 5, an auto dust base for convenient self-cleaning and charging.
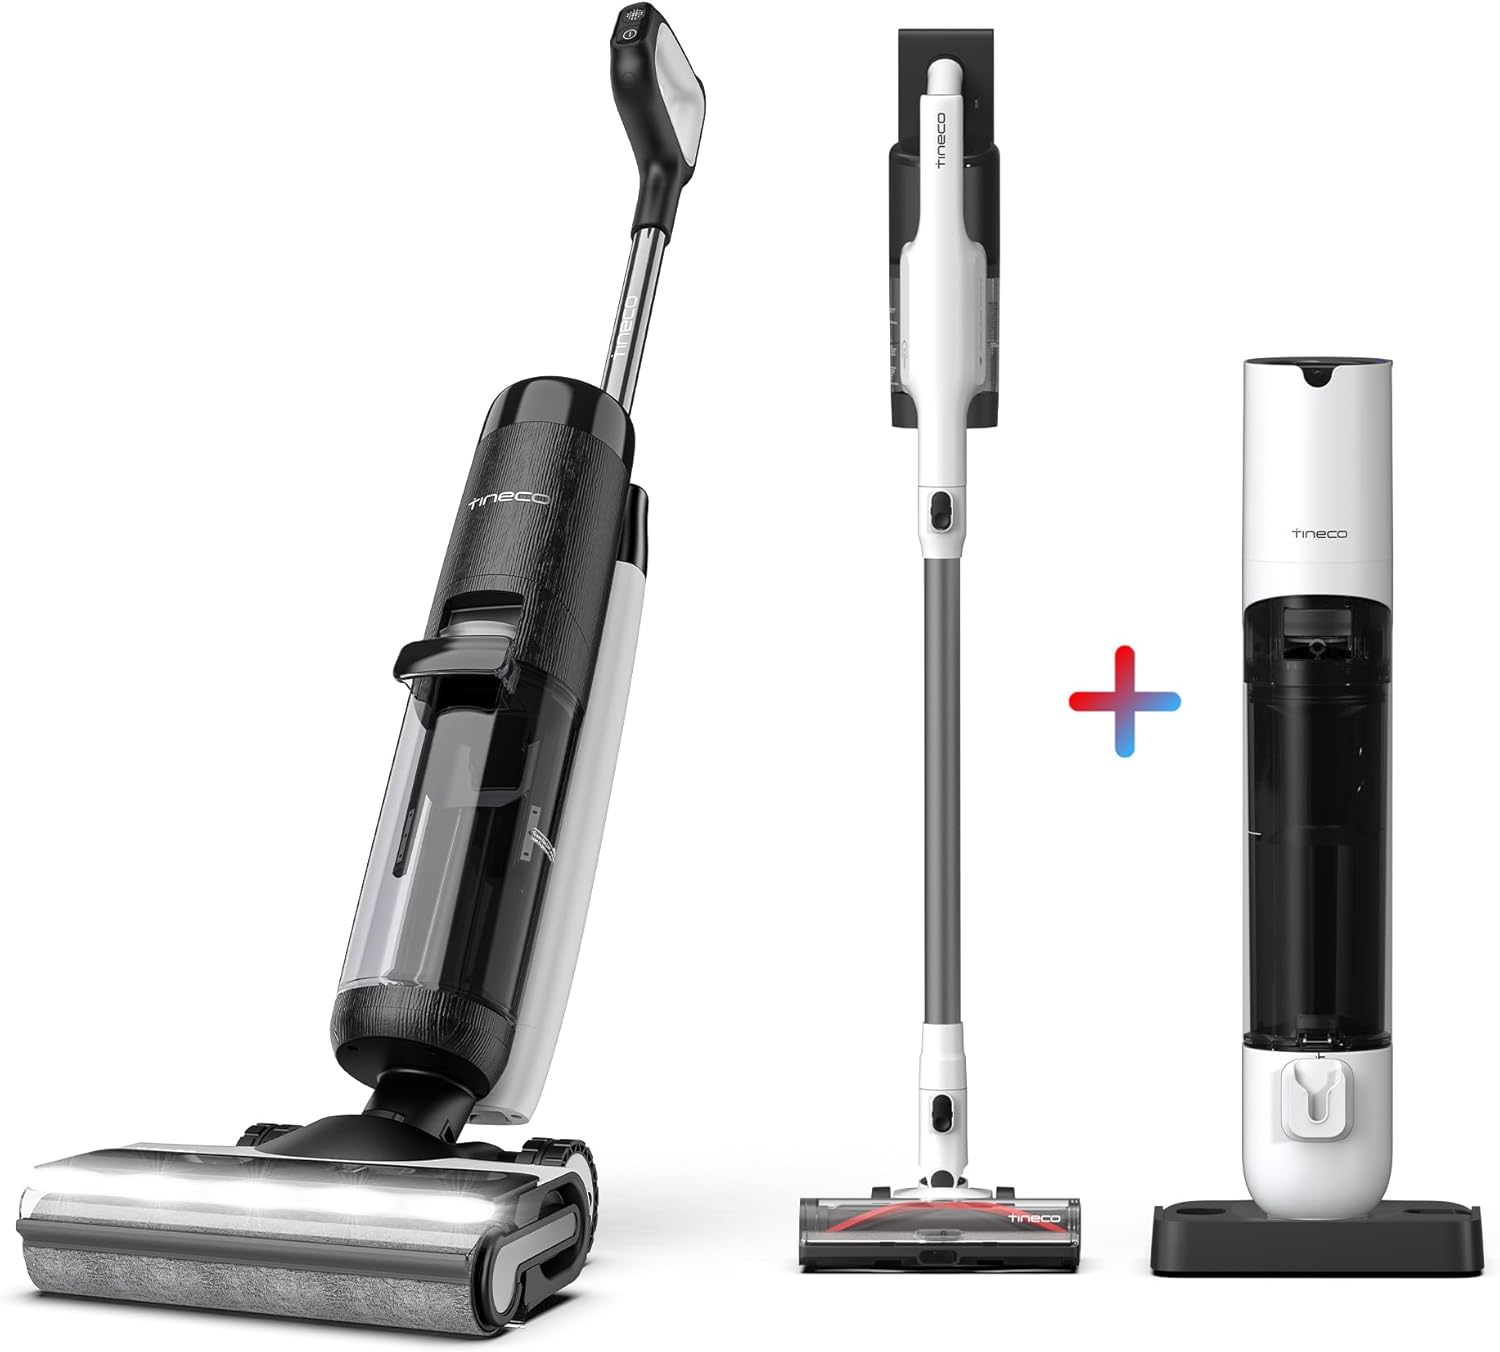
Figure 1: Tineco Floor ONE S7 PRO Wet Dry Vacuum Cleaner and Pure ONE Station 5. This image displays the complete system, including the main wet dry vacuum unit and the accompanying Pure ONE Station 5 auto dust base.
Key Features:
- MHCBS Technology: Ensures continuous fresh water washing and efficient dirty water recycling for a thorough clean.
- SmoothPower Bi-directional Self-Propulsion: Assists movement forward and backward, making cleaning effortless.
- Extended Runtime: Up to 40 minutes of operation, optimized by Tineco iLoop for efficient water and battery management.
- Pure ONE Station 5: A 3-in-1 cleaning station that self-cleans, recharges, and stores the vacuum.
- 45-Day Hassle-Free Dustbin: The 2.5L eco dustbin in the station holds debris for up to 45 days, reducing emptying frequency.
- Full-Path Self-Cleaning: The station automatically cleans the brush, tube, and filter of the vacuum.
- Powerful Suction: Equipped with 175W powerful suction for effective debris removal.

Figure 2: Illustration of MHCBS Technology. This diagram shows how the MHCBS technology ensures the brush always cleans with fresh water, preventing cross-contamination.
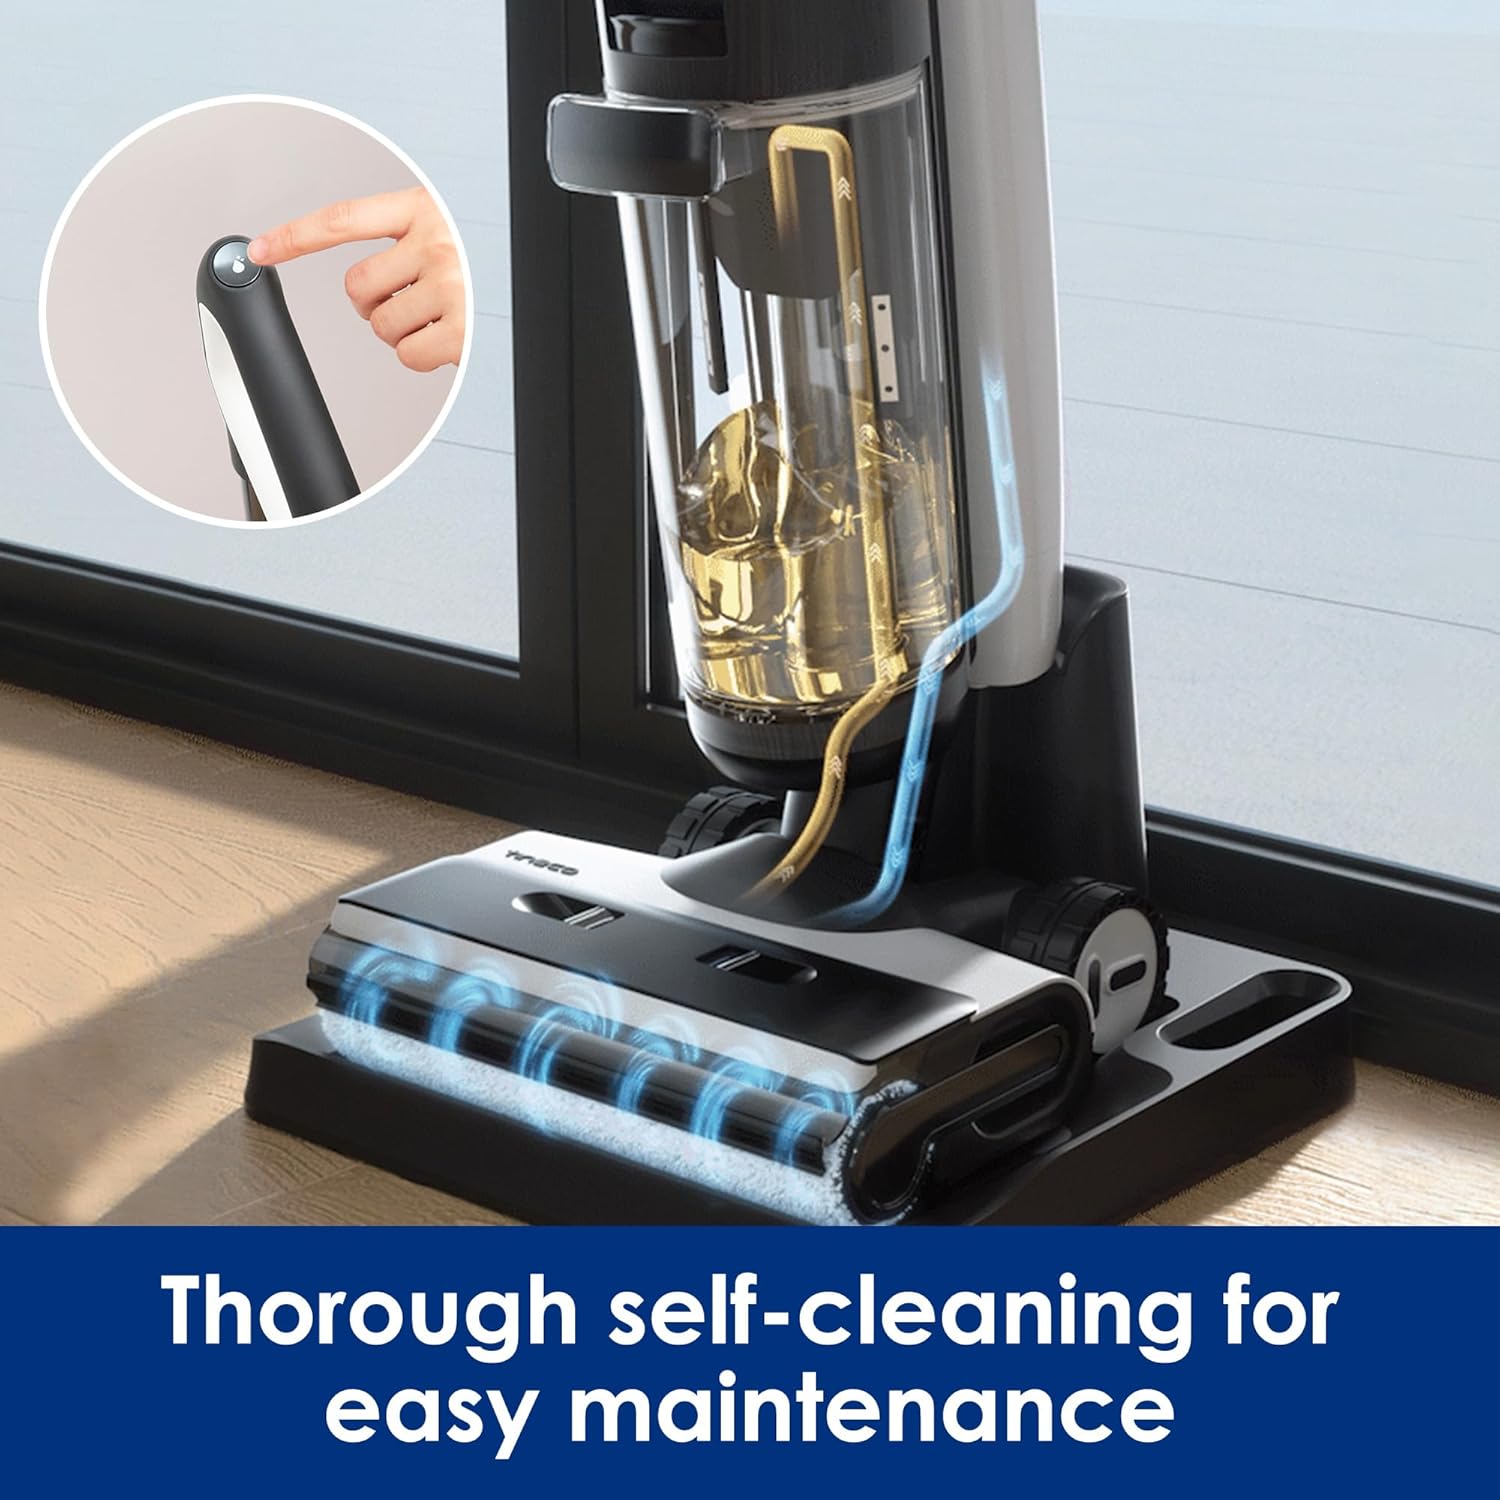
Figure 3: Self-Cleaning Mechanism. This image highlights the thorough self-cleaning process of the Tineco Floor ONE S7 PRO, simplifying maintenance.

Figure 4: SmoothPower Bi-directional Self-Propulsion. This image demonstrates the ease of movement provided by the SmoothPower system, making pushing or pulling the vacuum effortless.

Figure 5: Up to 40 Minutes of Runtime. This image illustrates the extended battery life of the Tineco Floor ONE S7 PRO, allowing for longer cleaning sessions.
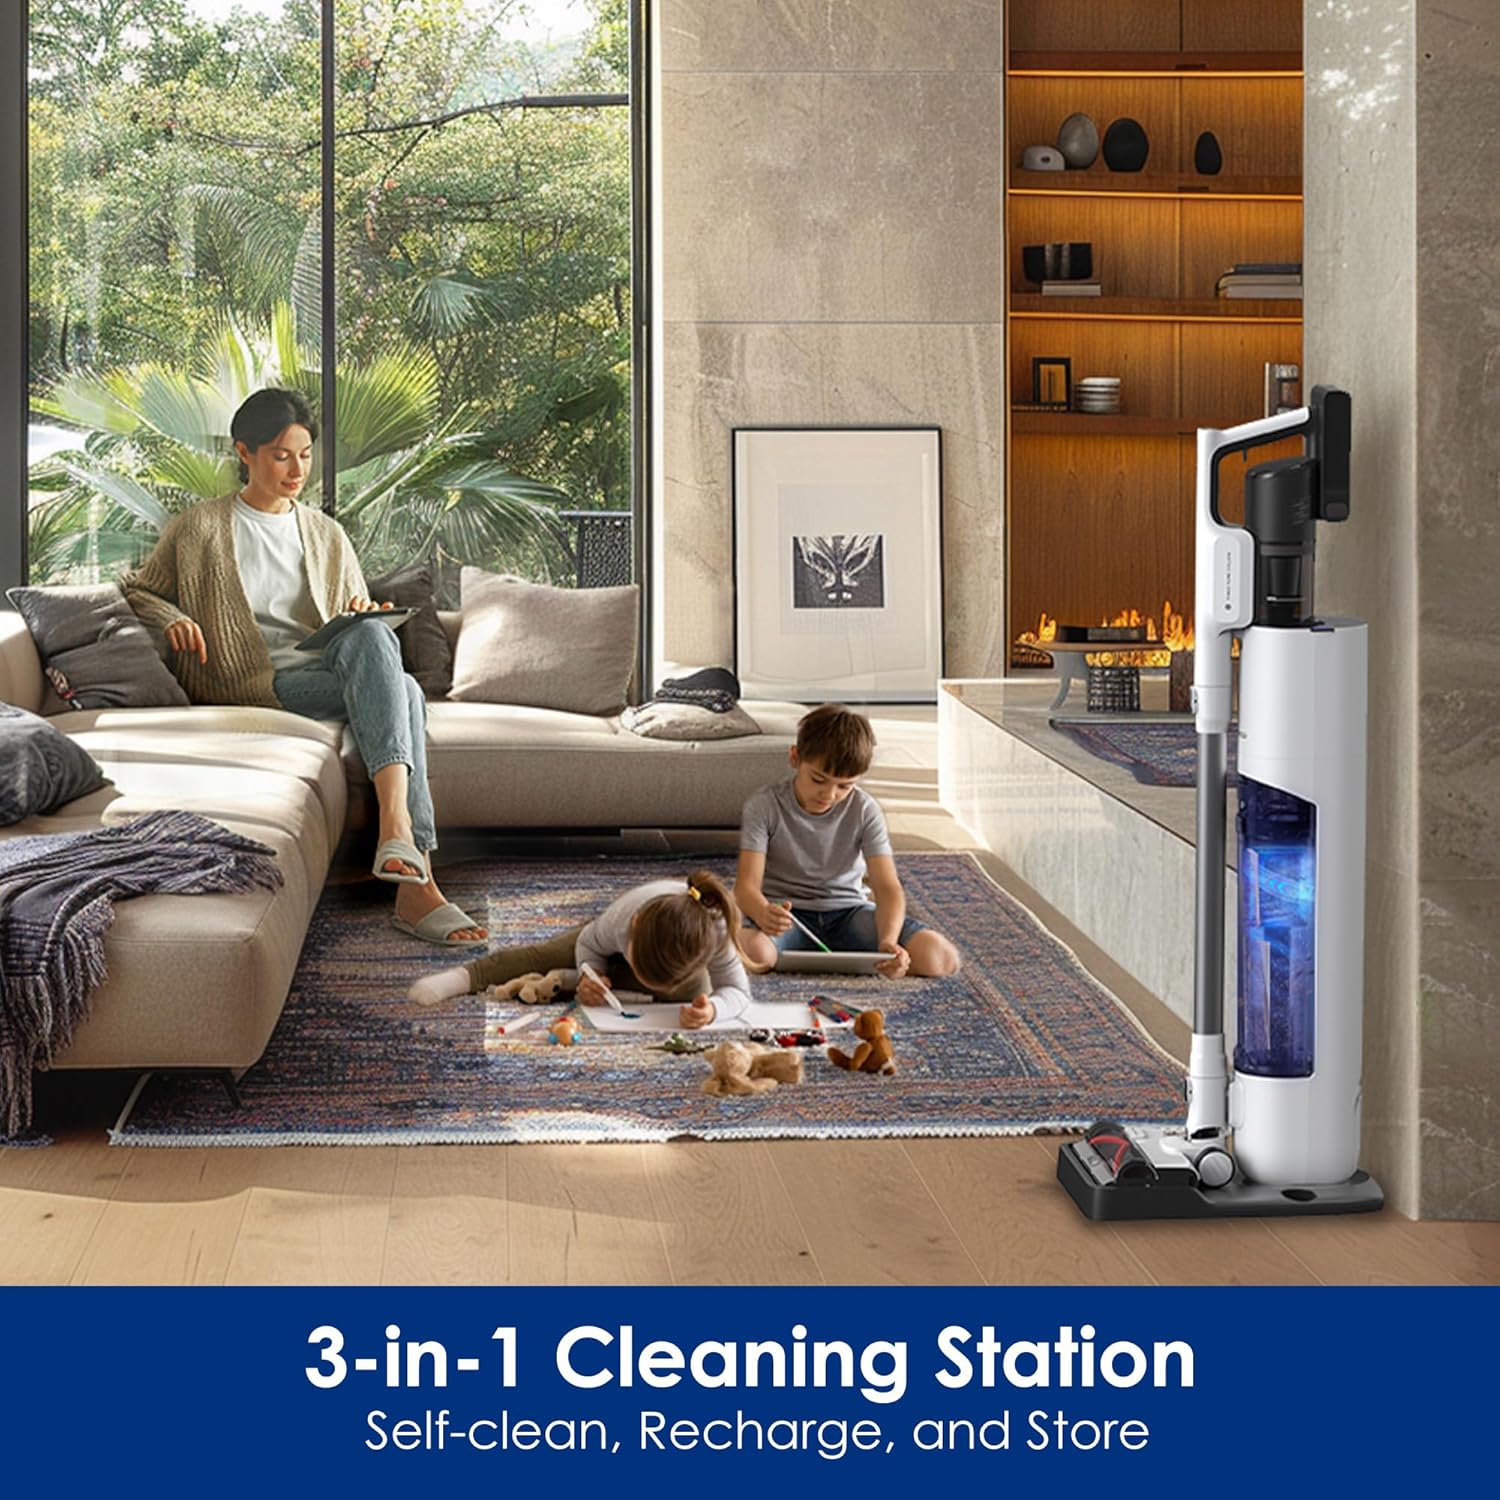
Figure 6: 45 Days Hassle-Free Dustbin. This image highlights the large capacity eco dustbin in the Pure ONE Station 5, reducing the frequency of emptying.
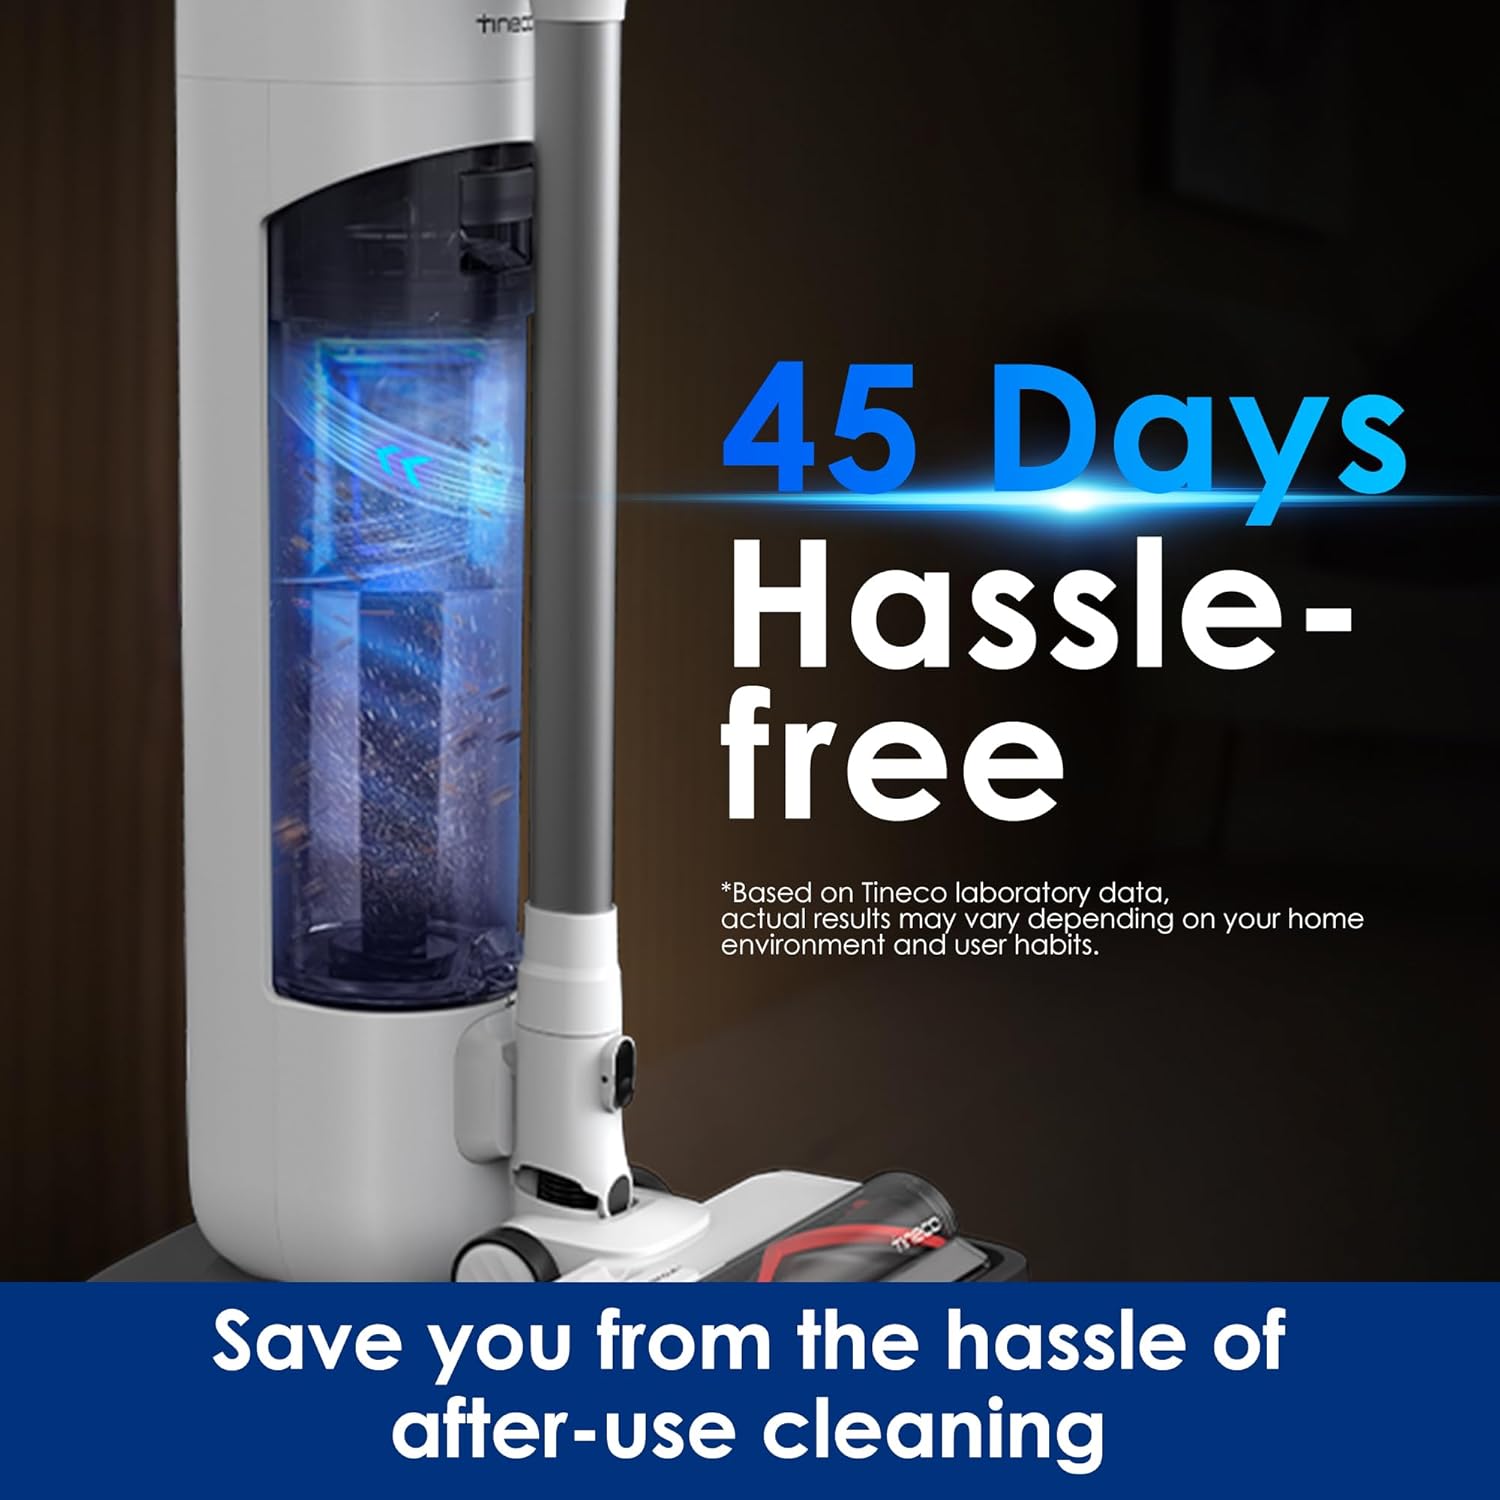
Figure 7: The 3-in-1 Cleaning Station. This image shows the Pure ONE Station 5, which serves as a self-clean, recharge, and storage hub for the vacuum.
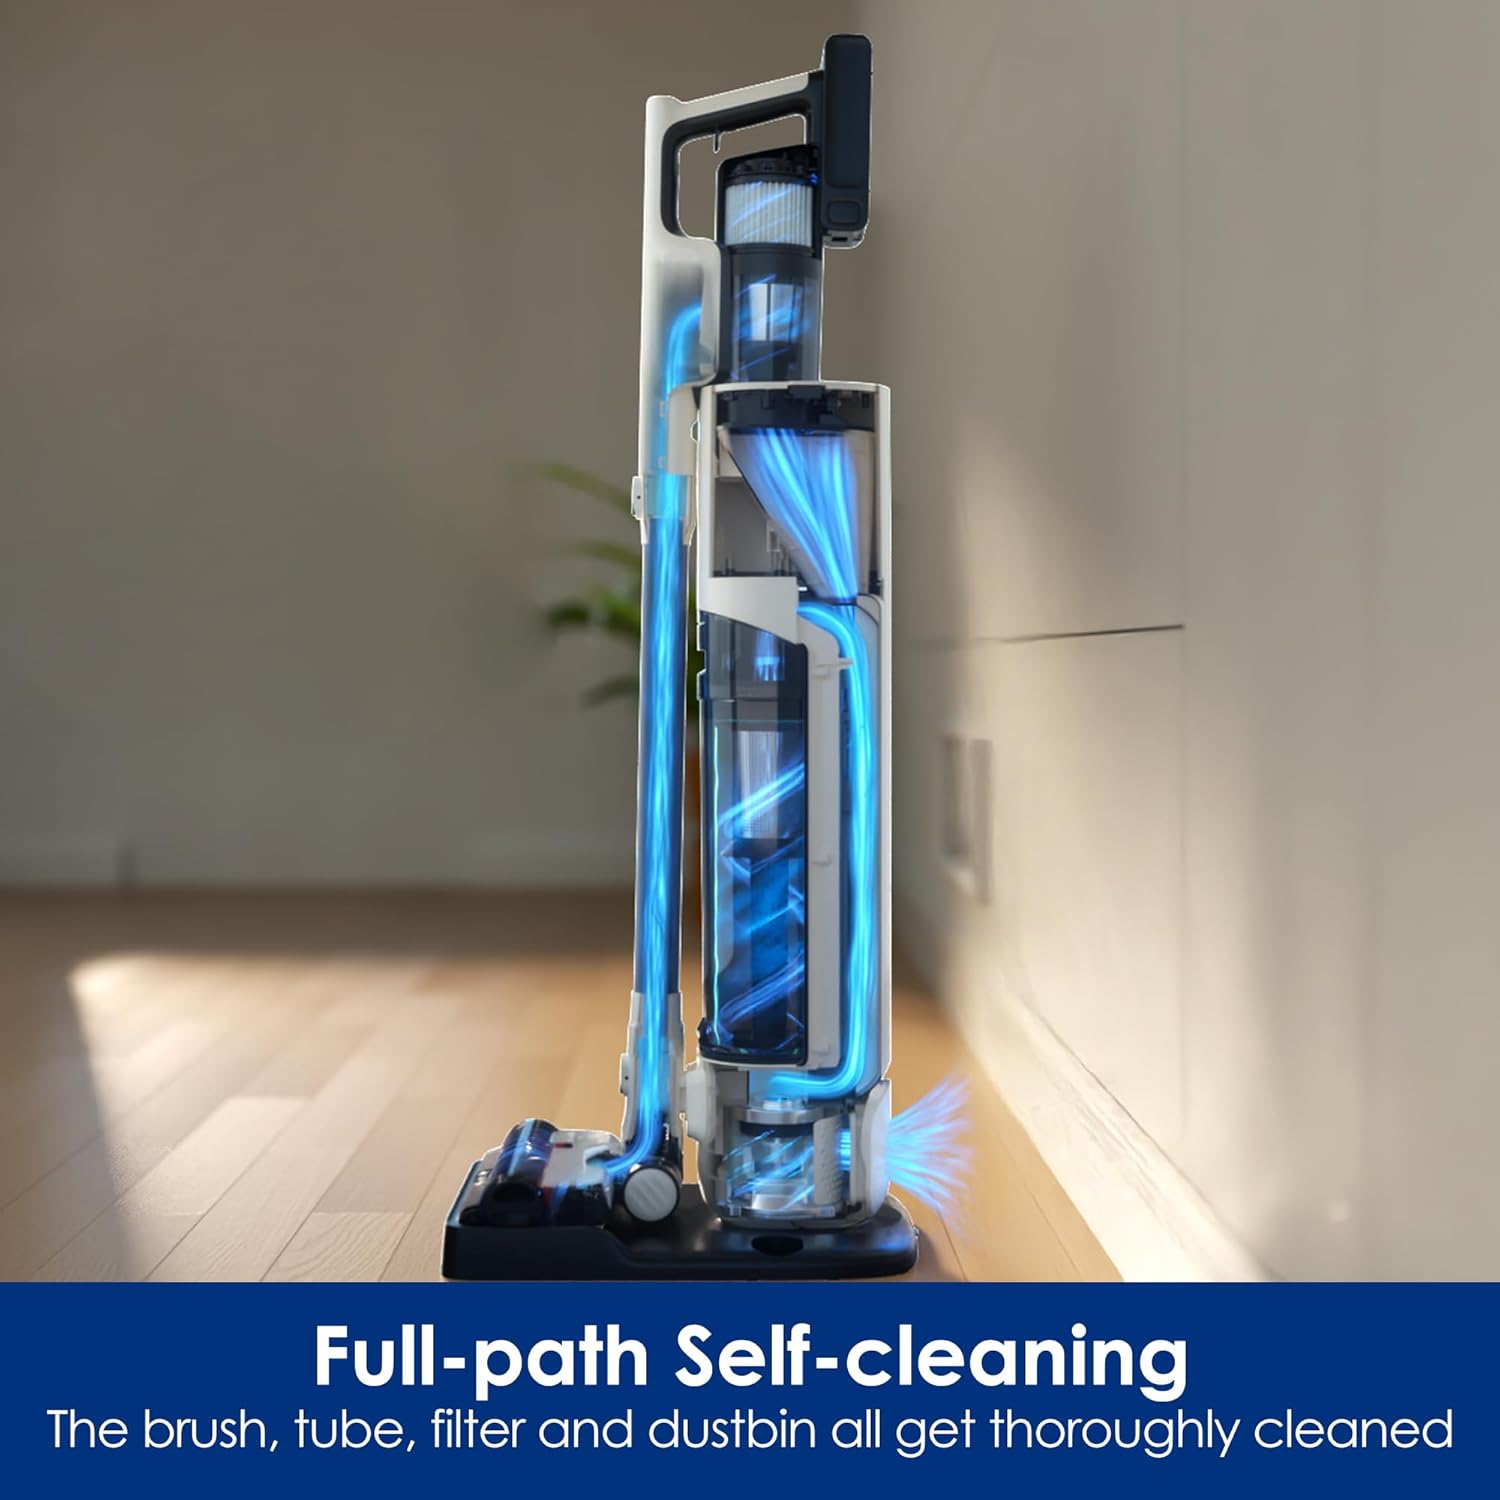
Figure 8: Full-Path Self-Cleaning. This image illustrates the comprehensive self-cleaning process within the Pure ONE Station 5, cleaning the brush, tube, and filter.
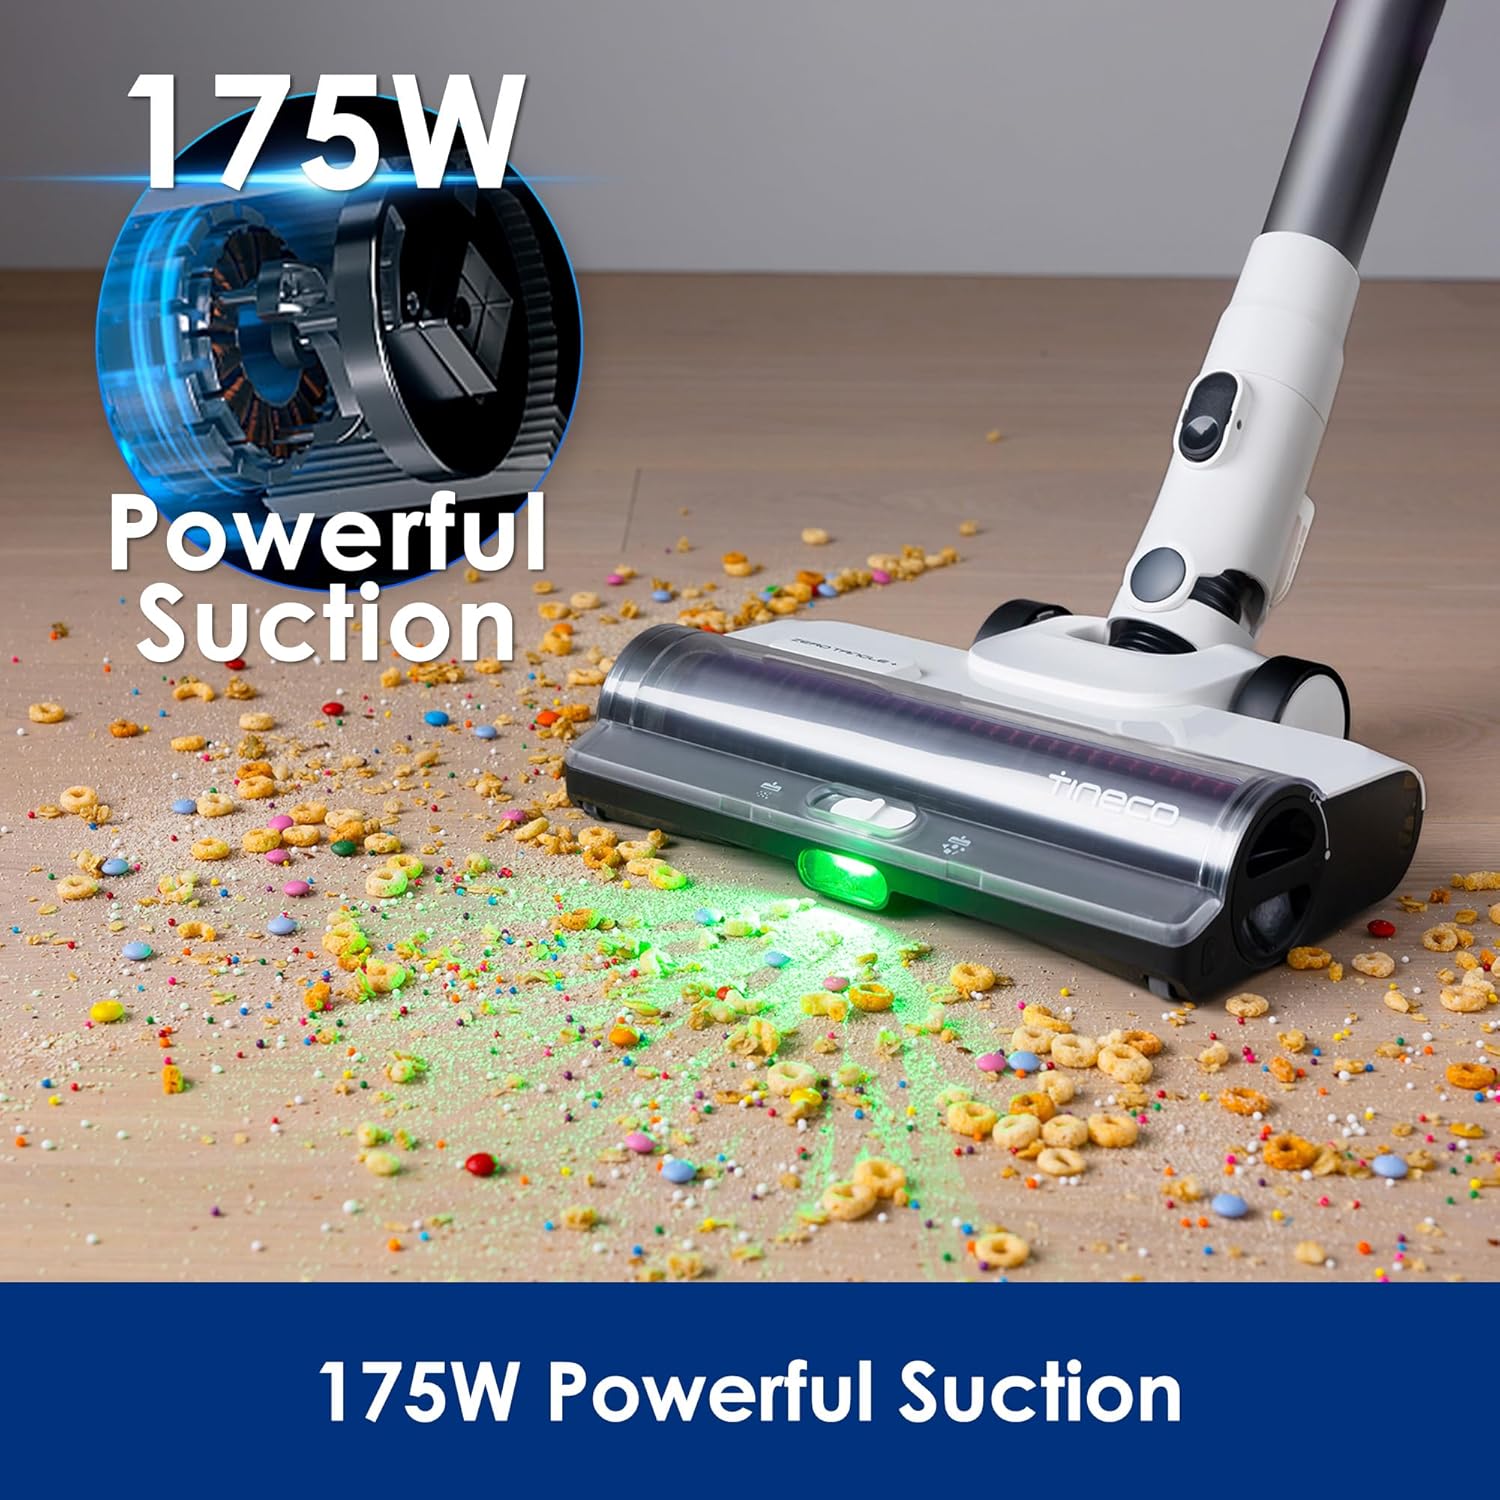
Figure 9: Powerful Suction Capability. This image illustrates the 175W powerful suction of the Tineco Floor ONE S7 PRO, effectively picking up various debris.
Setup
- Unpacking: Carefully remove all components from the packaging. Ensure all parts listed in the packing list are present.
- Assembly:
- Insert the handle into the main body of the vacuum until it clicks into place.
- Place the Pure ONE Station 5 on a flat, stable surface near a power outlet.
- Charging:
- Connect the power adapter to the Pure ONE Station 5 and plug it into a wall outlet.
- Place the Floor ONE S7 PRO vacuum onto the charging base of the station. The indicator lights will show charging status. Fully charge before first use (approximately 4-5 hours).
- Filling the Clean Water Tank:
- Remove the clean water tank from the vacuum.
- Fill the tank with clean tap water up to the MAX line. For optimal cleaning, add a small amount of Tineco cleaning solution (do not exceed the recommended amount).
- Securely reattach the clean water tank to the vacuum.
Operation
- Power On: Press the power button on the handle to turn on the vacuum. The LED display will illuminate.
- Mode Selection: The vacuum typically starts in Auto mode, which intelligently adjusts suction power and water flow based on detected mess. If other modes are available (e.g., MAX mode), refer to the display for selection.
- Cleaning:
- Tilt the vacuum back to engage the brush roll.
- Begin cleaning by pushing and pulling the vacuum across the floor. The SmoothPower bi-directional self-propulsion system will assist your movement.
- The iLoop Smart Sensor Technology will detect wet and dry messes, adjusting cleaning power automatically. The display will show the cleaning status (e.g., red for heavy dirt, blue for light dirt/clean).
- Emptying Dirty Water Tank: When the dirty water tank is full, an indicator will alert you. Remove the tank, empty its contents, rinse, and reattach.
- Returning to Station: After cleaning, return the vacuum to the Pure ONE Station 5 for charging and self-cleaning.
Maintenance
Regular maintenance ensures optimal performance and extends the lifespan of your Tineco Floor ONE S7 PRO and Pure ONE Station 5.
- Self-Cleaning Cycle:
- After each use, place the vacuum on the Pure ONE Station 5.
- Press the self-clean button on the station. The station will automatically clean the brush roll, internal tubes, and filter.
- Ensure the clean water tank has sufficient water for the self-cleaning cycle.
- Emptying the Eco Dustbin (Pure ONE Station 5):
- The 2.5L eco dustbin in the station can hold debris for up to 45 days, depending on usage.
- When the dustbin full indicator appears on the station, remove the dustbin and dispose of the contents.
- Wipe the interior of the dustbin and the station's dustbin compartment with a damp cloth.
- Cleaning the Brush Roll:
- Even with self-cleaning, periodically remove the brush roll for manual inspection and cleaning.
- Remove any tangled hair or debris from the brush roll and its housing using the cleaning tool provided.
- Rinse the brush roll under running water and allow it to air dry completely before reinserting.
- Cleaning the Filter:
- The filter is part of the full-path self-cleaning, but it's recommended to manually rinse the filter every few uses.
- Remove the filter from the dirty water tank. Rinse it under cold water until clean.
- Allow the filter to air dry for at least 24 hours before reinserting. Do not use a wet filter.
- Cleaning the Dirty Water Tank:
- After each use, empty and rinse the dirty water tank thoroughly.
- Wipe the inside of the tank to remove any residue.
Troubleshooting
Refer to this section for common issues and their solutions. If the problem persists, contact Tineco customer support.
| Problem | Possible Cause | Solution |
|---|---|---|
| Vacuum not turning on | Battery is low or depleted. | Place the vacuum on the Pure ONE Station 5 to charge. Ensure the station is plugged in. |
| Poor suction or cleaning performance | Dirty water tank is full; Clean water tank is empty; Brush roll is tangled or dirty; Filter is clogged. | Empty the dirty water tank. Refill the clean water tank. Clean the brush roll. Clean or replace the filter. |
| Water leakage | Water tanks not properly installed; Tank seals are damaged. | Ensure both clean and dirty water tanks are securely in place. Check tank seals for damage and contact support if necessary. |
| Self-cleaning not working | Insufficient water in clean water tank; Vacuum not properly seated on station. | Ensure clean water tank is filled. Reposition the vacuum firmly on the Pure ONE Station 5. |
| Unusual noise | Obstruction in brush roll or air path; Damaged component. | Check brush roll and air path for blockages and remove. If noise persists, contact customer support. |
Specifications
| Feature | Detail |
|---|---|
| Brand | Tineco |
| Model Name | Tineco Floor ONE S7 PRO |
| Special Feature | Bagless |
| Included Components | Brush |
| Is Cordless? | Yes |
| Capacity | 2.5 Liters (Eco Dustbin) |
| Runtime | Up to 40 minutes |
| Recommended Uses | Hard Floor, Bare Floor |
| Color | Black and Silver |
| Battery Type | Lithium-Ion |
| Control Method | App, Push Button |
| Portable | Yes |
| Indoor/Outdoor Usage | Indoor |
Warranty and Support
Tineco products are designed for durability and performance. For warranty information and customer support, please refer to the official Tineco website or contact their customer service directly.
Typically, Tineco offers a limited warranty on its products. Keep your purchase receipt as proof of purchase for any warranty claims.
For technical assistance, spare parts, or service inquiries, please visit the Tineco Support Page or contact their customer service team.