1. Introduction
This manual provides comprehensive instructions for the installation, operation, and maintenance of your ECO-WORTHY 3000W 24V Hybrid Solar Charge Inverter. This all-in-one unit integrates a 3000W pure sine wave inverter and a 60A MPPT solar charge controller, designed to efficiently manage your solar power system.
Key features include:
- Multiple Operating Modes: Supports two output modes (utility bypass and inverter output) and four charging modes (solar only, utility priority, solar priority, and hybrid charge).
- Advanced MPPT Technology: Features a 60A MPPT charge controller with 99.9% efficiency for optimal solar energy harvesting.
- Pure Sine Wave Output: Provides stable and clean power, suitable for sensitive electronics.
- Intelligent Design: Equipped with an LCD screen and LED indicators for real-time system data, an AC output control switch, an energy-saving mode, and a variable-speed cooling fan.
- Broad Battery Compatibility: Compatible with various 24V battery types, including Gel, AGM, Lithium, LiFePO4, Flooded, and NCM/NCA batteries.
2. Product Overview
The ECO-WORTHY Hybrid Solar Charge Inverter combines essential components of a solar power system into a single unit, simplifying installation and operation.

Image: Front view of the ECO-WORTHY 3000W 24V Hybrid Solar Charge Inverter, showing the LCD display and control buttons.
2.1. Bottom Interface and Connections
The bottom panel of the inverter provides all necessary connection ports for your solar power system.

Image: Detailed view of the inverter's bottom interface, highlighting various connection ports and their labels.
- On/Off Switch: Main power control for the unit.
- AC Input Port: Connects to the utility grid or an AC generator.
- AC Output Port: Provides 230V AC power to your loads.
- PV+ PV- Port: Connects to your solar panel array.
- Grounding Screw Hole: For system grounding to ensure safety.
- RS485 Communication Port: For data communication with external devices.
- USB Communication Port: For data communication and monitoring.
- Dry Node Port: For external control or signaling.
- Battery Port (BAT+ BAT-): Connects to your 24V battery bank.
2.2. All-in-One Design
This inverter integrates a 60A MPPT solar charge controller and a 3000W pure sine wave inverter into a single compact unit, reducing wiring complexity and installation time.

Image: Illustration of the inverter's internal components, demonstrating the integration of the 60A MPPT solar charge controller and the 3000W pure sine wave inverter.
3. Setup and Installation
Proper installation is crucial for the safe and efficient operation of the inverter. It is recommended that installation be performed by qualified personnel.
3.1. Wiring Diagram
The following diagram illustrates the typical wiring connections for the ECO-WORTHY Hybrid Solar Charge Inverter in a complete solar power system.
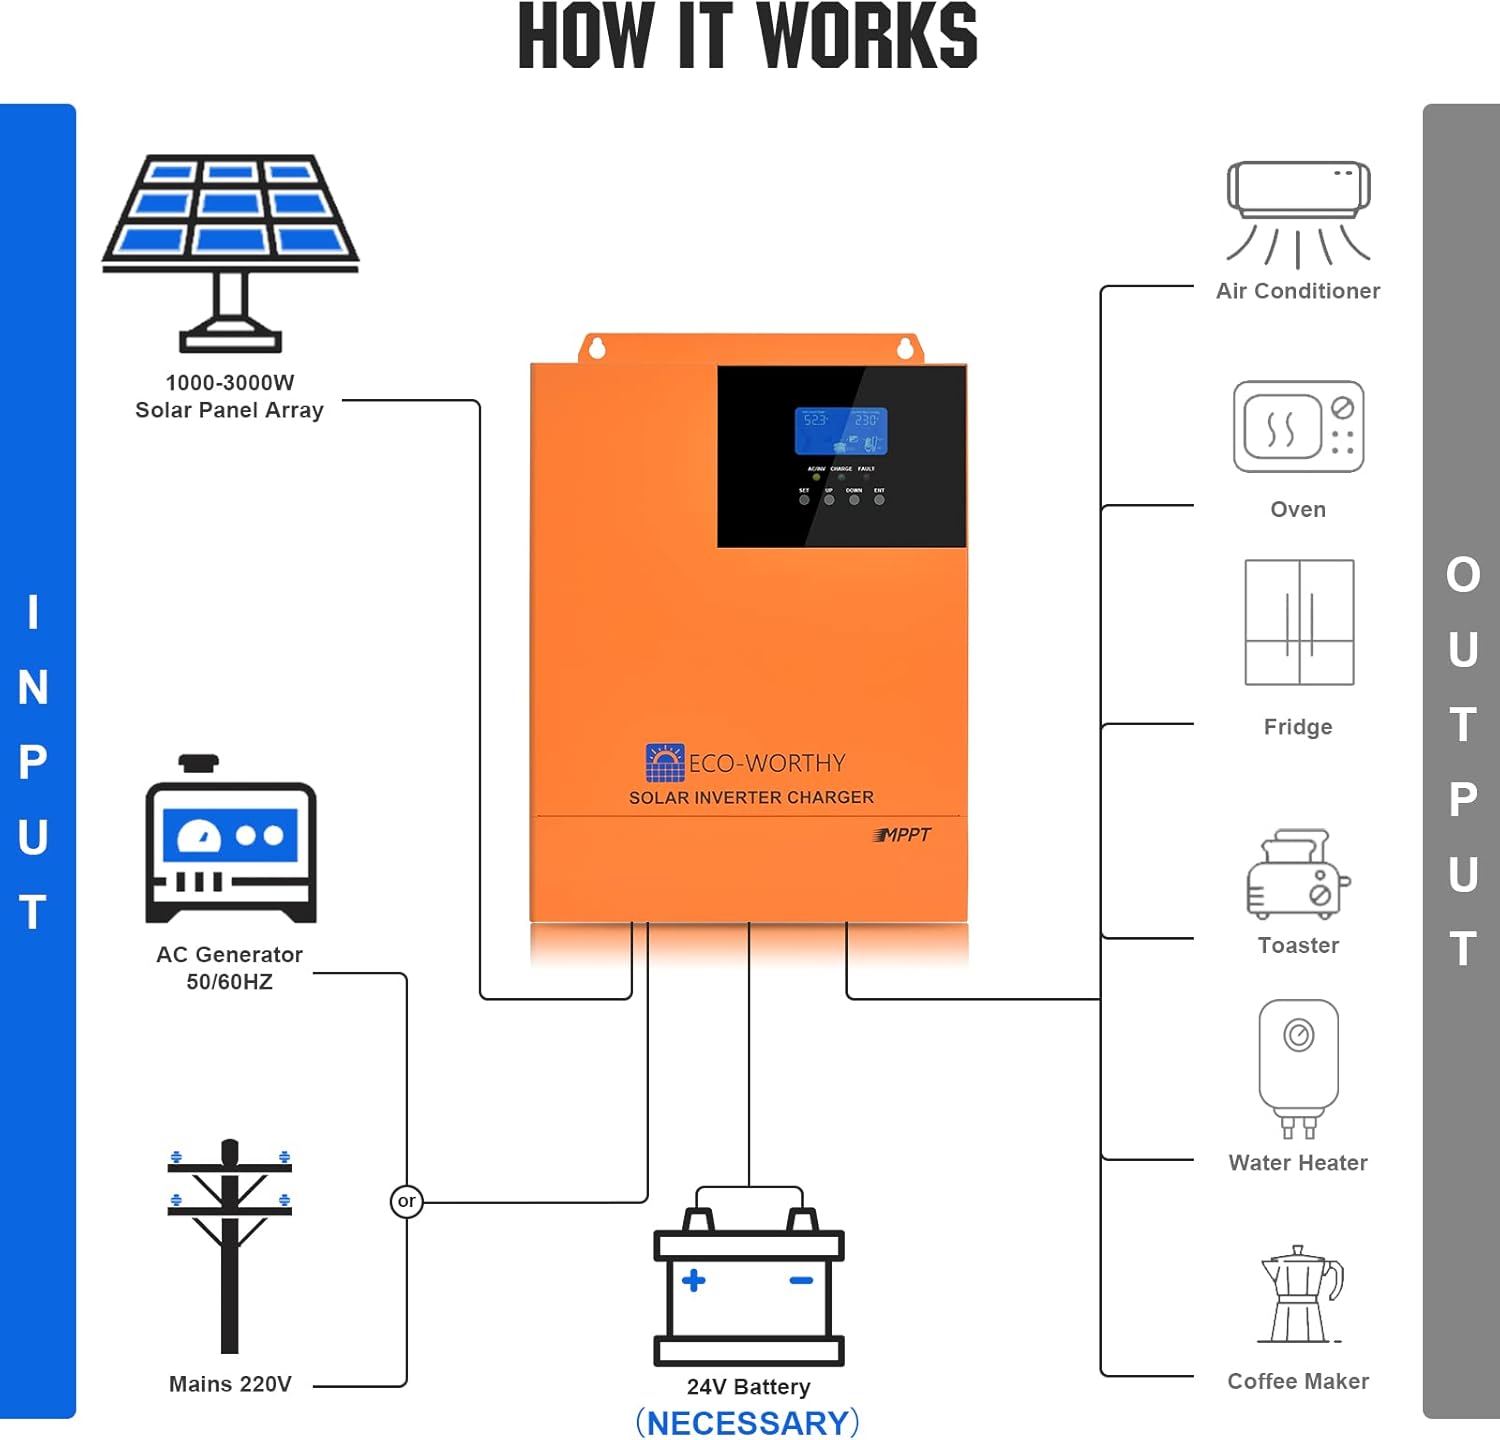
Image: A comprehensive wiring diagram showing connections from solar panels, AC generator/mains, 24V battery, and various AC loads to the hybrid inverter.
- Input: Connect solar panel array (1000-3000W), AC generator (50/60Hz), or Mains 220V.
- Battery: Connect a 24V battery bank (necessary for operation).
- Output: Connect various AC loads such as air conditioners, ovens, refrigerators, toasters, water heaters, and coffee makers.
3.2. Wire Gauge Recommendations
Using appropriate wire gauges is essential for safety and performance. Refer to the following recommendations:

Image: Visual representation of recommended wire gauges for battery and AC load connections.
- Battery Wire: 2AWG (American Wire Gauge)
- AC Loads Wire: 7AWG
Always ensure all connections are secure and properly insulated. Consult local electrical codes for specific requirements.
4. Operating Modes
The inverter offers flexible operating modes to suit various power requirements and grid conditions.
4.1. Output Modes (UPS Function)
The inverter provides three output priority modes to manage power delivery to your loads, functioning as an Uninterruptible Power Supply (UPS).
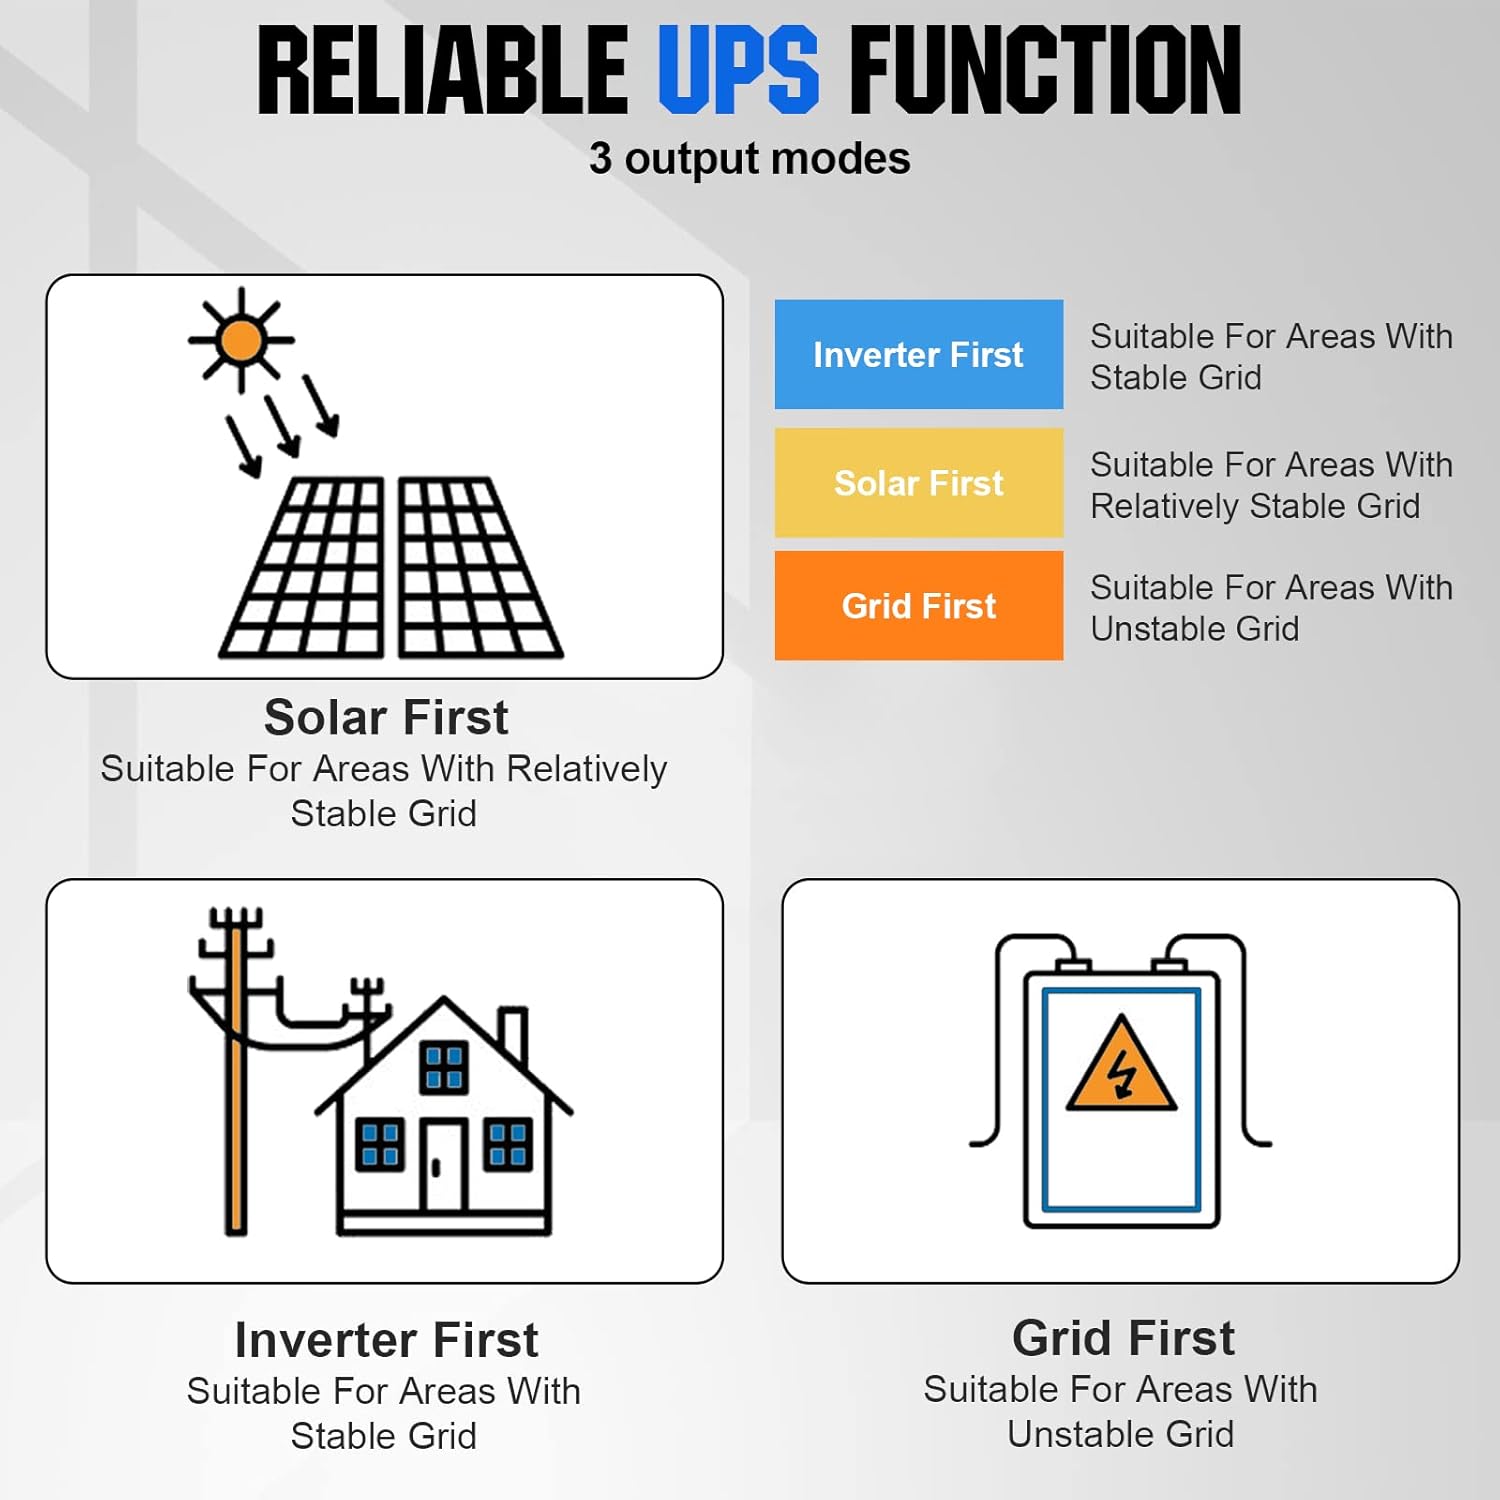
Image: Flowchart depicting the three reliable UPS output modes: Inverter First, Solar First, and Grid First, with descriptions of their suitable applications.
- Inverter First: Prioritizes power from the inverter (battery/solar). Suitable for areas with stable grid power where you want to maximize self-consumption.
- Solar First: Prioritizes solar power, then battery, then grid. Suitable for areas with relatively stable grid power, aiming to use solar energy primarily.
- Grid First: Prioritizes utility grid power, then inverter (battery/solar). Suitable for areas with unstable grid power, ensuring continuous supply from the grid when available.
4.2. Battery Charging Modes
The inverter supports four battery charging modes to optimize energy storage based on your preferences and available sources.

Image: Illustrations of the four battery charging modes: Solar Priority, Solar Only, Mains Priority, and Hybrid Charge, explaining how each mode utilizes solar and grid power.
- Solar Only: Charges the battery exclusively from solar panels.
- Mains Priority: Charges the battery primarily from the utility grid, switching to solar if the grid is insufficient.
- Solar Priority: Charges the battery primarily from solar panels, switching to the utility grid when solar is insufficient.
- Hybrid Charge: Utilizes both solar and utility grid power simultaneously for the fastest charging.
5. Battery Compatibility
The ECO-WORTHY Hybrid Solar Charge Inverter is designed to be compatible with a wide range of 24V battery types, ensuring flexibility for various energy storage solutions.

Image: Icons representing different battery types, indicating the inverter's compatibility with Flooded (FLD), AGM/Sealed (SLA), GEL, Lithium (LF6), LiFePO4 (LF4), and NCM/NCA batteries.
Compatible 24V battery types include:
- Flooded (FLD)
- AGM/Sealed (SLA)
- GEL
- Lithium (Li-ion)
- LiFePO4
- NCM/NCA
Note: The unit requires a 24V battery bank to operate.
6. Monitoring and Settings
The inverter features an intuitive LCD display and control buttons for easy monitoring of system status and adjustment of settings.

Image: Close-up of the inverter's LCD screen showing various display modes and the control buttons (SET, UP, DOWN, ENT) with their functions and LED indicator meanings.
6.1. LCD Display
The LCD provides dynamic information including input/battery voltage, output/load, AC output frequency, charging mode, battery type, charging voltage settings, and equalization charging voltage.
6.2. Control Buttons
- SET: Enter/Exit settings menu.
- UP: Navigate to the previous choice or increase a value.
- DOWN: Navigate to the next choice or decrease a value.
- ENT: Confirm/Enter options under the settings menu.
6.3. LED Indicators
- AC/INV (Yellow): Steady on indicates Mains output. Flashing indicates Inverter output.
- CHARGE (Green): Steady on indicates charging completed. Flashing indicates battery charging.
- FAULT (Red): Steady on indicates a fault state.
7. Maintenance
Regular maintenance helps ensure the longevity and optimal performance of your ECO-WORTHY Hybrid Solar Charge Inverter.
- Cleaning: Periodically clean the exterior of the inverter with a dry cloth. Ensure ventilation openings are free from dust and debris to prevent overheating.
- Connection Check: Regularly inspect all electrical connections (solar panels, battery, AC input/output) to ensure they are tight and free from corrosion.
- Environmental Conditions: Ensure the inverter is installed in a well-ventilated area, away from direct sunlight, moisture, and flammable materials.
- Battery Inspection: Follow the manufacturer's maintenance guidelines for your specific battery type.
8. Troubleshooting
If you encounter issues with your inverter, refer to the following basic troubleshooting steps. For complex problems, contact customer support.
- No Power Output: Check the main On/Off switch, battery connections, and AC output circuit breaker. Verify battery voltage is within the operating range.
- No Charging: Ensure solar panels are connected correctly and receiving sufficient sunlight. Check AC input connection if using utility charging. Verify charging mode settings.
- Fault Indicator On: Note the specific fault code or pattern on the LCD/LEDs and consult the detailed troubleshooting section in the full product manual (if available) or contact support.
- Overheating: Ensure adequate ventilation around the unit. Clear any obstructions from the cooling fan vents. Reduce load if continuously operating at maximum capacity.
9. Specifications
Technical specifications for the ECO-WORTHY 3000W 24V Hybrid Solar Charge Inverter.
| Feature | Specification |
|---|---|
| Brand | ECO-WORTHY |
| Model Number | ECO3000W(SR) |
| ASIN | B0DGLN1R8D |
| UPC | 810127135666 |
| Item Weight | 7.95 Kilograms |
| Manufacturer | ECO-WORTHY |
| Average Customer Review | 3.8 out of 5 stars (10 ratings) |
| Spare Parts Availability | Information not available |
| Software Updates Guaranteed Until | Information not available |
10. Warranty and Support
Information regarding specific warranty terms and conditions for the ECO-WORTHY 3000W 24V Hybrid Solar Charge Inverter is not available in the provided product data. For warranty claims, technical support, or service inquiries, please refer to the documentation included with your product or contact ECO-WORTHY customer service directly through their official channels.
Please note that information on spare parts availability and guaranteed software updates is also not available in the provided data.