BTSEURY BTSEURYcf1q4ebd93
Aluminum Alloy Crank Arm User Manual
Brand: BTSEURY | Model: BTSEURYcf1q4ebd93
1. Product Overview
The BTSEURY Aluminum Alloy Crank Arm is a high-quality component designed for single-speed bicycles. Constructed from durable aluminum alloy, it offers a lightweight yet robust solution for your bike's drivetrain. Its precise tooth pattern and multi-stripe fixing method ensure efficient power transfer and a secure fit.
Key Features:
- Aluminum Alloy Material: Lightweight, corrosion-resistant, wear-resistant, sturdy, and durable construction.
- Fine Processed Tooth Pattern: 144 BCD 48T single speed crankset with multi-stripe fixing method for direct crank force.
- Lightweight Design: Interior weight reduction design for a lighter crank.
- Good Workmanship: Exquisite craftsmanship and aesthetic appeal for a superior user experience.
- Easy to Install and Disassemble: Simple installation, making it an ideal replacement part for bike repair.
2. Setup and Installation
Proper installation is crucial for the performance and longevity of your crank arm set. If you are unsure about any steps, it is recommended to seek professional assistance from a qualified bicycle mechanic.
Tools Required:
- Crank Puller (if removing an old crank)
- Hex Wrenches (typically 8mm or 10mm for crank bolts)
- Torque Wrench (recommended for precise tightening)
- Grease (for spindle and pedal threads)
- Clean Rags
Installation Steps:
- Prepare the Bottom Bracket: Ensure the bottom bracket spindle is clean and free of debris. Apply a thin layer of grease to the spindle for easier installation and to prevent seizing.
- Install Right Crank Arm (with Chainring): Slide the right crank arm onto the drive-side (right side) of the bottom bracket spindle. Ensure the splines or square taper are correctly aligned.
- Secure Right Crank Arm: Insert the crank bolt into the spindle and tighten it. If using a torque wrench, tighten to the manufacturer's specified torque (refer to your bottom bracket or bike manufacturer's guidelines, typically around 35-50 Nm).
- Install Left Crank Arm: Slide the left crank arm onto the non-drive side (left side) of the bottom bracket spindle, ensuring it is aligned 180 degrees opposite the right crank arm.
- Secure Left Crank Arm: Insert the crank bolt and tighten it to the same torque specifications as the right crank arm.
- Install Pedals: Apply a small amount of grease to the pedal threads. Note that the right pedal tightens clockwise, and the left pedal tightens counter-clockwise. Tighten securely.

Image: The complete BTSEURY Aluminum Alloy Crank Arm Set, showing both the crank arm with integrated chainring and the separate left crank arm. This image provides a clear view of the product's design and components.
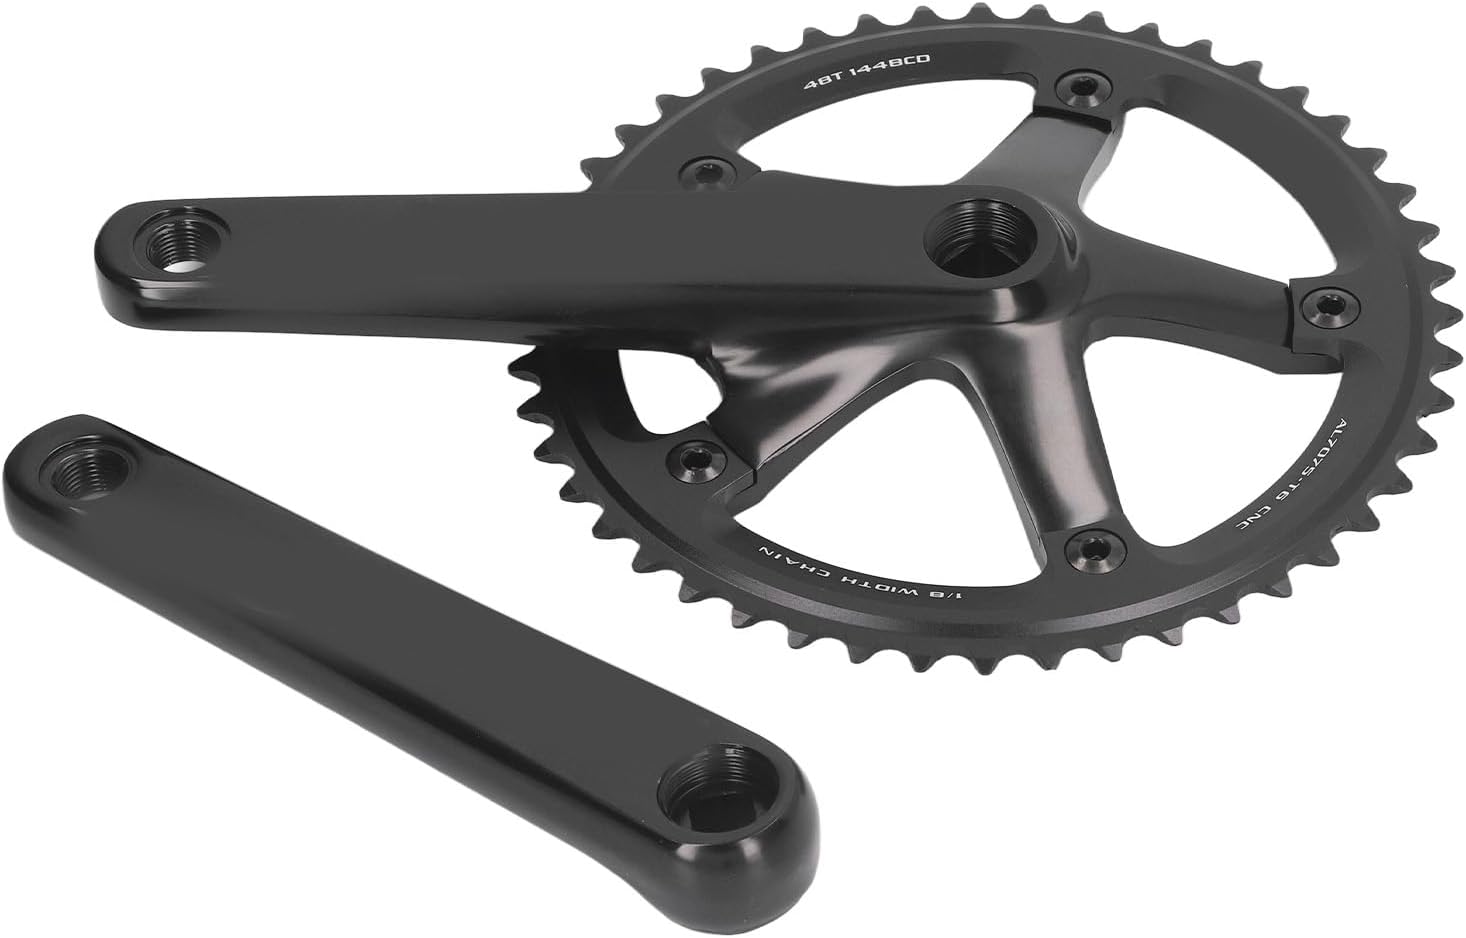
Image: A different perspective of the BTSEURY crank arm set, highlighting the square taper interface on both crank arms and the bolt holes for the chainring. This view helps in understanding the attachment points.
3. Operating Instructions
Once installed, the crank arm set operates as part of your bicycle's drivetrain. No special operating procedures are required beyond normal cycling. However, it is important to be aware of the following:
- Regular Inspection: Periodically check the crank arms and chainring for any signs of looseness, bending, or damage before each ride.
- Listen for Noises: Pay attention to any unusual creaking, clicking, or grinding sounds coming from the crank area during pedaling. These could indicate a loose component or a need for maintenance.
- Smooth Pedaling: Ensure your pedaling motion is smooth and consistent. Avoid excessive force or sudden impacts that could stress the crank arms.

Image: The BTSEURY crank arm set displayed in the foreground, with a black bicycle against a brick wall in the background. This image illustrates the product in context with its intended use.
4. Maintenance
Regular maintenance will extend the life of your crank arm set and ensure safe operation.
- Cleaning: Keep the crank arms and chainring clean from dirt, mud, and road grime. Use a mild detergent and water, then rinse thoroughly and dry.
- Bolt Tightness: Periodically check the tightness of the crank bolts and chainring bolts. Loose bolts can lead to creaking noises, reduced efficiency, and potential damage.
- Inspection for Wear: Inspect the chainring teeth for excessive wear (e.g., 'shark fin' shape). Worn teeth can lead to poor chain retention and shifting issues. Also, check the crank arms for any cracks or signs of fatigue, especially around the pedal and spindle interfaces.
- Lubrication: While the crank arms themselves don't require lubrication, ensure your bottom bracket and chain are properly lubricated according to their respective maintenance schedules.

Image: A detailed close-up of the BTSEURY crank arm and chainring. The image highlights the interior weight reduction design and the precise tooth pattern, emphasizing the product's engineering and finish.

Image: Another close-up view focusing on the material and fine processed tooth pattern of the BTSEURY crank arm. This image provides a clear view of the aluminum alloy texture and the precision of the chainring teeth.
5. Troubleshooting
Here are some common issues and their potential solutions:
- Crank Arm Feels Loose:
Solution: Check and re-tighten the crank bolts on both sides. Ensure they are torqued to the manufacturer's specifications. If the problem persists, the bottom bracket spindle or the crank arm interface might be worn and require replacement. - Creaking or Clicking Noise from Crank Area:
Solution: This is often caused by loose components. Check crank bolts, pedal tightness, and chainring bolt tightness. Remove, clean, and re-grease the bottom bracket spindle and pedal threads before reassembly. Ensure the bottom bracket itself is properly installed and tightened. - Chain Skipping or Poor Engagement:
Solution: Inspect the chainring teeth for wear. If they appear sharp or hooked ('shark fin' shape), the chainring may need to be replaced. Also, check your chain for wear and replace if necessary. - Bent or Damaged Crank Arm:
Solution: If a crank arm is visibly bent or shows signs of structural damage (e.g., cracks), it must be replaced immediately. Do not attempt to straighten a bent crank arm as it can weaken the material and lead to catastrophic failure.
6. Specifications
| Attribute | Value |
|---|---|
| Item Model Number | BTSEURYcf1q4ebd93 |
| ASIN | B0DGLKN7XS |
| Manufacturer | BTSEURY |
| Item Weight | 1.55 pounds (Approx. 705g) |
| Package Dimensions | 11.02 x 8.66 x 1.97 inches |
| Material | Aluminum Alloy |
| BCD | 144 |
| Chainring Teeth | 48T |
| Speed Compatibility | Single Speed |
7. Warranty and Support
For warranty information and customer support regarding your BTSEURY Aluminum Alloy Crank Arm, please refer to the documentation included with your purchase or visit the official BTSEURY website. Typically, warranty details cover manufacturing defects and material flaws under normal use conditions.
If you have any questions or require assistance, please contact BTSEURY customer service through their official channels.
Ask a question about this manual
Ask about setup, troubleshooting, compatibility, parts, safety, or missing instructions. Manuals+ will review the question and use this page’s manual context to help answer it.