1. Introduction
Thank you for choosing the flexman Desktop Monitor Stand Riser. This product is designed to enhance your workspace ergonomics and connectivity. By elevating your monitor to an optimal viewing height, it helps reduce neck and eye strain. Additionally, its integrated 8-in-1 docking station, fast charging capabilities, and organizational features provide a streamlined and efficient desktop environment.
Please read this manual thoroughly before use to ensure proper setup and operation.
2. Package Contents
Verify that all items listed below are present in your package:
- 1 x Monitor Riser
- 1 x Hub (8-in-1 Docking Station)
- 2 x Converters
- 1 x LED Light
- 1 x Black Data Cable (approx. 1.4m / 4.6ft)
- 1 x White Charging Cable (approx. 1.14m / 3.7ft)

Image: All components included in the flexman Desktop Monitor Stand Riser package.
3. Setup Instructions
The flexman Monitor Stand Riser requires minimal assembly. Follow these steps to set up your device:
- Placement: Place the monitor riser on a stable, flat surface on your desk. Ensure there is enough space for your monitor and peripherals.
- Monitor Placement: Carefully place your monitor on top of the riser. Ensure it is centered and stable. The riser is designed to support monitors up to 25KG (55 lbs).
- Connect Data Cable: Connect the black data cable from the riser's input port to an available USB port on your computer. This cable controls the three USB data transfer ports (2 x USB 2.0, 1 x USB 3.0).
- Connect Charging Cable: Connect the white charging cable from the riser's input port to a power adapter (not included) or a suitable power source. This cable controls the two fast charging ports (Type-C and USB fast charging port).
- Integrate Hub (Optional): If using the 8-in-1 hub, connect it to one of the available USB ports on the riser or directly to your computer as needed.
- LED Light (Optional): Connect the included LED light to any available USB port for additional illumination.
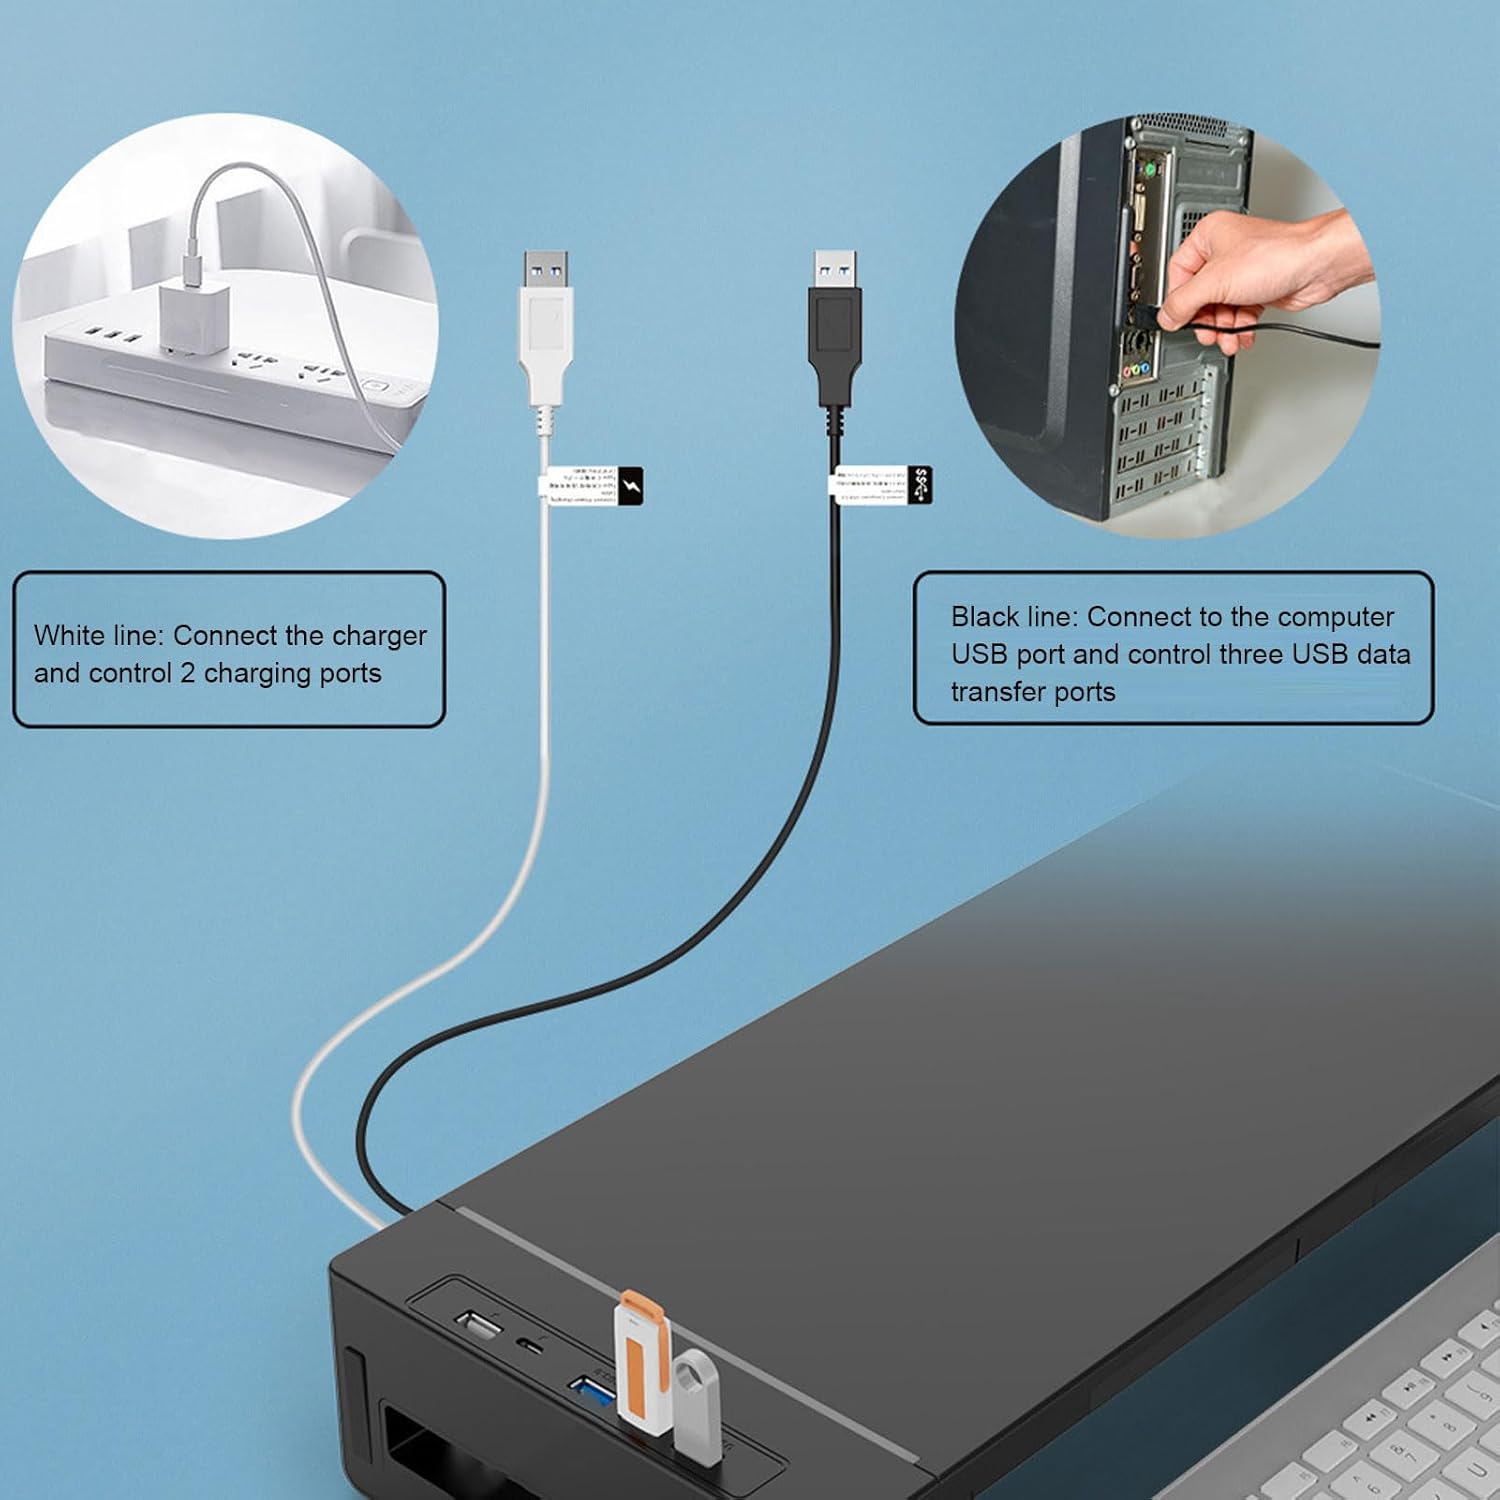
Image: Connection diagram illustrating the black data cable for data transfer and the white charging cable for power supply.
4. Operating Instructions
4.1. USB Ports and Charging
The monitor riser features multiple ports for connectivity and charging:
- USB 3.0 Data Port: For high-speed data transfer (up to 10 times faster than USB 2.0). Connect USB drives, external hard drives, or other high-bandwidth devices here.
- USB 2.0 Data Ports (x2): For connecting peripherals such as keyboards, mice, or other standard USB devices.
- Type-C Fast Charging Port: Provides fast charging for compatible Type-C devices.
- USB Fast Charging Port: Provides fast charging for compatible USB-A devices.
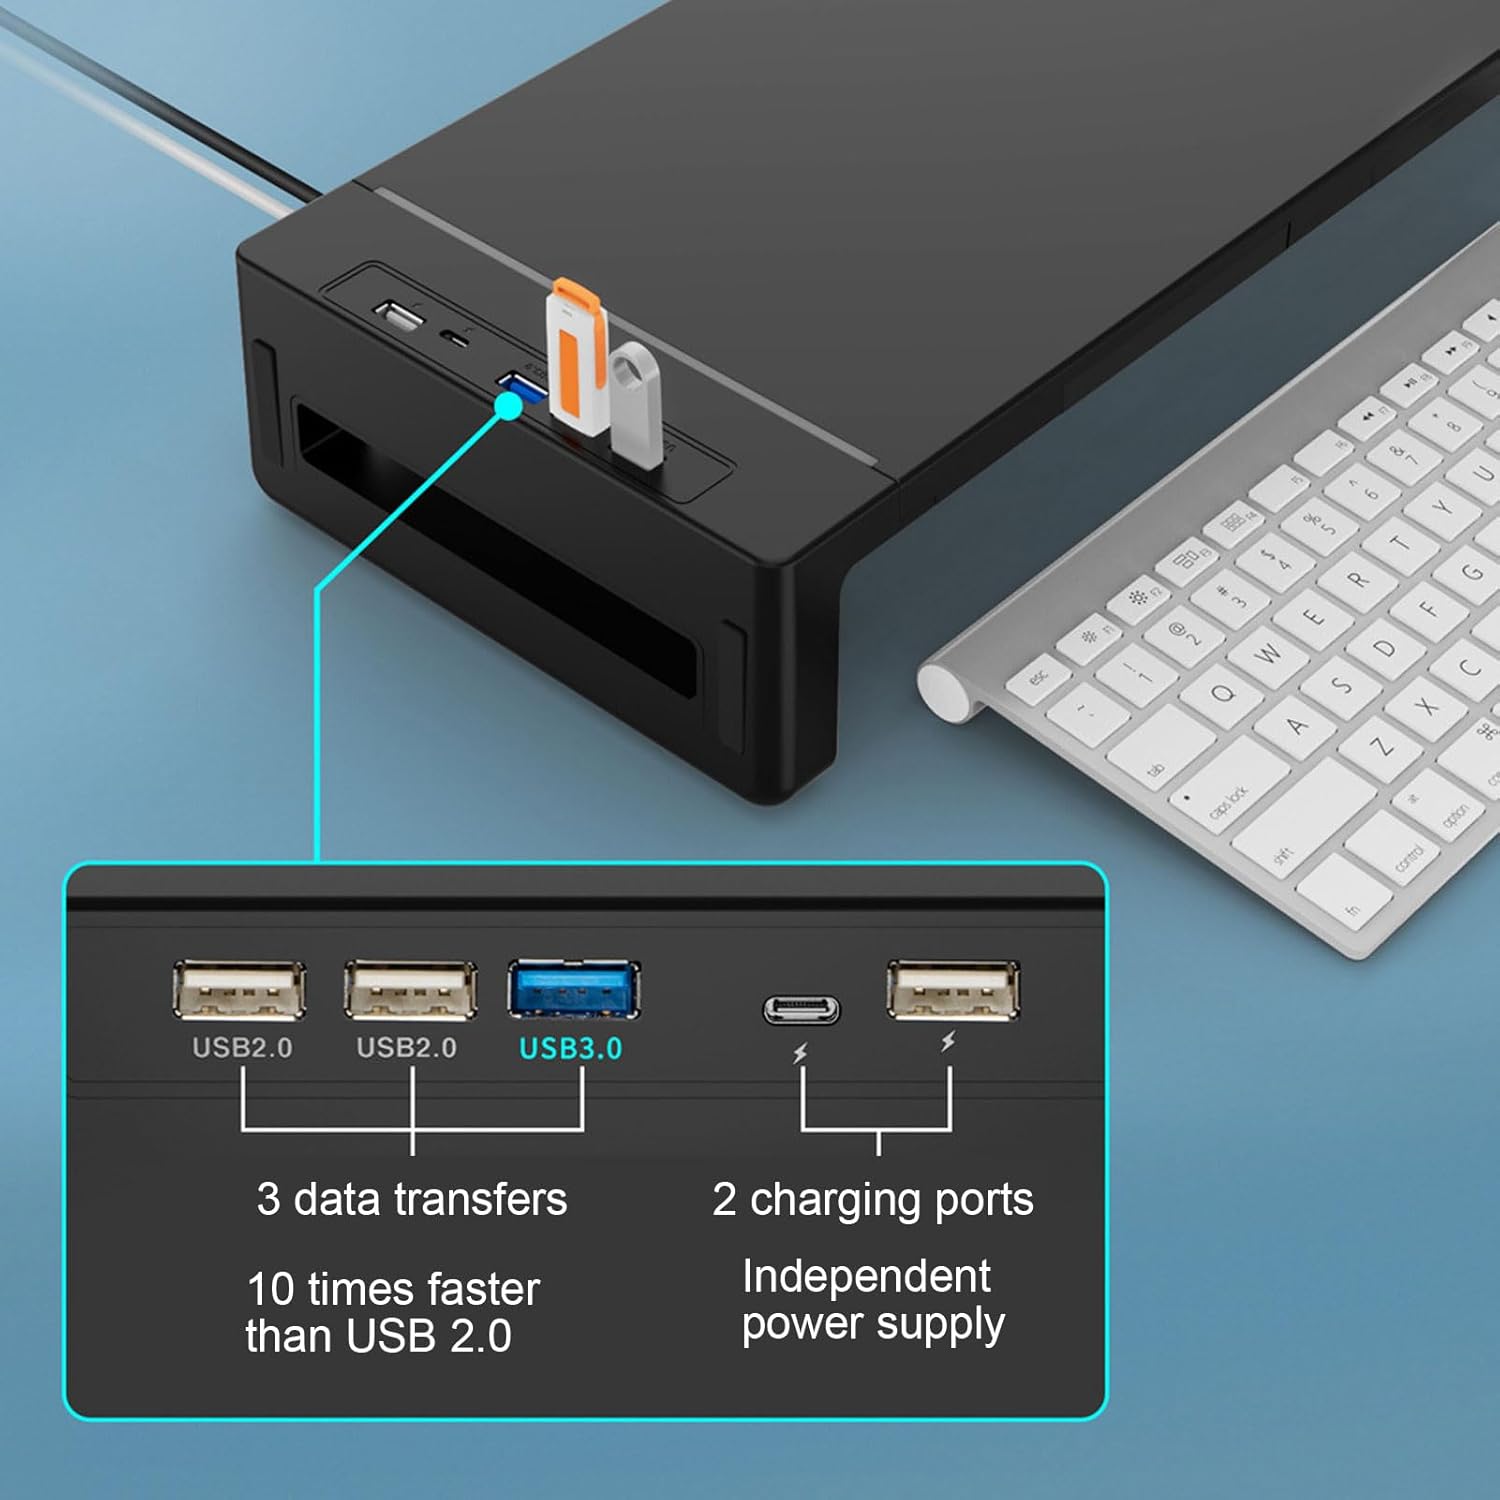
Image: Detailed view of the USB and charging ports on the monitor stand.
4.2. Integrated Drawer
The monitor stand includes a convenient pull-out drawer for organized storage of small office supplies, notebooks, or personal items. To use, simply pull the drawer forward. Push it back in to close.

Image: The storage drawer in use, demonstrating its capacity for small items.
4.3. Phone Holder
A dedicated phone holder is integrated into the design, allowing you to keep your smartphone visible and accessible while working. Simply place your phone into the holder slot.
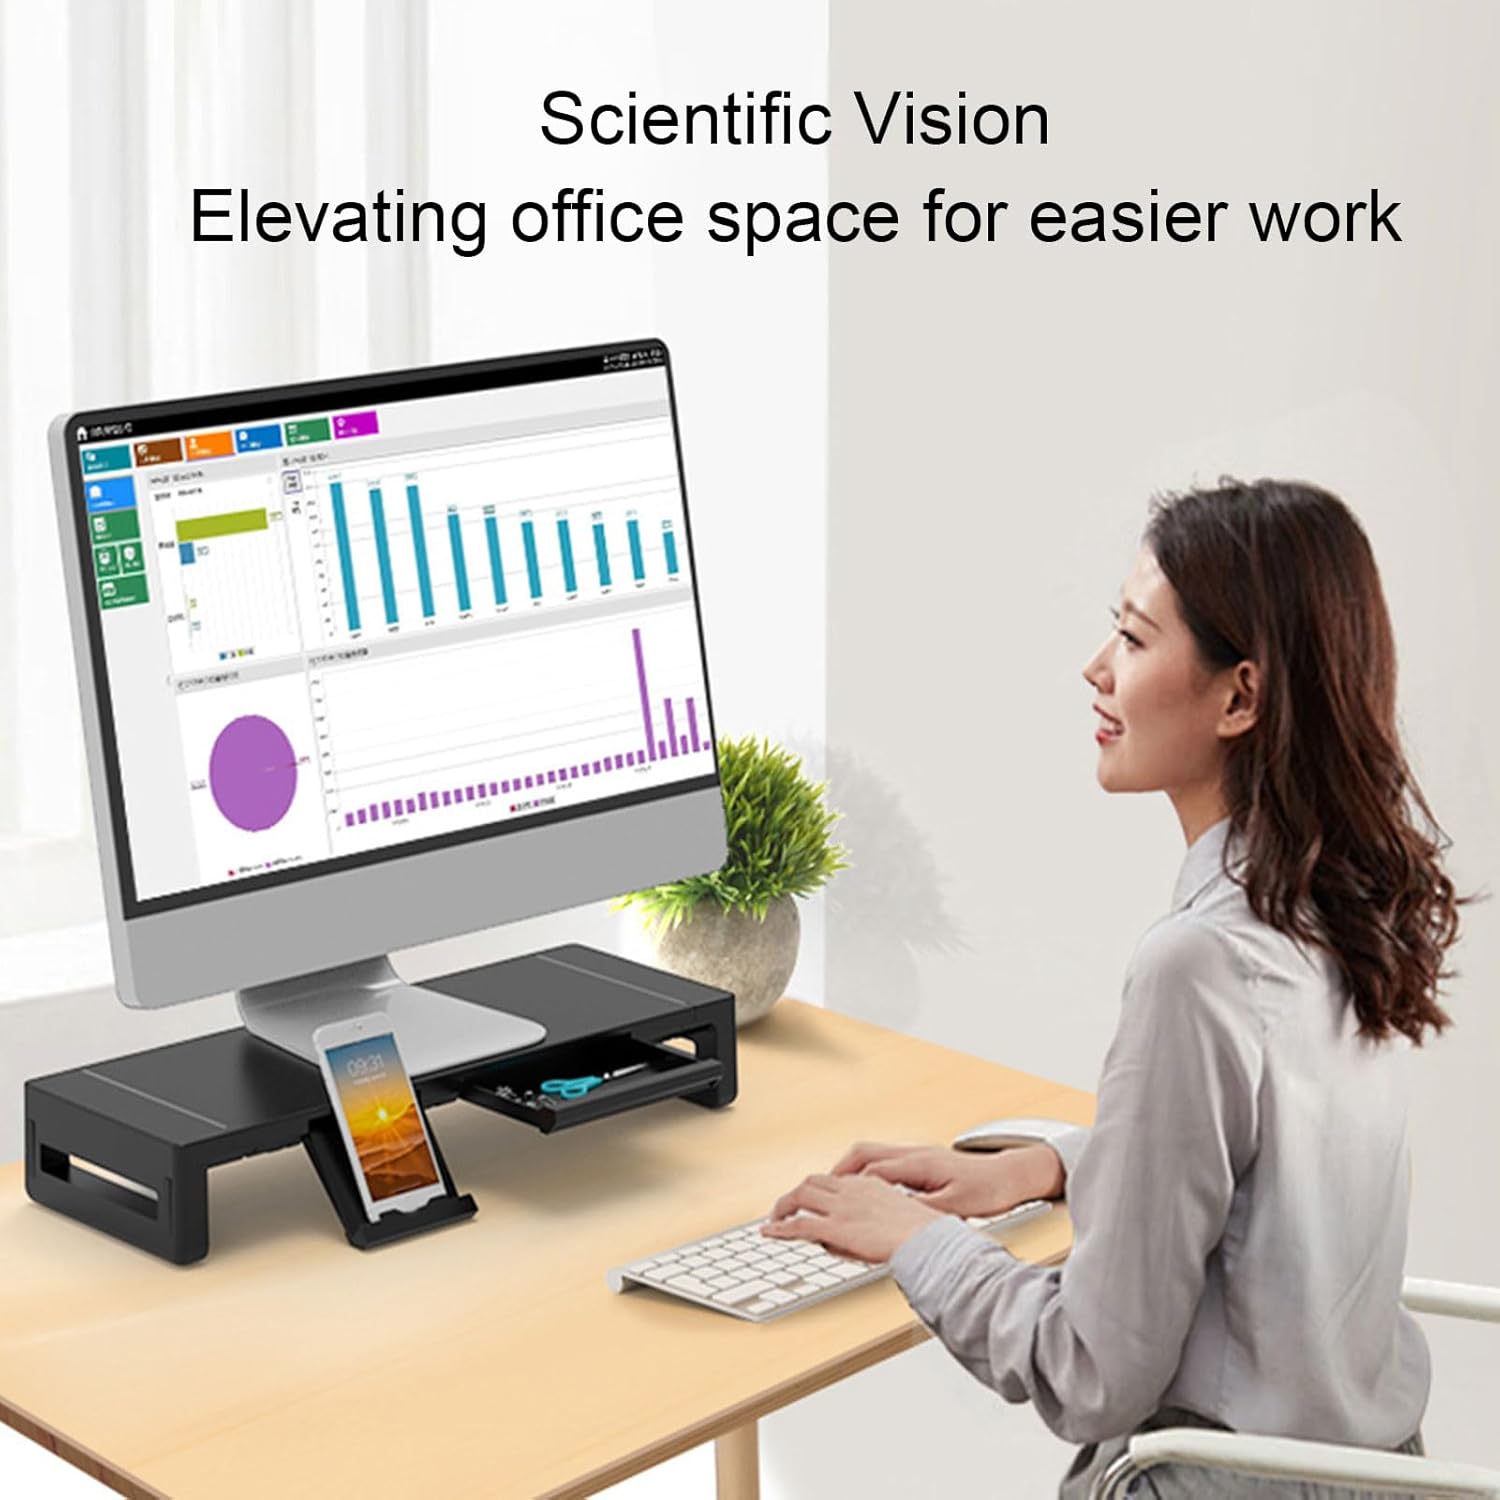
Image: The monitor stand in an office setting, showing the phone holder in use.
5. Features Overview
- Ergonomic Design: Elevates your monitor to a comfortable viewing height, reducing strain on your neck and eyes.
- High Load Capacity: Constructed with durable materials and 4 steel support rods, capable of supporting monitors up to 25KG (55 lbs) without deformation.
- 8-in-1 Docking Station: Provides extensive connectivity with 2 x USB 2.0, 1 x USB 3.0, 1 x Type-C fast charging, and 1 x USB fast charging port.
- Fast Charging: Dedicated ports for rapid charging of compatible devices, supporting 5V 3A, 9V 2A, and 12V 1.5A.
- Integrated Storage Drawer: Keeps your desk tidy by providing a discreet space for small office essentials.
- Built-in Phone Holder: Offers a convenient and accessible spot for your smartphone.

Image: Illustration of the internal steel support rods and the 25KG load capacity.
6. Specifications
| Specification | Detail |
|---|---|
| Item Type | Monitor Stand Riser |
| Model Number | flexmanngw2sim4yh |
| Material | ABS, Aluminum Alloy |
| Load Bearing Capacity | 25KG (55 lbs) |
| Input (Black Data Cable) | 5V 2A |
| Input (White Charging Cable) | 5V 3A, 9V 2A, 12V 1.5A |
| Data Interface | 2 x USB 2.0, 1 x USB 3.0 |
| Charging Interface | 1 x Type-C Fast Charging, 1 x USB Fast Charging |
| Black Data Cable Length | Approx. 1.4m / 4.6ft |
| White Charging Cable Length | Approx. 1.14m / 3.7ft |
| Product Weight | Approx. 1740 g / 3.83 lbs |
| Package Dimensions | 17.32 x 8.27 x 3.54 inches |
| Assembly Required | No |

Image: Dimensions of the monitor stand, phone holder, and storage box.
7. Maintenance
To ensure the longevity and optimal performance of your flexman Monitor Stand Riser, follow these simple maintenance guidelines:
- Cleaning: Wipe the surface with a soft, dry cloth. For stubborn marks, a slightly damp cloth with mild soap can be used, followed by drying thoroughly. Avoid abrasive cleaners or solvents.
- Cable Management: Periodically check cables for any signs of wear or damage. Ensure cables are not kinked or pinched.
- Load Capacity: Do not exceed the maximum load capacity of 25KG (55 lbs) to prevent damage to the stand and your equipment.
8. Troubleshooting
If you encounter issues with your monitor stand, refer to the following common problems and solutions:
- Devices not charging:
- Ensure the white charging cable is securely connected to both the riser and a functioning power source.
- Verify that the power source provides adequate power (e.g., a wall adapter, not a low-power USB port).
- Check if the device being charged is compatible with the charging ports.
- Data transfer not working or slow:
- Ensure the black data cable is securely connected to both the riser and a functioning USB port on your computer.
- Try connecting the device directly to your computer to rule out device issues.
- For USB 3.0 speeds, ensure both the port on the riser and your computer are USB 3.0 compatible.
- Stand feels unstable:
- Ensure the stand is placed on a completely flat and stable surface.
- Verify that the weight of your monitor and any items on the stand do not exceed the 25KG load capacity.
9. Warranty and Support
For warranty information or technical support, please refer to the documentation provided at the time of purchase or contact your retailer. Keep your purchase receipt as proof of purchase.