1. Introduction
This instruction manual provides detailed information for the proper installation, operation, and maintenance of your Nebakne 100 Keys White Key Cabinet. Please read this manual thoroughly before using the product to ensure safe and efficient operation. This key cabinet is designed to securely store and organize up to 100 keys, making it ideal for various environments such as offices, car dealerships, rental businesses, and homes.
2. Important Safety Information
WARNING:
- Always follow the manufacturer's instructions for proper installation.
- Keep keys out of reach of children to prevent choking hazards.
- Ensure the cabinet is securely mounted to a stable surface to prevent accidental falls.
- Do not attempt to force the lock or tamper with the cabinet's security features.
3. Product Overview
The Nebakne 100 Keys White Key Cabinet is a robust and secure solution for key management. It features a high-quality steel construction with an anti-theft design, including solid lock bolts and a pry-resistant steel door.
3.1 Key Features
- 100 Position Capacity: Spacious design to accommodate up to 100 keys.
- Anti-Theft Design: Constructed from high-quality steel with a protective coating, two solid lock bolts, internal anti-theft hinge, and thick pry-resistant steel door.
- Wall Mountable: Pre-drilled holes and mounting hardware included for easy and secure wall installation.
- Organized Storage: Numbered key hooks and adjustable numbered key shelves, along with 100 colorful key tags for easy identification and management.
- Key Return Drop Slot: Allows convenient key returns without needing to open the main cabinet.
- High-Quality Secure Lock: Built-in secure lock with two backup keys provided.
3.2 Product Components
- Key Cabinet Unit
- Numbered Key Hooks (100 positions)
- Adjustable Numbered Key Shelves
- Colorful Key Tags (100 pieces)
- Mounting Hardware (screws, anchors)
- Backup Keys (2 pieces)

Figure 3.2.1: Front view of the Nebakne 100 Keys White Key Cabinet with the door open, displaying the internal key organization system and a hand operating the lock.

Figure 3.2.2: Detailed interior view highlighting the 100-key capacity and the arrangement of colorful key tags on numbered hooks.
4. Setup and Installation
The Nebakne Key Cabinet is designed for easy wall-mounted installation. Ensure you choose a secure and accessible location for mounting.
4.1 Required Tools (Not Included)
- Drill
- Drill bit appropriate for wall material and anchor size
- Pencil
- Level
- Screwdriver
4.2 Installation Steps
- Choose Location: Select a sturdy wall surface that can support the weight of the cabinet and its contents. Consider accessibility and security.
- Mark Drilling Points: Hold the key cabinet against the wall at the desired height. Use a pencil to mark the positions of the pre-drilled mounting holes on the wall. Use a level to ensure the marks are aligned horizontally.
- Drill Holes: Using the appropriate drill bit, drill holes at the marked positions. The depth and diameter of the holes should match the provided wall anchors.
- Insert Anchors: Gently tap the wall anchors into the drilled holes until they are flush with the wall surface.
- Mount Cabinet: Align the pre-drilled holes on the back of the cabinet with the installed wall anchors. Insert the mounting screws through the cabinet holes and into the anchors.
- Secure Cabinet: Tighten the screws firmly with a screwdriver until the cabinet is securely fastened to the wall. Do not overtighten.
- Test Stability: Gently pull on the cabinet to ensure it is stable and properly mounted before loading with keys.

Figure 4.2.1: Illustration of the key cabinet's pre-drilled mounting holes and the included mounting hardware for wall installation.
5. Operating Instructions
5.1 Locking and Unlocking the Cabinet
- To Unlock: Insert one of the provided keys into the lock on the cabinet door. Turn the key clockwise to unlock the mechanism, then pull the door open.
- To Lock: Close the cabinet door firmly. Insert the key into the lock and turn it counter-clockwise until the lock engages. Remove the key and store it in a secure location.
- Backup Keys: Two backup keys are provided. Keep one in a safe, separate location in case the primary key is lost.

Figure 5.1.1: Detail of the cabinet's secure lock and key for operation.
5.2 Organizing Keys
- Attach Key Tags: For each key, attach one of the colorful key tags. Write relevant information (e.g., room number, vehicle ID, owner name) on the tag for easy identification.
- Hang Keys: Hang the keys on the numbered hooks inside the cabinet. Utilize the adjustable shelves to optimize space and prevent keys from tangling.
- Maintain Order: Consistently return keys to their designated numbered hooks to maintain organization and facilitate quick retrieval.
5.3 Using the Key Return Drop Slot
The key return drop slot allows users to return keys without needing to unlock and open the main cabinet door. This is useful for quick and convenient returns.
- Locate the key return drop slot on the side of the cabinet.
- Insert the key (with its tag) into the slot. The key will drop into the cabinet for secure storage.
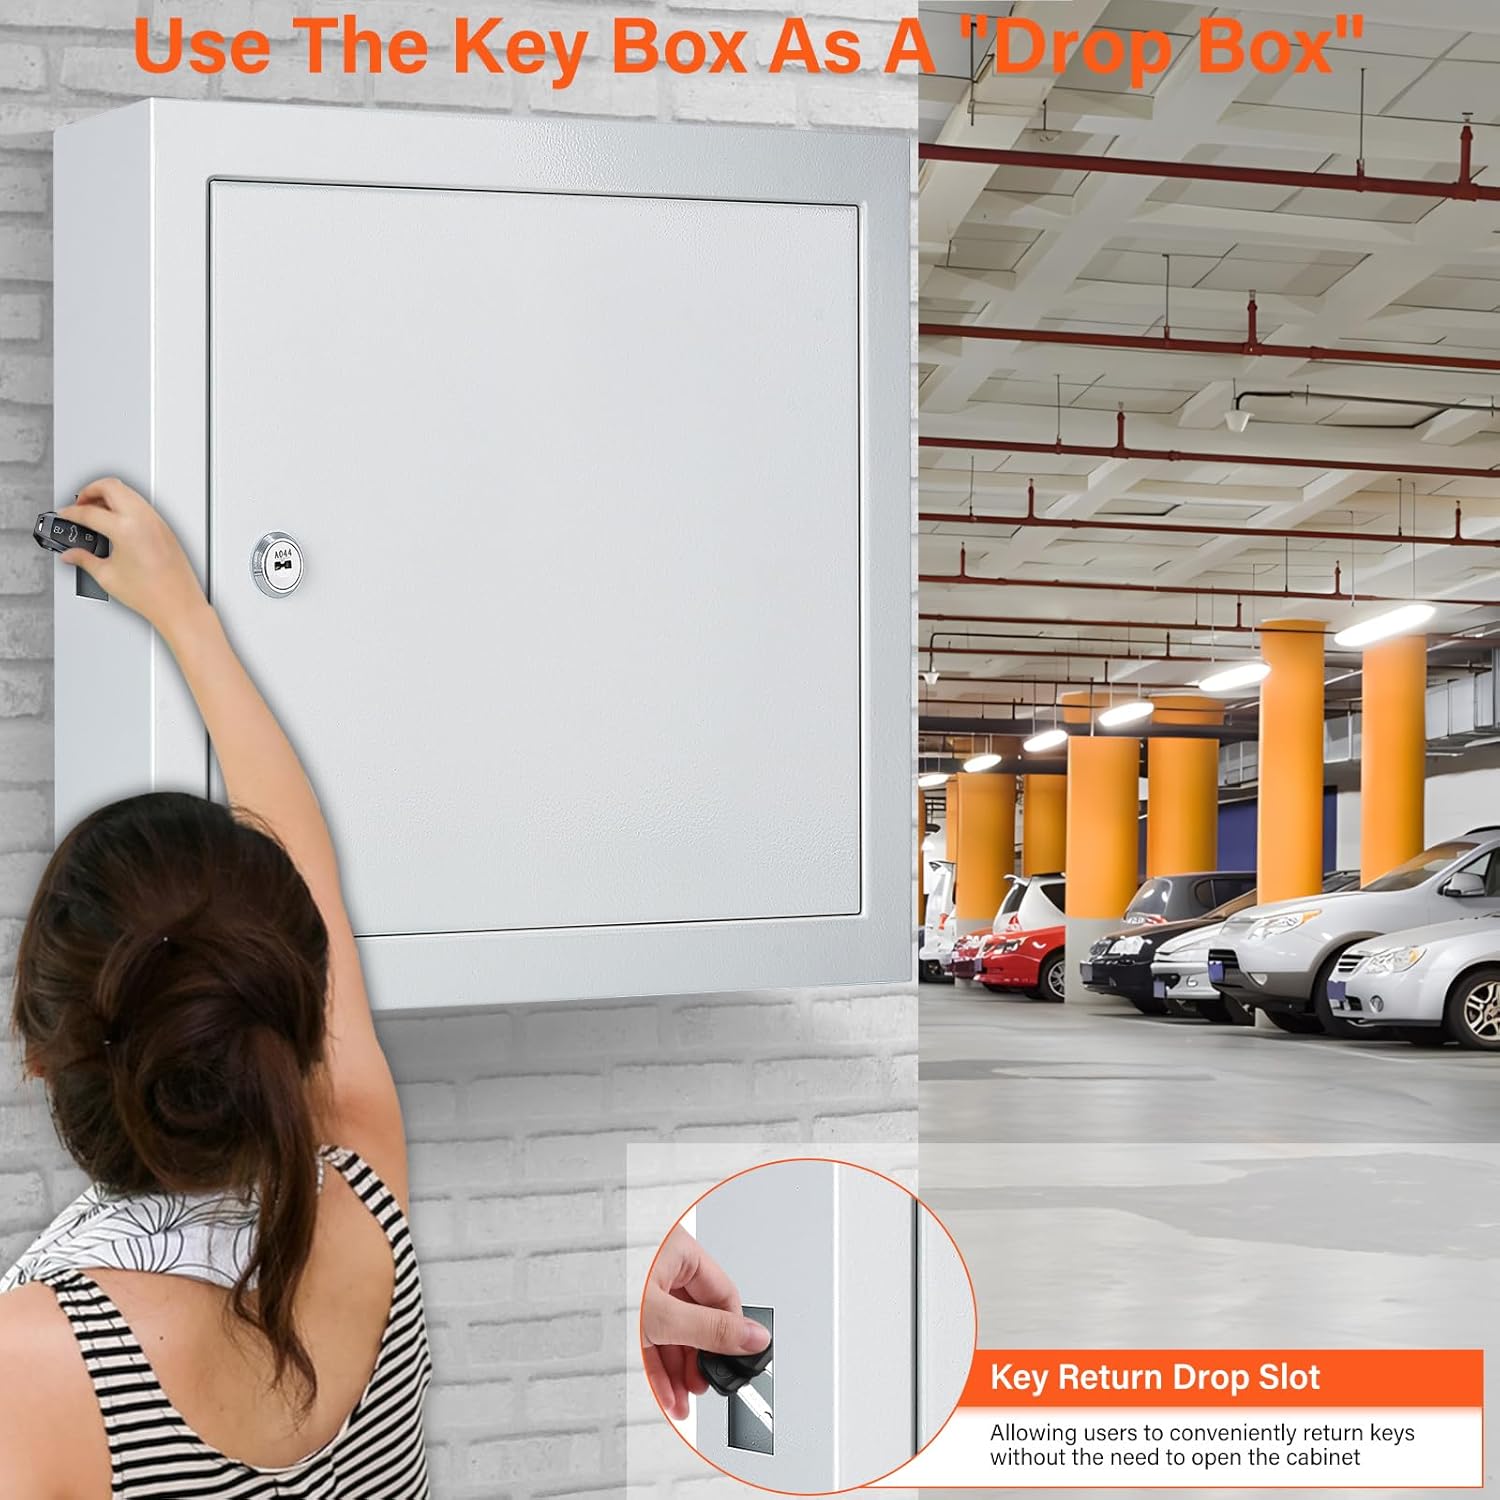
Figure 5.3.1: Demonstration of the key return drop slot feature.
6. Maintenance
- Cleaning: Wipe the exterior and interior of the cabinet with a soft, damp cloth. Avoid abrasive cleaners or solvents that could damage the finish.
- Lock Care: Periodically check the lock mechanism for smooth operation. If it becomes stiff, a small amount of graphite lubricant can be applied to the keyhole.
- Mounting Check: Regularly inspect the mounting screws and wall anchors to ensure the cabinet remains securely attached to the wall. Tighten if necessary.
- Key Tags: Replace any damaged or unreadable key tags to maintain clear organization.
7. Troubleshooting
| Problem | Possible Cause | Solution |
|---|---|---|
| Cabinet door does not close properly. | Keys are obstructing the door closure. | Ensure all keys are properly hung on their hooks and are not protruding. Adjust key placement if necessary. |
| Key is difficult to turn in the lock. | Lock mechanism is dry or dirty. | Apply a small amount of graphite lubricant to the keyhole. Do not use oil-based lubricants. |
| Cabinet feels loose on the wall. | Mounting screws have loosened. | Tighten all mounting screws. If the issue persists, inspect wall anchors for damage and replace if necessary. |
| Lost primary key. | Key misplaced or lost. | Use one of the provided backup keys. If all keys are lost, contact Nebakne customer support for assistance. |
8. Specifications
| Feature | Detail |
|---|---|
| Brand | Nebakne |
| Model Number | Ny-30-W |
| Color | White |
| Capacity | 100 Key Hooks |
| Product Dimensions (D x W x H) | 3.93"D x 11.81"W x 13.77"H |
| Item Weight | 9.2 Pounds |
| Material | Alloy Steel |
| Finish Type | Painted |
| Mounting Type | Wall Mount |
| Special Feature | Lockable |
| Included Components | Key Box, Key Hooks, Mounting Bolts |
| Assembly Required | No (for cabinet itself, only mounting) |
| Recommended Uses | Storage Keys (Car, Office, House, Garage, Rental Business) |
9. Warranty and Support
For warranty information or technical support regarding your Nebakne 100 Keys White Key Cabinet, please contact Nebakne customer service directly. Refer to the contact information provided with your purchase or visit the official Nebakne website for assistance.
Manufacturer: Nebakne
Website: Nebakne Official Store on Amazon (for general inquiries and product information)


