
1. Introduction
This document provides essential information for the ORCOW replacement filter, designed to maintain the optimal performance and air quality of your compatible Rowenta and Tefal vacuum cleaners. Regular filter maintenance is crucial for efficient dust and allergen capture.
2. Compatibility
This filter is compatible with the following vacuum cleaner models:
- Rowenta Swift Power Cyclonic: RO2910EA, RO2913EA, RO2915EA, RO2932EA, RO2933EA, RO2957EA, RO2981EA
- Tefal Swift Power Cyclonic: TW2913EA, TW2925EA, TW2971EA
Please verify your vacuum cleaner's model number to ensure compatibility.
3. Key Features
The ORCOW replacement filter offers several key features designed to enhance your vacuuming experience:
- Effective Filtration: Designed to efficiently remove dirt, dust, trash, pet hair, and other particles from the air.
- Improved Air Quality: Helps reduce the penetration of dust, pollen, and other allergens into the air you breathe, benefiting allergy sufferers.
- Durable Construction: Made from environmental-friendly and durable materials for longevity and consistent performance.
- Easy Installation: Engineered for straightforward replacement and installation in compatible vacuum cleaners.
- Maintenance of Suction Power: Regular replacement helps maintain the vacuum cleaner's optimal cleaning performance and suction power.
4. Setup and Installation
Installing the ORCOW replacement filter is a simple process. For precise instructions, always refer to your specific vacuum cleaner's original user manual, as filter compartment access may vary by model.
- Power Off: Ensure your vacuum cleaner is unplugged from the power outlet before beginning any maintenance.
- Locate Filter Compartment: Identify the filter compartment on your vacuum cleaner. This is typically located near the dust bin or exhaust vent.
- Remove Old Filter: Carefully open the compartment and remove the old filter. Dispose of the old filter responsibly.
- Insert New Filter: Place the new ORCOW replacement filter into the compartment, ensuring it is seated correctly and securely. The filter should fit snugly without force.
- Close Compartment: Close the filter compartment securely.

Image: The ORCOW replacement filter, ready for installation. This image shows the circular filter with its black frame and white pleated media, designed for easy handling and insertion into the vacuum cleaner's filter housing.
5. Operating Principles
Once correctly installed, the ORCOW filter functions as a critical component of your vacuum cleaner's filtration system. As air is drawn into the vacuum, it passes through the filter media, which traps microscopic dust particles, allergens, and debris, preventing them from being recirculated into your home's air. This passive operation ensures cleaner exhaust air and contributes to a healthier living environment.
6. Maintenance
Regular maintenance of your filter is essential to maintain your vacuum cleaner's performance and extend its lifespan.
- Frequent Cleaning: It is recommended to clean the filter frequently, especially if you notice a decrease in suction power or if the filter appears visibly dirty. For most filters, this involves gently tapping it over a waste bin to dislodge accumulated dust. Some filters may be washable; refer to your vacuum's manual for specific cleaning instructions.
- Timely Replacement: For optimal performance and air quality, replace the filter every 2-3 months, or more frequently if you have pets, allergies, or use your vacuum extensively. A clogged filter can significantly reduce suction and strain the vacuum motor.
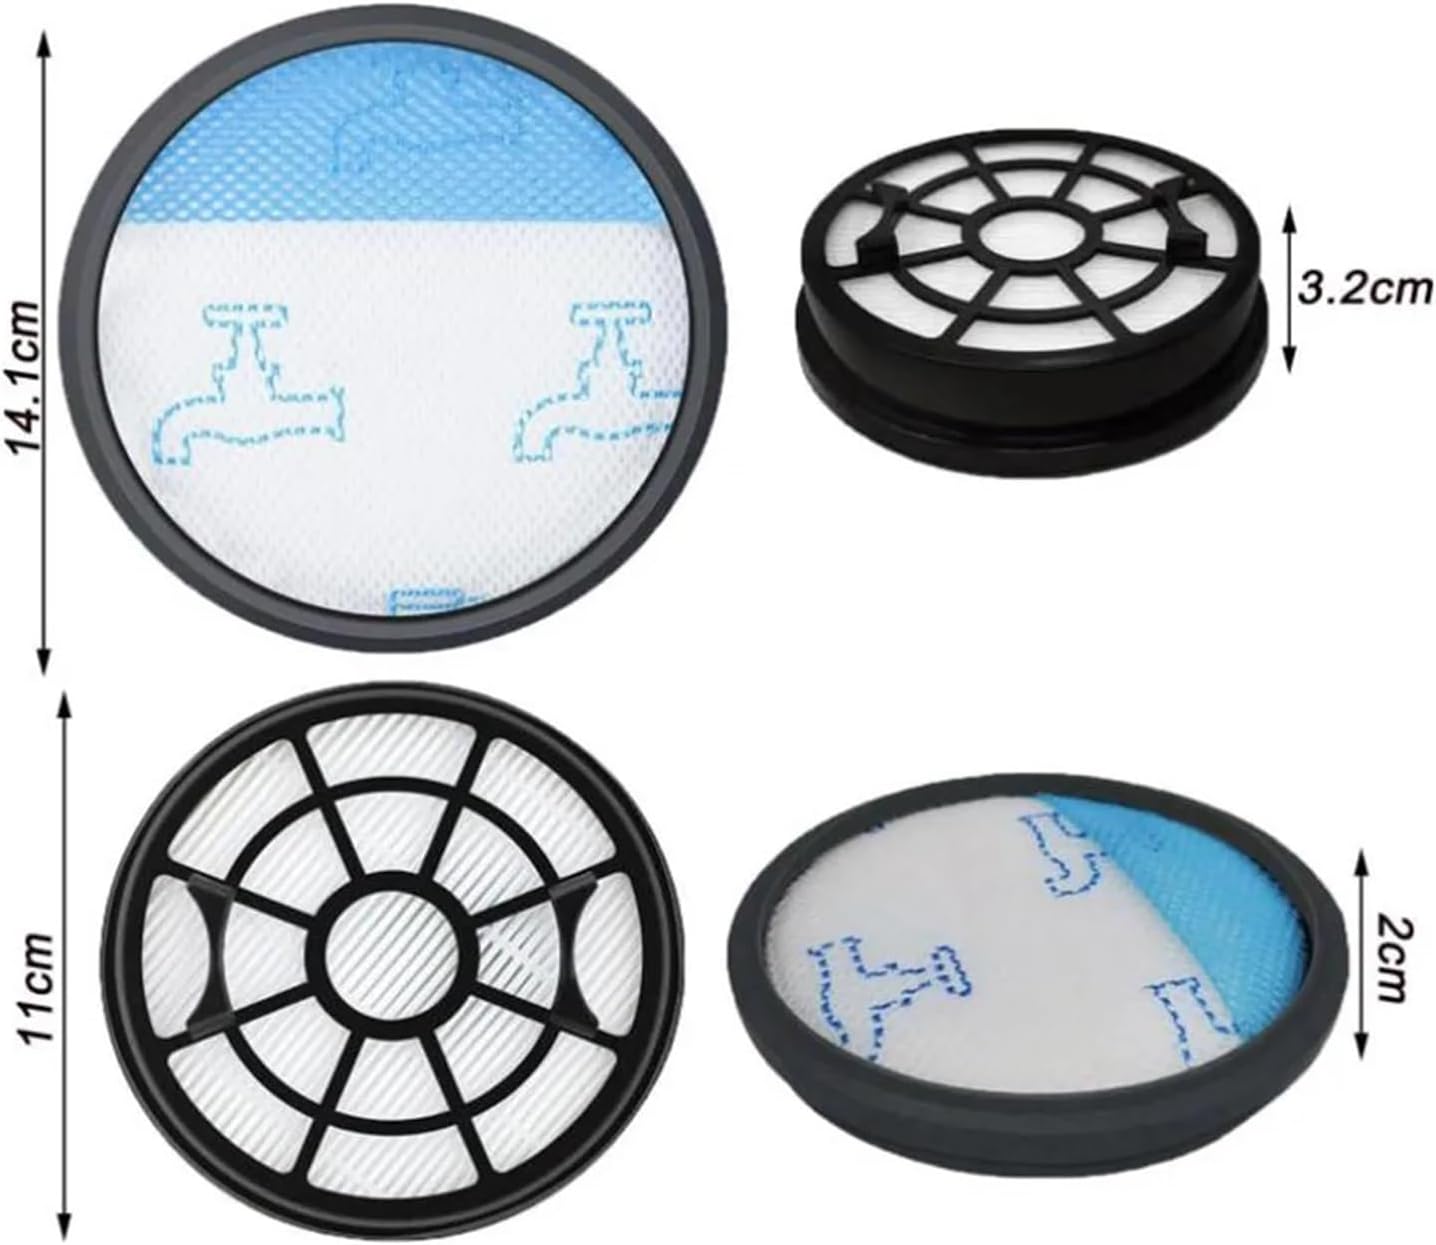
Image: This image illustrates the dimensions of the filter (14.1cm diameter, 11cm diameter, 3.2cm height, 2cm height) and shows two variations: one with a blue sponge layer and one with a white pleated filter. This helps in identifying the correct filter type and size for replacement.

Image: A split view of the filter, showcasing its internal components. One half reveals a blue sponge layer, while the other half displays the white pleated filter media, demonstrating the multi-layered filtration system.
7. Troubleshooting
If you encounter issues with your vacuum cleaner's performance, the filter may be a contributing factor. Consider the following:
- Reduced Suction Power: This is often the primary indicator of a clogged filter. Remove and clean the filter. If suction does not improve, it is likely time for a replacement.
- Unusual Odors: A dirty or old filter can trap odor-causing particles. Replacing the filter can help eliminate unpleasant smells during vacuuming.
- Dust Escaping: If you notice dust escaping from the vacuum's exhaust, the filter may be damaged, improperly installed, or completely saturated. Inspect the filter for damage and ensure it is correctly seated. Replace if damaged.

Image: This image displays the main filter unit alongside a separate white circular sponge component. This illustrates that some filter systems may include multiple parts that require individual attention during maintenance or replacement.
8. Specifications
| Attribute | Value |
|---|---|
| Item Weight | 50 Grams |
| Number of Pieces | 1 |
| Unit Count | 1.0 Count |
| Assembly Required | No |

Image: A clear top-down view of the ORCOW replacement filter, highlighting its circular design and the intricate black plastic frame that supports the white pleated filter media. This view is useful for confirming the filter's appearance and structure.
9. Warranty and Support
For information regarding product warranty, returns, or technical support, please refer to your original purchase documentation or contact the seller directly through the platform where the product was purchased. Keep your order details readily available for faster assistance.