1. Introduction
This manual provides detailed instructions for the installation, operation, and maintenance of the Generic Carburetor Replacement Part, model 9592-3. This component is specifically designed as a replacement for Generac RV Q55G and GN-480 engines. Careful adherence to these instructions will help ensure proper fitment, optimal engine performance, and longevity of the part. Before proceeding with any steps, please thoroughly review this manual and compare the replacement part with your original component to confirm compatibility.
2. Safety Information
Always prioritize safety when working with engine components and fuel systems. Failure to follow safety precautions can result in serious injury or damage to equipment.
- Disconnect Power: Before beginning any work, ensure the engine is turned off and cooled down. Disconnect the spark plug wire or battery to prevent accidental starting.
- Fuel Handling: Gasoline is highly flammable. Work in a well-ventilated area, away from open flames, sparks, or other ignition sources. Use an approved container for draining fuel.
- Protective Gear: Wear appropriate personal protective equipment, including safety glasses, gloves, and sturdy footwear.
- Hot Surfaces: Engine components can remain hot for an extended period after operation. Allow sufficient time for cooling before handling.
- Professional Assistance: If you are unsure about any step or lack the necessary tools or experience, consult a qualified technician.
3. Package Contents
The package includes one (1) set of the following components:
- Carburetor Assembly
- Intake Gaskets (2 pieces)
- Fuel Filter
- Spark Plugs (2 pieces)
- Fuel Line
- Electrical Wiring Harness
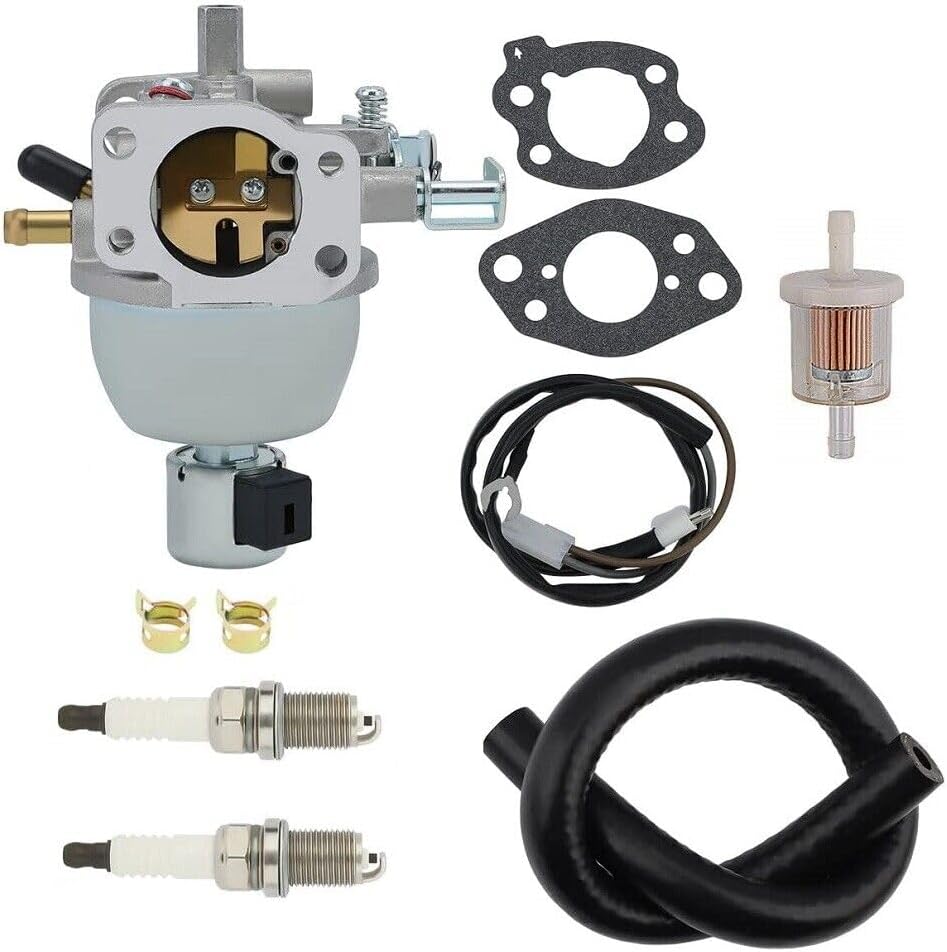
Figure 3.1: Complete Carburetor Replacement Kit. This image displays all components included in the package: the main carburetor unit, two mounting gaskets, a fuel filter, two spark plugs, a length of fuel line, and an electrical wiring harness.
4. Product Overview and Dimensions
The replacement carburetor is designed to match the specifications of the original Generac part. Key dimensions are provided below for verification.

Figure 4.1: Carburetor Front View with Dimensions. This image highlights the front dimensions of the carburetor, including a measurement of 29.5mm across an internal opening, 42mm for the mounting bolt spacing, and approximately 7mm for the fuel inlet diameter.

Figure 4.2: Carburetor Side View with Dimensions. This image illustrates the side dimensions of the carburetor, showing an internal bore of 25.5mm and a mounting bolt spacing of 42mm.

Figure 4.3: Carburetor with Gaskets and Wiring. This image shows the carburetor unit along with the two included gaskets and the attached electrical wiring harness, ready for installation.
5. Setup and Installation
This section outlines the general steps for replacing the carburetor. Specific procedures may vary slightly depending on your engine model. Refer to your engine's service manual for detailed instructions if available.
- Preparation: Ensure the engine is cool and disconnect the spark plug wire. Place a suitable container under the fuel line to catch any spilled fuel.
- Drain Fuel: Close the fuel shut-off valve (if present) and disconnect the fuel line from the old carburetor. Drain any remaining fuel from the carburetor bowl.
- Remove Air Filter Assembly: Carefully remove the air filter housing and any associated ducting to gain access to the carburetor.
- Disconnect Linkages and Wiring: Disconnect the throttle linkage, choke linkage, and any electrical wiring connected to the old carburetor. Note their positions for reassembly.
- Remove Old Carburetor: Unbolt the old carburetor from the engine intake manifold. Remove and discard the old gaskets.
- Install New Gaskets: Clean the mounting surfaces on the engine and the new carburetor. Place the new gaskets in their correct positions.
- Install New Carburetor: Mount the new carburetor onto the engine, ensuring the gaskets are properly seated. Tighten the mounting bolts evenly to the manufacturer's specifications (if known), or until snug. Do not overtighten.
- Reconnect Linkages and Wiring: Reattach the throttle and choke linkages, and connect the electrical wiring to the new carburetor. Ensure all connections are secure and move freely.
- Install New Fuel Filter and Line: Replace the old fuel filter with the new one provided. Connect the new fuel line to the carburetor and the fuel tank, securing with clamps if necessary.
- Replace Spark Plugs: Remove the old spark plugs and install the new ones provided. Tighten to the recommended torque.
- Reassemble Air Filter: Reinstall the air filter housing and any removed ducting.
- Final Checks: Double-check all connections, ensuring they are tight and secure. Verify that no tools or debris are left in the engine compartment.
6. Operating
After successful installation, follow these steps to operate your engine:
- Refill Fuel: Open the fuel shut-off valve (if applicable) and allow fuel to flow into the carburetor. Check for any leaks around the fuel lines and carburetor.
- Reconnect Spark Plug: Reconnect the spark plug wire.
- Start Engine: Follow your engine's specific starting procedure (e.g., set choke, pull starter cord or engage electric start).
- Warm-up: Allow the engine to run for a few minutes to reach operating temperature. Observe for smooth idling and proper throttle response.
- Adjustments (if necessary): If the engine runs rough or does not idle correctly, minor adjustments to the idle speed screw may be required. Consult your engine's service manual for specific adjustment procedures.
7. Maintenance
Regular maintenance helps ensure the longevity and reliable performance of your carburetor and engine.
- Fuel Filter: Inspect the fuel filter periodically for debris or discoloration. Replace it annually or more frequently if operating in dusty conditions or with questionable fuel quality.
- Fuel Lines: Check fuel lines for cracks, leaks, or hardening. Replace as needed.
- Spark Plugs: Inspect spark plugs regularly. Clean or replace them according to your engine's maintenance schedule.
- Carburetor Cleaning: If the engine experiences fuel-related issues (e.g., rough running, hard starting) despite a clean fuel filter, the carburetor may require cleaning. This typically involves disassembling the carburetor and cleaning jets and passages with carburetor cleaner. This procedure should only be performed by individuals with appropriate mechanical knowledge.
- Fuel Storage: When storing the engine for extended periods, drain the fuel system or use a fuel stabilizer to prevent gum and varnish buildup in the carburetor.
8. Troubleshooting
This section addresses common issues that may arise after carburetor replacement.
| Problem | Possible Cause | Solution |
|---|---|---|
| Engine does not start | No fuel flow, no spark, incorrect choke setting, air leak | Check fuel level, ensure fuel valve is open, check fuel filter, verify spark plug connection and condition, ensure choke is set correctly, check for air leaks around carburetor gaskets. |
| Engine runs rough or stalls | Improper idle adjustment, air leak, fuel contamination, clogged jet | Adjust idle speed, check for air leaks, ensure fresh fuel, consider carburetor cleaning if other solutions fail. |
| Fuel leaks | Loose connections, damaged fuel line, improperly seated gaskets, float bowl issue | Tighten fuel line clamps, inspect fuel lines for damage, ensure gaskets are correctly installed and bolts are snug, inspect carburetor float and needle valve. |
| Engine lacks power | Clogged fuel filter, dirty air filter, spark plug issue, carburetor not tuned correctly | Replace fuel filter, clean/replace air filter, inspect/replace spark plugs, ensure carburetor linkages move freely. |
9. Specifications
- Model: 9592-3
- Compatibility: Generac RV Q55G Engines, Generac GN-480 Engines
- Material: Metal alloy (carburetor body)
- Approximate Dimensions (refer to Figures 4.1 and 4.2):
- Mounting Bolt Spacing: 42mm
- Air Intake Bore: 25.5mm
- Fuel Inlet Diameter: 7mm
- Package Contents: 1 Carburetor, 2 Gaskets, 1 Fuel Filter, 2 Spark Plugs, Fuel Line, Electrical Wiring.
10. Warranty and Support
Warranty information for this Generic replacement part is not provided within the product details. For specific warranty terms or technical support, please contact the seller or manufacturer directly. Retain your proof of purchase for any warranty claims.