A1DFDFGOQSFG 15kg/0.5g
A1DFDFGOQSFG Electronic Scales User Manual
Model: 15kg/0.5g High Precision Industrial Weighing Scale
1. Introduction
Thank you for choosing the A1DFDFGOQSFG Electronic Scales. This high-precision industrial weighing scale is designed for accurate measurements in various applications. This manual provides detailed instructions for setup, operation, maintenance, and troubleshooting to ensure optimal performance and longevity of your device. Please read this manual thoroughly before using the scale.
2. Safety Information
- Always place the scale on a stable, flat, and level surface to ensure accurate readings.
- Avoid exposing the scale to extreme temperatures, humidity, or direct sunlight.
- Do not overload the scale beyond its maximum capacity.
- Keep the scale away from strong electromagnetic fields, which can interfere with its operation.
- Clean the scale regularly with a soft, damp cloth. Do not use abrasive cleaners or immerse the scale in water.
- If the scale is not functioning correctly, refer to the troubleshooting section or contact customer support. Do not attempt to repair the device yourself.
3. Package Contents
Please check the package contents upon unboxing to ensure all items are present:
- 1 x A1DFDFGOQSFG Precision Electronic Scale
- 1 x User Manual
- 1 x Power Adapter (DC 9V)
4. Product Overview and Setup
Familiarize yourself with the components of your electronic scale before initial use.
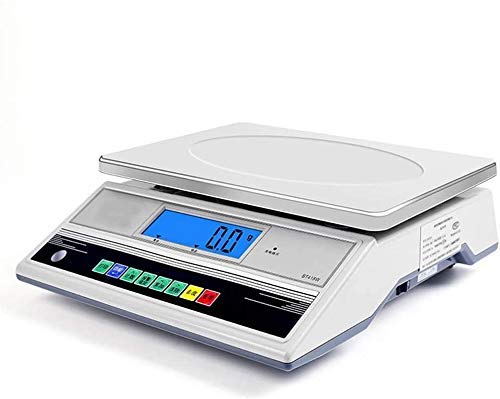
Figure 1: Overview of the A1DFDFGOQSFG Electronic Scale, highlighting key components such as the stainless steel tray, display area, control buttons, RS232 serial port, DC 9V socket, level instrument, foot nails, and power switch.
4.1 Setup Instructions
- Placement: Place the scale on a firm, flat, and stable surface, free from vibrations.
- Leveling: Use the Level Instrument (bubble level) located on the scale to ensure it is perfectly level. Adjust the Foot Nails at the bottom of the scale until the bubble is centered.
- Power Connection: Connect the provided power adapter to the DC 9V Socket on the scale and plug it into a suitable power outlet.
- Initial Power On: Locate the Switch (power button) and turn the scale ON. The display will perform a self-test and then show "0.0" or "0.00".
5. Operating Instructions
This section details the basic operation and functions of your electronic scale.

Figure 2: Close-up view of the A1DFDFGOQSFG Electronic Scale's control panel and display area, showing the various function buttons.
5.1 Basic Weighing
- Ensure the scale is powered on and displays "0.0" or "0.00".
- Gently place the item to be weighed on the Stainless Steel Weighing Pan.
- Read the weight displayed on the Display Area.
5.2 Unit Conversion
The scale supports multiple weighing units: g (grams), ct (carats), dwt (pennyweights), oz (ounces), and tl (taels).
- Press the UNIT button (if available, or cycle through units using a designated button) to switch between different units. The current unit will be indicated on the display.
5.3 Zero Function
The Zero function allows you to reset the display to zero, compensating for minor fluctuations or if the display is not at zero when empty.
- With nothing on the weighing pan, if the display is not "0.0", press the Zero button. The display will reset to zero.
- Press and hold the Zero button to enter the setting mode (as indicated in the product description). Refer to advanced settings for specific configurations.
5.4 Tare Function (Peeling)
The Tare function allows you to subtract the weight of a container, so only the weight of the contents is measured.
- Place an empty container on the weighing pan. The display will show its weight.
- Press the Peeling button (often labeled TARE). The display will reset to "0.0", indicating the container's weight has been tared.
- Add the items to be weighed into the container. The display will show only the net weight of the items.
5.5 Accumulate Function
The Accumulate function allows you to sum up multiple weighings.
- Weigh an item and press the Accumulate button. The weight will be added to the total.
- Repeat for subsequent items. The scale will keep a running total.
- The Accumulate button also functions as a left shift key in setting status.
5.6 Clear Function
The Clear function is used to clear accumulated values or as a right shift key in setting status.
- Press the Clear button to clear the current accumulated value or to function as a right shift key in setting status.
5.7 Alarm Function
The Alarm function allows you to set weight limits, triggering an alarm when the weight exceeds or falls below a set threshold.
- Press the Alarm button to enter the alarm setting mode.
- Use the appropriate buttons (e.g., Accumulate for left shift, Clear for right shift, Alarm for digital minus) to set the desired upper and lower weight limits.
- Confirm your settings. An audible or visual alarm will activate when the weight on the pan falls outside the set range.
5.8 Print Function (RS232 Output)
The scale is equipped with an RS232 serial port for data output to a compatible printer or computer system.
- Connect the scale to a compatible device via the RS232 serial port.
- In communication mode 2, press the Print button to output print characters.
- Refer to the specific communication protocol documentation for detailed integration instructions.
6. Maintenance
Proper maintenance ensures the accuracy and longevity of your electronic scale.
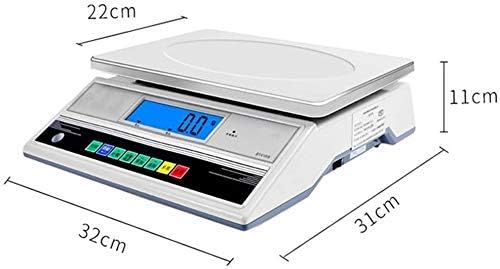
Figure 3: Side view of the A1DFDFGOQSFG Electronic Scale, illustrating its compact design and smooth surfaces for easy cleaning.
- Cleaning: The surface of the scale, especially the stainless steel weighing pan, is designed to be completely flat and easy to clean. Wipe the scale with a soft, slightly damp cloth. Do not use harsh chemicals, abrasive cleaners, or immerse the scale in water.
- Storage: When not in use for extended periods, store the scale in a dry, cool place, away from direct sunlight and extreme temperatures.
- Calibration: While the scale is factory-calibrated, professional calibration may be required periodically for applications demanding the highest precision. Consult a qualified technician for calibration services.
7. Troubleshooting
If you encounter issues with your scale, refer to the following common problems and solutions:
| Problem | Possible Cause | Solution |
|---|---|---|
| Scale does not turn on | No power, loose connection, faulty adapter | Check power cable connection. Ensure outlet is functional. Verify power switch is ON. |
| Inaccurate readings | Uneven surface, scale not level, overload, drafts, interference | Place on a stable, level surface. Adjust foot nails. Do not exceed max capacity. Avoid drafts. Keep away from electronic devices. |
| Display shows "OL" or "EEEE" | Overload | Remove item immediately. Ensure weight is within scale's capacity. |
| Display is unstable or fluctuates | Vibrations, drafts, electromagnetic interference | Move scale to a stable location. Shield from drafts. Reduce nearby electronic interference. |
If the problem persists after trying these solutions, please contact customer support.
8. Specifications
Detailed technical specifications for the A1DFDFGOQSFG Electronic Scale.
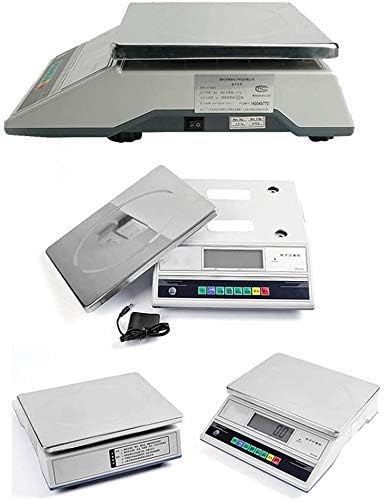
Figure 4: Dimensional drawing of the A1DFDFGOQSFG Electronic Scale, showing its length, width, and height.
- Material: ABS scale body, Stainless steel weighing pan
- Product Dimensions: 36cm (Length) x 31cm (Width) x 11cm (Height)
- Weighing Pan Size: 32cm x 23cm
- Net Weight: Approximately 6kg
- Accuracy (Current Model): 15kg/0.5g
- Available Accuracies (Other Models): 3kg/0.1g, 6kg/0.1g, 10kg/0.1g, 20kg/0.1g, 30kg/0.1g, 30kg/1g
- Main Units: g (gram), ct (carat), dwt (pennyweight), oz (ounce), tl (tael)
- Power Supply: DC 9V (via included adapter)
- Connectivity: RS232 serial port
- Model Number: soAZ72334
- ASIN: B0DGKRC145
9. Warranty and Support
For any questions, technical assistance, or support regarding your A1DFDFGOQSFG Electronic Scale, please contact our customer service team. We are committed to answering any questions you may have within 24 hours.
Please refer to your purchase documentation for specific warranty terms and conditions.
Ask a question about this manual
Ask about setup, troubleshooting, compatibility, parts, safety, or missing instructions. Manuals+ will review the question and use this page’s manual context to help answer it.