Y&H SA8048-US
Y&H MPPT 80A Solar Charge Controller User Manual
Brand: Y&H | Model: SA8048-US
1. Product Overview
The Y&H MPPT 80A Solar Charge Controller is an intelligent regulator designed for solar power systems. It features advanced Maximum Power Point Tracking (MPPT) technology to efficiently charge 12V, 24V, 36V, and 48V battery systems. Equipped with a clear LCD display and dual USB charging ports, it offers comprehensive protection and versatile operating modes for various applications, including lead-acid and lithium batteries.

2. Key Features
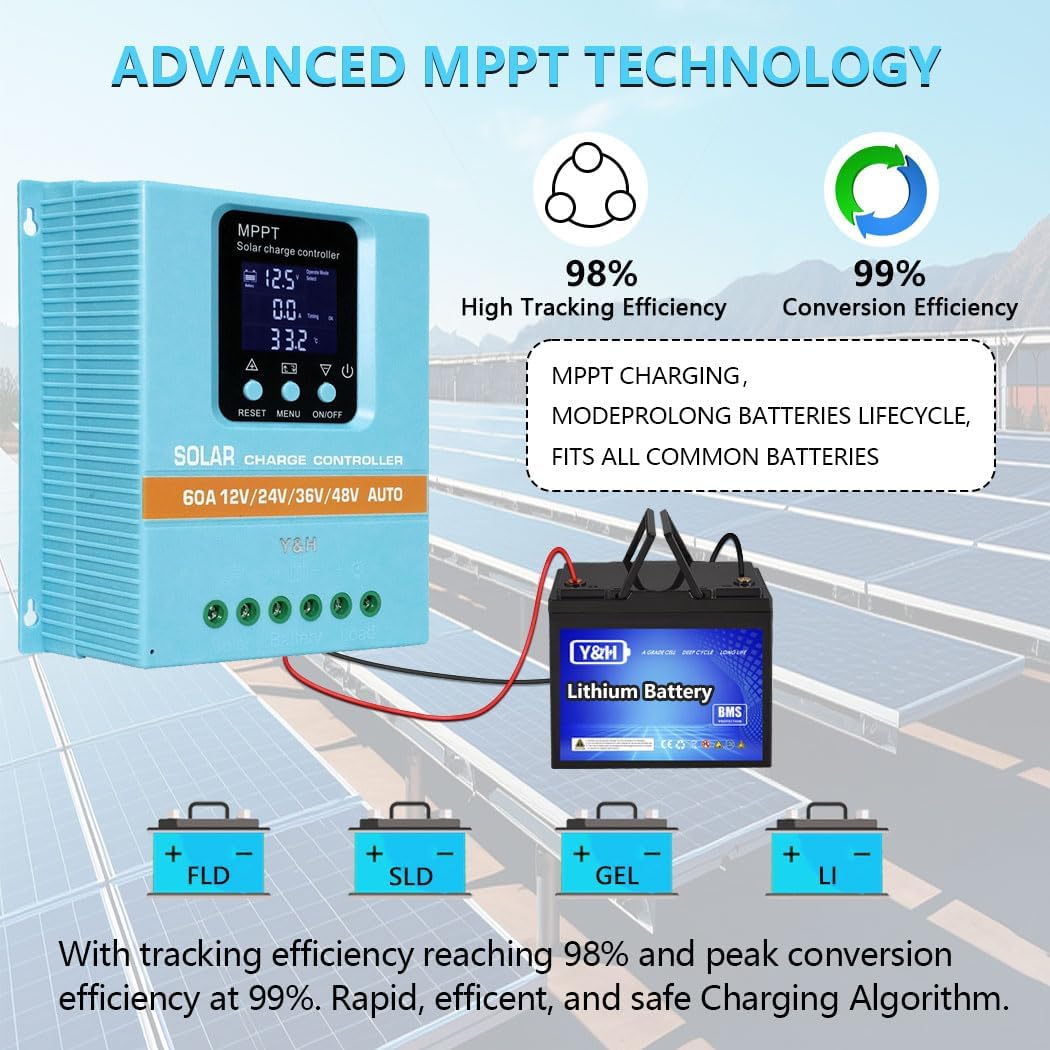
- Advanced MPPT Technology: Utilizes Maximum Power Point Tracking algorithm for tracking efficiency not less than 99.5%, significantly improving solar energy utilization.
- Multi-Voltage Compatibility: Automatic recognition for 12V, 24V, 36V, and 48V battery systems.
- Dual USB Ports: Includes two 5V USB charging ports for convenience.
- Versatile Operating Modes: Features 7 distinct operating modes: charging, light control, light control + time delay, universal control, manual control, and timing control.
- Comprehensive Protection: Built-in safeguards against battery over-voltage, over-current, power failure, overcharge, deep discharge, reverse connection, and overheat temperature.
- Battery Type Compatibility: Compatible with Seal, GEL, Flooded, and LifePO4 battery types.
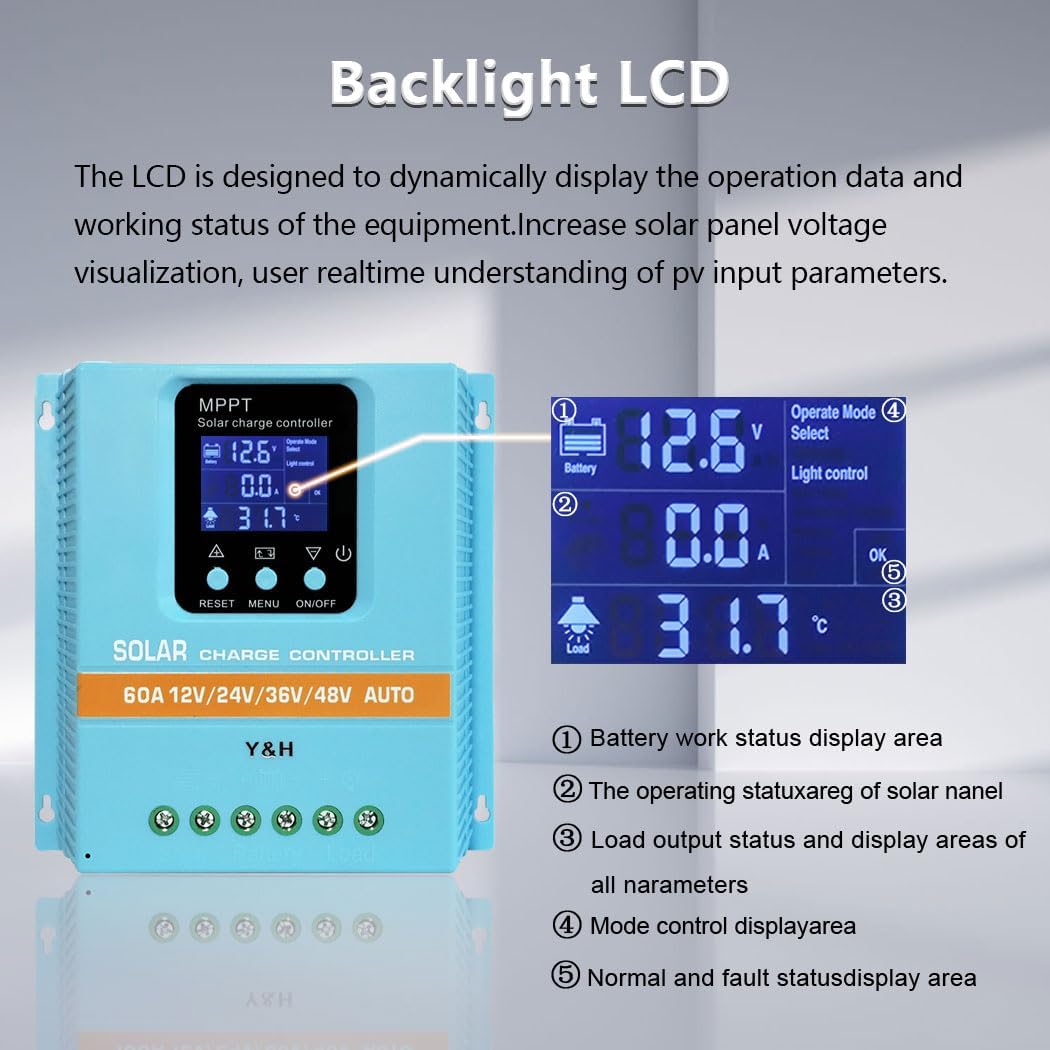
- Dynamic LCD Display: Provides real-time operational data including working mode, battery voltage, PV charging current, battery discharging current, product working temperature, and delay time.
- Enhanced Heat Dissipation: Designed with increased radiator gear spacing for natural heat dissipation, contributing to improved charging efficiency.


3. Setup and Installation
Proper installation is crucial for the safe and efficient operation of your solar charge controller. Follow these steps carefully:
- Prepare for Installation: Ensure all components (solar panels, battery, load) are disconnected from power sources before beginning.
- Mount the Controller: Choose a dry, well-ventilated location away from direct sunlight and moisture. Mount the controller vertically to allow for optimal heat dissipation.
- Connect the Battery: IMPORTANT: Connect the battery to the controller FIRST. Ensure correct polarity (+ to + and - to -). The controller will automatically detect the battery voltage.
- Connect the Solar Panel Array: After the battery is connected, connect the solar panel array to the controller. Ensure correct polarity. The controller will begin charging the battery.
- Connect the DC Load (Optional): If using a DC load directly from the controller, connect it last. Ensure the load's voltage and current requirements are within the controller's specifications.
It is important to use appropriate cable sizes for all connections to ensure system safety and efficient operation. Refer to local electrical codes and guidelines for proper wiring practices.

4. Operating Instructions
The controller features an intuitive LCD display and control buttons for easy operation and monitoring.
4.1. LCD Display Overview

- 1. Battery Work Status Display Area: Shows current battery voltage and charge status.
- 2. Operating Status of Solar Panel: Displays PV input parameters, including current and voltage from the solar array.
- 3. Load Output Status and Display Areas of All Parameters: Shows load current, temperature, and other system parameters.
- 4. Mode Control Display Area: Indicates the currently selected operating mode.
- 5. Normal and Fault Status Display Area: Provides indicators for normal operation or error codes if a fault occurs.
4.2. Control Buttons
- RESET Button: Used to reset certain parameters or clear fault indicators.
- MENU Button: Navigates through different display screens and enters parameter setting mode.
- UP Button: Increases values or moves up in menu options.
- DOWN/ON/OFF Button: Decreases values, moves down in menu options, or toggles the DC load on/off.
4.3. Operating Modes
The controller supports 7 operating modes, selectable via the MENU button:
- Charging Mode: Standard battery charging.
- Light Control Mode: Load turns on at dusk and off at dawn.
- Light Control + Time Delay Control Mode: Load turns on at dusk and stays on for a set duration.
- Universal Control Mode: Load is always on.
- Manual Control Mode: Load is controlled manually via the ON/OFF button.
- Timing Control Mode: Load turns on and off based on pre-set timers.
- (Seventh mode not explicitly detailed in provided data, typically a test mode or similar)
Refer to the on-screen menu for detailed parameter adjustments within each mode.
5. Maintenance
Regular maintenance ensures the longevity and optimal performance of your Y&H MPPT Solar Charge Controller.
- Inspect Connections: Periodically check all wiring connections (battery, solar panel, load) for tightness and corrosion. Loose connections can cause voltage drops and overheating.
- Clean the Controller: Keep the controller's exterior clean and free of dust. Ensure the heat sink fins are not obstructed to allow for proper air circulation and heat dissipation. Use a dry cloth for cleaning.
- Monitor Performance: Regularly check the LCD display for normal operation parameters (battery voltage, charging current, temperature). Note any unusual readings.
- Check Battery Health: Ensure your battery is in good condition and properly maintained according to its manufacturer's guidelines. A faulty battery can affect the controller's performance.
- Environmental Check: Ensure the installation environment remains dry and within the specified operating temperature range.
6. Troubleshooting
If you encounter issues with your solar charge controller, refer to the following common troubleshooting steps:
| Problem | Possible Cause | Solution |
|---|---|---|
| Controller display is off or no power. | Battery not connected or reverse polarity; battery voltage too low; loose connection. | Ensure battery is connected correctly with proper polarity. Check battery voltage (must be above minimum operating voltage). Verify all battery connections are secure. |
| Battery not charging from solar panels. | Solar panel not connected or reverse polarity; insufficient sunlight; faulty solar panel; controller fault. | Check solar panel connections and polarity. Ensure panels are receiving adequate sunlight. Test solar panel output voltage. Monitor controller display for error codes. |
| Load not working. | Load not connected; load mode incorrect; battery voltage too low; overload protection activated. | Verify load connections. Check the controller's operating mode (e.g., ensure it's not in light control mode if you want it on during the day). Check battery voltage. Reduce load if overload protection is active. |
| Controller overheating. | Poor ventilation; excessive load; high ambient temperature. | Ensure adequate airflow around the controller. Reduce load if possible. Relocate controller to a cooler environment if ambient temperature is consistently high. |
If the problem persists after following these steps, please contact customer support.
7. Specifications
| Parameter | Value |
|---|---|
| Model Number | SA8048-US |
| Rated Charge Current | 80A |
| System Voltage | 12V/24V/36V/48V Auto |
| Max PV Input Voltage | 100V |
| MPPT Tracking Efficiency | ≥99.5% |
| Conversion Efficiency | Up to 97% |
| USB Output | Dual 5V ports |
| Dimensions (L x W x H) | 19.5cm x 18.6cm x 6.5cm (7.68in x 7.32in x 2.56in) |
| Item Weight | 1.7 pounds |
| Battery Types Supported | Seal, GEL, Flooded, LifePO4 |
8. Warranty and Support
For warranty information specific to your purchase, please refer to the terms and conditions provided by your retailer at the time of purchase. Y&H is committed to customer satisfaction.
If you have any questions, encounter difficulties, or require technical assistance, please reach out to the seller or Y&H customer support through the platform where the product was purchased. Providing your order details will help expedite the support process.
You can also visit the official Y&H store on Amazon for more information and resources: Y&H Amazon Store.
Related Documents - SA8048-US
 |
Y&H SY Series MPPT Solar Charge Controller Wiring and Setting Guide A comprehensive guide to wiring and setting up the Y&H SY series MPPT solar charge controller, covering battery connection, solar panel connection, load connection, and voltage settings for various battery types. |
 |
SY-SLCD Charge Controller User Manual User manual for the Y&H SY-SLCD charge controller, detailing its features, operation, and fault codes for 12V, 24V, 36V, and 48V systems. |
 |
Y&H SY Series Solar Charge Controller: Wiring and Setting Guide Comprehensive guide for wiring and setting up Y&H SY series MPPT solar charge controllers. Covers battery and solar panel connection, load connection, voltage settings, and load mode functions. |
 |
Y&H SY Controller Quick Installation Guide for MPPT Solar Charge Controllers Concise installation guide for Y&H SY Series MPPT Solar Charge Controllers. Covers wiring, solar panel connection, load connection, and important safety precautions for 12V, 24V, 36V, and 48V systems. |
 |
Y&H MPPT Solar Charge Controller User Manual Comprehensive user manual for the Y&H MPPT Solar Charge Controller, detailing safety instructions, product features, system connection, LCD display functions, troubleshooting, and technical specifications for models BL912A-BL912E and C-series. |
 |
Y&H BL912 MPPT Solar Charge Controller Wiring Tutorial A comprehensive guide on wiring the Y&H BL912 MPPT Solar Charge Controller, covering battery connection, solar panel connection, and load connection with detailed instructions and safety precautions. |