1. Introduction
This manual provides detailed instructions for the safe and efficient operation of your HOVVIDA AM21J2 Portable Air Compressor. Please read this manual thoroughly before using the product and retain it for future reference.
The HOVVIDA AM21J2 is a compact and powerful cordless air compressor designed for inflating various items such as car, motorcycle, and bicycle tires, as well as sports balls. It features a high-precision alloy cylinder, a powerful motor, multiple inflation modes, an automatic stop function, an emergency LED light, and a power bank function.
2. Safety Information
To ensure safe operation, always follow these precautions:
- Keep the device away from children.
- Do not operate the compressor in wet conditions or near flammable liquids or gases.
- Ensure the air hose is securely connected before inflation.
- Do not over-inflate items. Always refer to the manufacturer's recommended pressure.
- Avoid prolonged continuous operation to prevent overheating. Allow the device to cool down if it becomes hot.
- Do not disassemble or modify the device. Contact customer support for repairs.
- Use only the provided charging cable and accessories.
- Store the compressor in a cool, dry place when not in use.
3. Package Contents
Verify that all items are present in the package:
- 1 x HOVVIDA Portable Air Compressor
- 1 x Air Hose
- 2 x Toy Nozzles (long and short)
- 1 x Ball Needle
- 1 x USB Type-C Charging Cable
- 1 x Storage Bag
- 1 x User Manual

Figure 1: HOVVIDA Portable Air Compressor with all accessories, including various nozzles, charging cable, and storage bag.
4. Product Overview
Familiarize yourself with the components and controls of your air compressor.

Figure 2: Digital display showing current and preset pressure, battery indicator, and mode icons. Control buttons include power, mode selection, and pressure adjustment.
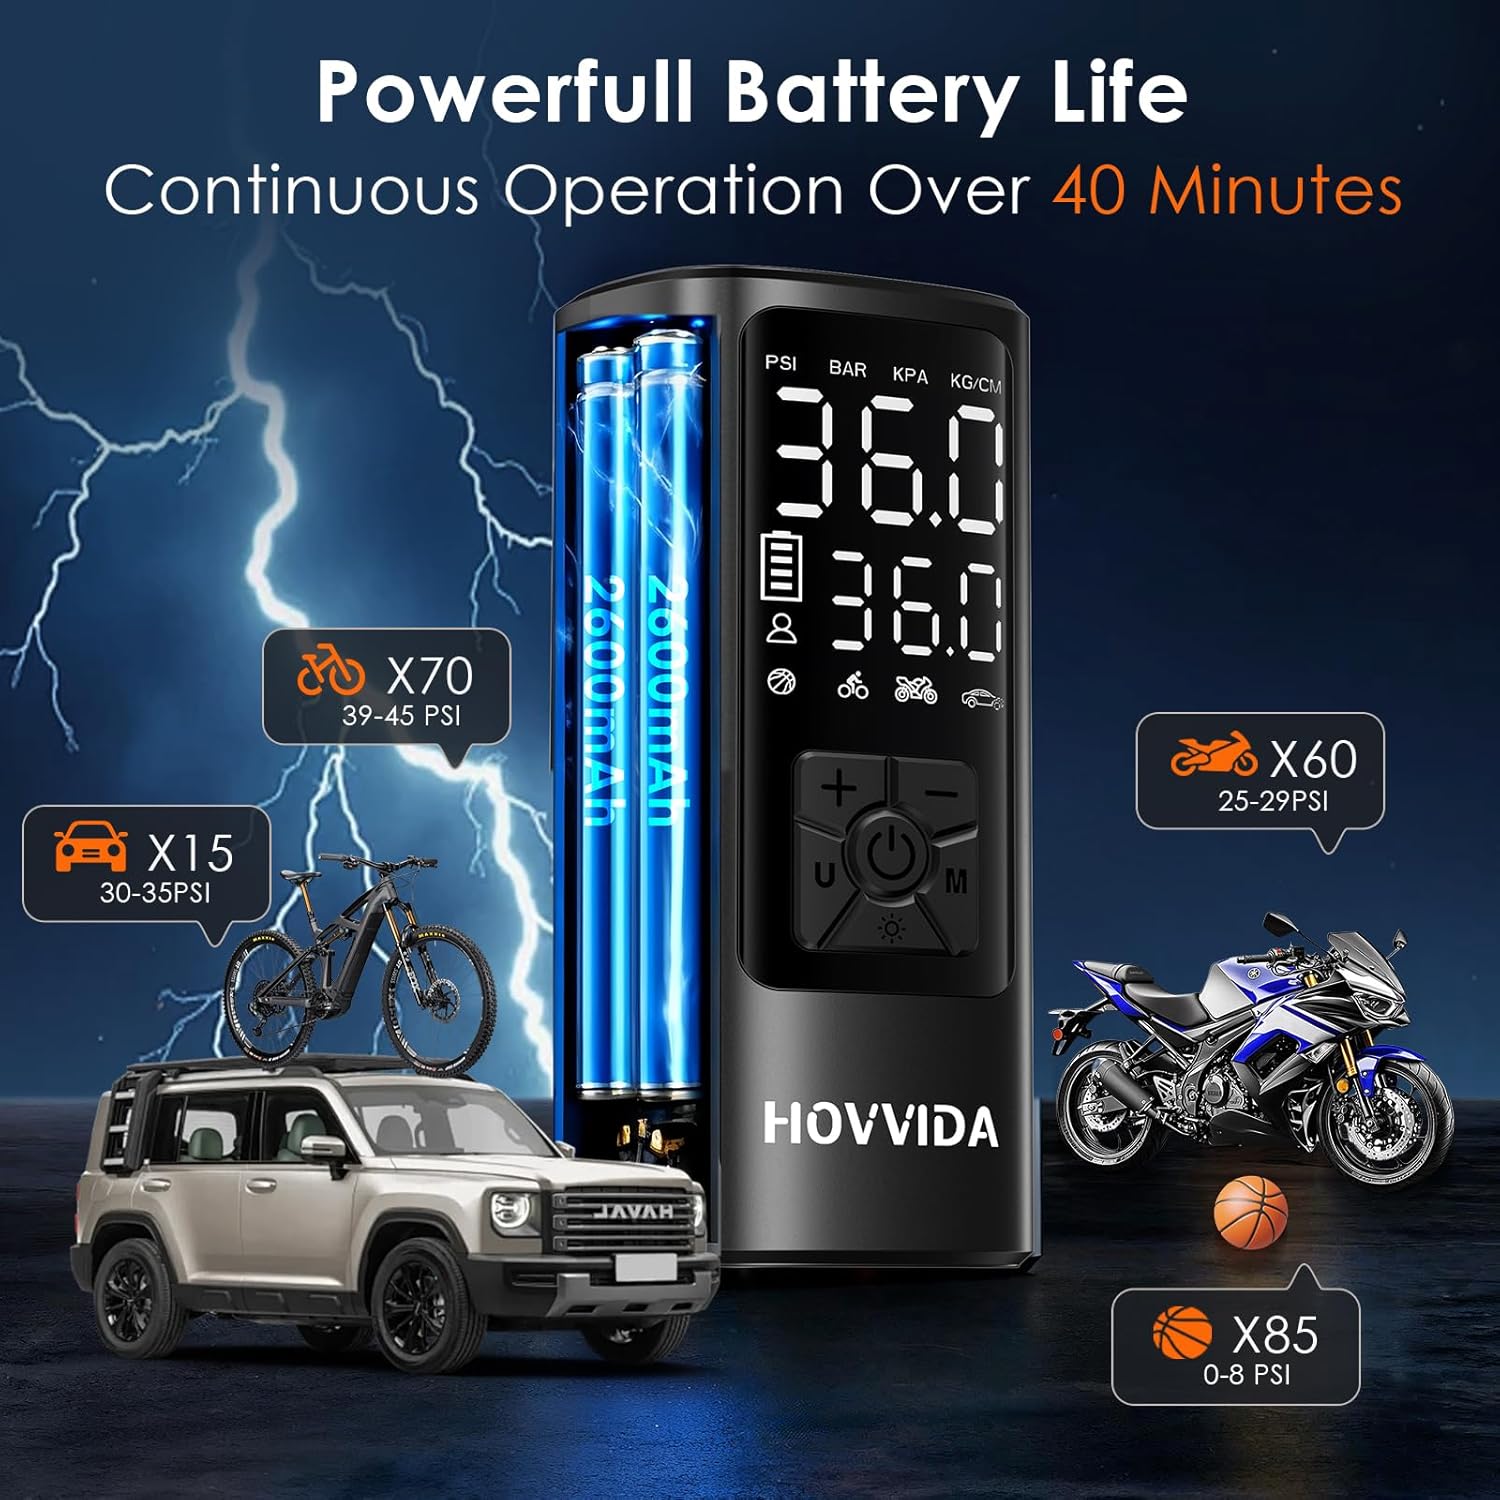
Figure 3: The dual value display screen clearly shows both the real-time tire pressure and the user-set preset pressure.
4.1. Components
- Digital Display: Shows real-time pressure, preset pressure, battery level, and selected mode.
- Air Hose Connection Port: For attaching the inflation hose.
- USB-C Input Port: For charging the compressor.
- USB-A Output Port: Functions as a power bank for charging external devices.
- LED Light: Provides illumination for night use.
4.2. Controls
- Power Button (U/Power Icon): Press and hold to turn on/off. Short press to start/stop inflation.
- Mode Button (M): Short press to cycle through inflation modes (Car, Motorcycle, Bicycle, Ball, Custom). Long press to change pressure units (PSI, BAR, KPA, Kg/cm²).
- Increase Button (+): Increases the preset pressure value.
- Decrease Button (-): Decreases the preset pressure value.
- LED Light Button (Sun Icon): Short press to turn the LED light on/off.

Figure 4: The compact and portable design of the HOVVIDA air compressor, suitable for easy transport and storage.
5. Setup
5.1. Initial Charging
- Before first use, fully charge the air compressor.
- Connect the USB Type-C charging cable to the compressor's USB-C input port and a suitable 5V USB power adapter (not included).
- The battery indicator on the display will show charging status. Charging is complete when the indicator shows full.
5.2. Attaching the Air Hose and Nozzle
- Screw the air hose securely into the air hose connection port on the top of the compressor.
- Select the appropriate nozzle for the item you wish to inflate.
- Schrader Valve: Directly connect the hose to car, motorcycle, or some bicycle tires.
- Presta Valve Adapter: (If applicable, use an external adapter if your bike has Presta valves, not included in standard package).
- Ball Needle: For sports balls.
- Toy Nozzles: For inflatable toys or air mattresses.
- Attach the selected nozzle to the other end of the air hose.
6. Operating Instructions
6.1. Power On/Off
- To Power On: Press and hold the Power button (U/Power Icon) for 3 seconds. The display will light up.
- To Power Off: Press and hold the Power button (U/Power Icon) for 3 seconds. The display will turn off. The device will also automatically power off after a period of inactivity.
6.2. Selecting Inflation Mode and Pressure Unit
- After powering on, short press the Mode button (M) to cycle through the 5 preset inflation modes: Car, Motorcycle, Bicycle, Ball, and Custom.
- Long press the Mode button (M) to switch between pressure units: PSI, BAR, KPA, Kg/cm².
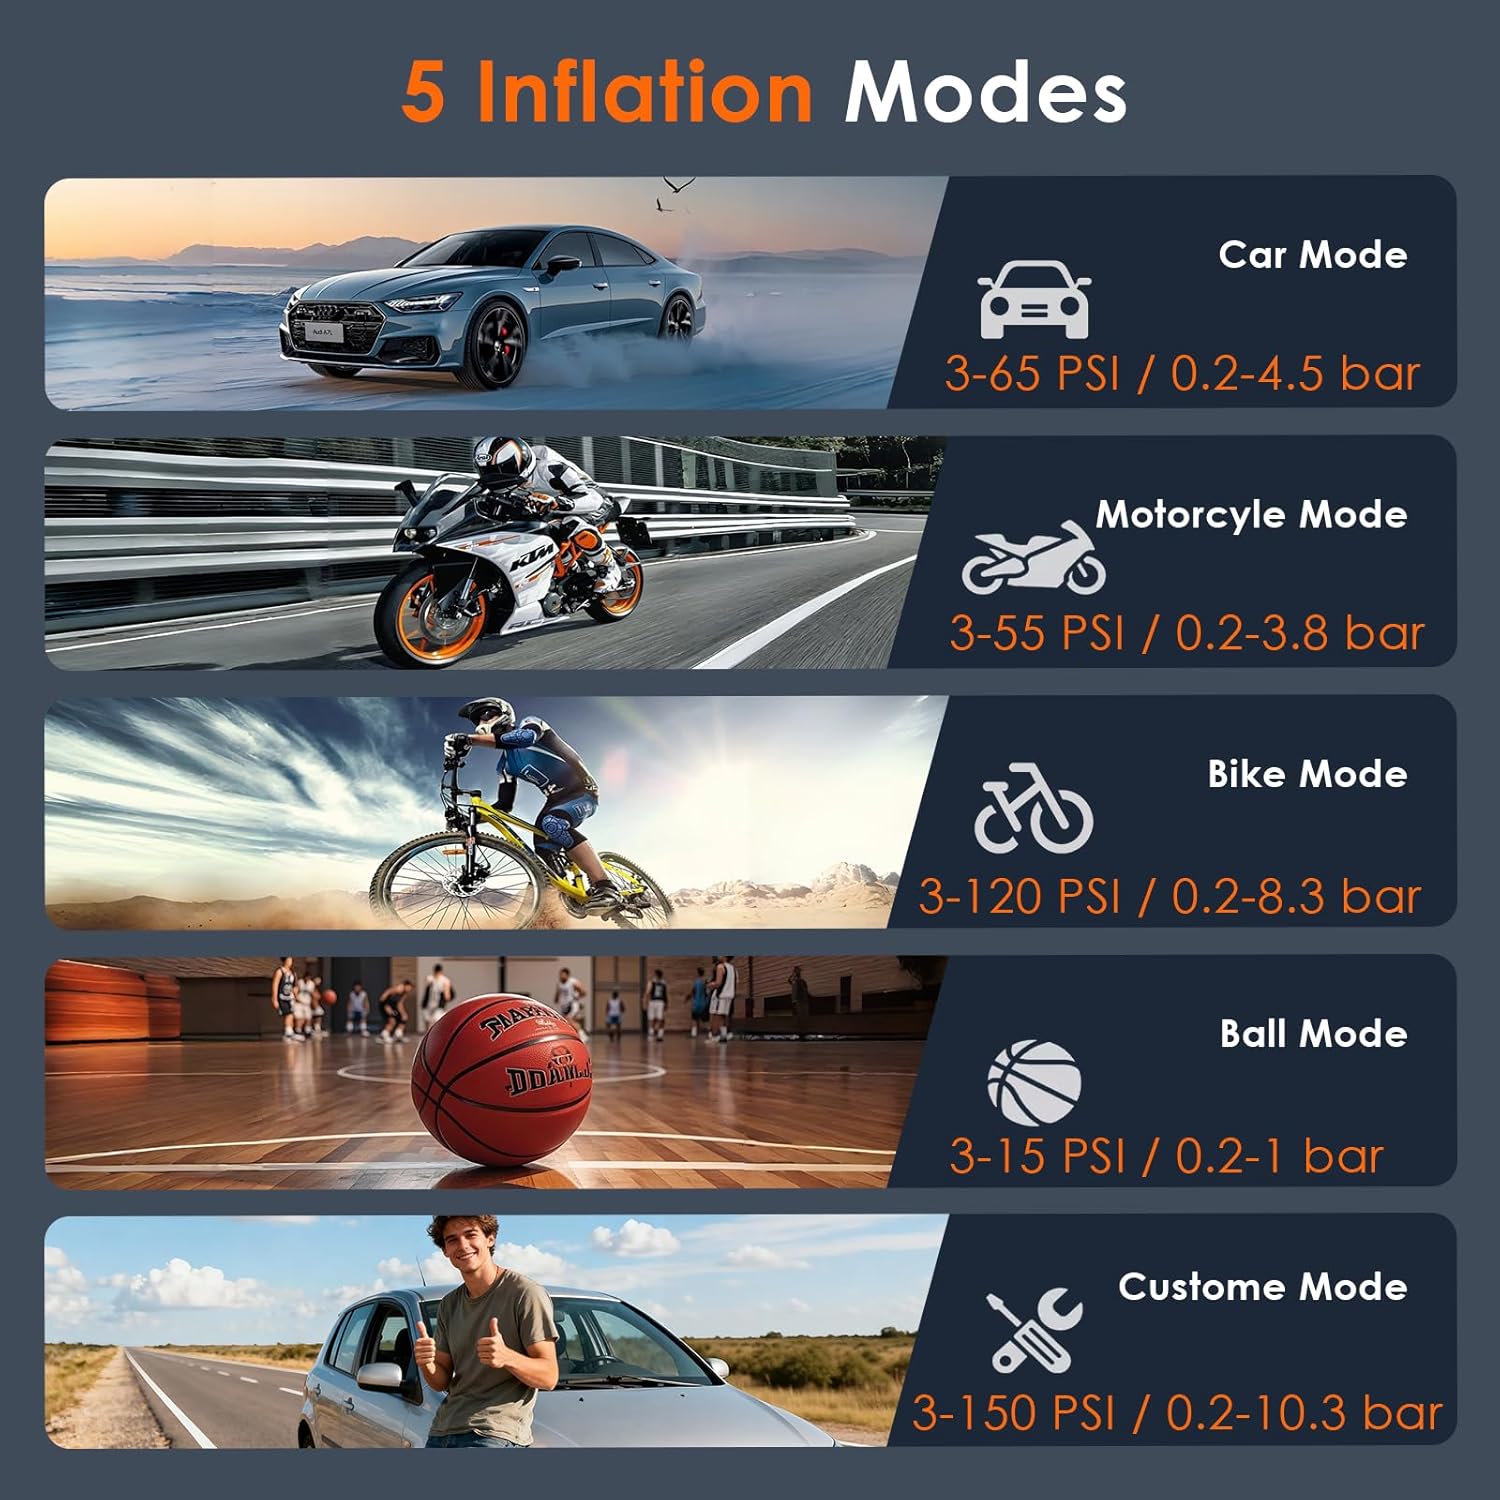
Figure 5: The five distinct inflation modes available on the compressor, each with a recommended pressure range.
6.3. Setting Target Pressure
- Once a mode is selected, the preset pressure will be displayed.
- Use the Increase (+) and Decrease (-) buttons to adjust the target pressure to your desired value. Refer to the item's manufacturer recommendations for correct pressure.
- For the Custom mode, you can set any pressure between 0-10.3 bar (0-150 PSI).
6.4. Inflation Process
- Connect the air hose with the appropriate nozzle to the item's valve. Ensure a tight seal to prevent air leakage.
- The display will show the current pressure of the item.
- Short press the Power button (U/Power Icon) to start inflation.
- The compressor will automatically stop once the preset target pressure is reached.
- After inflation, quickly disconnect the hose from the valve to minimize air loss.
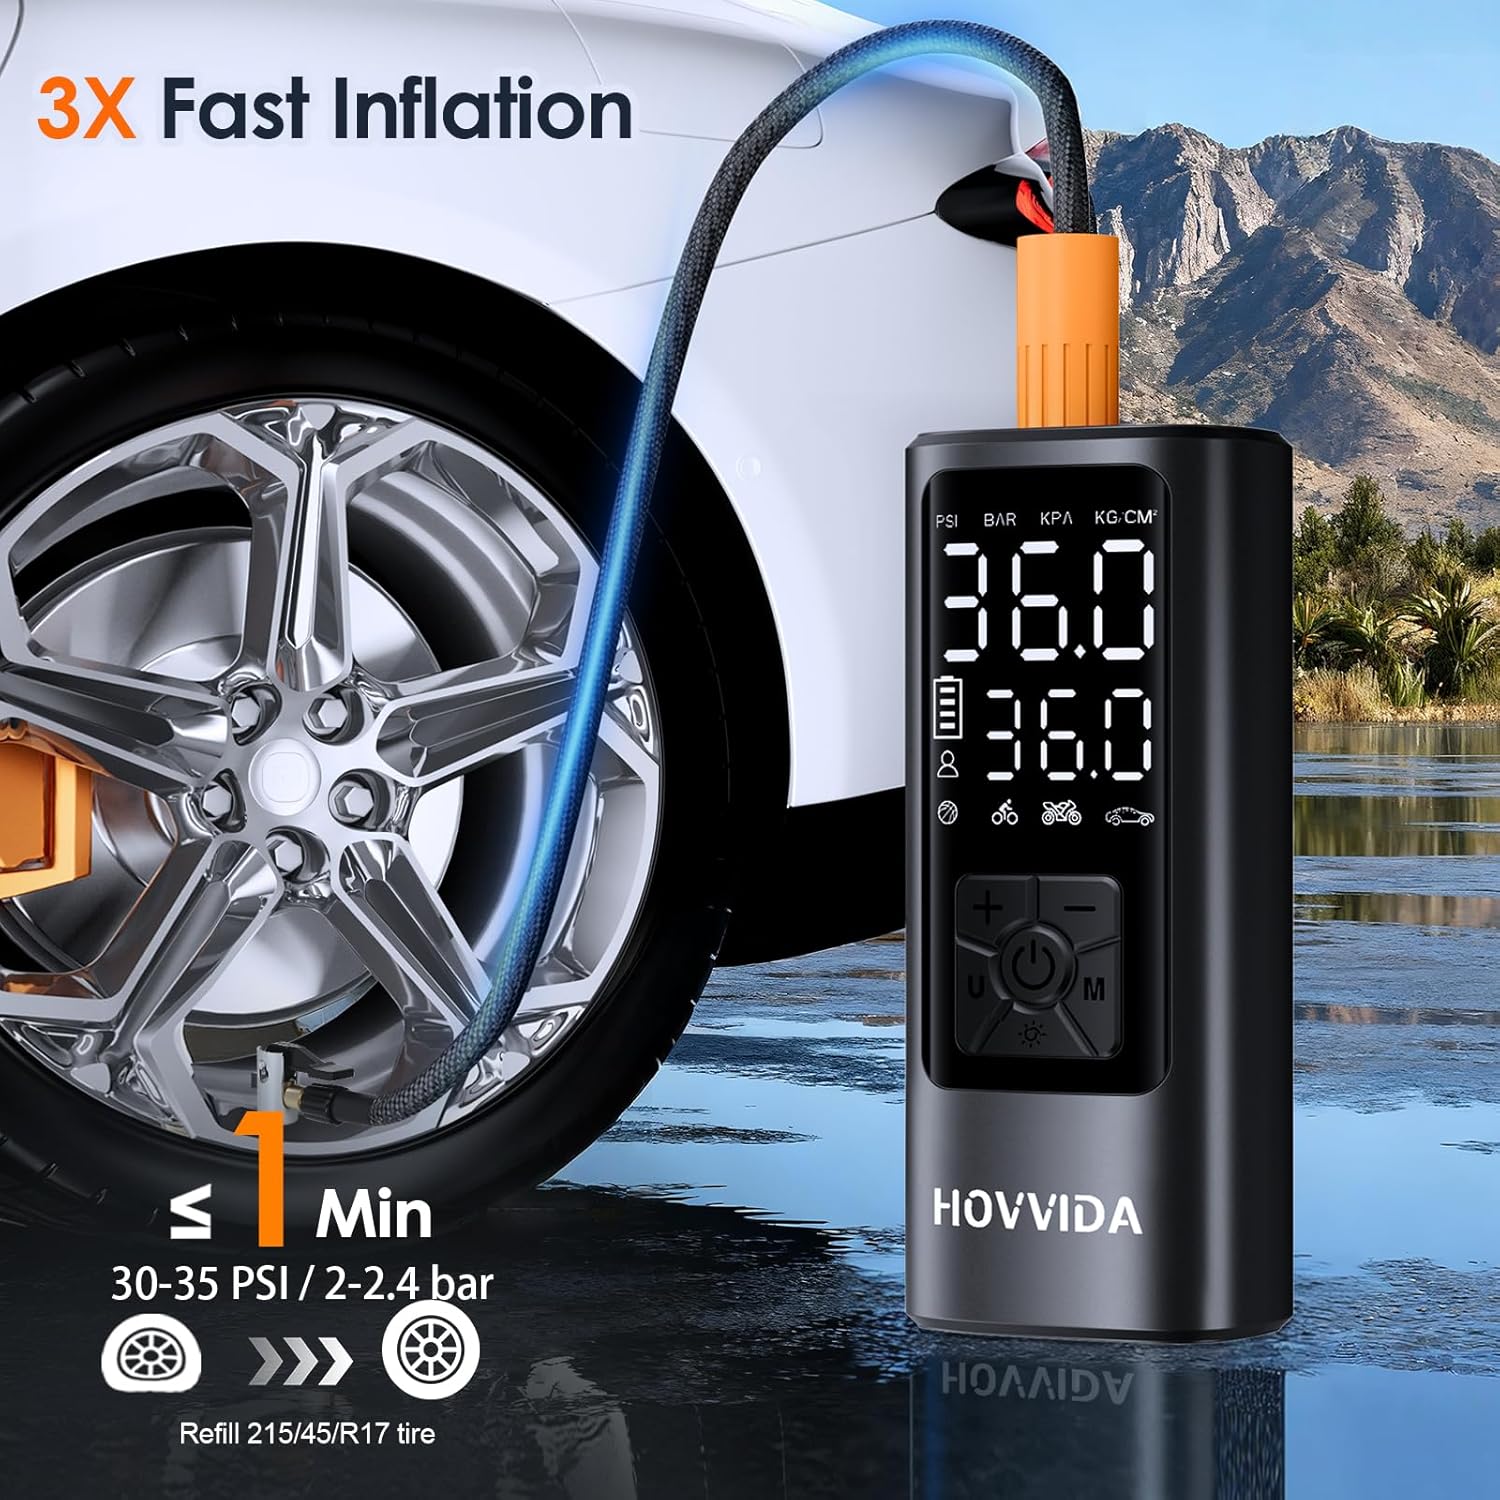
Figure 6: The compressor in action, demonstrating its fast inflation capability for vehicle tires.

Figure 7: Illustration of the automatic shut-off feature, which stops inflation once the target pressure is reached.

Figure 8: Overview of the compressor's powerful battery life, indicating its capacity to inflate multiple items on a single charge.
6.5. Emergency LED Light
- Short press the LED Light button (Sun Icon) to turn the light on or off. This is useful for operating in low-light conditions or as an emergency light.
6.6. Power Bank Function
- The compressor can be used as a power bank. Connect your mobile phone or other USB-powered device to the USB-A output port using a compatible cable.
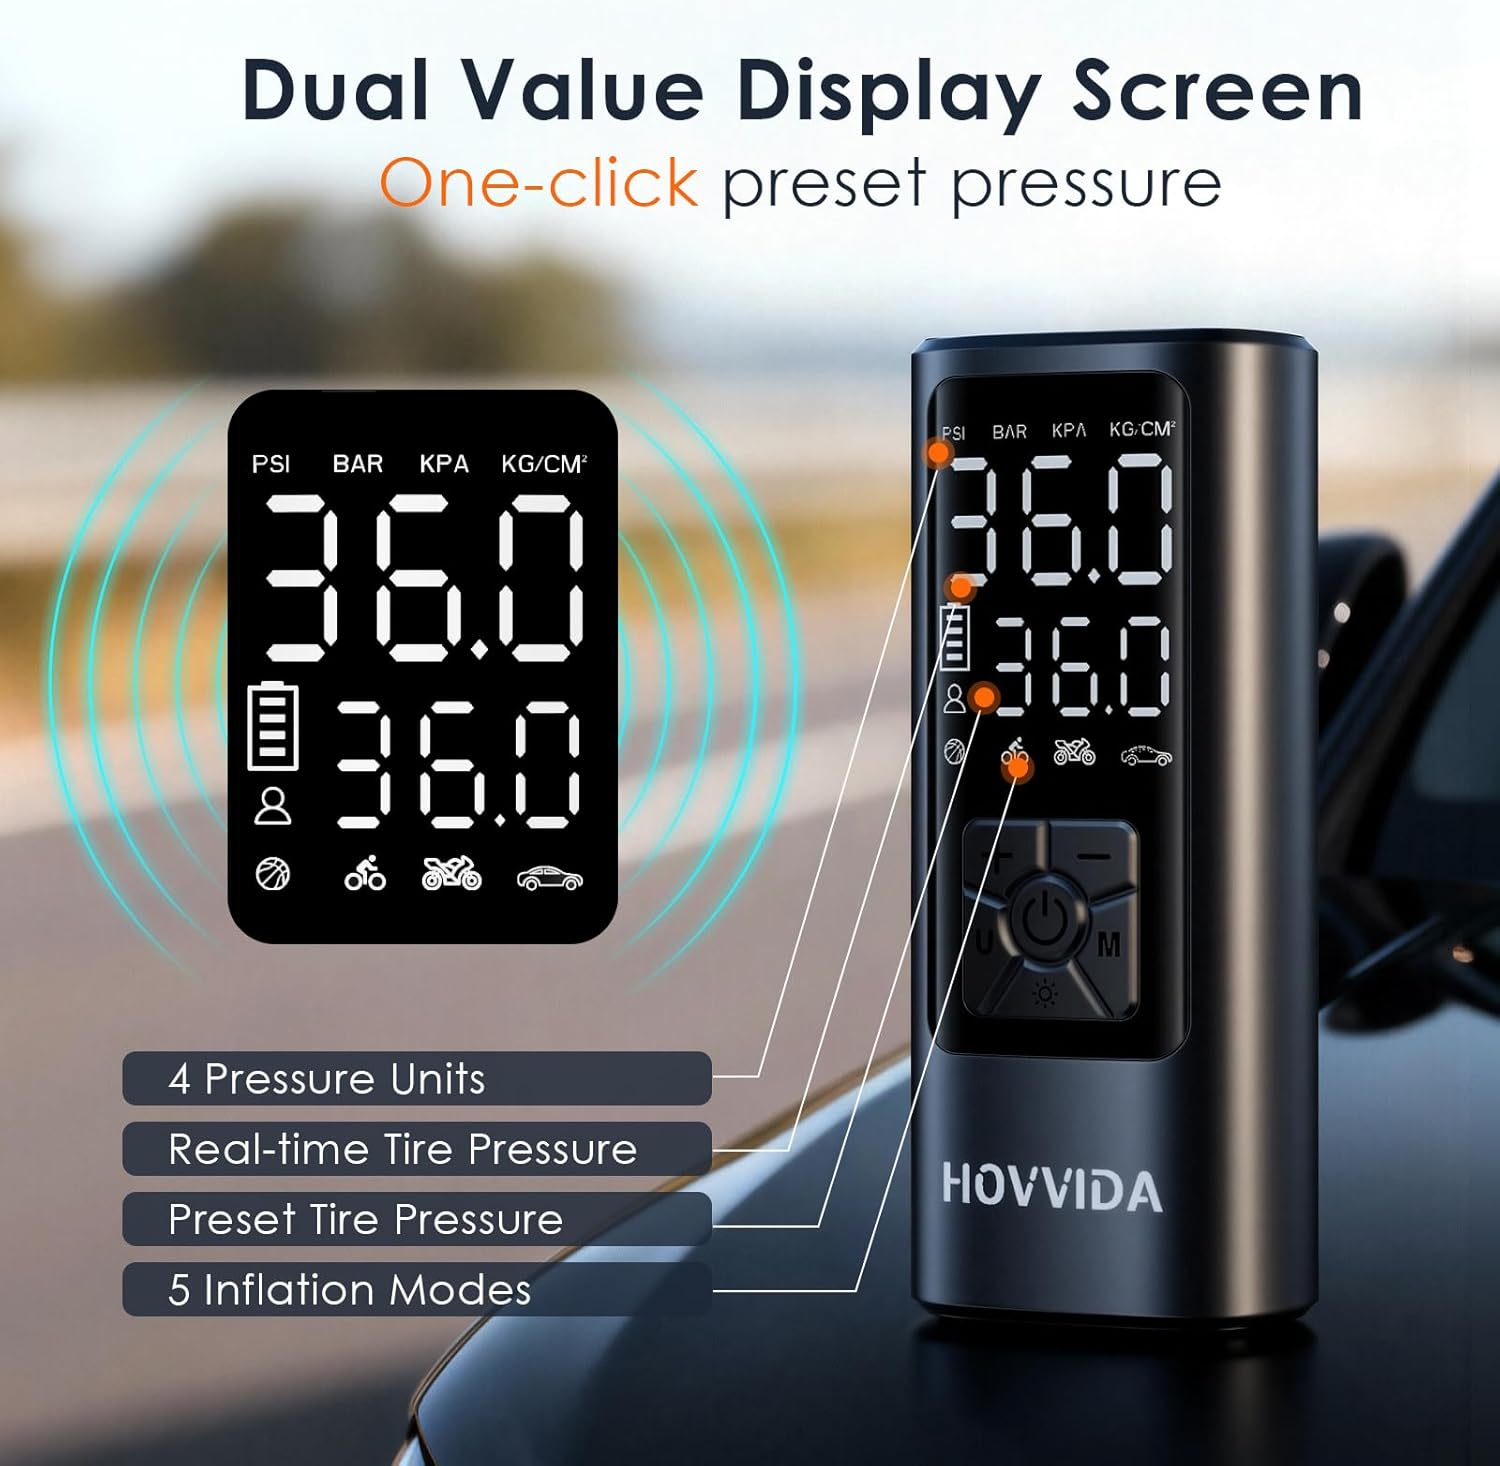
Figure 9: The compressor's integrated LED light for illumination and its capability to charge external devices via the USB-A output port.
7. Maintenance
- Cleaning: Wipe the exterior of the compressor with a soft, damp cloth. Do not use harsh chemicals or abrasive cleaners. Ensure no water enters the ports.
- Storage: Store the compressor and its accessories in the provided storage bag in a cool, dry place, away from direct sunlight and extreme temperatures.
- Battery Care: To prolong battery life, charge the compressor fully every 3-6 months even if not in regular use. Avoid completely draining the battery frequently.
- Hose and Nozzles: Inspect the air hose and nozzles regularly for any signs of wear or damage. Replace if necessary.
8. Troubleshooting
| Problem | Possible Cause | Solution |
|---|---|---|
| Compressor does not turn on. | Low battery or no charge. | Charge the compressor fully using the USB-C cable. |
| Compressor does not inflate. |
|
|
| Inaccurate pressure reading. | Loose connection or faulty sensor. | Ensure all connections are tight. If problem persists, contact customer support. |
| Compressor overheats and stops. | Prolonged continuous operation. | Allow the compressor to cool down for at least 10-15 minutes before resuming operation. |
9. Specifications
| Brand | HOVVIDA |
| Model Number | AM21J2 |
| Dimensions (L x W x H) | 156 x 62 x 43 mm (6.5 x 4.2 x 15 cm) |
| Weight | 600 Grams |
| Material | Plastic |
| Power Source | Battery Powered |
| Voltage | 5 Volts |
| Max Power | 54 Watt |
| Airflow Capacity | 25 Liters per minute |
| Max Pressure | 10.3 Bars (150 PSI) |
| Hose Length | 20 Centimeters |
| Battery Capacity | 2 x 2600 mAh (5200 mAh total) |
10. Warranty and Support
HOVVIDA products are designed and manufactured to the highest quality standards. For specific warranty information, please refer to the warranty card included with your purchase or contact HOVVIDA customer support.
If you encounter any issues or have questions regarding your HOVVIDA AM21J2 Portable Air Compressor, please contact our customer support team for assistance. Contact details can typically be found on the product packaging or the official HOVVIDA website.