Introduction
This manual provides detailed instructions for the installation, operation, and maintenance of your SHANGZHAOYUAN X99 Dual CPU Motherboard. This high-performance E-ATX motherboard is designed for Intel LGA 2011-V3 Xeon E5 V3/V4 series processors, supporting up to 256GB DDR4 memory, PCIe 3.0, NVME/NGFF M.2, SATA 6Gbps, USB 3.0, and Gigabit LAN. Please read this manual thoroughly before proceeding with installation.

Figure 1: Overview of the X99 Dual CPU Server Motherboard highlighting key features.
Package Contents
Before beginning installation, please verify that all components listed below are present in your package:
- 1x X99 Dual CPU Motherboard
- 1x I/O Shield
- 2x SATA Cables
- 2x LGA2011-V3 CPU Fan Brackets
Note: A user manual is not included in the physical package. This digital document serves as your user manual. A CR2032 battery for the CMOS is also not included and must be purchased separately.

Figure 2: Included items in the product package.
Setup Guide
1. CPU Installation
The X99 Dual CPU Motherboard features two LGA 2011-3 sockets, supporting Intel Xeon E5-2XXX-V3 and E5-2XXX-V4 series processors. For dual CPU operation, both CPUs must be of the same model. Intel Core i7 series processors do not support dual CPU configurations on this motherboard.
If installing only one CPU, it must be placed in CPU slot 1. Ensure proper alignment of the CPU with the socket's triangle marker before gently lowering the CPU into place. Secure the retention arm.

Figure 3: Layout of the X99 Dual CPU Motherboard, showing CPU socket locations and overall dimensions.
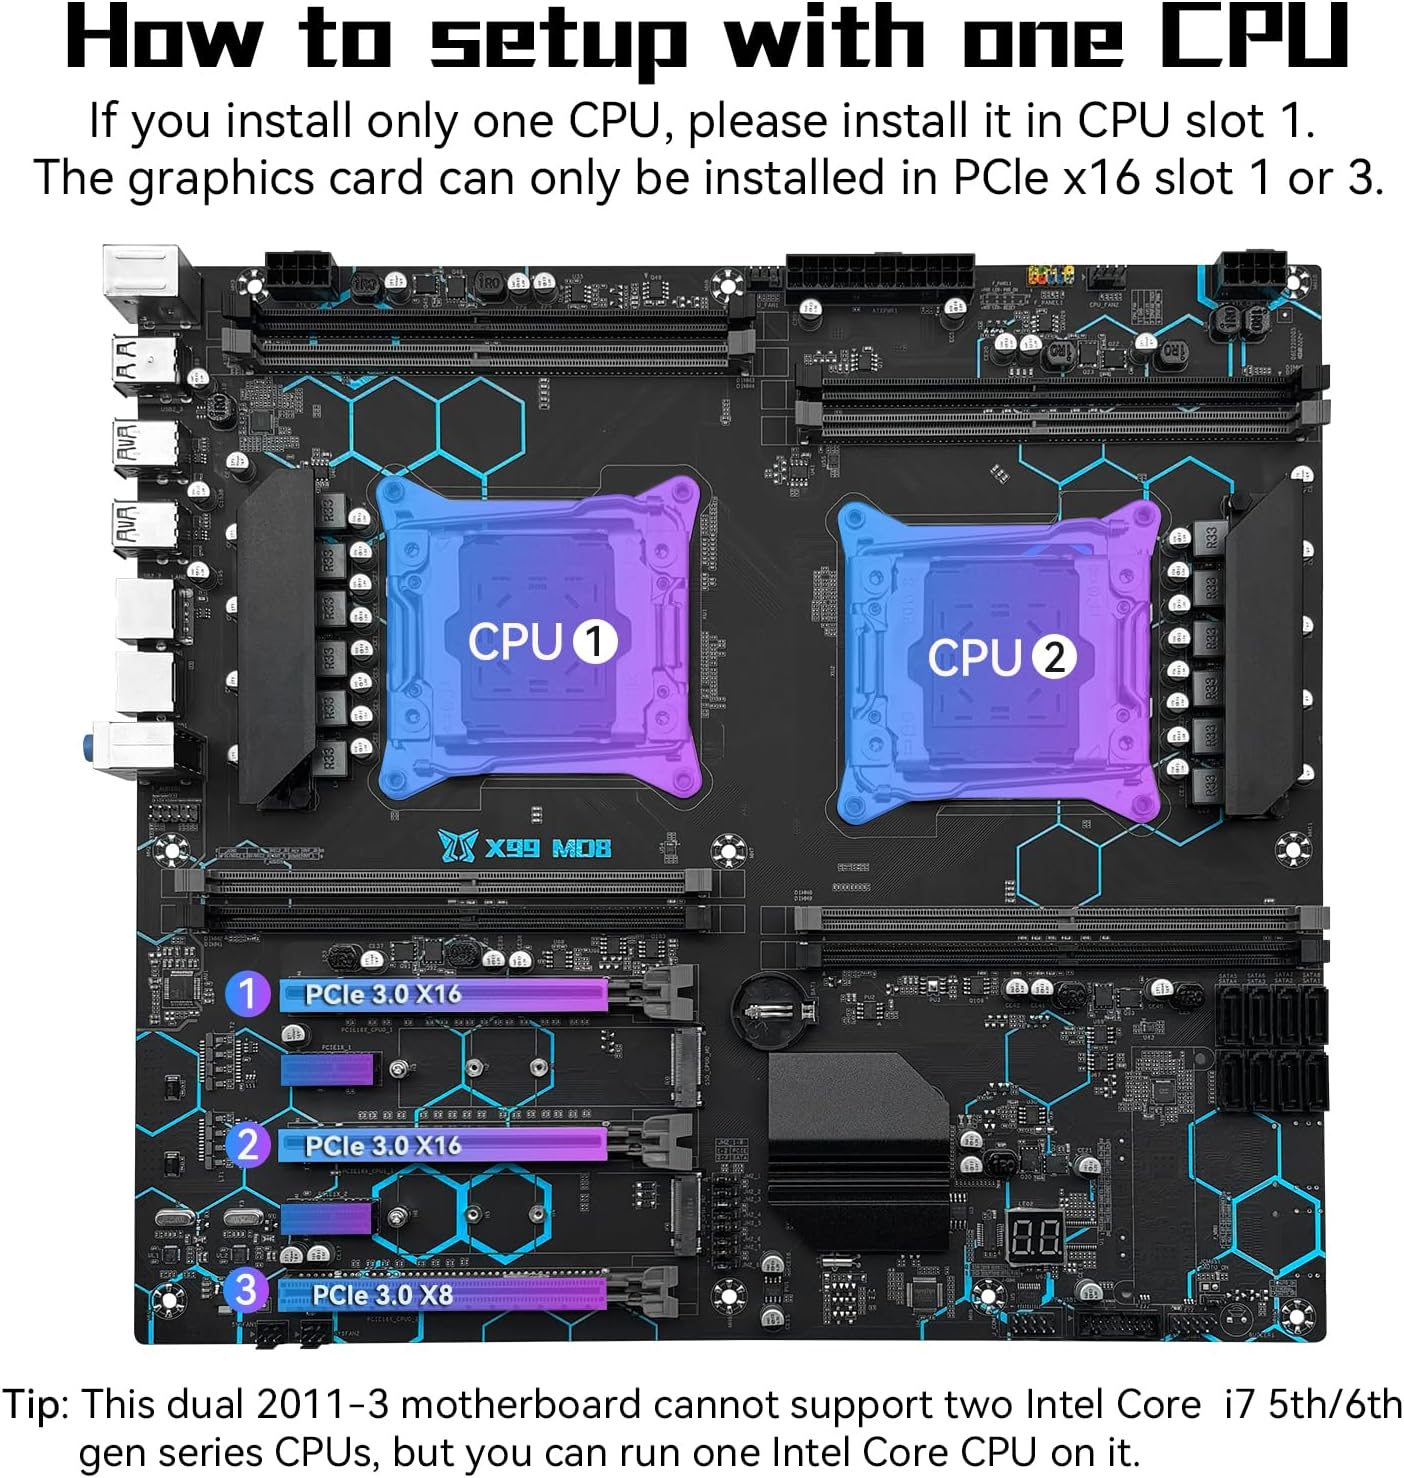
Figure 4: Guide for installing a single CPU and corresponding PCIe slot usage.
2. Memory Installation
The motherboard supports 8-channel DDR4 ECC/RECC/Desktop memory, with a maximum capacity of 256GB (8x32GB) at 2133/2400MHz. When using E5 V4 CPUs, only ECC or RECC memory is supported; desktop memory is not compatible. Ensure memory modules are inserted firmly into the DIMM slots until the clips lock into place.

Figure 5: Close-up view of the 8-channel DDR4 memory slots on the X99 motherboard.
3. PCIe Device Installation
The motherboard is equipped with 2 PCIe 3.0 X16 slots, 1 PCIe 3.0 X8 slot, and 2 PCIe 2.0 X1 slots. These slots allow for the expansion of practical functions such as graphics cards, network cards, and other expansion cards. When using a single CPU, the graphics card should be installed in PCIe x16 slot 1 or 3.

Figure 6: Detailed view of the PCIe expansion slots available on the motherboard.
4. M.2 Storage Installation
The motherboard features dual M.2 slots supporting both NVME M.2 and NGFF (SATA) M.2 hard drives. The default mode for these slots is NVME M.2. To switch to NGFF (SATA) M.2 mode, you must adjust the corresponding jumper cap. Refer to the diagram for correct jumper settings.

Figure 7: Illustration of the dual M.2 slots and their configuration options via jumper caps.
5. Power Supply Connection
Connect your power supply unit to the motherboard using the 24-pin, and two 8-pin power interfaces. A power supply greater than 600W is recommended to ensure stable operation, especially under load. The motherboard utilizes a 6-phase power supply design for stable power delivery.

Figure 8: Diagram illustrating the power supply and heat dissipation components of the motherboard.
6. Motherboard Layout and Connectors
Familiarize yourself with the various ports and connectors on the motherboard for proper system assembly. This includes USB ports, Ethernet ports, audio jacks, SATA ports, and fan headers.

Figure 9: Comprehensive layout of the X99 Motherboard, detailing all ports and connectors.
Operating Instructions
Once all components are correctly installed and connected, you can proceed with powering on your system. It is recommended to install a Windows 10 operating system, as it can often resolve driver issues automatically. For specific drivers, you may consider using driver management software like Driver Talent.
The integrated diagnostic card can assist in identifying potential issues during boot-up by displaying error codes.
Maintenance
Clearing CMOS
If you encounter boot issues or need to reset BIOS settings, clearing the CMOS can often resolve the problem. To clear the CMOS:
- Disconnect power from the motherboard.
- Locate the CMOS clear jumper (JCMOS1) on the motherboard.
- Pull out the jumper cap from its default position (pins "2" and "3").
- Install the jumper cap on pins "1" and "2" for approximately 5 seconds.
- Return the jumper cap to its original position on pins "2" and "3".
- Reconnect power and attempt to boot the system.
Note: There is no need to remove the CR2032 CMOS battery to clear CMOS using the jumper method.
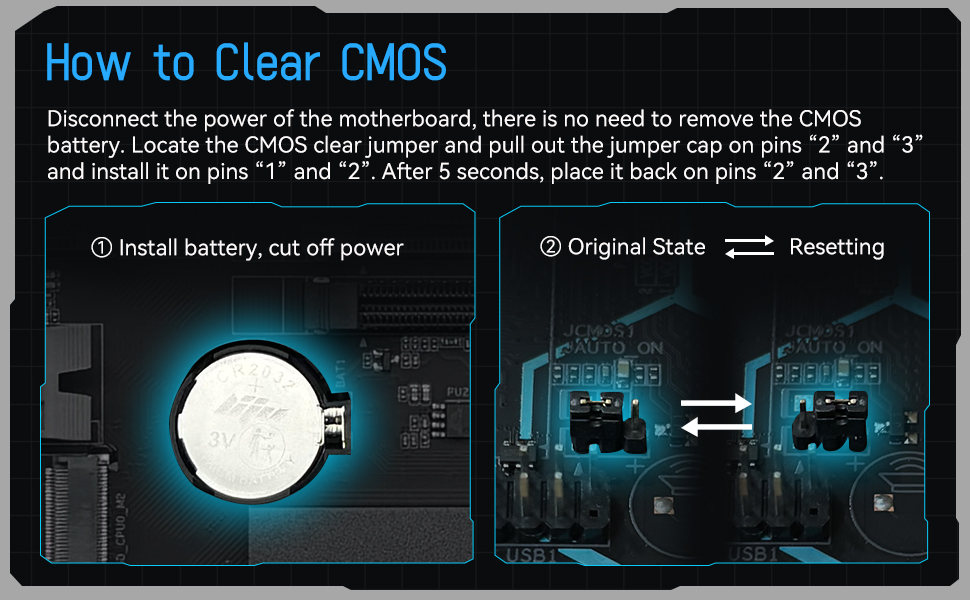
Figure 10: Visual guide for the CMOS clearing procedure.
General Care
To ensure the longevity of your motherboard, keep your system clean and free of dust. Regularly clean dust from fans and heatsinks using compressed air. Ensure adequate airflow within your computer case to prevent overheating.
Troubleshooting
If you encounter issues such as no display, no boot, no screen, or problems with network/sound cards, consider the following steps:
- Reset CMOS: Follow the "Clearing CMOS" instructions in the Maintenance section.
- Check Connections: Ensure all power cables, data cables, and component connections (CPU, RAM, GPU) are securely seated.
- Clean Contacts: Use an eraser to gently wipe the metal contacts on memory modules, CPU, and graphics card to remove any residue that might interfere with connectivity.
- Single Component Test: If possible, test components individually (e.g., one RAM stick at a time, different graphics card) to isolate the faulty part.
- Diagnostic Card: Utilize the diagnostic card on the motherboard to interpret error codes, which can pinpoint the area of the problem.
- Driver Issues: For driver-related problems, ensure you are running Windows 10 or use a driver update utility.
Specifications
| Feature | Specification |
|---|---|
| Brand | SHANGZHAOYUAN |
| Model Name | SHANGZHAOYUAN X99 MD8 |
| CPU Socket | LGA 2011-3 (Dual CPU Design) |
| Compatible Processors | Intel Xeon E5 V3/V4 series processors (E5-2XXX-V3, E5-2XXX-V4). Intel Core i7 5th/6th series processors (single CPU only). |
| Chipset Type | Intel C612 |
| RAM Memory Technology | DDR4 (ECC/RECC/Desktop) |
| Memory Slots | 8-channel DIMM slots |
| Max Memory Capacity | 256GB (8x32GB) |
| Memory Clock Speed | 2133/2400MHz |
| PCIe Expansion Slots | 2x PCIe 3.0 X16, 1x PCIe 3.0 X8, 2x PCIe 2.0 X1 |
| M.2 Slots | Dual M.2 (NVME PCIe 3.0 X4 bandwidth, NGFF SATA M.2 switchable) |
| SATA Ports | 8x SATA 6Gbps |
| USB Ports | USB 3.0, USB 2.0 (specific counts from image) |
| Network | Dual Gigabit LAN |
| Form Factor | E-ATX |
| Dimensions | 15 x 13.5 x 2.5 inches (Package), 320mm x 300mm (Motherboard) |
| Item Weight | 3.8 pounds |
| Power Interface | 24pin + 8pin + 8pin |
| PCB Layers | 6-layer PCB |
| Additional Features | Diagnostic Card, 3 VRM Heat Sinks |
Warranty and Support
For warranty information and specific support inquiries, please contact the seller or manufacturer directly. The manufacturer is SHANGZHAOYUAN. You can visit the SHANGZHAOYUAN Store on Amazon for more information.
For general technical assistance, refer to the troubleshooting section of this manual. Many common issues can be resolved by ensuring proper component installation and driver compatibility.