hygger 680 LPH 8W
Hygger Aquarium Filter User Manual
Model: 680 LPH 8W
1. Product Overview
The Hygger Aquarium Filter is designed to provide efficient multi-stage filtration for various aquatic environments, including tanks for turtles, frogs, and fish. It ensures clean and healthy water by effectively removing impurities and promoting water circulation and oxygenation.

Image: The Hygger Aquarium Filter operating in a shallow water tank, demonstrating its waterfall output and suitability for aquatic pets like turtles.
2. Key Features
- Efficient Multi-Stage Filtration: Utilizes a double layer sponge and activated carbon for comprehensive water purification, removing debris, odors, and impurities.
- Adjustable Flow Rate: Features a knob to control water flow, allowing customization based on tank size and inhabitant needs.
- Quiet Operation: Equipped with an ultra-silent motor, ensuring minimal noise disturbance even at maximum flow (680 L/H).
- Low Water Level Compatibility: Designed to operate effectively in shallow water, with a minimum water level requirement of 10 cm, ideal for turtles and amphibians.
- Easy Maintenance: Features a side-opening filtration chamber for convenient cleaning and replacement of filter media without full disassembly.
- Water Change Function: Includes a water gun design for quick and easy water changes by connecting a hose (not included).
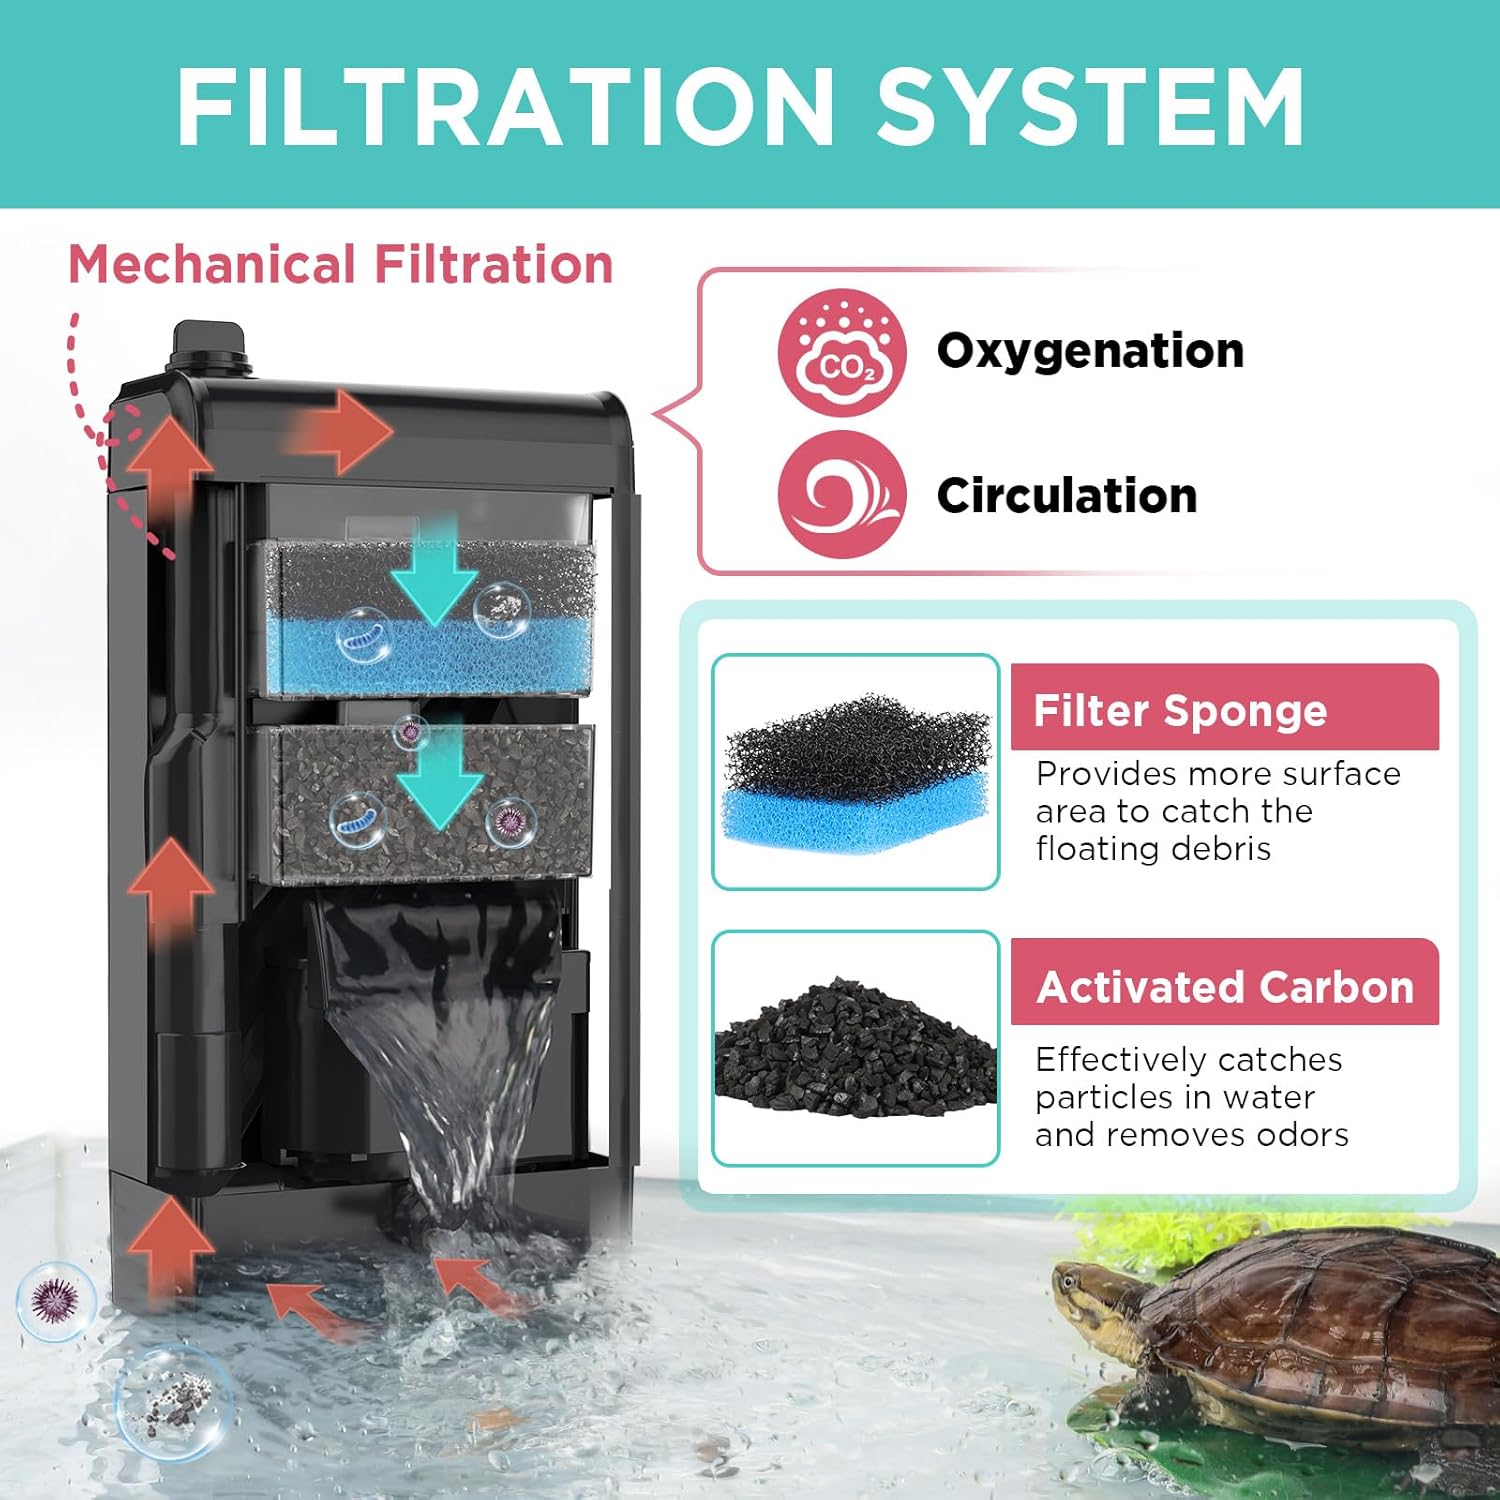
Image: A detailed diagram illustrating the mechanical filtration process, oxygenation, and circulation provided by the filter, highlighting the filter sponge and activated carbon components.
3. Components
The Hygger Aquarium Filter consists of several key components designed for optimal performance and ease of use:
- Outlet Tap: The top outlet for filtered water.
- Filter Sponge: Provides mechanical filtration, trapping debris and particles.
- Carbon Bag: Contains activated carbon for chemical filtration, removing odors and discoloration.
- Water Pump (Internal): Drives water through the filtration media.
- Water Nozzle: The lower outlet for water discharge, often creating a waterfall effect.
- Suction Cups: Three strong suction cups for secure vertical or horizontal mounting on the tank wall.

Image: An exploded view diagram showing the detachable and washable components of the filter, including the outlet tap, filter sponge, carbon bag, internal water pump, and water nozzle.
4. Setup Instructions
- Unpack and Inspect: Carefully remove all components from the packaging and ensure no parts are missing or damaged.
- Install Filter Media: Ensure the filter sponge and carbon bag are correctly placed within the filtration chamber.
- Mount the Filter: Attach the filter securely to the inside wall of your aquarium using the three powerful suction cups. It can be placed vertically or horizontally.
- Ensure Minimum Water Level: The filter requires a minimum water level of 10 cm (3.9 inches) to operate correctly. Ensure your tank meets this requirement.
- Connect Power: Plug the filter into a suitable power outlet. Ensure your hands are dry before handling the plug.

Image: The filter positioned in a tank, indicating the 10 cm minimum water level required for proper operation, alongside examples of suitable aquatic animals like turtles, fish, frogs, and newts.
5. Operating Instructions
5.1 Starting the Filter
Once installed and plugged in, the filter will begin operating automatically. Water will be drawn in from the bottom, passed through the filter media, and discharged through the outlet.
5.2 Adjusting Water Flow
The filter features an adjustable flow rate knob located on the top. Rotate the knob to increase or decrease the water flow according to your preference and the needs of your aquatic inhabitants.

Image: A close-up showing the adjustable knob on the filter, allowing users to control the water flow from low to high settings.
5.3 Water Change Function
The filter is equipped with a convenient water change feature:
- Pull Up: Gently pull up the top outlet tap.
- Rotate Outlet: Rotate the outlet to align with the desired direction for water drainage.
- Install Hose: Connect a suitable hose (not included) to the outlet.
- Place Hose in Bucket: Direct the other end of the hose into a bucket or drain.
- Start Water Change: The filter will begin to pump water out of the tank.

Image: A step-by-step visual guide demonstrating how to use the filter's water change function, from pulling up the outlet to draining water into a bucket.
6. Maintenance
Regular maintenance is crucial for the longevity and efficiency of your Hygger Aquarium Filter.
6.1 Cleaning Filter Media
The filter sponge and carbon bag should be cleaned regularly, ideally once every 1-2 weeks, depending on tank conditions and bioload.
- Unplug the Filter: Always disconnect the power before performing any maintenance.
- Open Filter Drawer: The filtration chamber can be opened from the side for easy access.
- Remove Media: Take out the filter sponge and carbon bag.
- Clean Sponge: Rinse the filter sponge thoroughly with old tank water (not tap water, to preserve beneficial bacteria) until clean.
- Replace Carbon Bag: The carbon bag should be replaced every 2-4 weeks as activated carbon becomes saturated and loses effectiveness.
- Reassemble: Place the cleaned sponge and new carbon bag back into the filter. Close the chamber securely.

Image: A visual guide demonstrating the ease of cleaning the filter, showing how to open the filter drawer, remove the carbon bag, and clean the filter sponge.
6.2 Cleaning the Impeller and Shaft
Periodically, the impeller and shaft of the water pump should be cleaned to prevent blockages and maintain quiet operation.
- Remove Bottom Cover: Detach the bottom cover of the filter.
- Remove Water Pump: Carefully take out the water pump assembly.
- Access Impeller: Turn the left motor cover to expose the impeller.
- Clean: Clean the impeller and shaft thoroughly with a small brush or cotton swab. Be careful not to use excessive force on the shaft inside the motor.
- Reassemble: Put all parts back together in reverse order.
Caution: The water intake consists of small holes along the bottom. Avoid using extra fine gravel in your tank to prevent clogging these intake points.

Image: Instructions for cleaning the impeller and shaft, including a caution about the water intake holes and avoiding fine gravel.
7. Troubleshooting
- Filter Not Starting:
- Check if the power cord is securely plugged into a working outlet.
- Ensure the water level in the tank is above the minimum 10 cm requirement.
- Inspect the impeller for any obstructions or damage. Clean if necessary.
- Reduced Water Flow:
- Clean the filter sponge and carbon bag, as they may be clogged with debris.
- Check the water intake holes at the bottom of the filter for blockages.
- Clean the impeller and its housing for any buildup.
- Ensure the flow adjustment knob is set to a higher flow setting.
- Excessive Noise:
- This filter is designed for quiet operation. If it becomes noisy, it often indicates an issue with the impeller.
- Unplug the filter and carefully remove and clean the impeller and its shaft. Ensure no debris is caught.
- Check that the filter is securely mounted and not vibrating against the tank glass.
- Ensure the water level is adequate.
- Water Not Clear:
- Clean or replace the filter sponge and carbon bag.
- Ensure the filter is running continuously.
- Check tank parameters (e.g., overfeeding, overstocking) that might contribute to poor water quality.
8. Specifications
| Power | 8W |
| Voltage/Frequency | AC 220-240V / 50HZ |
| Max Flow Rate (Q.Max) | 180 GPH (680 LPH) |
| Product Dimensions | 23.5 x 12 x 6.5 cm |
| Minimum Water Level | 3.9 inches (10 cm) |
| Application Fish Tank Size | 5-60 Gallons (19-227 Liters) |
| Outlet Hose Diameter (Outer) | 3/4 inches (18MM) (Hose NOT INCLUDED) |
| Outlet Hose Diameter (Inner) | 1/2 inches (14MM) (Hose NOT INCLUDED) |

Image: A visual representation of the product specifications, including power, voltage, flow rate, dimensions, and applicable tank sizes.
9. Warranty and Support
Specific warranty information for this product is not provided in the available data. For warranty claims, technical support, or further assistance, please refer to the contact information provided by your retailer or the official Hygger website.
Ask a question about this manual
Ask about setup, troubleshooting, compatibility, parts, safety, or missing instructions. Manuals+ will review the question and use this page’s manual context to help answer it.