1. Important Safety Information
Please read all instructions carefully before installation and use. Failure to follow these instructions may result in injury or product damage.
- Always wear safety glasses during installation.
- Handle glass panels with extreme care. Tempered glass, while strong, can shatter if struck at the edges or corners.
- Ensure the installation surface (walls, floor) is structurally sound and level.
- Use appropriate tools and hardware for your specific wall type.
- Do not overtighten screws, as this can damage components or glass.
- Keep children and pets away from the installation area.
- If you are unsure about any part of the installation, consult a qualified professional.
2. Package Contents
Verify that all components are present and undamaged before beginning installation.
- Shower door glass panels (1/4" (6mm) thick SGCC tempered glass)
- All mounting parts (hardware kit)
- Towel bar / Handle set
- Sealing strips
- Installation instructions (this manual)
3. Product Specifications
| Brand | Oudbo Molartte |
| Model Number | AHA-UG6072/48072 |
| Dimensions | 48" W x 76" H (Adjustable width: 48-48.4" W) |
| Glass Thickness | 1/4" (6mm) SGCC Tempered Glass |
| Material | Glass, Aluminum Alloy Frame, Stainless Steel Hardware |
| Color | Matte Black |
| Assembly Required | Yes |
| Item Weight | 96 Pounds |
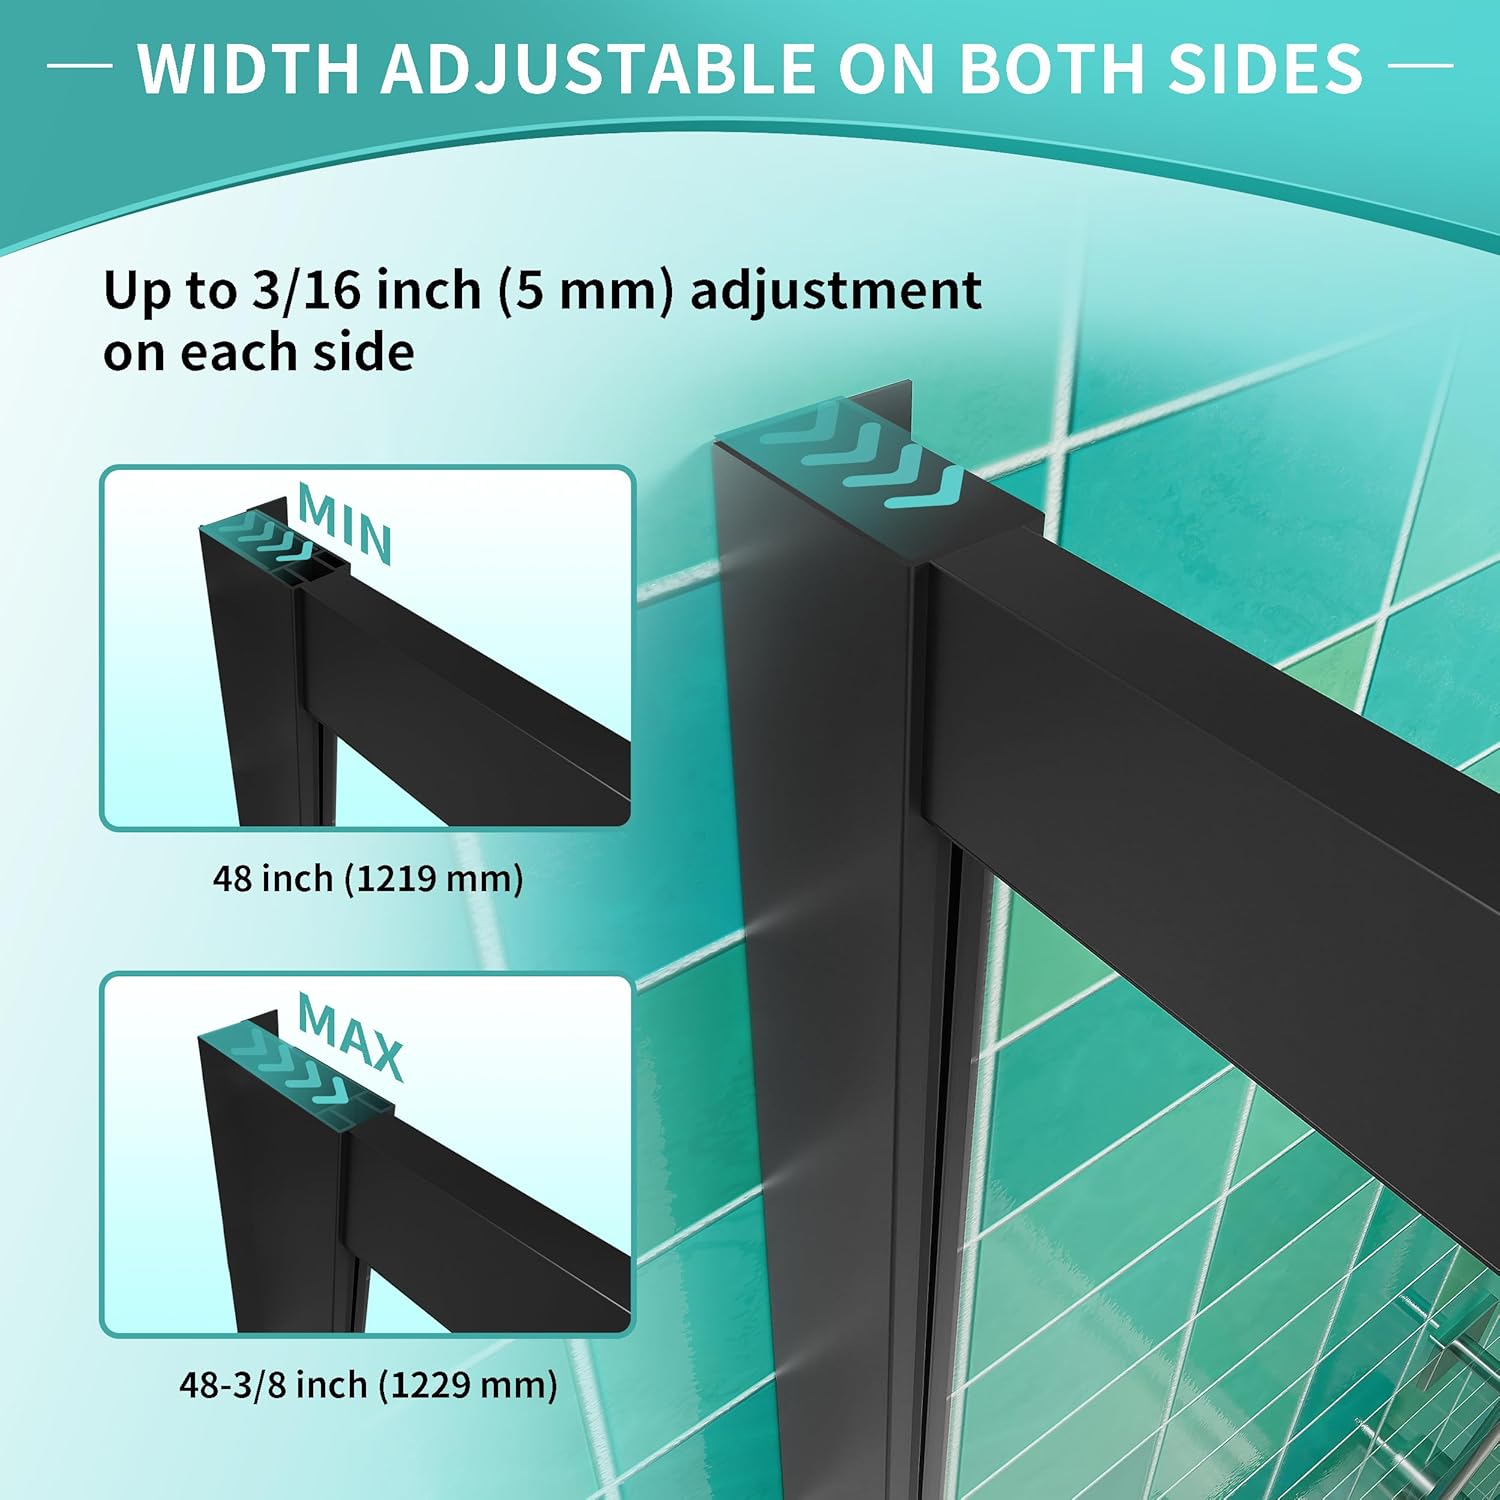 Figure 3.1: Model Dimensions. This diagram illustrates the key measurements of the shower door, including a 48-inch model width, 76-inch model height, 20-inch fixed glass, 25-9/16-inch door glass, 20-3/8-inch access width, and 16-9/16-inch towel rail and handle lengths.
4. Setup and Installation
This section provides general guidance for installing your Oudbo Molartte sliding shower door. Refer to the detailed diagram and ensure all measurements are accurate for your specific bathroom layout.
4.1 Pre-Installation Checks
- Confirm wall studs or solid blocking are present where the wall profiles will be mounted.
- Ensure the shower base or curb is level.
- Clean the installation area thoroughly.
4.2 Adjustable Width Feature
The shower door features an adjustable width, allowing for up to 3/8 inches (approximately 10mm) of adjustment on each side. This flexibility helps accommodate variations in wall alignment.
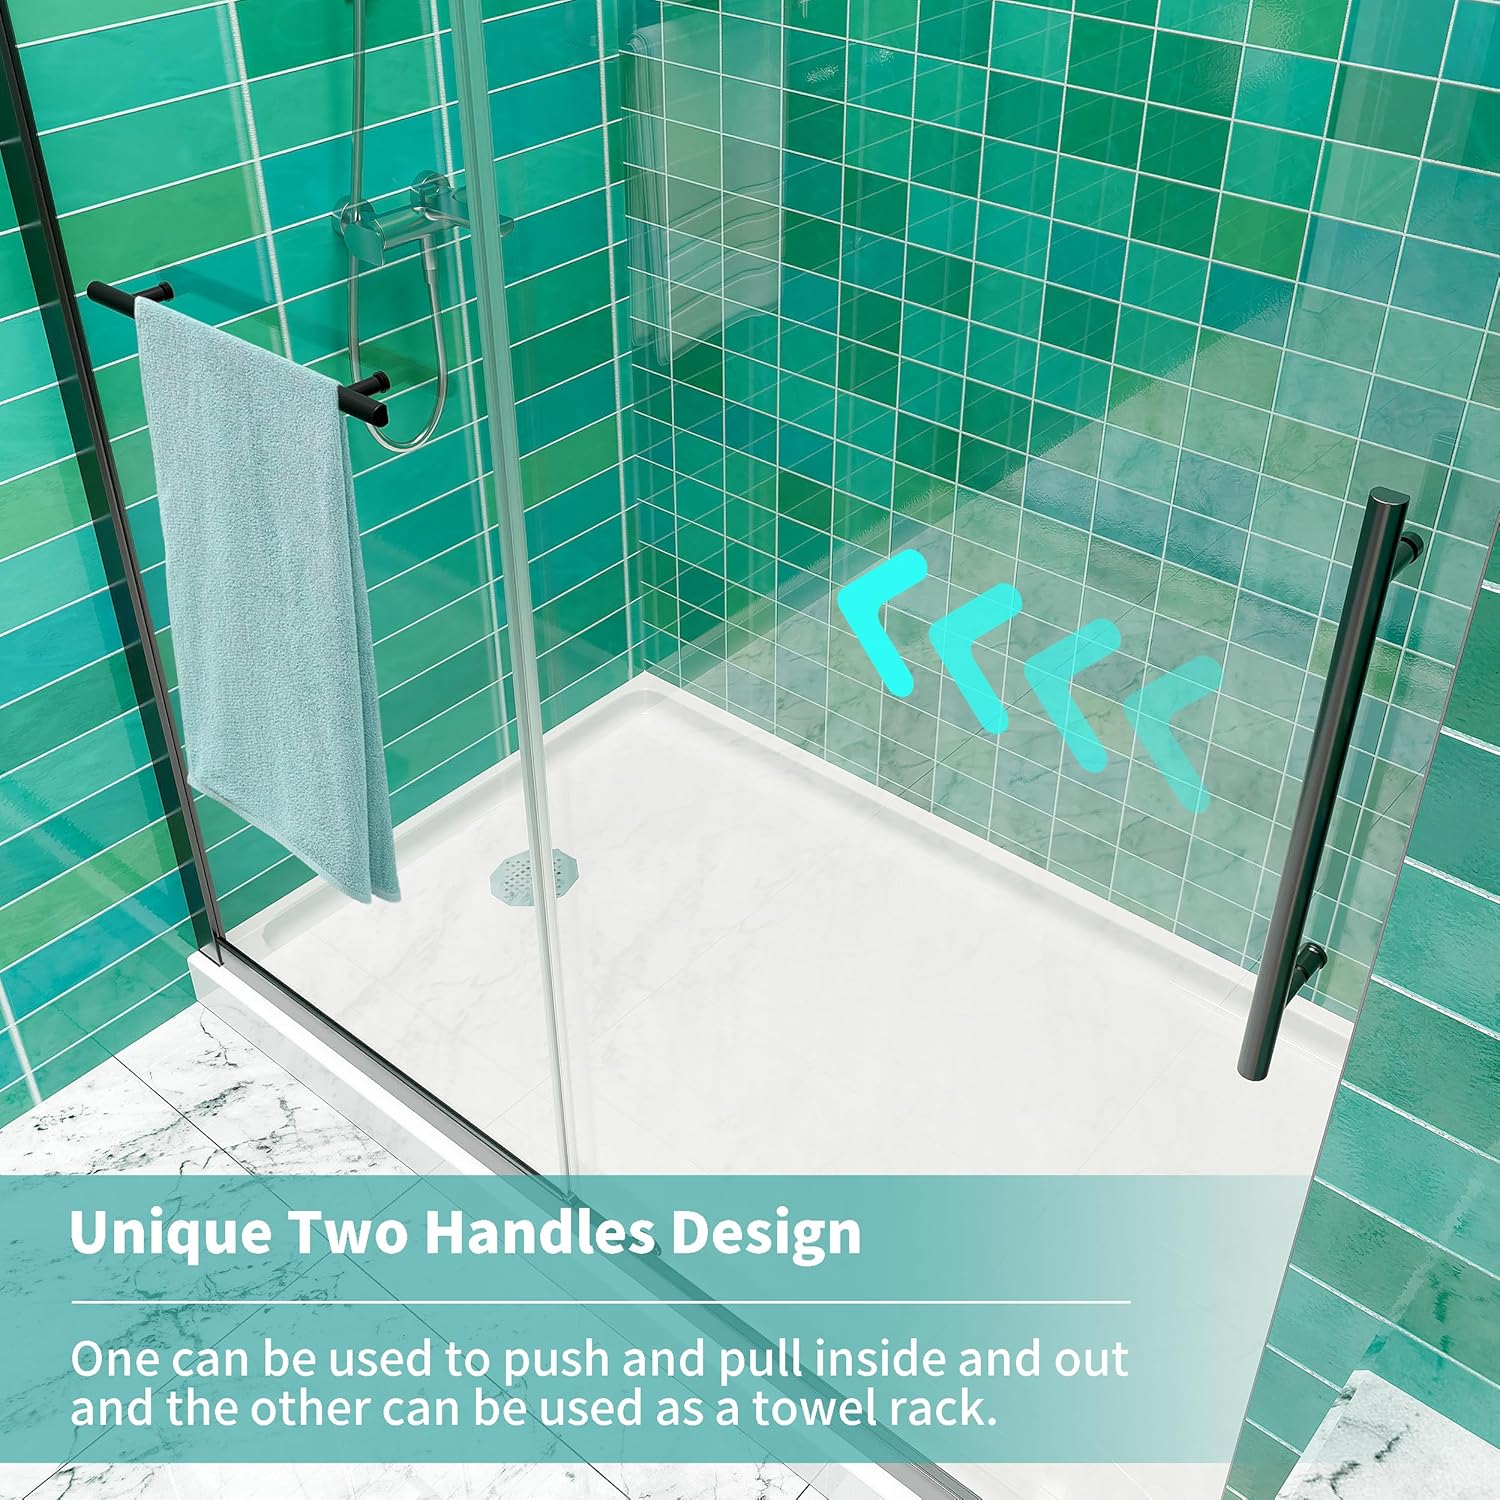 Figure 4.1: Width Adjustment. The frame allows for minor adjustments to fit openings between 48 inches and 48-3/8 inches.
4.3 Reversible Installation
The sliding shower door is designed for reversible installation, meaning it can be configured to open from either the left or the right side, depending on your bathroom layout and preference.
 Figure 4.2: Reversible Door Opening. The door can be installed to slide open from either the left or right side.
4.4 General Installation Steps (Summary)
- Measure and Mark: Carefully measure the shower opening and mark the positions for the wall profiles.
- Install Wall Profiles: Secure the vertical wall profiles to the walls using appropriate fasteners. Ensure they are plumb.
- Install Top and Bottom Tracks: Attach the top and bottom tracks to the wall profiles, ensuring they are level.
- Install Fixed Glass Panel: Carefully place the fixed glass panel into its designated track and secure it.
- Install Sliding Door Panel: Mount the rollers onto the sliding door panel and then hang the panel onto the top track. Adjust as needed for smooth operation.
- Attach Handles/Towel Bar: Secure the handles and towel bar to the sliding door panel. Note the unique two-handle design where one serves as a towel rack.
- Apply Sealing Strips: Install the waterproof sealing strips along the edges of the glass panels and bottom track to prevent water leakage.
- Final Adjustments: Test the door's sliding motion and make any necessary adjustments to ensure smooth and quiet operation.
 Figure 4.3: Smooth Sliding Mechanism. The rollers are designed for effortless, quiet, and smooth operation.
 Figure 4.4: Waterproof Design. Sealing strips ensure water remains within the shower enclosure.
 Figure 4.5: Unique Two Handles Design. One handle facilitates door movement, while the other serves as a convenient towel rack.
5. Operating Instructions
The Oudbo Molartte sliding shower door is designed for simple and smooth operation.
- To open the shower door, grasp the handle on the sliding panel and gently push it along the top and bottom tracks in the desired direction (left or right, depending on your installation).
- To close the shower door, pull the handle until the sliding panel meets the fixed panel or wall profile, ensuring a complete seal.
- Avoid forcing the door. If resistance is felt, check for obstructions in the track or consult the troubleshooting section.
6. Maintenance and Cleaning
Regular maintenance ensures the longevity and appearance of your shower door.
6.1 Glass Cleaning
The 1/4" (6mm) SGCC tempered glass features a water-repelling spot guard coating. This coating resists hard water stains, soap scum, and limescale, making cleaning quicker and maintaining a lasting shine.
- For daily cleaning, wipe down the glass with a soft cloth or squeegee after each use.
- For deeper cleaning, use a non-abrasive glass cleaner or a solution of mild soap and water. Avoid harsh chemicals, abrasive pads, or scouring powders, as these can damage the coating and glass surface.
- Rinse thoroughly with clean water and dry with a soft cloth to prevent water spots.
 Figure 6.1: Tempered Glass Features. The glass is SGCC tested for safety, strength, and durability, and is easy to clean.
6.2 Frame and Hardware Cleaning
- Wipe down the matte black aluminum alloy frame and stainless steel hardware with a soft, damp cloth.
- Avoid abrasive cleaners or sponges that could scratch the finish.
- The quick-release design allows for easy access to clean the gaps in the shower door, preventing dirt and soap residue buildup. To utilize this feature, gently disengage the bottom rollers (refer to your specific installation guide for detailed steps) to lift the door slightly for cleaning the track.
 Figure 6.2: Quick-Release Design. This feature simplifies cleaning by allowing access to the door's lower track.
6.3 Track Maintenance
- Regularly inspect the top and bottom tracks for any debris, hair, or soap scum buildup.
- Clean the tracks using a small brush or vacuum cleaner to ensure smooth sliding operation.
- Periodically check the rollers for smooth movement. If they become stiff, clean them and apply a silicone-based lubricant if necessary (avoid oil-based lubricants).
7. Troubleshooting
This section addresses common issues you might encounter with your shower door.
| Problem | Possible Cause | Solution |
|---|---|---|
| Door does not slide smoothly or is stiff. | Debris in tracks, worn rollers, misaligned panels. | Clean tracks thoroughly. Inspect and clean rollers; apply silicone lubricant if needed. Check panel alignment and adjust according to installation instructions. |
| Water leaks from the bottom or sides of the door. | Damaged or improperly installed sealing strips, gaps in silicone sealant, uneven shower base. | Inspect sealing strips and replace if damaged or re-install correctly. Apply fresh silicone sealant where needed. Ensure the shower base is level. |
| Door does not close completely. | Obstruction in track, misaligned panels, worn rollers. | Check for and remove any obstructions. Verify panel alignment and adjust. Inspect rollers for damage. |
| Limited access width when door is open. | This is a characteristic of the sliding door design. | The design of a sliding bypass shower door means that one panel overlaps the other when open, resulting in an access width that is less than the total width of the shower opening. For this 48" W door, the access width is approximately 20-3/8". This is normal operation. |
8. Warranty and Support
While specific warranty details are not provided in this manual, Oudbo Molartte products are designed for durability and performance.
For technical assistance, replacement parts, or warranty inquiries, please contact Oudbo Molartte customer support through the retailer where the product was purchased or visit the official Oudbo Molartte website for contact information.
When contacting support, please have your model number (AHA-UG6072/48072) and purchase date available.