1. Introduction
Thank you for choosing the Amopatio 41 Cu Ft Horizontal Outdoor Storage Shed. This manual provides essential information for the safe assembly, operation, and maintenance of your new storage shed. Please read these instructions carefully before beginning assembly and retain them for future reference.

Image 1.1: The Amopatio 41 Cu Ft Horizontal Outdoor Storage Shed, shown with its top lid open, revealing the interior storage space.
2. Safety Information
Your safety is paramount. Please observe the following precautions:
- Assembly Safety: Always follow the assembly instructions precisely. Wear appropriate safety gear, such as gloves, during assembly. Some components may be heavy or have sharp edges.
- Two-Person Assembly: For optimal safety and ease, assembly of this shed is recommended with two adults.
- Secure Placement: Ensure the shed is placed on a level, stable surface. For added stability, especially in windy conditions, consider anchoring the shed to the ground.
- Weight Distribution: Distribute stored items evenly to prevent tipping. Do not overload the shed.
- Children and Pets: Keep children and pets away from the assembly area. Do not allow children to play inside or climb on the shed.
- Flammable Materials: Do not store flammable liquids, chemicals, or other hazardous materials inside the shed.
- Ventilation: Ensure adequate ventilation if storing items that may emit fumes.
3. Parts List
Before beginning assembly, carefully unpack all components and compare them against the detailed parts list provided in your product packaging. Ensure all parts are present and undamaged. If any parts are missing or damaged, please contact Amopatio customer support immediately.
Typical components include:
- Wall panels (front, back, side)
- Roof panels and lid
- Floor panel
- Door panels
- Frame components (metal or resin supports)
- Hardware (screws, bolts, nuts, washers, hinges, latches)
- Hydraulic air pumps
- Chain hooks
4. Assembly Instructions
Detailed, step-by-step assembly instructions with diagrams are included in your product packaging. Please refer to those instructions for the most accurate and complete guidance. The following provides a general overview and important tips:
- Preparation: Choose a flat, level surface for assembly. Clear the area of any debris. Lay out all parts and hardware within easy reach.
- Review Instructions: Read through the entire instruction manual provided in the box before starting. Familiarize yourself with all steps and components.
- Base Assembly: Begin by assembling the base and floor panel. Ensure it is stable and square.
- Wall Panel Installation: Attach the wall panels to the base, following the numerical sequence in the instructions. Secure them firmly.
- Door and Lid Assembly: Install the door panels and the top lid. Pay close attention to the hinge and latch mechanisms. The hydraulic air pumps assist in smooth lid operation.
- Hardware Check: Double-check all screws, bolts, and fasteners to ensure they are tightened securely. Avoid over-tightening, especially with resin components.
- Troubleshooting Assembly: If you encounter difficulty with parts not fitting perfectly or mis-drilled holes, do not force components. Re-examine the instructions and ensure correct orientation. Contact customer support if issues persist.

Image 4.1: Diagram illustrating the exterior and interior dimensions of the Amopatio storage shed, including storage capacity.

Image 4.2: The Amopatio storage shed with both doors and the lid fully open, showcasing its multifunctional storage capabilities for garden tools, lawn equipment, and other household items.
5. Operating Instructions
The Amopatio storage shed is designed for ease of use and secure storage.
- Opening the Lid: The top lid is equipped with hydraulic air pumps for smooth and effortless opening and closing. Gently lift the lid, and the pumps will assist in holding it open.
- Opening the Doors: The front doors can be opened independently. Unlatch the padlock latch (if a padlock is installed) and the internal locking door mechanism to open both doors fully.
- Trash Can Integration: For convenient trash disposal, attach the included chain hooks to the lids of your trash cans and the shed's lid. When you open the shed's lid, the trash can lids will lift simultaneously, allowing for one-handed garbage throwing.
- Securing the Shed: Close the doors and lid firmly. Engage the internal locking door mechanism and the padlock latch. A padlock (not included) can be added for enhanced security. The windproof latch provides additional stability in adverse weather conditions.
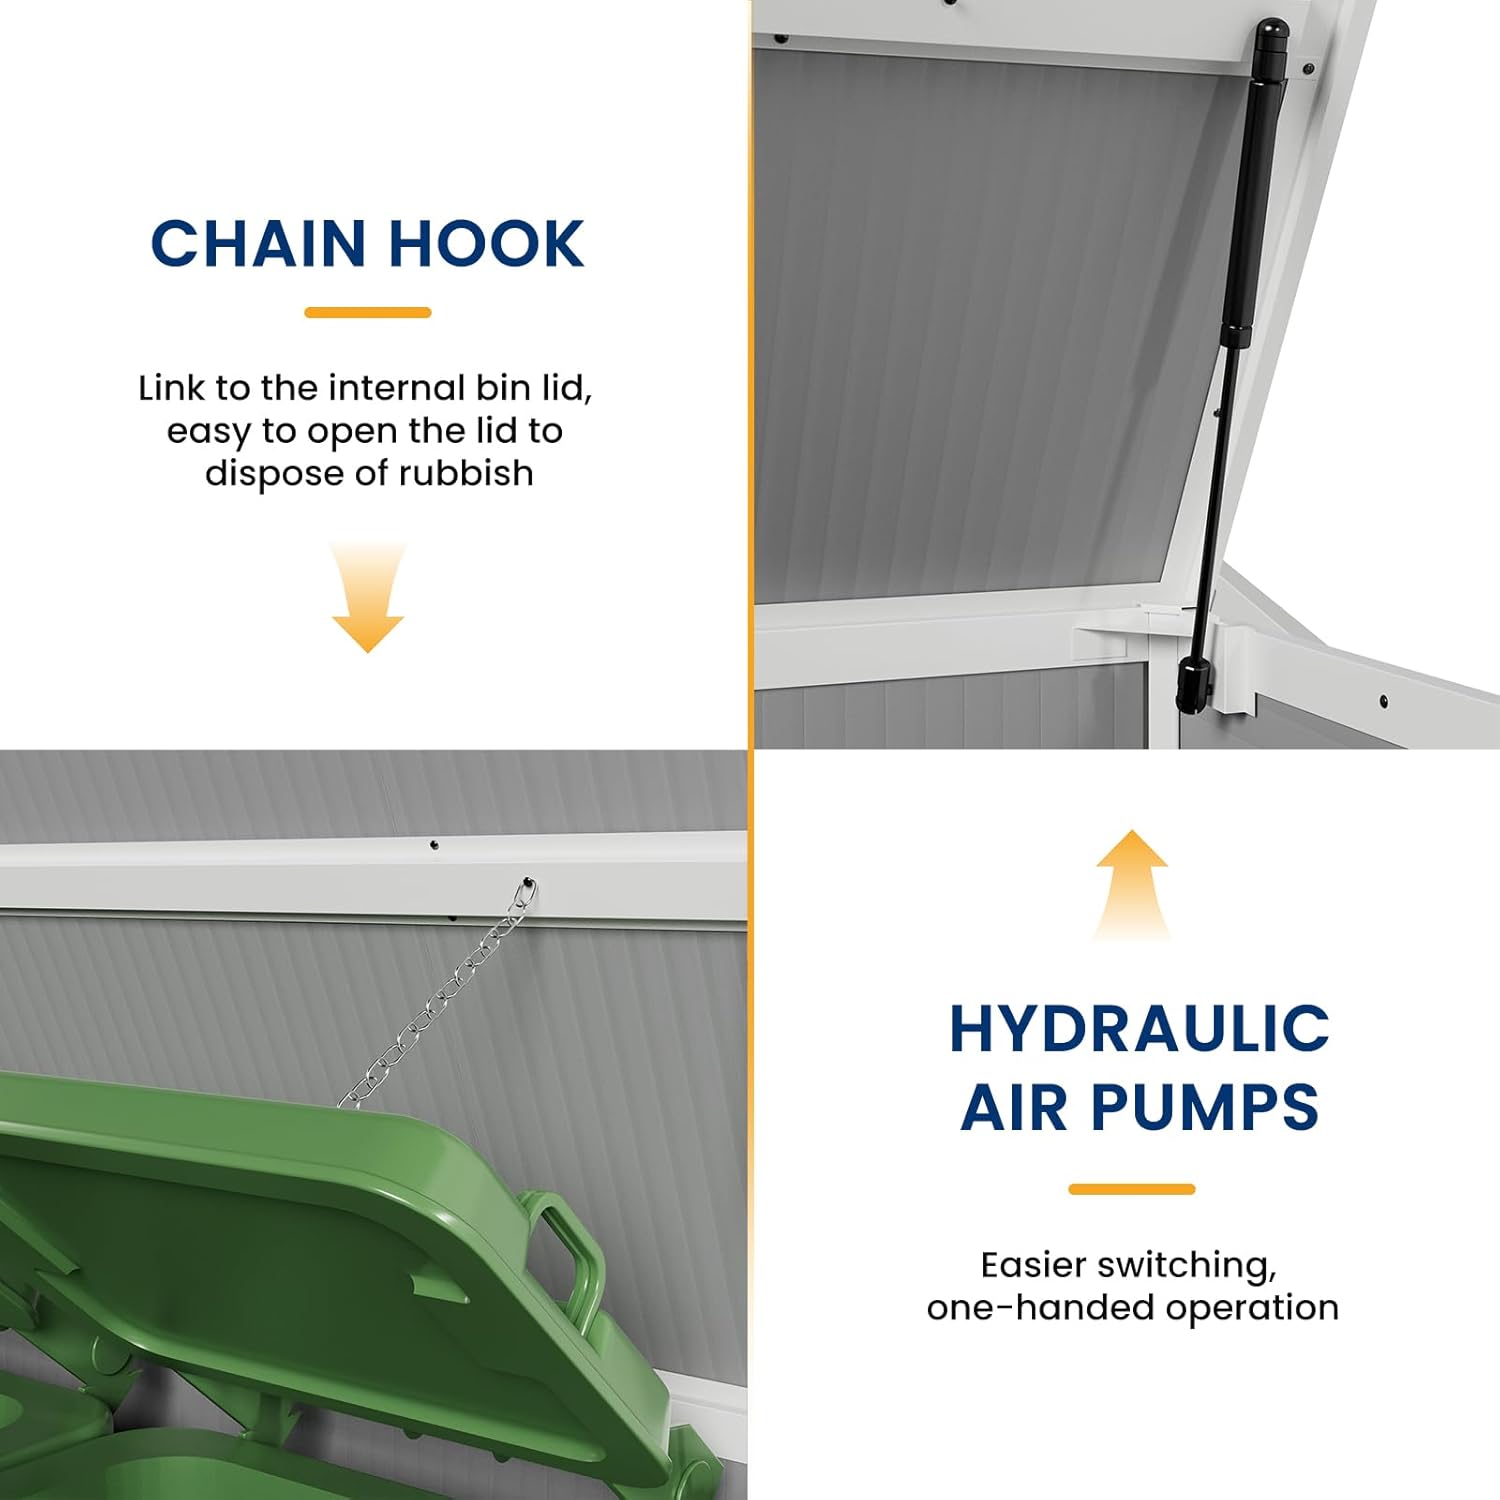
Image 5.1: Close-up view of the shed's lid mechanism, highlighting the chain hook for trash can lids and the hydraulic air pump for assisted opening.

Image 5.2: A person demonstrating the one-handed trash disposal feature, with the shed lid and trash can lids lifting in unison.
6. Maintenance
The Amopatio storage shed is constructed from durable, weather-resistant resin designed for low maintenance.
- Cleaning: To clean the shed, simply wipe it down with a damp cloth and mild soap. Avoid abrasive cleaners or harsh chemicals that could damage the resin. Rinse thoroughly with water.
- UV Protection: The resin material offers UV protection, preventing discoloration and degradation from sun exposure.
- Periodic Inspection: Periodically check all fasteners and hinges to ensure they remain tight and secure. Lubricate hinges if they become stiff.
- Winter Care: While weather-resistant, clearing heavy snow accumulation from the lid can help prolong the life of the shed and its hydraulic components.
7. Troubleshooting
If you encounter issues with your Amopatio storage shed, please refer to the following common solutions:
| Problem | Possible Cause | Solution |
|---|---|---|
| Difficulty during assembly | Incorrect part orientation, misaligned holes, missing hardware. | Carefully re-read the assembly instructions. Ensure parts are oriented correctly. Do not force components. If holes are misaligned, contact customer support. Verify all hardware is present. |
| Lid or doors do not close properly | Obstruction, uneven ground, loose hinges, misaligned frame. | Check for any items blocking the closure. Ensure the shed is on a level surface. Tighten hinge screws. Inspect the frame for proper alignment. |
| Shed feels unstable | Loose fasteners, not anchored, uneven ground. | Tighten all assembly fasteners. Consider anchoring the shed to the ground using appropriate hardware (not included). Relocate to a level surface. |
If these solutions do not resolve your issue, please contact Amopatio customer support for further assistance.
8. Specifications
| Feature | Detail |
|---|---|
| Brand | Amopatio |
| Model | 41 Cu Ft Horizontal Outdoor Storage Shed |
| Color | Gray |
| Material | Resin |
| Product Dimensions (Exterior) | 55.9"W x 29.53"D x 43.31"H |
| Product Dimensions (Interior) | 52.95"L x 26.77"W x 41.73"H |
| Storage Capacity | 41.37 cu ft |
| Item Weight | 20 Pounds |
| Water Resistance Level | Water Resistant |
| Assembly Required | Yes |
| Door Style | Lid/Top Cover and Double Front Doors |
9. Warranty and Support
Amopatio is committed to providing a pleasant shopping experience and high-quality products. While specific warranty details are provided with your product packaging, Amopatio stands behind its products.
If you have any questions, require assistance with assembly, or encounter any issues with your storage shed, please do not hesitate to contact Amopatio customer support. Refer to the contact information provided in your product packaging or visit the official Amopatio website for support options.