
1. Important Safety Instructions
When using electrical appliances, basic safety precautions should always be followed to reduce the risk of fire, electric shock, and/or injury to persons, including the following:
- Read all instructions before operating the appliance.
- Do not touch hot surfaces. Use handles or knobs.
- To protect against fire, electric shock, and injury to persons, do not immerse cord, plugs, or appliance in water or other liquid.
- Close supervision is necessary when any appliance is used by or near children.
- Unplug from outlet when not in use and before cleaning. Allow to cool before putting on or taking off parts, and before cleaning the appliance.
- Do not operate any appliance with a damaged cord or plug, or after the appliance malfunctions or has been damaged in any manner.
- The use of accessory attachments not recommended by the appliance manufacturer may result in fire, electric shock, or injury to persons.
- Do not use outdoors.
- Do not let cord hang over edge of table or counter, or touch hot surfaces.
- Do not place on or near a hot gas or electric burner, or in a heated oven.
- Always attach plug to appliance first, then plug cord into the wall outlet. To disconnect, turn any control to 'off', then remove plug from wall outlet.
- Do not use appliance for other than intended use.
2. Product Overview
The Daewoo 2-in-1 Coffee Maker with Integrated Grinder combines convenience and functionality, allowing you to grind fresh coffee beans and brew directly in one appliance. It features a 1-liter capacity, 8 adjustable grind levels, an LCD screen, and a 24-hour programmable timer.
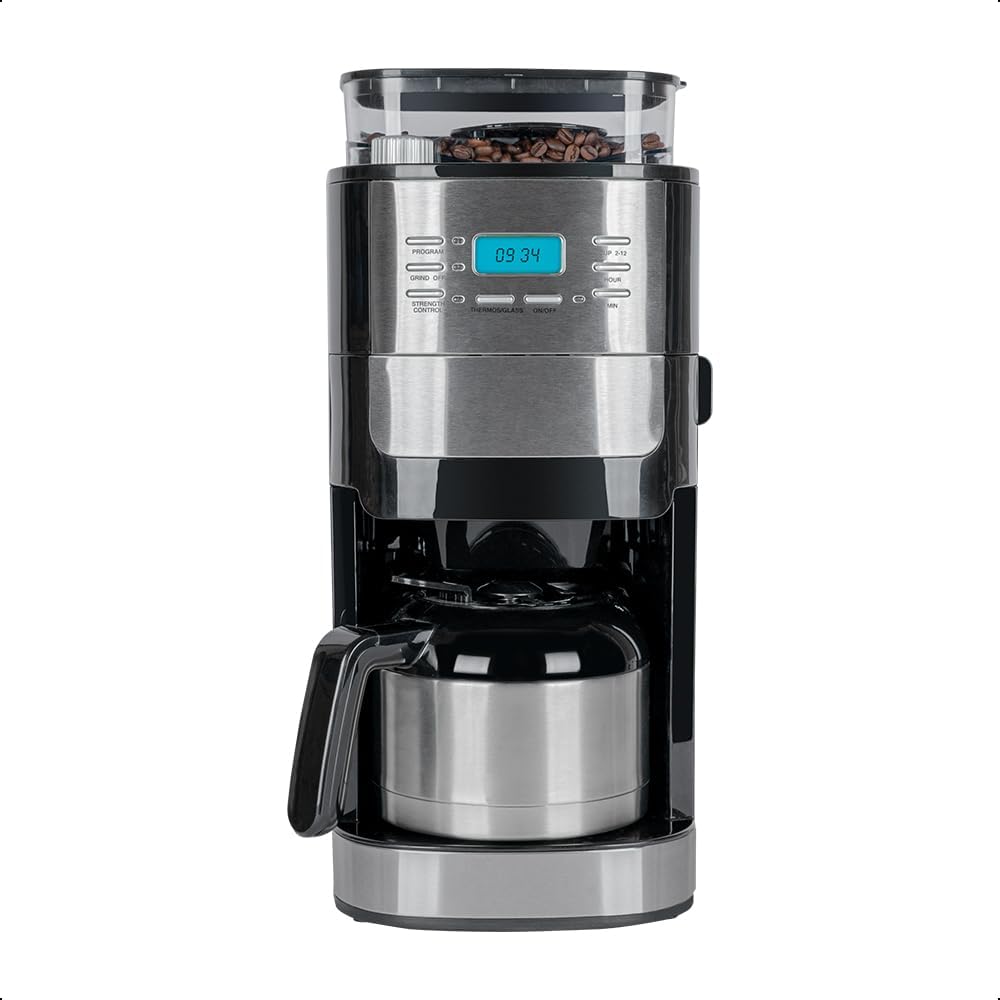
Image 1: Front view of the Daewoo 2-in-1 Coffee Maker, showcasing its sleek design with the integrated grinder on top and the thermal carafe below.
Components:
- Coffee Bean Hopper with Sealed Lid (200g capacity)
- Conical Burr Grinder (8 adjustable levels)
- Water Reservoir (1L capacity)
- LCD Display with Blue Backlight
- Control Panel (Program, Grind Off, Strength, Hour, Min, On/Off)
- Filter Basket
- Thermal Carafe (Double-walled stainless steel)
- Drip Tray

Image 2: Diagram illustrating the dimensions of the coffee maker: 45 cm height, 25 cm depth, and 19.5 cm width.
3. Setup
3.1 Unpacking
- Carefully remove all packaging materials from the coffee maker.
- Inspect the appliance for any damage. Do not use if damaged.
- Keep packaging materials out of reach of children.
3.2 Initial Cleaning
Before first use, clean all removable parts and run a brewing cycle with only water.
- Wash the thermal carafe, filter basket, and coffee bean hopper lid in warm, soapy water. Rinse thoroughly and dry.
- Wipe the exterior of the coffee maker with a damp cloth.
- Fill the water reservoir with fresh water to the MAX line.
- Place the empty filter basket into its position and close the lid.
- Place the thermal carafe on the heating plate.
- Press the 'On/Off' button to start a brewing cycle with water only. Discard the water after the cycle.
3.3 First Use Preparation
- Place the coffee maker on a stable, flat, heat-resistant surface.
- Ensure the power cord is securely plugged into a grounded electrical outlet.
4. Operating Instructions
4.1 Adding Water
Open the water reservoir lid and fill with fresh, cold water up to the desired level, indicated by the water level markings. Do not exceed the MAX fill line.
4.2 Adding Coffee Beans or Ground Coffee

Image 3: Top view of the coffee maker showing coffee beans loaded into the transparent hopper, ready for grinding.
- For Whole Beans: Open the coffee bean hopper lid and pour whole coffee beans into the hopper. Ensure the lid is securely closed to maintain freshness. The hopper has a 200g capacity.
- For Pre-Ground Coffee: If using pre-ground coffee, press the 'Grind Off' button on the control panel. Add the desired amount of ground coffee directly into the filter basket.
4.3 Setting Grind Level (for Whole Beans)
The integrated conical burr grinder offers 8 levels of grind adjustment. Rotate the grind selector knob located near the bean hopper to choose your preferred grind size, from fine to coarse.
4.4 Setting Coffee Strength
Press the 'Strength' button on the control panel to cycle through available coffee strength options (e.g., Mild, Medium, Strong). The selected strength will be displayed on the LCD.
4.5 Brewing Coffee
- Ensure water is in the reservoir and coffee (beans or ground) is in place.
- Place the thermal carafe securely on the heating plate.
- Press the 'On/Off' button to begin the brewing process. If whole beans are used, the grinder will activate first, followed by brewing.
- The LCD display will show the current time or brewing status.

Image 4: Close-up of the coffee maker's control panel, featuring the LCD screen with blue backlight and various buttons for programming and settings.
4.6 Programming Brew Time (24h)
To set a delayed brew time:
- Prepare the coffee maker with water and coffee as described above.
- Press the 'Program' button. The display will flash.
- Use the 'Hour' and 'Min' buttons to set the desired start time for brewing.
- Press 'Program' again to confirm. The indicator light will illuminate, signifying that the program is set.
4.7 Keep Warm Function
After brewing, the coffee maker automatically enters a 'keep warm' mode, maintaining the coffee's temperature in the thermal carafe for a set period. The double-walled stainless steel carafe helps preserve aroma and temperature longer.
4.8 Automatic Shut-off
For safety and energy efficiency, the appliance features an automatic shut-off function after a period of inactivity or after the keep warm cycle concludes.
5. Maintenance and Cleaning
Regular cleaning ensures optimal performance and extends the lifespan of your coffee maker.
5.1 Daily Cleaning
- Always unplug the coffee maker before cleaning and allow it to cool completely.
- Remove the filter basket and discard used coffee grounds. Wash the filter basket and thermal carafe in warm, soapy water. Rinse thoroughly and dry.
- Wipe the exterior surfaces of the coffee maker with a soft, damp cloth. Do not use abrasive cleaners or scouring pads.
- Clean the drip tray and its cover.

Image 5: The double-walled stainless steel thermal carafe, designed to keep coffee hot and fresh.
5.2 Deep Cleaning / Descaling
Mineral deposits from water can build up over time, affecting performance. Descale your coffee maker every 2-3 months, or more frequently if you have hard water.
- Fill the water reservoir with a mixture of white vinegar and water (1:2 ratio).
- Place an empty filter basket and the thermal carafe in position.
- Run a full brewing cycle with the vinegar solution.
- After the cycle, let the solution sit in the carafe for 15-20 minutes, then discard.
- Run 2-3 cycles with fresh water only to rinse thoroughly and remove any vinegar odor.
5.3 Grinder Cleaning
Periodically clean the grinder to prevent oil buildup and ensure consistent grinding.
- Ensure the coffee maker is unplugged.
- Remove any remaining coffee beans from the hopper.
- Use a small brush (often included with grinders) to clean the burrs and the bean chute.
- Wipe the inside of the hopper with a dry cloth.
6. Troubleshooting
Refer to the table below for common issues and their solutions.
| Problem | Possible Cause | Solution |
|---|---|---|
| Coffee does not brew. | No water in reservoir; Not plugged in; Program not set correctly. | Fill water reservoir; Check power connection; Verify program settings. |
| Coffee tastes weak. | Insufficient coffee; Grind too coarse; Strength setting too low. | Add more coffee; Adjust grind to finer setting; Select stronger brew strength. |
| Coffee tastes bitter. | Too much coffee; Grind too fine; Over-extraction. | Reduce coffee amount; Adjust grind to coarser setting; Clean the machine. |
| Grinder not working. | No beans in hopper; Hopper lid not closed; 'Grind Off' selected. | Add beans; Ensure hopper lid is secure; Deselect 'Grind Off' if using whole beans. |
| Water leaks from machine. | Water reservoir overfilled; Carafe not positioned correctly. | Do not exceed MAX fill line; Ensure carafe is centered on heating plate. |
7. Specifications
| Feature | Specification |
|---|---|
| Model Number | DCM-1989 |
| Brand | DAEWOO |
| Capacity | 1 Liter (approx. 8 cups) |
| Power | 750 Watts |
| Voltage | 127 Volts |
| Material | Stainless Steel |
| Dimensions (L x W x H) | 25 x 19.5 x 45 cm |
| Weight | 3.5 kg |
| Special Features | Automatic Shut-off, Removable Reservoir, Thermal Carafe, Integrated Coffee Grinder, Programmable, Timer |
8. Warranty and Support
For warranty information, please refer to the documentation included with your product packaging or contact Daewoo customer support. Keep your purchase receipt as proof of purchase.
For further assistance or to explore other Daewoo products, please visit the official Daewoo store:


