
Introduction
This manual provides detailed instructions for the safe and effective replacement of the YRGGWB Dishwasher Motherboard, model WQP12-7601.D.1-1 V1.1 LYP04304A0(X). This component is designed to restore or improve the functionality of compatible Midea dishwashers by replacing a faulty or aging control board. Proper installation can lead to improved dishwasher performance, increased reliability, and extended appliance life.
Safety Information
Always prioritize safety when working with electrical appliances. Failure to follow these safety guidelines may result in electric shock, injury, or damage to the appliance.
- Disconnect Power: Before beginning any work, ensure the dishwasher is completely disconnected from its power source. Turn off the circuit breaker supplying power to the dishwasher.
- Wear Protective Gear: Use insulated gloves and safety glasses to protect against potential hazards.
- Professional Installation Recommended: If you are not comfortable with electrical repairs, seek assistance from a qualified appliance technician.
- Handle with Care: Electronic components are sensitive to static electricity. Handle the motherboard by its edges and avoid touching the circuit board directly.
- Inspect Components: Before installation, visually inspect the new motherboard for any signs of damage.
Compatibility
This replacement motherboard is specifically designed for Midea dishwashers that utilize the WQP12-7601 series control board. It is compatible with models requiring the WQP12-7601.D.1-1 V1.1 LYP04304A0(X) motherboard. It is crucial to verify the model number and part number of your existing dishwasher motherboard against the specifications provided in this manual to ensure proper fit and function.
Installation Guide
Follow these steps carefully to replace the dishwasher motherboard. Refer to your dishwasher's service manual for specific access panel removal instructions if needed.
- Power Disconnection: Ensure the dishwasher is unplugged from the wall outlet or the circuit breaker is switched off.
- Access Motherboard: Locate and remove the access panel(s) that cover the dishwasher's control board. This is typically found behind the kick plate or on the back of the appliance.
- Document Connections: Before disconnecting any wires, take clear photos of all cable connections to the existing motherboard. This will serve as a reference for reconnecting the new board.
- Disconnect Cables: Carefully disconnect all wiring harnesses and connectors from the old motherboard. Pay attention to specific connectors such as CN5 (for Light and Upper Fan) and CN8 (for FLMDO GND +5URX), as indicated on the board.
- Remove Old Board: Unscrew or unclip the old motherboard from its mounting brackets.
- Install New Board: Position the new YRGGWB motherboard into the mounting brackets and secure it with screws or clips.
- Reconnect Cables: Using your reference photos, carefully reconnect all wiring harnesses and connectors to their corresponding ports on the new motherboard. Ensure all connections are secure and correctly oriented.
- Secure and Reassemble: Replace any removed access panels and secure them. Ensure no wires are pinched.
- Power On and Test: Restore power to the dishwasher. Run a short test cycle to verify proper operation and check for any error codes or unusual sounds.
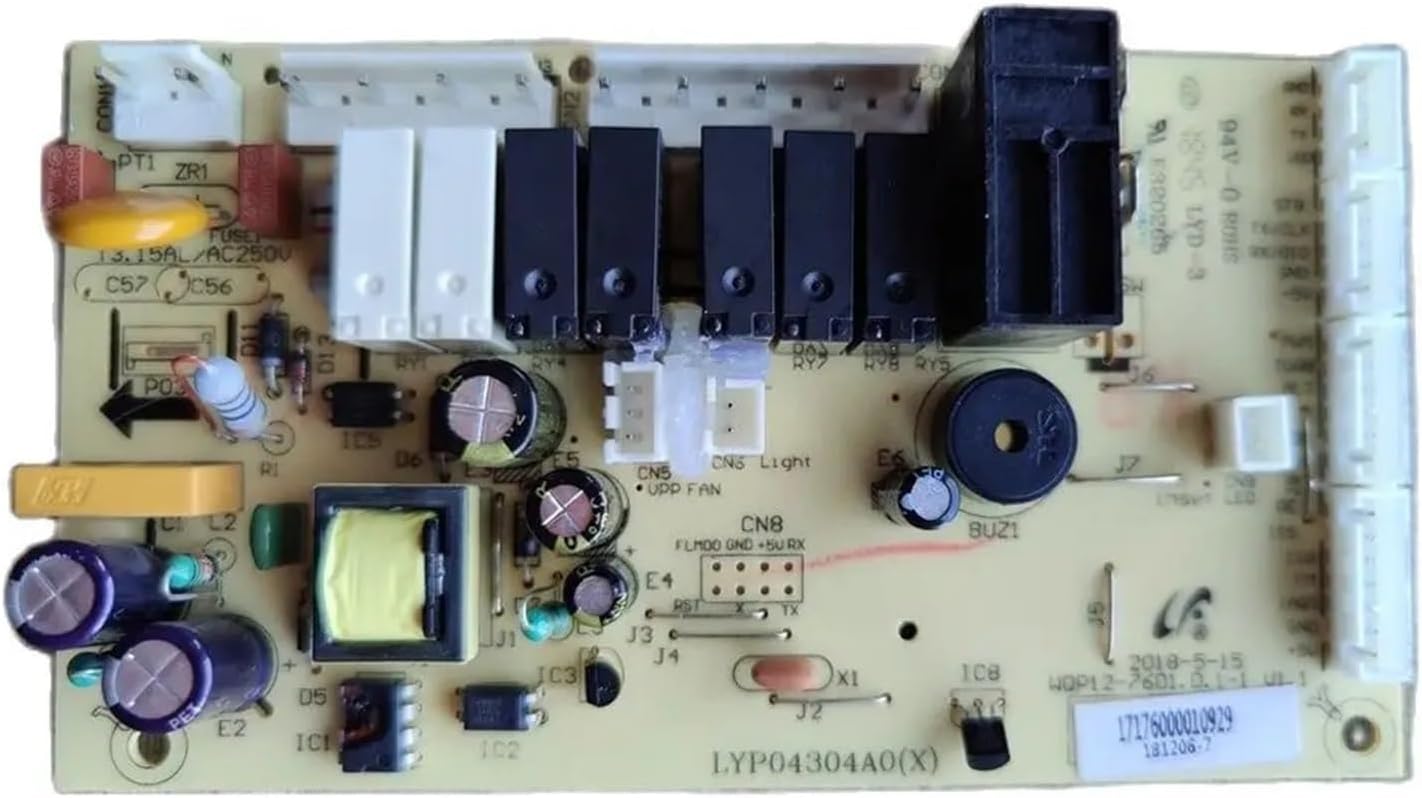
Image: The YRGGWB Dishwasher Motherboard, model WQP12-7601.D.1-1 V1.1 LYP04304A0(X). This image displays the layout of the board, including connectors like CN5 (Light, UPP FAN), CN8 (FLMDO GND +5URX), and the fuse (3.15AL/AC250V).
Operating Verification
After successful installation, it is important to verify that the dishwasher is functioning correctly. Initiate a complete wash cycle and observe the dishwasher's performance. Check for proper water intake, spray arm rotation, heating, draining, and overall cycle completion. Listen for any unusual noises and confirm that the control panel responds as expected. If any issues arise, refer to the Troubleshooting section.
Maintenance
The YRGGWB Dishwasher Motherboard is a sealed electronic component and does not require routine user maintenance. To ensure its longevity and optimal performance, keep the dishwasher's environment dry and free from excessive moisture, dust, and extreme temperature fluctuations. Avoid spilling liquids near the control panel area.
Troubleshooting
If you encounter issues after replacing the motherboard, consider the following:
- Dishwasher Not Powering On:
- Verify that the power cord is securely plugged in.
- Check the circuit breaker for the dishwasher.
- Inspect the fuse on the motherboard (labeled FUSE 3.15AL/AC250V) for continuity. If blown, it may indicate another electrical issue or improper installation.
- Error Codes Displayed:
- Consult your specific Midea dishwasher's user manual for the meaning of any displayed error codes.
- Ensure all cable connections to the motherboard are firm and correctly seated.
- Specific Functions Not Working (e.g., fan, light):
- Check the connections to the relevant ports on the motherboard, such as CN5 for the light and upper fan, and CN8 for FLMDO GND +5URX.
- Ensure the components themselves (fan, light) are not faulty.
- Unusual Noises or Smells: Immediately disconnect power and re-inspect all connections and components for any signs of damage or incorrect installation.
Specifications
| Model Number | WQP12-7601.D.1-1 V1.1 LYP04304A0(X) |
| Brand | YRGGWB |
| Compatibility | Midea WQP12-7601 series dishwashers |
| Fuse Specification | 3.15AL/AC250V |
| Key Connectors | CN5 (Light, UPP FAN), CN8 (FLMDO GND +5URX) |
| Dimensions | Refer to physical product for exact measurements |
Warranty and Support
For information regarding product warranty, returns, or technical assistance, please refer to the documentation provided at the time of purchase or contact the YRGGWB customer support directly through the retailer where the product was acquired. Ensure you have your purchase details and the product model number readily available.