SEAOURA SR-657
SEAOURA Aquarium Light Instruction Manual
Model: SR-657 | Brand: SEAOURA
1. Introduction
The SEAOURA Aquarium Light is designed to provide optimal lighting conditions for freshwater aquariums, supporting plant growth and enhancing the visual appeal of your aquatic environment. This light features a 24/7 custom timer, power-off memory, and a full spectrum 7-row LED array with 8 color options and 20 dimmable brightness levels. It simulates natural day and night cycles, offering a flexible and intelligent lighting solution for your fish tank.
This manual provides detailed instructions for the setup, operation, maintenance, and troubleshooting of your new aquarium light. Please read it thoroughly before use to ensure proper function and longevity of the product.

Figure 1: Overview of the SEAOURA Aquarium Light and its controller.
2. Safety Information
- Always disconnect power before performing any maintenance or installation.
- This product is designed for indoor use with freshwater aquariums only. Do not use in saltwater or other environments.
- Ensure the power adapter and controller are kept dry and away from water splashes.
- Do not operate the light if the power cord or plug is damaged.
- The light body is IP68 waterproof, meaning it can withstand submersion, but the controller and power adapter are not.
- Keep out of reach of children.
- Do not attempt to disassemble or modify the light or controller. Refer to qualified personnel for repairs.
3. Package Contents
Please check the package to ensure all components are present:
- SEAOURA Aquarium LED Light Unit
- External Controller with Timer Display
- Adjustable Mounting Brackets (2 pcs)
- Power Adapter
- CR2032 Battery (pre-installed in controller for memory function)
- User Manual (this document)
4. Specifications
| Feature | Detail |
|---|---|
| Model Number | SR-657 |
| Power | 24W |
| LED Quantity | 168 Pcs (W:112, R:8, G:8, B:16, RGB:24) |
| Light Source Type | Light Emitting Diode (LED) |
| Color Temperature | White 12600K |
| CRI (Color Rendering Index) | 92 |
| PAR (Photosynthetically Active Radiation) | 144 |
| Lumen | 2034 |
| Lux | 8764 |
| Input Voltage | AC 100 - 240V |
| Product Dimensions | 56.39 x 9.91 x 0.76 cm (Light Unit) |
| Applicable Tank Size | 24'' to 30'' (60-75CM) |
| Cable Length | 7.2 ft |
| Waterproof Rating | IP68 (Light Body) |
| Material | Aluminum, Polycarbonate (PC) |

Figure 2: Technical specifications and LED configuration.

Figure 3: Ultra-slim design and high light transmittance.
5. Setup
5.1 Mounting the Light
- Unpack all components and ensure they are intact.
- Attach the adjustable mounting brackets to both ends of the light unit. The brackets slide into slots on the light body.
- Place the light unit on top of your aquarium, ensuring the brackets rest securely on the tank edges. The adjustable design allows fitting tanks from 24 to 30 inches (60-75 cm).
- Adjust the brackets to center the light over your aquarium for even illumination.

Figure 4: Adjustable mounting bracket installation and dimensions.
5.2 Power Connection
- Connect the cable from the light unit to the external controller.
- Connect the power adapter to the external controller.
- Plug the power adapter into a standard electrical outlet. The controller display should illuminate.
6. Operating Instructions
6.1 Controller Overview
The external controller allows you to manage all functions of the aquarium light. Familiarize yourself with the buttons:
- SET Button: Enters setting mode and confirms selections.
- L1-L5 Buttons: Preset lighting levels/modes (L1-L4 for 24/7 mode stages, L5 for Off).
- DAY/NIGHT Button: Toggles between Day Mode and Night Mode.
- Color Button: Cycles through available colors in Regular Mode.
- 24/7 Button: Activates the 24/7 natural cycle mode.
- Up/Down Arrows: Adjust parameters (time, brightness, color).

Figure 5: Controller interface with local time scheduling.
6.2 Setting the Current Time
- Press and hold the SET button until the hour digits on the display start flashing.
- Use the Up/Down Arrows to adjust the hour.
- Press SET again to move to the minute digits. Use the Up/Down Arrows to adjust the minutes.
- Press SET one more time to confirm and exit time setting.
6.3 Lighting Modes
The light offers three primary operating modes: Regular Mode, Day Mode, Night Mode, and 24/7 Natural Mode.
6.3.1 Regular Mode (Manual Control)
In Regular Mode, you can manually select colors and brightness levels.
- Press the Color button to cycle through 8 different colors (red, green, blue, pink, purple, cyan, orange, and color cycle) and full spectrum white.
- Use the Up/Down Arrows to adjust the brightness level (20 levels available).
6.3.2 Day Mode & Night Mode (Custom Timer)
These modes allow you to set specific start and end times for a full spectrum "Day" light or a blue "Night" light.
- Press the DAY/NIGHT button to select either DAY or NIGHT mode. The corresponding indicator will light up.
- Press and hold SET until the start time flashes. Use Up/Down Arrows to set the start hour and minute, pressing SET to confirm each.
- Repeat for the end time.
- For Day Mode, you can adjust the brightness using the Up/Down Arrows. For Night Mode, the color is typically blue, and brightness can also be adjusted.

Figure 6: Custom timer settings for Day and Night modes.
6.3.3 24/7 Natural Cycle Mode
This mode simulates a natural daily light cycle, including sunrise, daylight, sunset, and moonlight, with gradual transitions.
- Press the 24/7 button to activate this mode. The display will show "24/7".
- The light will automatically transition through the following stages based on the current time you set:
- L1 Sunrise: Gradual increase in brightness and color shift (15-minute fade).
- L2 Daylight: Full brightness, white spectrum.
- L3 Sunset: Gradual decrease in brightness and color shift (15-minute fade).
- L4 Moonlight: Low brightness, blue light.
- L5 Off: Light turns off.
- The 15-minute brightness gradient between stages helps prevent startling fish.
Figure 7: The 24/7 natural light cycle simulation.
6.4 Time Memory Function
The controller features a built-in CR2032 battery that preserves your time and program settings even if power is disconnected. This means the light will resume its schedule automatically once power is restored after an outage or tank maintenance, eliminating the need for frequent re-calibration.

Figure 8: Internal battery for time memory function.
7. Maintenance
Regular maintenance ensures optimal performance and longevity of your aquarium light.
- Cleaning: The light body is IP68 waterproof and can be wiped clean with a soft, damp cloth. Ensure the light is disconnected from power before cleaning. Do not use abrasive cleaners or solvents.
- Controller Care: Keep the controller and power adapter dry. If they become wet, immediately disconnect power and allow them to dry completely before re-connecting.
- Battery Replacement: The CR2032 battery in the controller provides power for the memory function. If the time settings are lost after a power outage, the battery may need replacement. Refer to a qualified technician or contact customer support for battery replacement.
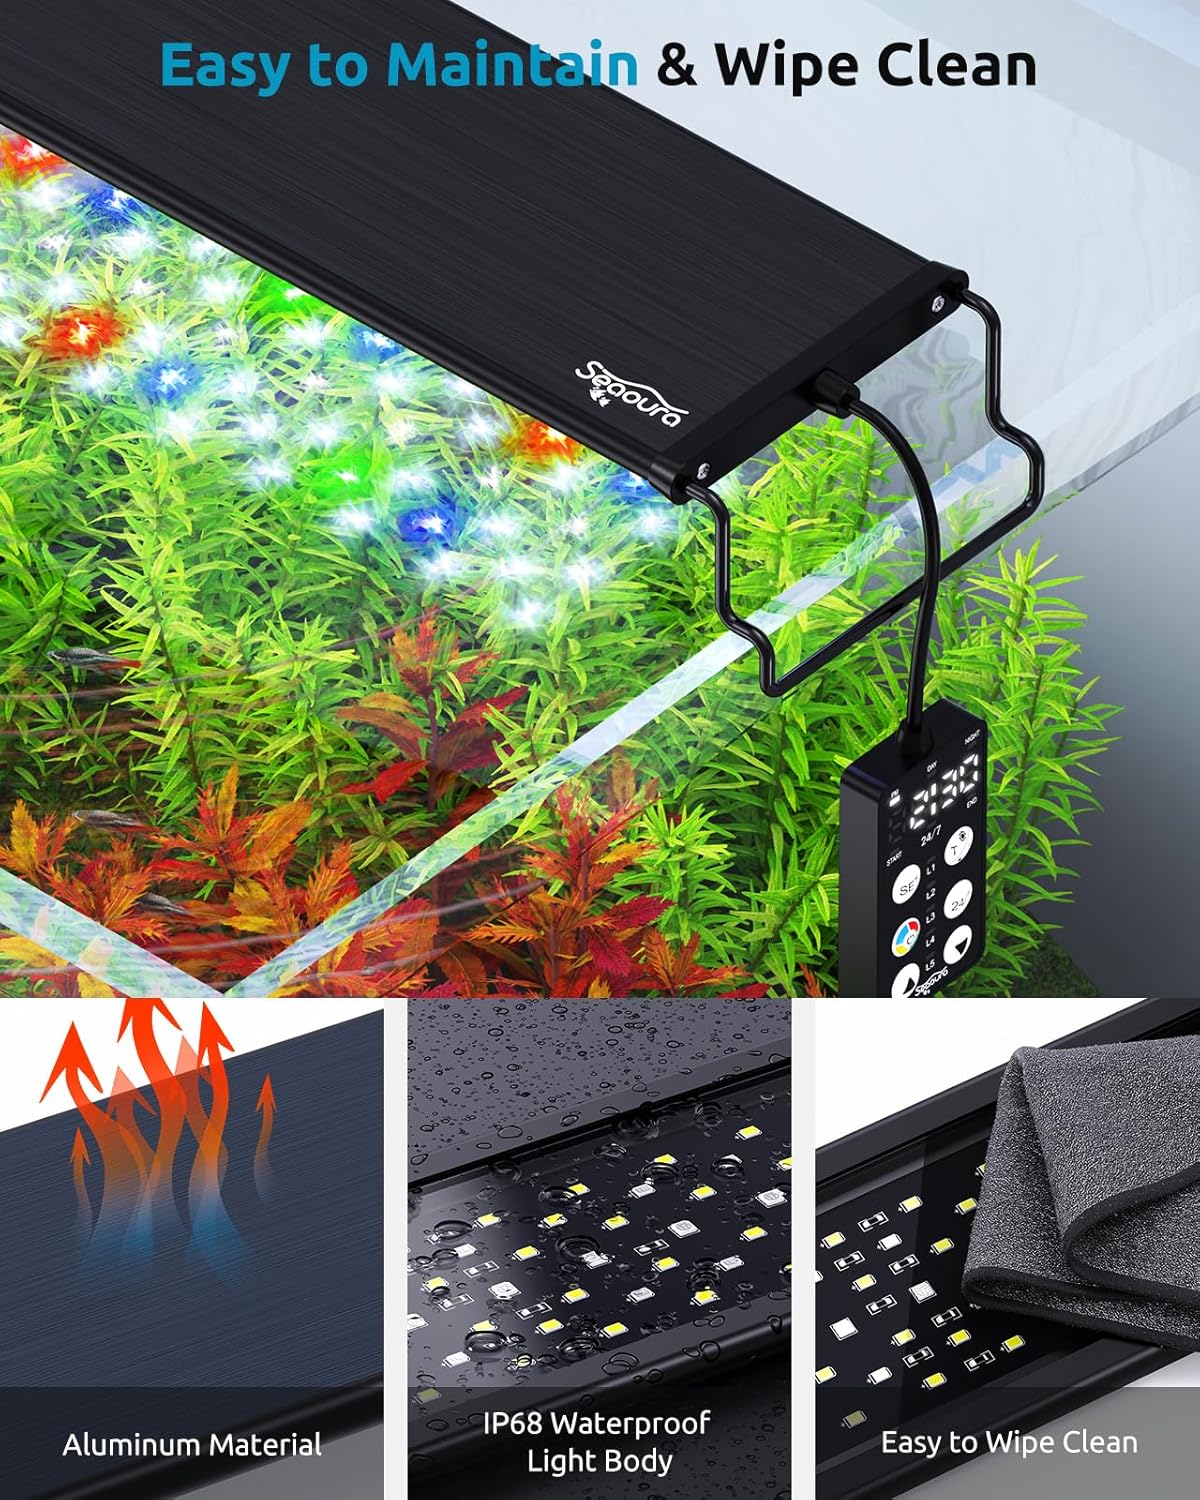
Figure 9: Easy maintenance and IP68 waterproof design.
8. Troubleshooting
If you encounter issues with your SEAOURA Aquarium Light, refer to the table below for common problems and solutions.
| Problem | Possible Cause | Solution |
|---|---|---|
| Light does not turn on. | No power, loose connection, faulty adapter. | Check power outlet. Ensure all connections (light to controller, controller to adapter, adapter to wall) are secure. Try a different outlet. |
| Timer settings are lost after power outage. | Controller battery (CR2032) is depleted or faulty. | The CR2032 battery is designed to maintain settings. If settings are lost, the battery may need replacement. Contact customer support for assistance. |
| Light is not bright enough for plant growth. | Incorrect brightness setting, tank size mismatch, specific plant requirements. | Ensure brightness is set to 100% in Regular or Day Mode. Verify the light's wattage and size match your aquarium's needs. Some plants require higher PAR values than others. |
| Algae growth is excessive. | Too much light intensity or duration, nutrient imbalance. | Reduce light duration or brightness. Adjust the 24/7 cycle to shorter daylight periods. Ensure proper tank maintenance and nutrient balance. |
| Controller display is blank or flickering. | Power issue, controller malfunction. | Check power connections. Disconnect and reconnect the power adapter. If the issue persists, contact customer support. |
9. Warranty and Support
Your SEAOURA Aquarium Light is covered by a return policy allowing for refund or replacement within 30 days of purchase. For specific warranty terms and conditions, please refer to your purchase documentation or the seller's policy on the platform where the product was acquired.
For technical support, troubleshooting assistance beyond this manual, or warranty claims, please contact SEAOURA customer service through the retailer's platform or visit the official SEAOURA brand store online. When contacting support, please have your product model number (SR-657) and purchase details ready.
Note: The manufacturer, SEAOURA, is committed to making fish keeping easier and more enjoyable.