Introduction
This manual provides detailed instructions for the safe and effective operation, setup, and maintenance of your TLBZK 878D 2-in-1 Hot Air Soldering Iron Station Kit. This versatile tool combines a soldering station and a hot air rework station, designed for various electronic repair and assembly tasks. Please read this manual thoroughly before using the device.
Safety Information
Always observe the following safety precautions to prevent injury or damage to the equipment:
- Ensure the workstation is placed on a stable, heat-resistant surface.
- Operate in a well-ventilated area to avoid inhaling fumes from soldering.
- Wear appropriate personal protective equipment, including safety glasses.
- The soldering iron tip and hot air nozzle reach very high temperatures. Avoid direct contact with skin or flammable materials.
- Always turn off the main power switch and unplug the unit when not in use or before performing maintenance.
- Do not use the unit near water or in damp conditions.
- Keep out of reach of children.
- This unit features an anti-static safety design to protect sensitive components.
Package Contents
Verify that all items listed below are included in your kit:
- TLBZK 878D Main Unit (Soldering and Hot Air Rework Station)
- Soldering Iron with Stand
- Hot Air Gun with Handle Bracket
- Desoldering Pump
- 5 Soldering Tips (various shapes)
- 3 Hot Air Nozzles (various sizes)
- 2 Tweezers (straight and curved)
- IC Extractor
- Power Cord

Image: The complete TLBZK 878D kit, showing the main unit, soldering iron, hot air gun, desoldering pump, soldering tips, hot air nozzles, tweezers, and IC extractor.

Image: Assortment of 5 soldering tips.

Image: Three hot air nozzles for various applications.

Image: Two types of precision tweezers.

Image: Desoldering pump and IC extractor tool.
Product Overview
The TLBZK 878D features a dual LED display for precise temperature monitoring of both the soldering iron and hot air gun. Controls are intuitively laid out for ease of use.
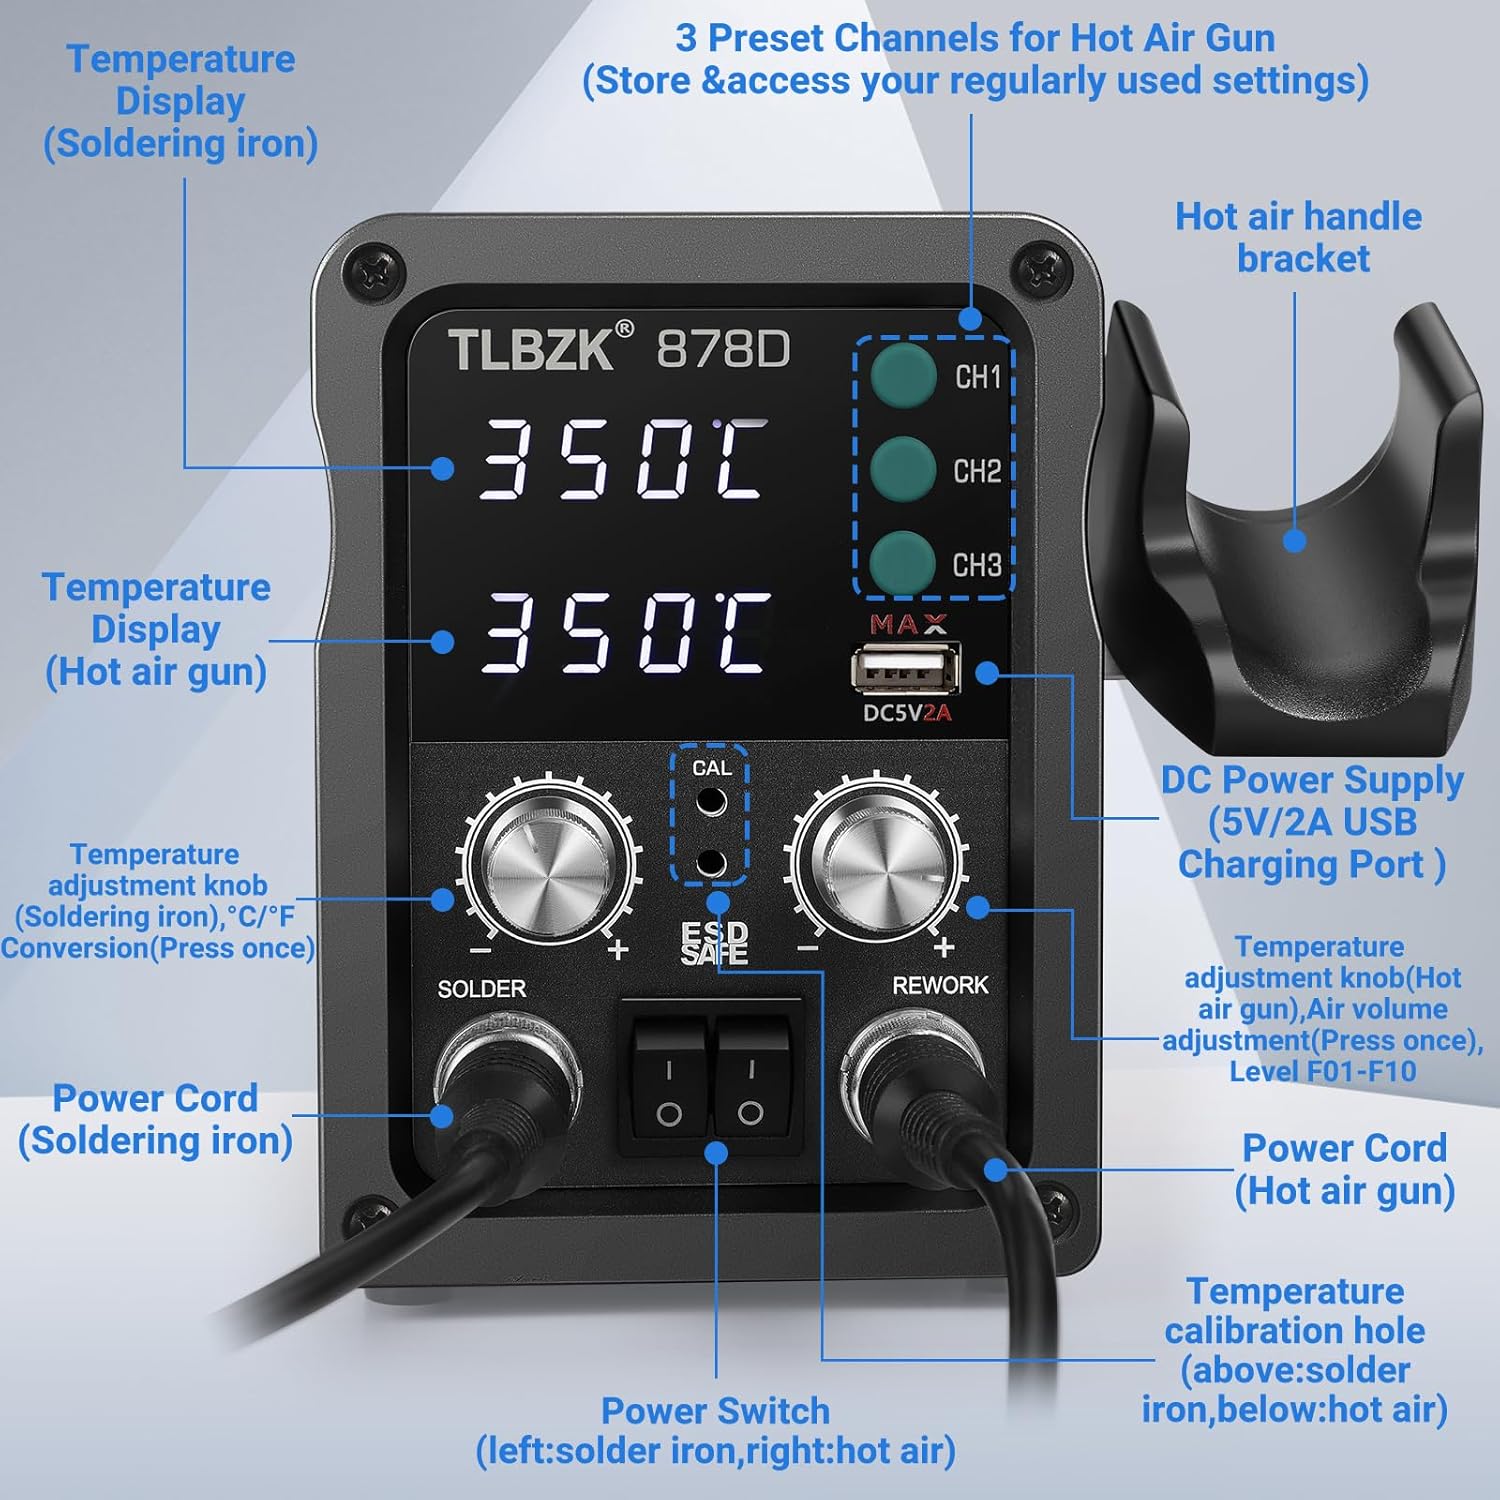
Image: Front panel of the TLBZK 878D, highlighting the temperature displays, control knobs, power switches, preset channels, and USB charging port.
Key Components:
- Temperature Display (Soldering Iron): Shows the current temperature of the soldering iron.
- Temperature Display (Hot Air Gun): Shows the current temperature of the hot air gun.
- Temperature Adjustment Knob (Soldering Iron): Adjusts soldering iron temperature. Press once to switch between °C/°F.
- Temperature Adjustment Knob (Hot Air Gun) / Air Volume Adjustment: Adjusts hot air gun temperature. Press once to adjust air volume (Level F01-F10).
- Power Switches: Separate switches for soldering iron (left) and hot air gun (right).
- Preset Channels (CH1, CH2, CH3): Store and access frequently used hot air gun settings.
- DC Power Supply (5V/2A USB Charging Port): For charging compatible devices.
- Hot Air Handle Bracket: Safely holds the hot air gun when not in use, activating auto start/stop function.
- Temperature Calibration Hole: For precise temperature calibration.
Setup
- Unpacking: Carefully remove all components from the packaging.
- Placement: Place the main unit on a stable, heat-resistant, and well-ventilated workbench.
- Connect Soldering Iron: Insert the soldering iron's connector into the 'SOLDER' port on the main unit and secure it. Place the soldering iron in its stand.
- Connect Hot Air Gun: Insert the hot air gun's connector into the 'REWORK' port on the main unit and secure it. Place the hot air gun in its handle bracket.
- Power Connection: Connect the power cord to the main unit's power input and then to a grounded electrical outlet.
- Initial Power On: Flip the main power switch located on the back of the unit. The displays will illuminate.
Operating Instructions
Soldering Iron Operation
- Power On: Ensure the main power switch is on. Flip the 'SOLDER' power switch on the front panel to the 'ON' position.
- Temperature Adjustment: Rotate the 'SOLDER' temperature adjustment knob to set the desired temperature. The digital display will show the set temperature.
- Temperature Unit Conversion: Press the 'SOLDER' temperature adjustment knob once to switch the display between Celsius (°C) and Fahrenheit (°F).
- Heating: The soldering iron will rapidly heat to the set temperature.
- Usage: Apply solder to the tip and begin soldering. Always return the iron to its stand when not actively soldering.
- Power Off: When finished, flip the 'SOLDER' power switch to 'OFF'. The iron will cool down.

Image: Demonstrates the soldering iron in use, highlighting its dedicated power switch, temperature adjustment knob, and digital temperature display.
Hot Air Gun Operation
- Power On: Ensure the main power switch is on. Flip the 'REWORK' power switch on the front panel to the 'ON' position.
- Temperature Adjustment: Rotate the 'REWORK' temperature adjustment knob to set the desired hot air temperature. The digital display will show the set temperature.
- Air Volume Adjustment: Press the 'REWORK' temperature adjustment knob once to enter air volume adjustment mode. Rotate the knob to select an air volume level from F01 to F10. Press again to confirm or wait a few seconds for it to auto-confirm.
- Preset Channels (CH1, CH2, CH3): Press one of the CH buttons to recall a saved temperature and airflow setting. To save a setting, adjust temperature and airflow, then press and hold the desired CH button until it beeps.
- Auto Start/Stop: The hot air gun features a handle sensing system. When the hot air gun is removed from its bracket, it will automatically start heating to the set temperature. When returned to the bracket, it will enter a cooling mode and then automatically shut off.
- Usage: Direct the hot air nozzle towards the component to be reworked. Maintain a safe distance to avoid overheating components or the PCB.
- Power Off: When finished, return the hot air gun to its bracket for auto-cooling and shutdown, then flip the 'REWORK' power switch to 'OFF'.

Image: Demonstrates the hot air gun in use, highlighting its dedicated power switch, temperature/air volume adjustment knob, and digital temperature display.

Image: Visual representation of the hot air gun's auto start/stop feature when removed from and returned to its handle bracket.
Maintenance
- Soldering Iron Tip Cleaning: Regularly clean the soldering iron tip with a damp sponge or brass wool to remove oxidation and ensure efficient heat transfer.
- Soldering Iron Tip Replacement: Replace worn or damaged soldering tips to maintain performance. Ensure the unit is cool before changing tips.
- Hot Air Nozzle Cleaning: Ensure hot air nozzles are free from debris. Clean gently with a soft brush if necessary.
- Unit Cleaning: Wipe the main unit and tools with a soft, dry cloth. Do not use abrasive cleaners or solvents.
- Storage: Store the unit and accessories in a clean, dry environment when not in use.
Troubleshooting
| Problem | Possible Cause | Solution |
|---|---|---|
| Soldering iron not heating | Main power switch off; Soldering iron switch off; Loose connection; Damaged heating element/tip. | Check main power and soldering iron switches; Ensure connection is secure; Replace tip or contact support if heating element is faulty. |
| Hot air gun not heating or no airflow | Main power switch off; Hot air gun switch off; Hot air gun not removed from bracket; Loose connection; Damaged heating element/fan. | Check main power and hot air gun switches; Ensure hot air gun is removed from bracket; Ensure connection is secure; Contact support if heating element or fan is faulty. |
| Temperature display inaccurate | Needs calibration; Faulty sensor. | Refer to calibration instructions (if provided in full manual) or contact support. |
| Unit powers off unexpectedly | Overheating; Power supply issue. | Ensure proper ventilation; Check power cord and outlet; Allow unit to cool down. If problem persists, contact support. |
Specifications
| Feature | Specification |
|---|---|
| Model | TLBZK 878D |
| Total Power Consumption | 600 Watts (Hot Air Gun) + 60 Watts (Soldering Iron) |
| Soldering Iron Temperature Range | 200°C - 500°C (392°F - 932°F) |
| Hot Air Gun Temperature Range | 100°C - 500°C (212°F - 932°F) |
| Display Type | Dual LED Digital Display |
| Temperature Stability | ±1°C (Static) |
| Airflow Type | Brushless Fan, Soft Air |
| Airflow Volume | Up to 120 L/min (Max) |
| ESD Safe | Yes |
| USB Output | 5V/2A |
| Item Weight | 5.5 pounds (approx. 2.5 kg) |
| Dimensions (Main Unit) | Approx. 10.12 x 6.73 x 5.98 inches |
| Material | Metal, Plastic |
| Power Source | AC |
Warranty and Support
For warranty information or technical support, please refer to the contact details provided with your purchase or visit the official TLBZK website. Keep your purchase receipt as proof of purchase.