1. Introduction
This document provides detailed instructions for the installation, operation, and maintenance of your WESLNN Hybrid Solar Inverter. This multi-function inverter/charger integrates the capabilities of an inverter, a solar charger, and a battery charger to deliver uninterrupted power. It features a full LCD display for user-configurable settings such as battery charging current, AC/solar charger priority, and acceptable input voltage. The integrated MPPT technology optimizes solar panel energy harvesting by tracking the maximum power point of the photovoltaic generator in various environmental conditions. The inverter produces a pure sine wave output, converting direct current to alternating current for your appliances.
2. Key Features
- Pure Sine Wave Solar Inverter output for sensitive electronics.
- Capable of operating without a battery in specific configurations.
- One-key restore function to factory settings for easy reset.
- Automatic activation feature for lithium batteries.
- Advanced MPPT solar charging with a maximum capacity of 6500W for the 6.2KW model.
- Wide PV input voltage range (90~450VDC) for flexible solar array design.
- Built-in dusk control kit for enhanced performance in challenging environments.
- Intelligent battery charging design to extend battery life.
- Dual output functionality for versatile power distribution.
3. Safety Instructions
Please read all instructions and cautionary markings on the unit and in this manual before installation and operation. Failure to follow these instructions may result in electric shock, fire, or severe injury. Keep this manual for future reference.
- Qualified Personnel: Installation and wiring must be performed by qualified personnel only.
- Ventilation: Ensure adequate ventilation around the inverter. Do not block ventilation openings.
- Environment: Install the inverter in a dry, cool, and well-ventilated area, away from flammable materials, corrosive gases, and excessive dust. Avoid direct sunlight and heat sources.
- Battery Safety: Batteries can produce explosive gases. Ensure proper ventilation when working near batteries. Wear eye protection and protective clothing.
- DC Disconnect: Always disconnect DC power from the solar array and battery before servicing the inverter.
- AC Disconnect: Always disconnect AC input and output power before servicing the inverter.
- Grounding: The inverter must be properly grounded.
- Overload: Do not overload the inverter beyond its rated capacity.
- Children: Keep children away from the inverter and batteries.
4. Product Overview
The WESLNN Hybrid Solar Inverter is designed for robust performance and ease of use. Below are visual representations of the unit and its typical system integration.

Figure 4.1: Angled view of the WESLNN Hybrid Solar Inverter, highlighting the front display panel and various connection ports on the underside. This view provides a general perspective of the unit's physical design.

Figure 4.2: Multi-angle view of the WESLNN Hybrid Solar Inverter, displaying its front, back, top, bottom, and side profiles. This comprehensive view helps in understanding the physical layout and placement of components like cooling fans and communication ports.
4.1 System Integration Diagram
The diagram below illustrates how the hybrid solar inverter integrates into a typical power system, connecting solar modules, a generator, utility grid, and a battery bank to power home appliances.
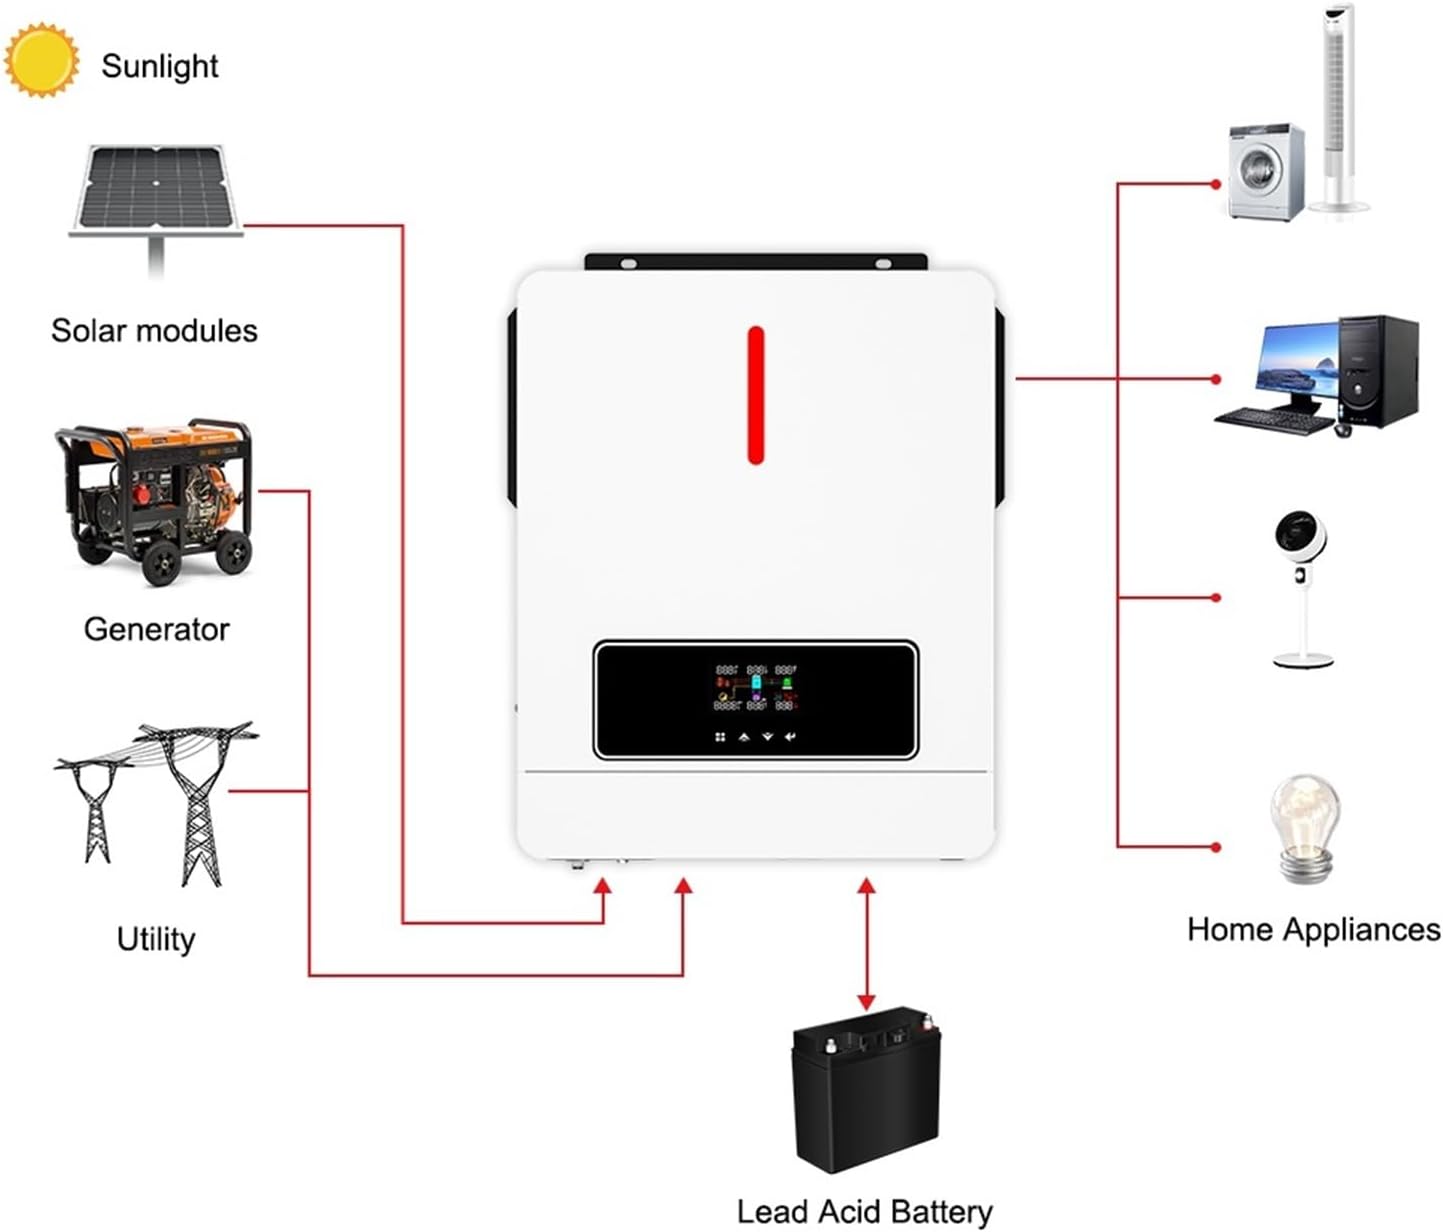
Figure 4.3: System integration diagram for the WESLNN Hybrid Solar Inverter. This visual guide shows the connections from solar modules (sunlight), a generator, and the utility grid as inputs, with a lead-acid battery for storage, and outputs powering various home appliances like fans, computers, and lights.
5. Setup and Installation
Proper installation is crucial for the safe and efficient operation of your inverter. Refer to the system integration diagram (Figure 4.3) for a visual guide.
5.1 Mounting the Inverter
- Select a suitable mounting location that is dry, well-ventilated, and protected from direct sunlight, rain, and dust.
- Ensure there is sufficient clearance around the inverter for proper airflow (at least 20 cm on all sides).
- Use appropriate mounting hardware to securely fasten the inverter to a vertical surface.
5.2 Wiring Connections
All wiring must comply with local electrical codes and regulations. Use appropriately sized cables for all connections.
- Battery Connection: Connect the battery bank to the inverter's battery terminals. Ensure correct polarity (+ to + and - to -). Install a DC circuit breaker between the battery and the inverter.
- PV Array Connection: Connect the solar panel array to the PV input terminals. Observe correct polarity. Install a DC circuit breaker between the PV array and the inverter. Ensure the PV input voltage is within the specified range (90-450VDC).
- AC Input Connection (Utility/Generator): Connect the AC utility grid or generator output to the AC input terminals. Install an AC circuit breaker.
- AC Output Connection (Load): Connect your AC loads (home appliances) to the AC output terminals. Install an AC circuit breaker.
- Grounding: Connect the inverter's ground terminal to a reliable earth ground.
Important: Double-check all connections before applying power. Incorrect wiring can damage the inverter and connected equipment.
6. Operating Instructions
Once the inverter is installed and wired correctly, you can proceed with initial startup and configuration.
6.1 Initial Startup
- Ensure all circuit breakers (DC and AC) are in the OFF position.
- Turn ON the battery circuit breaker. The inverter's LCD display should illuminate.
- Turn ON the PV array circuit breaker.
- Turn ON the AC input (utility/generator) circuit breaker.
- Turn ON the AC output (load) circuit breaker.
- The inverter will perform a self-test and then begin operation according to its default or previously configured settings.
6.2 LCD Display and Button Operation
The inverter features an LCD display and buttons for monitoring system status and configuring settings. Refer to the specific user interface section in the full manual for detailed navigation and parameter adjustments.
- Monitoring: The LCD displays real-time information such as input/output voltage, current, frequency, battery status, and operational mode.
- Configuration: Use the buttons to navigate through menus and adjust parameters like battery charging current, AC/solar charger priority, output voltage range, and alarm settings.
- Factory Reset: A dedicated one-key restore function allows resetting all settings to factory defaults if needed.
7. Maintenance
Regular maintenance ensures the longevity and optimal performance of your WESLNN Hybrid Solar Inverter.
- Cleaning: Periodically clean the inverter's exterior and ventilation openings to prevent dust accumulation. Use a dry, soft cloth. Do not use liquid cleaners.
- Connections: Annually inspect all electrical connections for tightness and signs of corrosion. Tighten any loose connections.
- Battery Inspection: If using lead-acid batteries, check electrolyte levels and terminal condition regularly. Keep terminals clean and free of corrosion.
- Environment: Ensure the installation environment remains within specified temperature and humidity ranges.
- Firmware Updates: Check the manufacturer's website for any available firmware updates that may improve performance or add features.
8. Troubleshooting
This section provides solutions to common issues you might encounter with your inverter. For problems not listed here, contact technical support.
8.1 Common Issues and Solutions
- Inverter Not Turning On:
- Check battery connections and voltage.
- Verify all DC and AC circuit breakers are ON.
- Ensure the power button on the inverter is pressed.
- No AC Output:
- Check AC output circuit breaker.
- Verify load connections.
- Check for overload conditions; reduce connected load.
- Review LCD display for error codes.
- Battery Not Charging:
- Check PV input voltage and current.
- Ensure PV array is not shaded.
- Verify AC input is present if AC charging is enabled.
- Check battery charging settings on the LCD.
- Overload Alarm:
- Reduce the total load connected to the inverter.
- Check for short circuits in the load wiring.
9. Specifications
The following table details the technical specifications of the WESLNN Hybrid Solar Inverter (6.2KW 48V model).
| Specification | Value |
|---|---|
| Model Number | 1005005557990057 |
| Power Rating | 6.2KW |
| System Voltage | 48VDC |
| MPPT Solar Charger Max Power | 6500W |
| PV Input Voltage Range | 90~450VDC |
| Output Waveform | Pure Sine Wave |
| Package Dimensions | 1 x 1 x 1 inches (Approximate) |
| Item Weight | 0.353 ounces (Approximate) |
| Manufacturer | WESLNN |
Physical dimensions of the inverter are provided below:

Figure 9.1: Dimensions of the WESLNN Hybrid Solar Inverter. The unit measures approximately 334 mm (13.1 inches) in length, 423 mm (16.6 inches) in width, and 110 mm (4.3 inches) in height. The net weight is approximately 10kg (22.05lb).
10. Warranty and Support
For warranty information, technical support, or service inquiries, please refer to the documentation included with your purchase or contact WESLNN customer service directly. Keep your purchase receipt as proof of purchase for warranty claims.