
GarveeTech Electric Deep Fryer
GarveeTech 10L Electric Deep Fryer User Manual
Model: Electric Deep Fryer (10L)
1. Important Safety Instructions
Please read all instructions carefully before using the appliance. Failure to follow these instructions may result in electric shock, fire, or serious injury.
- Always ensure the appliance is placed on a stable, heat-resistant, and non-slip surface.
- Do not immerse the control panel, heating element, or power cord in water or other liquids.
- Unplug the deep fryer from the outlet when not in use and before cleaning. Allow it to cool completely before handling or cleaning parts.
- Do not operate any appliance with a damaged cord or plug, or after the appliance malfunctions or has been damaged in any manner.
- Keep hands and face away from hot oil and steam during operation. The lid helps prevent splashing, but caution is still required.
- The frying basket handle is insulated; however, always use caution and oven mitts when handling hot components.
- Do not overfill the frying basket with food, as this can cause oil overflow and safety hazards.
- Monitor the power light and heating indicator light to confirm the appliance's operational status and ensure it is turned off after use.
- This appliance is not intended for use by persons (including children) with reduced physical, sensory, or mental capabilities, or lack of experience and knowledge, unless they have been given supervision or instruction concerning use of the appliance by a person responsible for their safety.
- Children should be supervised to ensure that they do not play with the appliance.
2. Product Overview
The GarveeTech 10L Electric Deep Fryer is designed for efficient and safe frying of various foods. It features a durable stainless steel construction, adjustable temperature control, and a removable frying basket for convenience.
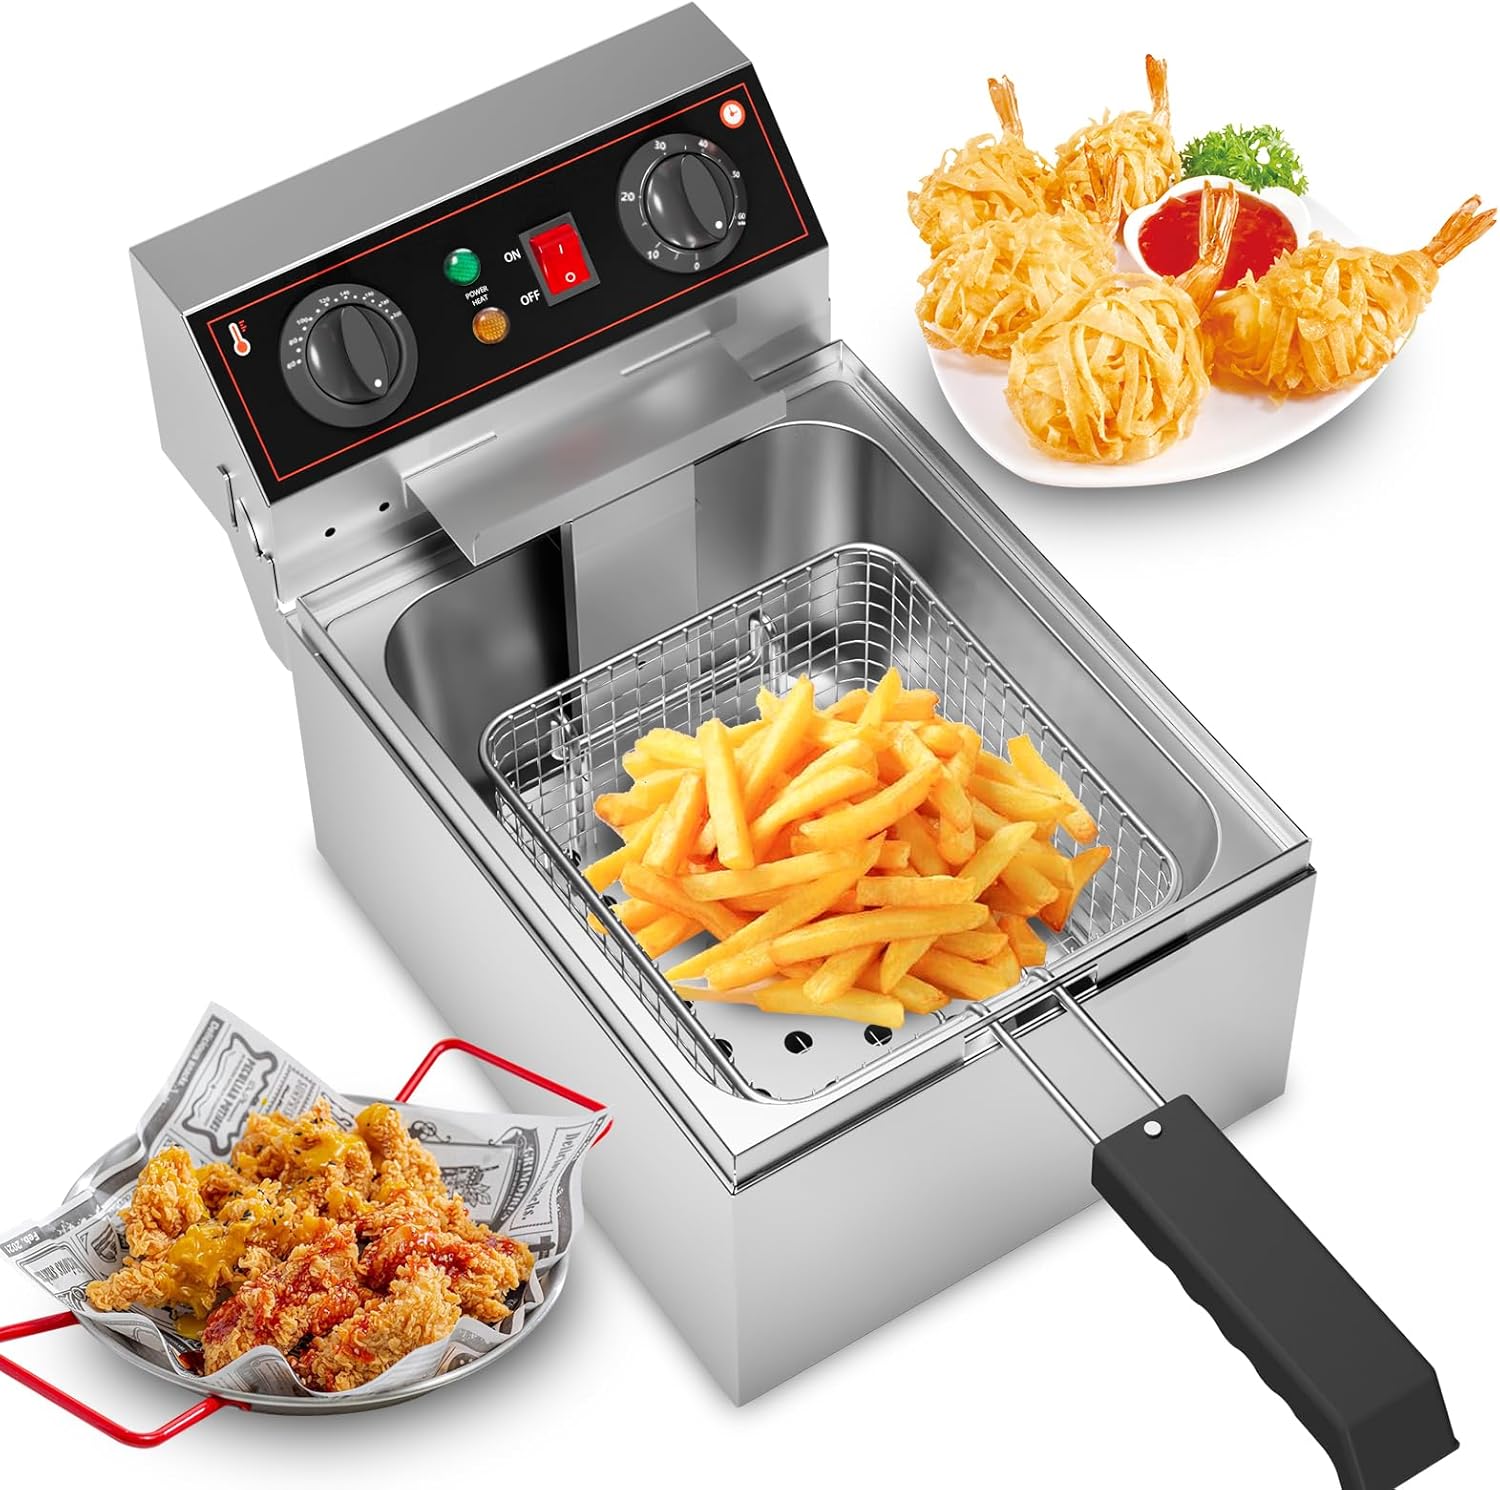
Figure 2.1: The GarveeTech 10L Electric Deep Fryer, showcasing its stainless steel body, control panel, frying basket filled with french fries, and examples of other fried dishes like shrimp and chicken.
2.1 Key Features
- Convenient and Safe Design: Features a lid to prevent oil splashing and an insulated frying basket handle for safe operation. Power and heating indicator lights provide clear operational status.
- Durable and Easy to Clean: Constructed from rust-resistant stainless steel with a thickened, removable oil tank and non-slip PVC feet for stability. The frying basket is protected by a heating tube partition to extend its lifespan.
- Large Capacity: Equipped with a 10.6QT oil tank and a 6.4QT removable frying basket, allowing for efficient cooking of various foods.
- Easy Operation with Wide Temperature Range: Simple temperature knob control (60℃ - 200℃ / 140℉ - 392℉) and a U-shaped stainless steel heating tube for even heat distribution.
2.2 Component Identification

Figure 2.2: Detailed diagram illustrating the main components of the deep fryer, including the Power Light, Heat Light, On-off Switch, Basket Hanging Plate, Heating Element, Filter Mesh, Foot, and Handle.
- Control Panel: Houses the temperature knob, power light, heat light, and on/off switch.
- Heating Element: U-shaped stainless steel tube located inside the machine for even heat distribution.
- Oil Tank: Removable 10.6QT capacity container for cooking oil.
- Frying Basket: 6.4QT capacity basket with an insulated handle for holding food during frying.
- Lid: Covers the oil tank to prevent splashing and retain heat.
- Basket Hanging Plate: Allows the basket to be suspended above the oil for draining.
- Filter Mesh: Helps filter out food particles.
- Non-slip Feet: PVC feet at the base for stability.
3. Setup
Proper setup ensures safe and efficient operation of your deep fryer.
- Unpacking: Carefully remove all components from the packaging. Retain packaging for future storage or transport if needed.
- Initial Cleaning: Before first use, wash the removable oil tank, frying basket, and lid with warm, soapy water. Rinse thoroughly and dry completely. Wipe the exterior of the main unit with a damp cloth. Ensure all parts are dry before assembly.
- Placement: Place the deep fryer on a stable, level, heat-resistant, and non-slip surface. Ensure there is adequate ventilation around the unit and keep it away from walls, curtains, and other flammable materials. The PVC non-slip feet will help secure the unit.
- Assembly:
- Insert the clean, dry oil tank into the main unit.
- Place the heating element assembly securely into its designated slot, ensuring it is properly seated.
- Position the frying basket inside the oil tank.
- Place the lid on top of the oil tank.
- Power Connection: Ensure the on/off switch is in the "OFF" position. Plug the power cord into a grounded electrical outlet.
4. Operating Instructions
Follow these steps for safe and effective operation of your deep fryer.
- Add Oil: Pour cooking oil into the removable oil tank. Ensure the oil level is between the MIN and MAX fill lines indicated inside the tank. Do not overfill.
- Power On: Turn the on/off switch to the "ON" position. The power light will illuminate.
- Set Temperature: Rotate the temperature knob to your desired frying temperature. The heating indicator light will turn on, indicating that the heating element is active. The temperature range is 60℃ - 200℃ (140℉ - 392℉).
- Preheating: Allow the oil to preheat to the set temperature. The heating indicator light will turn off once the desired temperature is reached, and will cycle on and off during operation to maintain the temperature.
- Prepare Food: Ensure food items are dry before placing them in the basket to minimize oil splattering. Do not overload the basket.
- Frying: Carefully lower the frying basket with food into the hot oil. Use the lid to cover the fryer if desired to prevent splashing.
- Monitor Cooking: Fry food until it reaches the desired crispness and color. The U-shaped heating tube ensures even heat distribution for consistent results.
- Draining: Once cooked, carefully lift the frying basket and hook it onto the basket hanging plate to allow excess oil to drain back into the tank.
- Serve: Transfer fried food to a serving dish lined with paper towels to absorb any remaining oil.
- Power Off: After use, turn the temperature knob to the lowest setting, then turn the on/off switch to the "OFF" position. Unplug the appliance from the power outlet.

Figure 4.1: Temperature guide for common fried foods, showing recommended temperatures for chips, fish, steak, and chicken within the fryer's operating range.
5. Maintenance and Cleaning
Regular cleaning and maintenance will extend the life of your deep fryer and ensure optimal performance.
- Cool Down: Always allow the oil and the appliance to cool completely before cleaning. This may take several hours. Do not attempt to clean while hot.
- Drain Oil: Once cooled, carefully pour the used oil into a suitable container for disposal or storage. Do not pour oil down the drain.
- Disassembly: Remove the oil tank, frying basket, and lid from the main unit. The detachable design facilitates easy cleaning.
- Cleaning Components:
- Wash the removable oil tank, frying basket, and lid with warm, soapy water. A non-abrasive sponge or brush can be used to remove food residue.
- Rinse all parts thoroughly with clean water to remove soap residue.
- Dry all components completely before reassembly or storage to prevent rust, especially for stainless steel parts.
- Cleaning Main Unit: Wipe the exterior of the main unit and the control panel with a damp cloth. Do not use abrasive cleaners or scourers. Never immerse the main unit (which contains electrical components) in water.
- Heating Tube Protection: The frying basket is designed with a heating tube partition to prevent direct contact and extend the lifespan of the heating element. Ensure this partition is in place during operation.
- Storage: Store the clean and dry deep fryer in a cool, dry place.
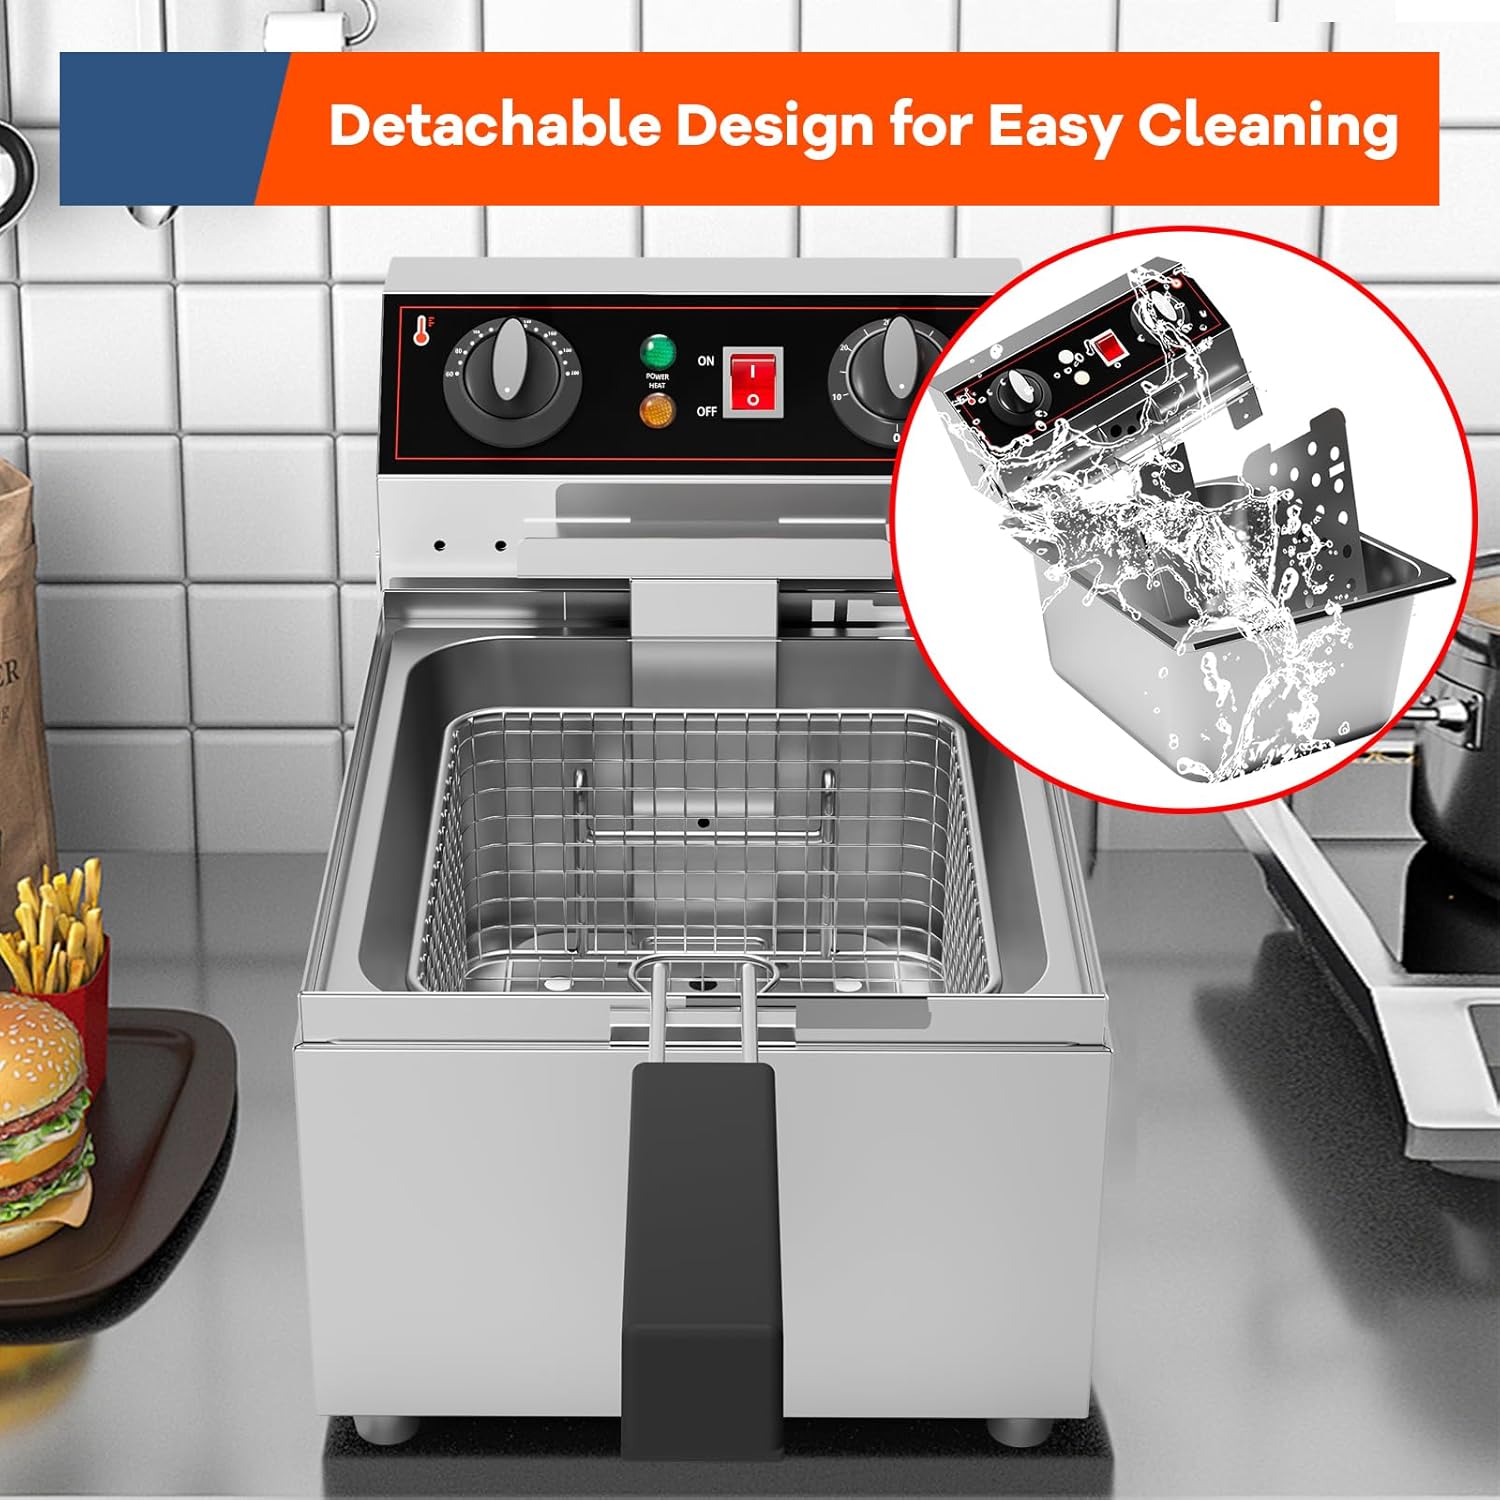
Figure 5.1: Illustration of the deep fryer's detachable design, highlighting how the control panel and heating element assembly can be separated from the oil tank for thorough cleaning.
6. Troubleshooting
If you encounter issues with your deep fryer, refer to the following common problems and solutions.
| Problem | Possible Cause | Solution |
|---|---|---|
| Appliance does not turn on. | Not plugged in; Power switch is off; No power from outlet. | Ensure the power cord is securely plugged into a working grounded outlet. Check if the on/off switch is in the "ON" position. Test the outlet with another appliance. |
| Oil is not heating up. | Temperature knob not set; Heating indicator light off; Heating element not properly seated. | Ensure the temperature knob is set to a desired temperature. Check if the heating indicator light is on (it cycles on/off during heating). Verify the heating element assembly is correctly installed. |
| Oil is splattering excessively. | Food is wet; Basket is overloaded; Oil level too high. | Ensure food is dry before frying. Do not overload the basket. Check that the oil level is within the MIN/MAX markings. Use the lid to contain splashes. |
| Food is not cooking evenly. | Oil not at correct temperature; Basket overloaded; Uneven food distribution. | Allow oil to reach the set temperature before adding food. Do not overload the basket. Distribute food evenly in the basket. |
If the problem persists after trying these solutions, please contact GarveeTech customer support for assistance.
7. Specifications
Detailed technical specifications for the GarveeTech 10L Electric Deep Fryer.
| Specification | Detail |
|---|---|
| Model Name | Electric Deep Fryer |
| Brand | GarveeTech |
| Material | Stainless Steel |
| Color | Silver |
| Product Dimensions (D x W x H) | 19.29"D x 12.6"W x 13.98"H |
| Item Weight | 14.17 Pounds |
| Oil Capacity | 10 Liters (10.6 QT) |
| Frying Basket Capacity | 6.4 QT |
| Temperature Range | 60℃ - 200℃ (140℉ - 392℉) |
| UPC | 198723839776 |
| ASIN | B0DG5DLLJ1 |
| Date First Available | September 5, 2024 |
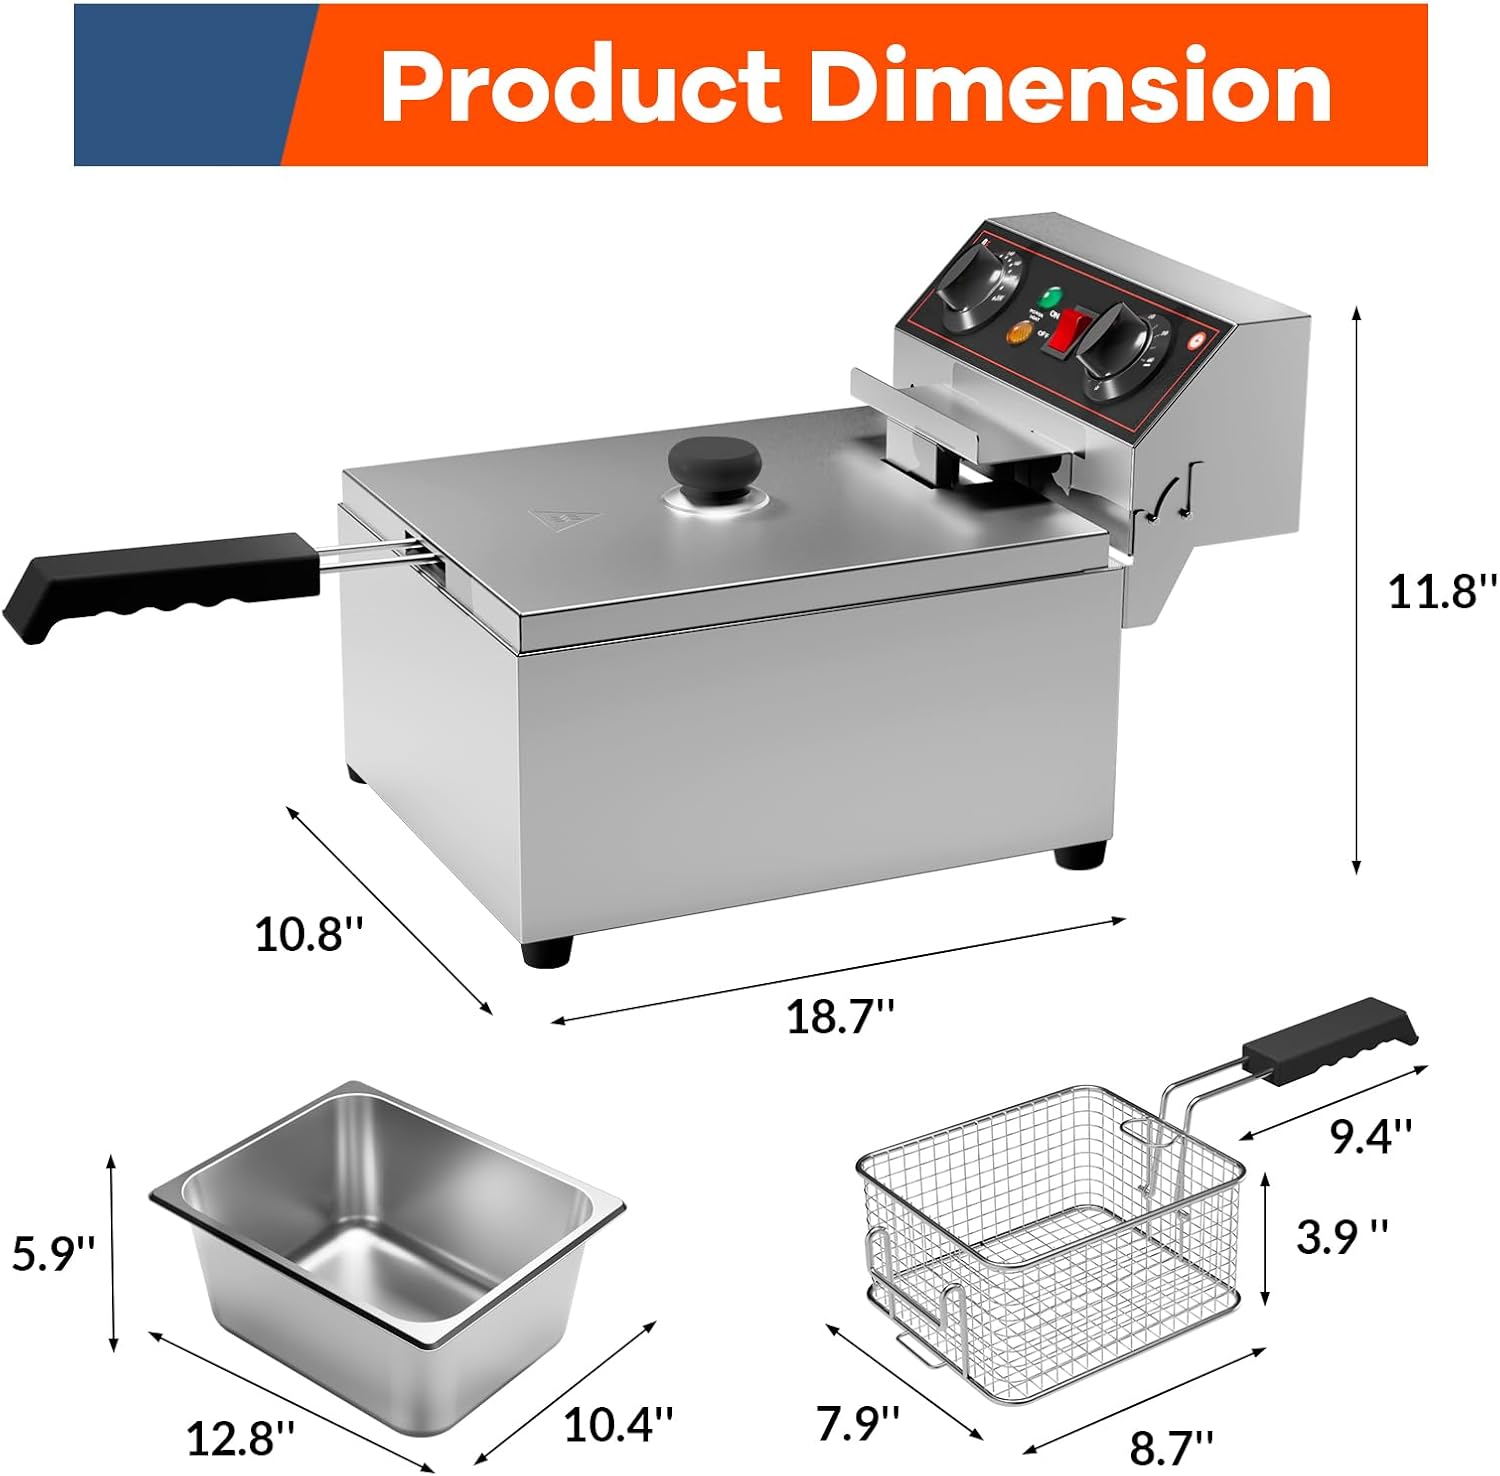
Figure 7.1: Diagram illustrating the overall product dimensions of the deep fryer, including the main unit, oil tank, and frying basket.
8. Warranty and Support
For warranty information, product support, or to purchase replacement parts, please refer to the official GarveeTech website or contact their customer service directly.
You can visit the official GarveeTech store for more information: GarveeTech Store
Ask a question about this manual
Ask about setup, troubleshooting, compatibility, parts, safety, or missing instructions. Manuals+ will review the question and use this page’s manual context to help answer it.