1. Introduction
This manual provides comprehensive instructions for the setup, operation, and maintenance of your Netzu Loud Alarm Clock Model 6208B. Please read this manual thoroughly before using the product to ensure proper function and longevity.
2. Safety Information
- Ensure the power adapter is compatible with your local power supply.
- Do not expose the device to water or excessive moisture.
- Avoid placing the device near heat sources or in direct sunlight.
- Keep out of reach of children.
- Use only the provided power adapter.
3. Package Contents
- Netzu Loud Alarm Clock (Model 6208B) x 1
- USB Power Cable x 1
- Power Adapter x 1
- User Manual x 1
4. Product Overview
Familiarize yourself with the alarm clock's components and controls.

Controls and Indicators:
- SNOOZE Button: Located on top, for temporary alarm pause.
- +/- Buttons: Adjust time, alarm, or volume.
- Alarm 1/2 Set Buttons: For setting individual alarms.
- Time Set Button: For setting the current time.
- 12/24HR Button: To switch between 12-hour and 24-hour time formats.
- Dimmer Slider: On the side, to adjust display brightness.
- Volume Slider: On the side, to adjust alarm volume.
- USB Port: For power input and charging.
- Battery Compartment: For backup batteries (2x AAA, not included).
5. Setup
5.1 Power Connection
Connect the alarm clock to a power source using the provided USB cable and power adapter. The display will illuminate once connected.

5.2 Battery Backup
Insert 2 AAA batteries (not included) into the battery compartment at the bottom of the clock. These batteries serve as a backup for time and alarm settings during a power outage. The display will not be lit during a power outage, but the alarm function will remain active.
5.3 Setting the Current Time
- Press and hold the TIME SET button for 2 seconds. The hour digits will begin to flash.
- Use the + or - buttons to adjust the hour.
- Press TIME SET again. The minute digits will flash.
- Use the + or - buttons to adjust the minutes.
- Press TIME SET once more to confirm and exit time setting mode.
5.4 12/24 Hour Format
To switch between 12-hour and 24-hour time display, press the 12/24HR button on the back of the clock.

6. Operating the Alarm Clock
6.1 Setting Alarms (Alarm 1 & Alarm 2)
The clock features two independent alarms. Follow these steps for each alarm:
- Press and hold the ALARM 1 SET or ALARM 2 SET button for 2 seconds. The hour digits for that alarm will flash.
- Use the + or - buttons to adjust the alarm hour.
- Press the respective ALARM SET button again. The minute digits will flash.
- Use the + or - buttons to adjust the alarm minutes.
- Press the respective ALARM SET button once more to confirm and exit alarm setting mode. The corresponding bell icon will appear on the display, indicating the alarm is active.

6.2 Alarm Volume
The alarm features 4 volume levels (85dB to 115dB). Adjust the volume using the VOLUME slider on the side of the clock.

6.3 Snooze Function
When the alarm sounds, press the large SNOOZE button on top of the clock to temporarily pause the alarm for 9 minutes. The alarm will sound again after 9 minutes. To turn off the alarm completely, press any other button.
6.4 Turning Alarms On/Off
To activate or deactivate an alarm, press the corresponding ALARM 1 ON/OFF or ALARM 2 ON/OFF button on the side of the clock. The bell icon on the display will indicate if the alarm is active.
6.5 Setting Customized Alarm Days
You can customize which days your alarms are active. Use the small switches next to the ALARM 1/2 SET buttons on the back of the clock to select:
- MON-SUN: Alarm active every day.
- MON-FRI: Alarm active on weekdays only.
- SAT-SUN: Alarm active on weekends only.
Video 1: How to Set the Customized Alarm. This video demonstrates the process of setting a customized alarm, including selecting specific days for the alarm to be active. While the video may feature a similar product from a different brand (GOLOZA), the functionality for setting alarm days is generally applicable.
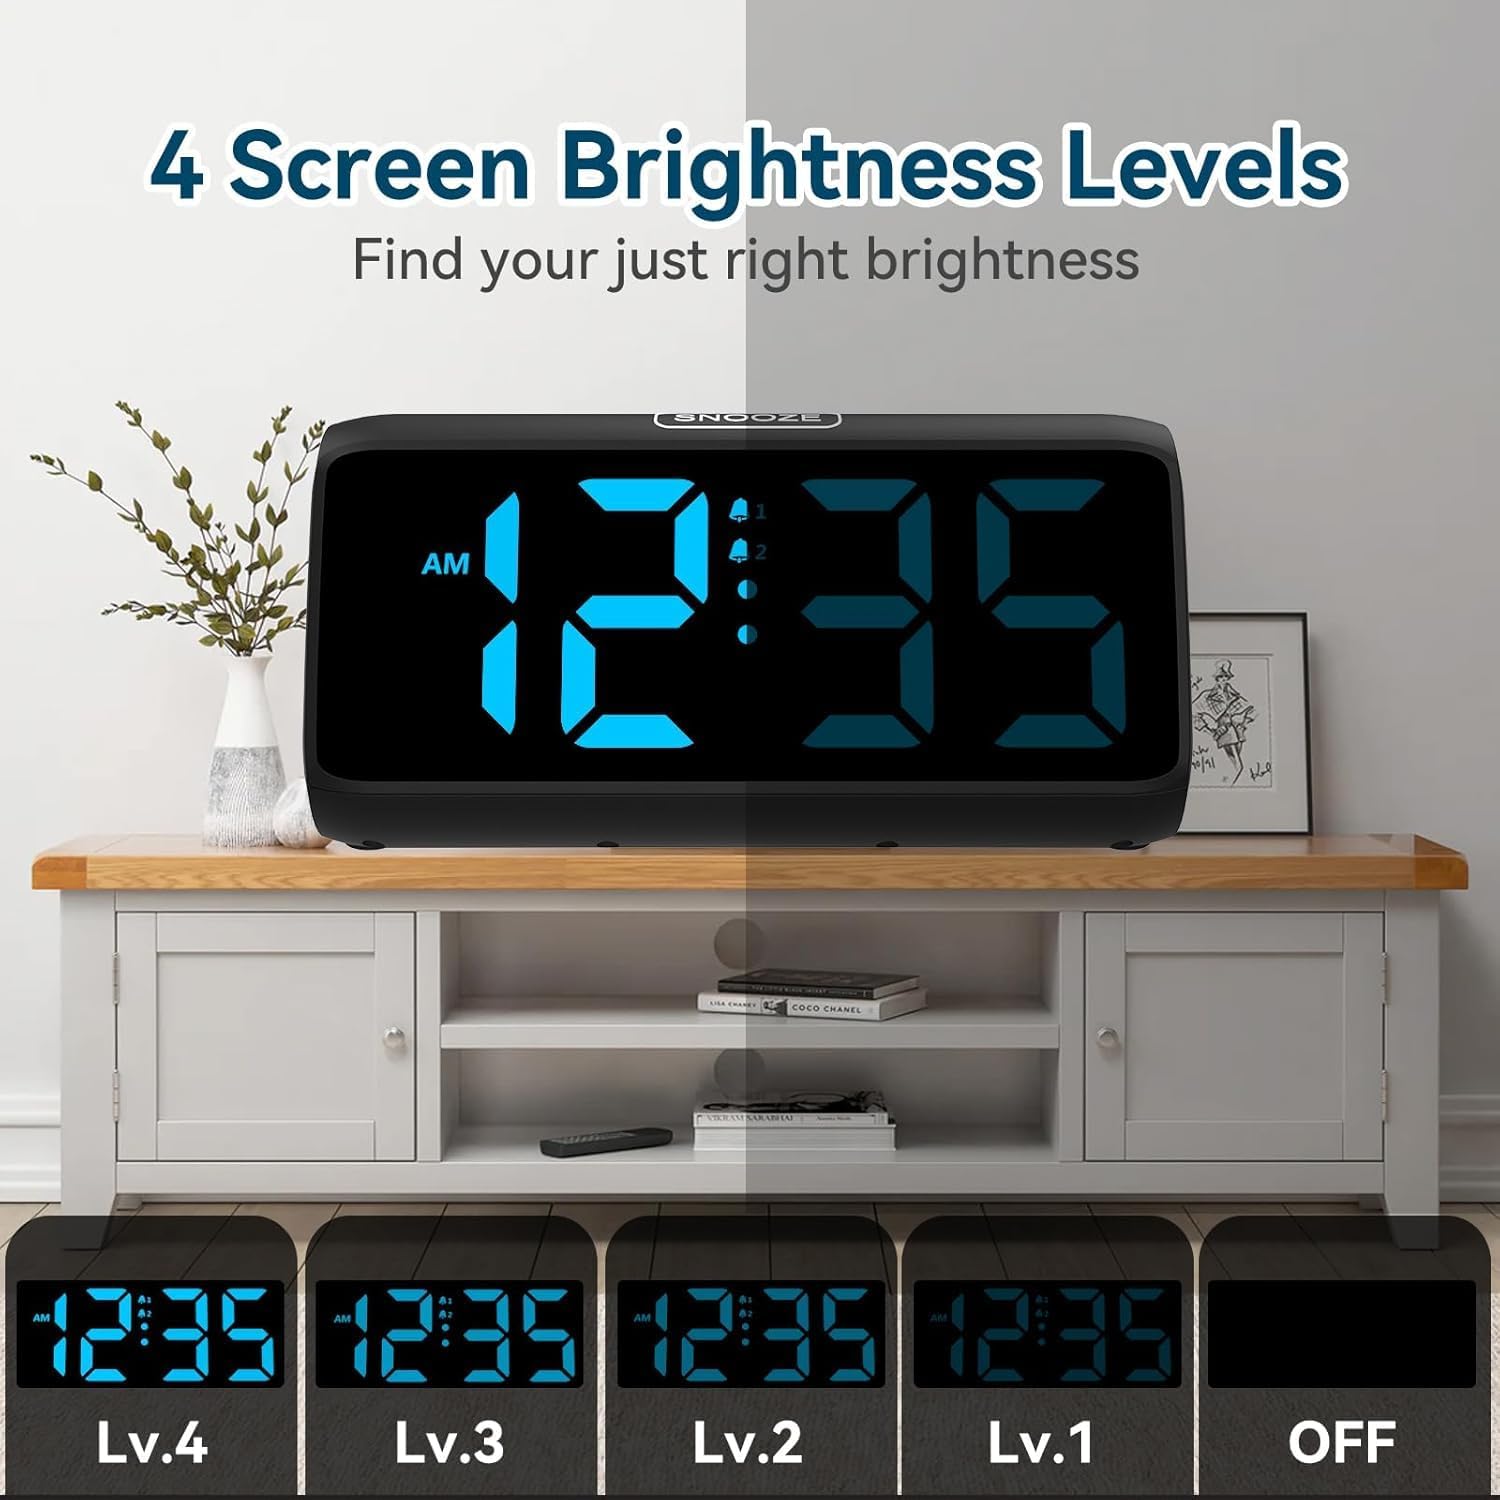
7. Display Settings
7.1 Brightness Levels
The alarm clock offers 5 levels of display brightness, including an option to turn the display completely off. Use the DIMMER slider on the side of the clock to adjust the brightness to your preference.
Video 2: FAMICOZY Small Simple Digital Alarm Clock. This video demonstrates basic features of a digital alarm clock, including brightness adjustment and alarm settings. While from a different brand, the core functionalities are similar to the Netzu alarm clock.
8. Maintenance
- Clean the clock with a soft, dry cloth. Do not use abrasive cleaners or solvents.
- Ensure the device is unplugged before cleaning.
- Replace backup batteries annually or when the low battery indicator appears.
9. Troubleshooting
| Problem | Possible Cause | Solution |
|---|---|---|
| Display is blank | No power supply. | Check power adapter connection. Ensure outlet is functional. |
| Alarm does not sound | Alarm is not activated or volume is too low. | Ensure the alarm is turned ON (bell icon visible). Adjust volume slider. |
| Time/Alarm settings reset after power outage | Backup batteries are dead or not installed. | Install or replace 2 AAA backup batteries. |
| Display too bright/dim | Brightness level needs adjustment. | Adjust the DIMMER slider on the side of the clock. |
10. Specifications
| Feature | Detail |
|---|---|
| Model Number | 6208B |
| Brand | Netzu |
| Product Dimensions | 15.8 x 3.81 x 7.2 cm |
| Item Weight | 280 g |
| Material | Plastic |
| Display Type | Digital |
| Alarm Volume Levels | 4 (85dB to 115dB) |
| Display Brightness Levels | 5 (including OFF) |
| Snooze Duration | 9 minutes |
| Power Source | Plug-in (AC adapter) with 2x AAA battery backup (for memory) |
11. Warranty and Support
For warranty information or technical support, please refer to the product packaging or contact Netzu customer service through the retailer where the product was purchased. Keep your purchase receipt for warranty claims.