Introduction
This manual provides detailed instructions for the installation, operation, maintenance, and troubleshooting of your ASRock Phantom Gaming X870 Riptide WiFi 7 Motherboard. Please read this manual thoroughly before installing or using the product to ensure proper functionality and to prevent damage.
The ASRock Phantom Gaming X870 Riptide WiFi 7 is an ATX motherboard designed for AMD Ryzen 7000, 8000, and 9000 Series Processors, featuring a 14+2+1 phase power design, DDR5 memory support up to 8000+ MHz, PCIe 5.0 x16 slot, multiple M.2 slots (including Gen5), Dual USB4 ports, 2.5GbE LAN, and WiFi 7 connectivity.
Package Contents
Verify that all components are present in the package:
- ASRock Phantom Gaming X870 Riptide WiFi 7 Motherboard
- WiFi Antenna
- SATA Data Cables
- M.2 Screws/Standoffs
- Quick Installation Guide
- Regulatory Notice
- ASRock Phantom Gaming Stickers/Badges

Image: The ASRock Phantom Gaming X870 Riptide WiFi 7 Motherboard shown with its included accessories, including the WiFi antenna, SATA cables, and documentation.
Setup and Installation
Before beginning installation, ensure your system is powered off and unplugged from the wall outlet. Wear an anti-static wrist strap to prevent electrostatic discharge (ESD) damage to components.
1. Motherboard Layout Overview
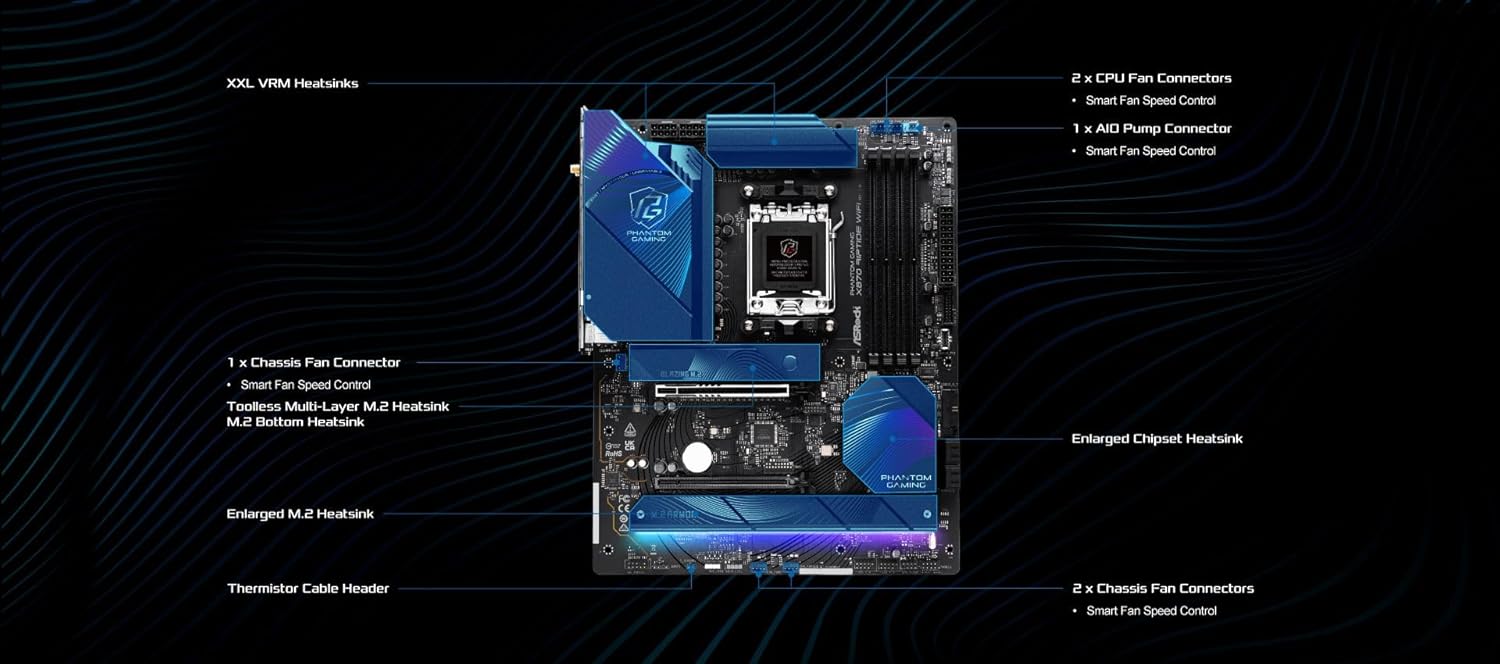
Image: Detailed diagram of the ASRock X870 Riptide WiFi 7 motherboard, highlighting key components such as the CPU socket, DDR5 DIMM slots, PCIe slots, M.2 sockets, SATA ports, and power connectors.

Image: Diagram illustrating the fan connectors, AIO pump connector, and various heatsinks (VRM, M.2, Chipset) on the ASRock X870 Riptide WiFi 7 motherboard.
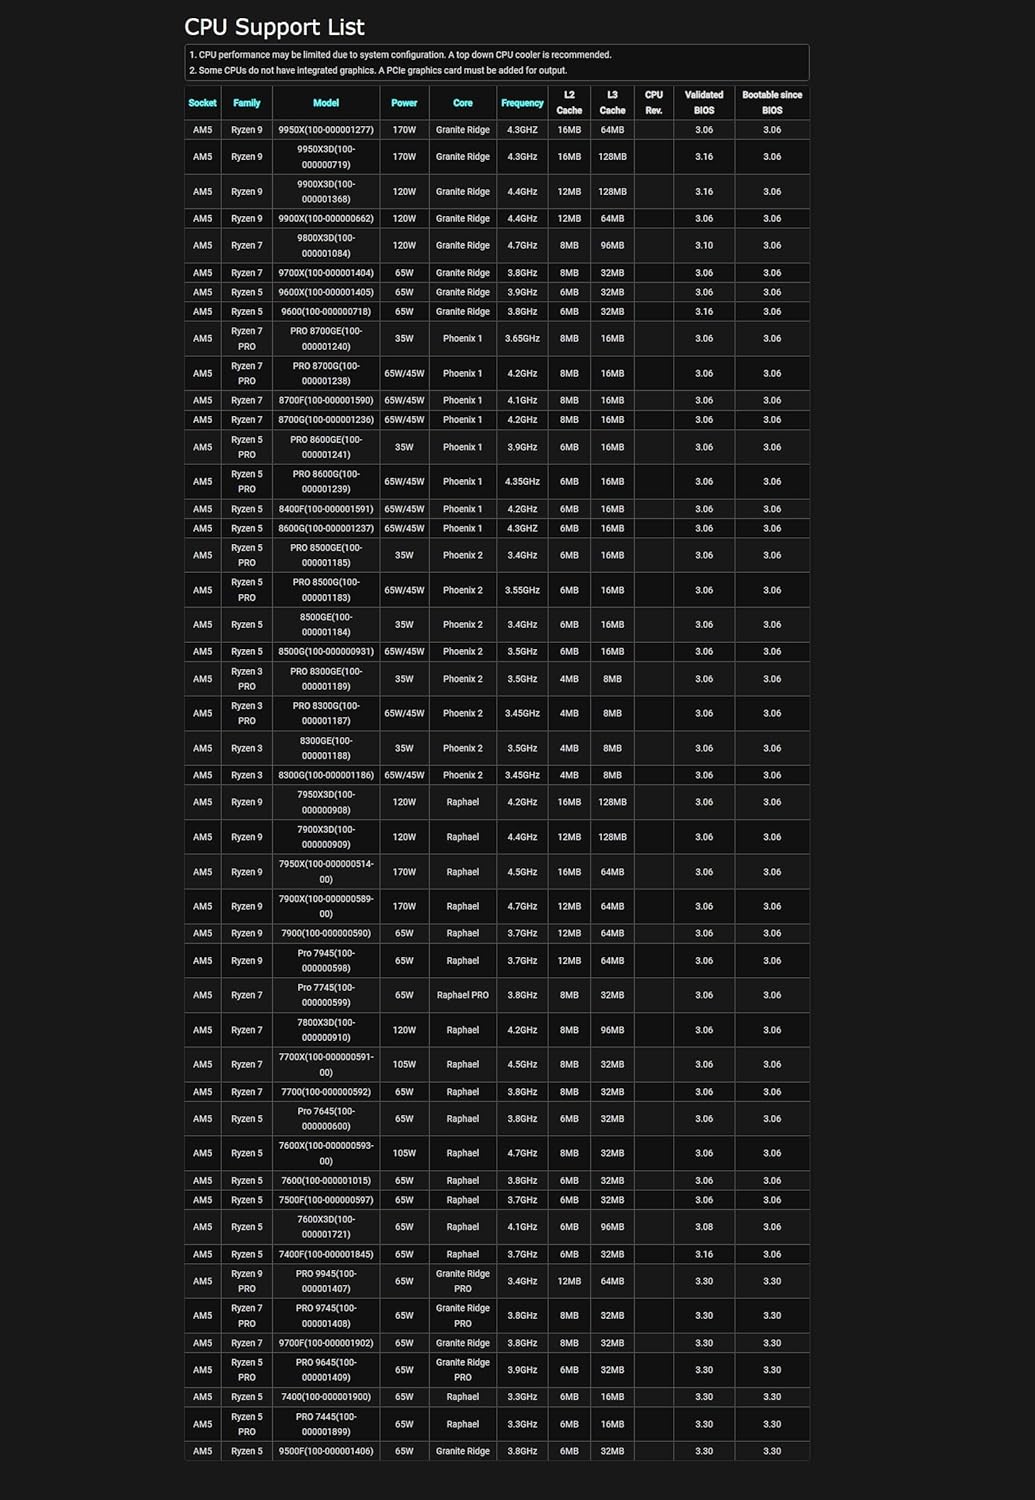
Image: View of the rear I/O panel of the ASRock X870 Riptide WiFi 7 motherboard, showing ports such as HDMI, USB4 Type-C, USB 3.2 Gen2x2 Type-C, 2.5GbE LAN, WiFi 7 antenna connectors, and audio jacks.
2. CPU Installation
- Open the CPU socket lever and remove the protective cover.
- Carefully align the AMD Ryzen processor with the socket, ensuring the golden triangle on the CPU matches the triangle on the socket.
- Gently place the CPU into the socket without forcing it.
- Close the CPU socket lever to secure the processor.
- Install your CPU cooler according to its manufacturer's instructions.
3. Memory (RAM) Installation
This motherboard supports DDR5 DIMMs in dual channel configuration. Refer to the motherboard manual for recommended memory slot population for optimal performance.
- Open the clips on both ends of the DIMM slot.
- Align the memory module with the slot, ensuring the notch on the module matches the key in the slot.
- Press down firmly on both ends of the memory module until the clips snap into place.

Image: Illustrates the DDR5 DIMM slots and highlights support for XMP and EXPO profiles for memory overclocking up to 8000+ MHz.
4. M.2 SSD Installation
The motherboard features multiple M.2 slots, including one PCIe Gen5 x4 Blazing M.2 slot and two PCIe Gen4 x4 Hyper M.2 slots.
- Locate the desired M.2 slot and remove the M.2 heatsink and screw/standoff.
- Insert the M.2 SSD into the slot at a 30-degree angle.
- Gently push the SSD down and secure it with the M.2 screw/standoff.
- Reinstall the M.2 heatsink to ensure proper cooling.

Image: Shows the Blazing M.2 slot, emphasizing its PCIe Gen5 x4 capability for high-speed SSDs.
5. Graphics Card Installation
- Open the latch on the PCIe 5.0 x16 slot.
- Align your graphics card with the slot and press down firmly until it clicks into place.
- Secure the graphics card to your chassis with screws.
- Connect necessary PCIe power cables from your power supply to the graphics card.
6. Power Connections
- Connect the 24-pin ATX power connector from your power supply to the motherboard.
- Connect the 8-pin and 4-pin (or two 8-pin) 12V CPU power connectors to the motherboard.
7. Front Panel and Peripheral Connections
- Connect front panel headers (power button, reset button, HDD LED, power LED) according to the motherboard manual.
- Connect USB headers, audio headers, and SATA devices as needed.
- Install the WiFi antenna to the rear I/O panel connectors.
Operating Instructions
1. First Boot and BIOS Setup
- After assembling your system, connect a monitor, keyboard, and mouse.
- Power on your system. Press Del or F2 during startup to enter the BIOS/UEFI setup utility.
- Configure boot order, enable XMP/EXPO profiles for memory, and adjust other settings as required.
- Save changes and exit the BIOS.
2. Driver Installation
After installing your operating system, install the necessary drivers for the motherboard components. These typically include chipset drivers, LAN drivers, WiFi drivers, audio drivers, and USB drivers. Drivers can be found on the ASRock support website for your specific motherboard model.
3. BIOS Updates
Regularly check the ASRock website for BIOS updates. BIOS updates can improve system stability, add support for new CPUs, and enhance performance. Use the ASRock Instant Flash utility or the BIOS Flashback Button for updating. Refer to the official ASRock guide for detailed instructions on BIOS updates.
Caution: Incorrect BIOS flashing can damage your motherboard. Follow instructions precisely.
Maintenance
- Dust Removal: Periodically clean dust from the motherboard and components using compressed air. Ensure the system is powered off and unplugged.
- Cable Management: Ensure cables are neatly routed to promote airflow and prevent interference.
- Software Updates: Keep your operating system, drivers, and BIOS updated to maintain optimal performance and security.
Troubleshooting
1. System Does Not Power On
- Check all power connections: 24-pin ATX, 8-pin/4-pin CPU power.
- Ensure the power supply is switched on.
- Verify front panel power button connection to the motherboard.
- Test with a different power supply if possible.
2. No Display Output
- Ensure the monitor is connected to the graphics card (not the motherboard's integrated graphics ports, unless using an APU).
- Reseat the graphics card and memory modules.
- Check if the monitor is set to the correct input source.
- Try booting with a single RAM stick in the recommended slot (often A2 or B2).
3. Instability or Crashes
- Check CPU and GPU temperatures. Overheating can cause instability.
- Ensure memory is compatible and running at stable speeds. Disable XMP/EXPO profiles to test at default speeds.
- Update BIOS and all drivers to the latest versions.
- Verify power supply wattage is sufficient for all components.
4. WiFi or LAN Connectivity Issues
- Ensure WiFi antennas are securely connected.
- Install the latest WiFi and LAN drivers from the ASRock website.
- Check network cable connections for LAN.
- Verify network settings in your operating system.
Specifications
| Feature | Specification |
|---|---|
| Brand | ASRock |
| Model Name | X870 RIPTIDE WIFI |
| CPU Socket | Socket AM5 |
| Compatible Processors | AMD Ryzen 7000, 8000, 9000 Series Processors |
| Chipset Type | AMD X870 |
| RAM Memory Technology | DDR5 |
| Memory Clock Speed | Up to 8000+ MHz (OC) |
| Memory Storage Capacity (Max) | 256 GB |
| Product Dimensions | 13.62 x 11.06 x 2.95 inches (ATX Form Factor) |
| Item Weight | 4.62 pounds |
| PCIe Slots | 1 x PCIe 5.0 x16 slot |
| M.2 Slots | 1 x PCIe Gen5 x4, 2 x PCIe Gen4 x4 |
| SATA Ports | 4 x SATA3 6.0 Gb/s |
| USB Ports | Dual USB4 ports, Front USB 3.2 Gen2x2 Type-C, various USB 3.2 Gen1/Gen2 |
| LAN | 2.5GbE LAN |
| Wireless Connectivity | WiFi 7, Bluetooth |
| Audio | Realtek ALC4082 7.1 CH HD Audio Codec, Nahimic Audio |
| Platform | Windows 10, Windows 11 |

Image: Diagram showing the ATX form factor dimensions of the ASRock X870 Riptide WiFi 7 motherboard, measuring approximately 12 inches by 9.6 inches.
Warranty and Support
For warranty information and technical support, please visit the official ASRock website or contact their customer service. Keep your proof of purchase for warranty claims.
ASRock Support Website: www.asrock.com/support.asp
Product Page: Amazon Product Page