1. Introduction
This manual provides essential instructions for the safe and effective use, setup, operation, and maintenance of your FPBIGCHA W-200-122P Pneumatic Spray Paint Gun. Please read this manual thoroughly before operating the spray gun to ensure proper function and to prevent injury or damage.

Image 1.1: The FPBIGCHA W-200-122P Pneumatic Spray Paint Gun.
2. Safety Information
WARNING: Failure to follow these safety instructions may result in serious injury or property damage.
- Always wear appropriate personal protective equipment (PPE), including a respirator, safety glasses, gloves, and protective clothing, when operating the spray gun.
- Ensure adequate ventilation in the work area to prevent the accumulation of hazardous fumes.
- Never point the spray gun at yourself or others. Keep hands and body parts away from the nozzle.
- Disconnect the air supply before cleaning, performing maintenance, or when the gun is not in use.
- Do not exceed the maximum recommended air pressure for the spray gun.
- Use only compatible and recommended materials for spraying. Follow paint manufacturer's safety guidelines.
- Keep the spray gun away from open flames, sparks, and other ignition sources.
- Store the spray gun and materials in a safe, secure location, out of reach of children.
3. Product Components
Familiarize yourself with the various parts of the W-200-122P spray gun before operation.

Image 3.1: Labeled diagram of the W-200-122P spray gun components.
- Fluid Nozzle: Controls the flow and shape of the paint.
- Air Cap Set: Shapes the atomized paint into a spray pattern.
- Pattern Adjustment Knob: Adjusts the width of the spray pattern.
- Fluid Adjustment Knob: Controls the volume of paint released.
- Fluid Needle: Regulates paint flow through the nozzle.
- Fluid Inlet: Connection point for the paint cup.
- Trigger: Activates air and fluid flow.
- Air Adjustment Set: Controls the air pressure at the gun.
- Air Inlet: Connection point for the air hose from the compressor.
4. Setup
Proper setup is crucial for optimal performance and safety.
- Prepare the Work Area: Ensure the area is clean, well-ventilated, and free from obstructions. Cover surrounding areas to protect them from overspray.
- Connect Air Supply: Attach a suitable air hose from your air compressor to the air inlet at the bottom of the spray gun handle. Ensure all connections are secure and leak-free. The W-200-122P requires an air compressor with a power output of 2.2~3.7 kW.
- Prepare Paint Material: Mix and thin your paint material according to the paint manufacturer's instructions. Strain the paint to remove any particles that could clog the nozzle.
- Fill the Paint Cup: The W-200-122P uses a pressure feed system with a 400cc cup volume. Securely attach the paint cup to the fluid inlet.
- Adjust Air Pressure: Set your air compressor to the recommended operating pressure for your paint material. Fine-tune the air pressure using the air adjustment set on the gun.
- Check Atomizing Cap: The atomizing cap is precision-machined for high atomization effect. Ensure it is clean and securely fastened.
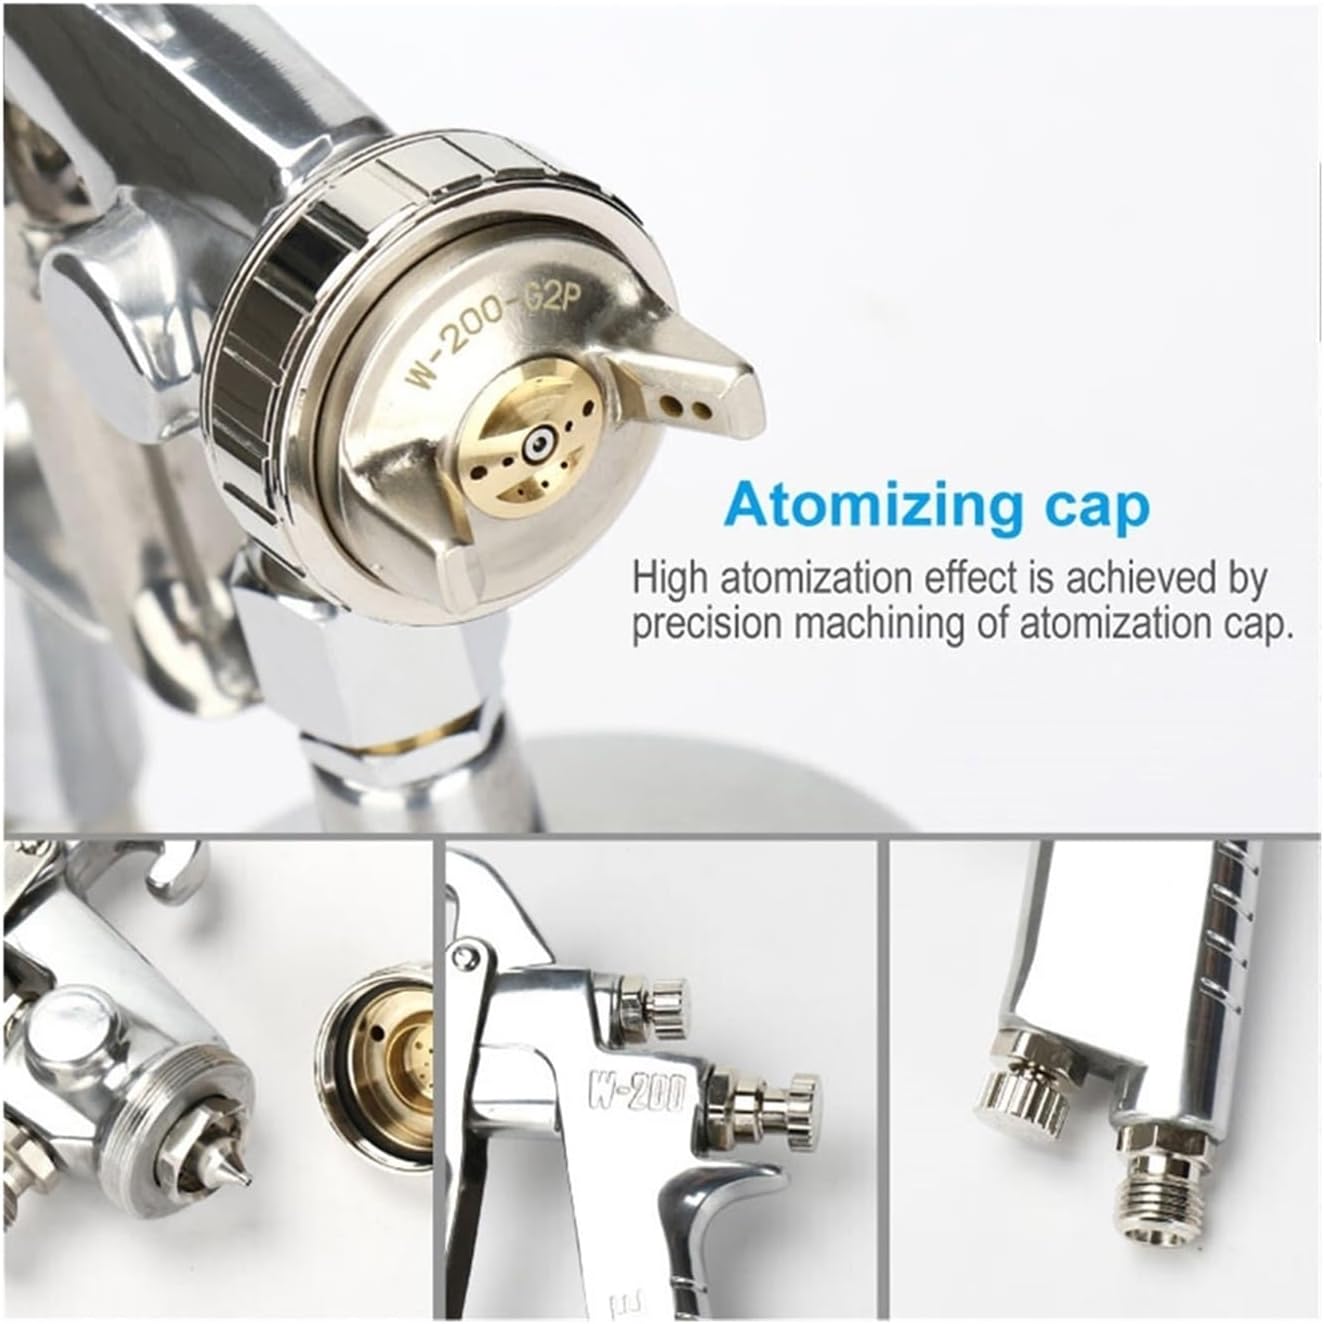
Image 4.1: Close-up of the atomizing cap.
5. Operating Instructions
Follow these steps for effective and consistent spraying.
- Initial Adjustments:
- Fluid Adjustment: Turn the fluid adjustment knob clockwise to decrease paint flow, counter-clockwise to increase.
- Pattern Adjustment: Turn the pattern adjustment knob to adjust the spray fan width. The W-200-122P offers fully adjustable wide fan pattern control.
- Air Adjustment: Use the air adjustment set to fine-tune air pressure for optimal atomization.
- Test Spray: Before spraying your actual workpiece, perform a test spray on a piece of scrap material. Adjust the fluid, pattern, and air controls until you achieve the desired finish.
- Spraying Technique:
- Hold the spray gun perpendicular to the surface, maintaining a consistent distance (typically 6-10 inches).
- Move the gun at a steady, even pace across the surface. Overlap each pass by about 50% to ensure even coverage.
- Release the trigger at the end of each pass and re-engage before starting the next pass.
- Apply multiple thin coats rather than one thick coat to prevent runs and sags.
- Finishing: Once spraying is complete, release the trigger and disconnect the air supply.
6. Maintenance
Regular cleaning and maintenance will extend the life of your spray gun and ensure consistent performance.
- Immediate Cleaning: After each use, immediately clean the spray gun.
- Empty Paint Cup: Remove any remaining paint from the cup.
- Flush with Solvent: Fill the cup with an appropriate cleaning solvent (e.g., paint thinner for oil-based paints, water for water-based paints). Spray the solvent through the gun until it runs clear.
- Disassemble and Clean: Disassemble the air cap, fluid nozzle, and fluid needle. Clean these components thoroughly with a brush and solvent. Pay close attention to small holes in the air cap.
- Clean Gun Body: Wipe down the exterior of the gun with a solvent-dampened cloth.
- Lubrication: Apply a small amount of spray gun lubricant to the fluid needle packing and air valve packing periodically.
- Reassembly: Reassemble the gun, ensuring all parts are correctly seated and tightened. Do not overtighten.
CAUTION: Never use metal objects to clean the nozzle or air cap holes, as this can damage them and affect spray performance.
7. Troubleshooting
Refer to this section for common issues and their solutions.
| Problem | Possible Cause | Solution |
|---|---|---|
| Poor atomization / Coarse spray | Low air pressure; Paint too thick; Clogged air cap/nozzle | Increase air pressure; Thin paint; Clean air cap/nozzle |
| Pulsating spray | Low paint level; Loose fluid nozzle; Air leak in fluid system | Refill paint cup; Tighten fluid nozzle; Check for leaks |
| Uneven spray pattern | Damaged or dirty air cap; Clogged fluid nozzle | Clean or replace air cap; Clean fluid nozzle |
| Paint leaks from nozzle | Worn fluid needle packing; Loose fluid nozzle | Replace packing; Tighten fluid nozzle |
| No paint flow | Clogged fluid nozzle/inlet; Fluid adjustment knob closed; Empty paint cup | Clean nozzle/inlet; Open fluid adjustment; Refill cup |
8. Specifications
Detailed specifications for the FPBIGCHA W-200-122P Pneumatic Spray Paint Gun.

Image 8.1: Product parameters for W-200 series spray guns.
| Feature | Specification |
|---|---|
| Model | W-200-122P |
| Brand | FPBIGCHA |
| Power Type | Pneumatic |
| Feed Type | Pressure Feed |
| Nozzle Diameter | 1.2 mm |
| Cup Volume | 400 cc |
| Air Consumption (L/min) | 560 |
| Paint Output (mL/min) | 500 |
| Pattern Width (mm) | 400 |
| Air Hole Model | G2P |
| Required Air Compressor | 2.2~3.7 kW |
| No-Load Speed | 1200 rpm |
| Item Weight | 800 Grams |
9. Warranty and Support
For warranty information, please refer to the documentation provided at the time of purchase or contact the seller directly. For technical support or replacement parts, please reach out to FPBIGCHA customer service through their official channels or the retailer from whom the product was purchased.