1. Introduction
Thank you for choosing the HOMVILLA Digital Alarm Clock. This device is designed to provide reliable timekeeping and alarm functions with user-friendly features such as a large LED display, adjustable brightness, dual alarms, and a convenient USB charging port. Please read this manual carefully to ensure proper use and to maximize the lifespan of your product.
2. Safety Information
- Do not expose the device to extreme temperatures, direct sunlight, or high humidity.
- Avoid dropping or subjecting the device to strong impacts.
- Use only the provided power adapter and USB cable.
- Keep the device away from water or other liquids.
- Do not attempt to disassemble or repair the device yourself. Contact customer support if issues arise.
- Remove the protective film from the display before first use.
3. Package Contents
Please check the package for the following items:
- HOMVILLA Digital Alarm Clock
- USB Charging Cable
- Power Adapter
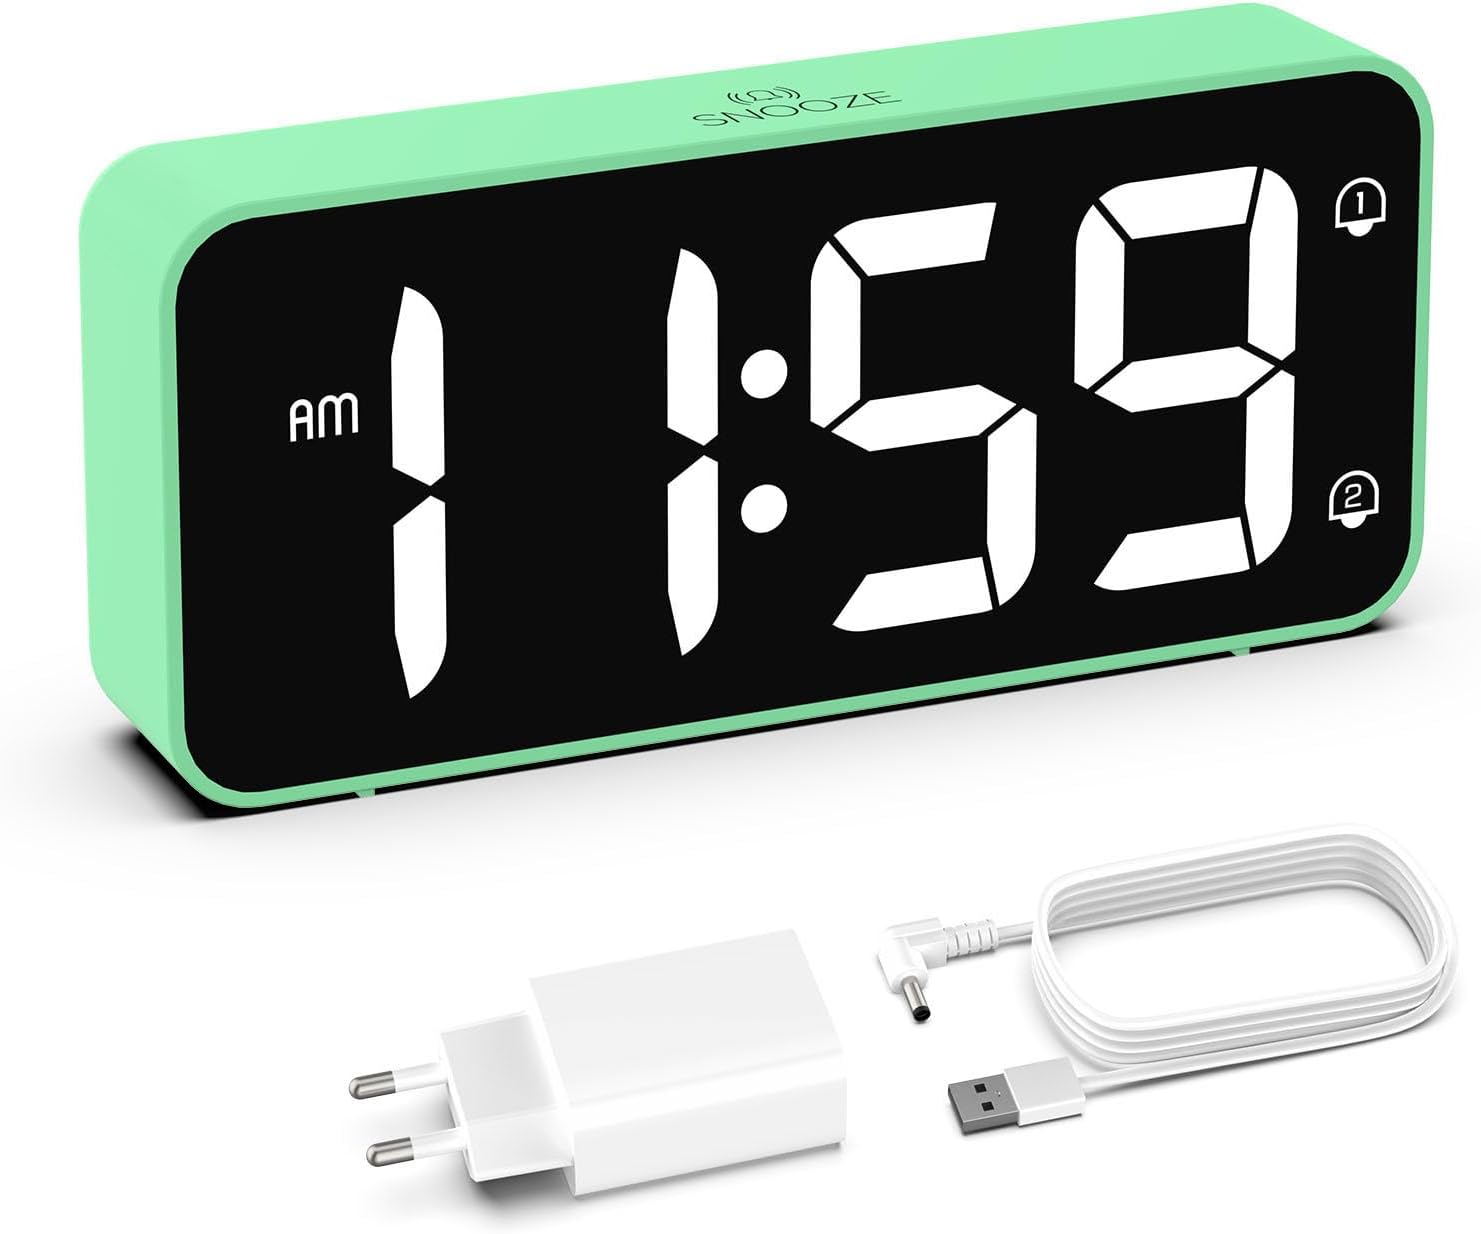
Image: The HOMVILLA Digital Alarm Clock, its USB charging cable, and the power adapter included in the package.
4. Product Overview
The HOMVILLA Digital Alarm Clock features a large LED display and intuitive controls. Familiarize yourself with the various components and buttons:

Image: A detailed diagram illustrating the front display and rear control panel of the alarm clock, with labels for each button, port, and dimension.
Front Display:
- Time Display: Large LED digits for current time.
- AM/PM Indicator: For 12-hour format.
- Alarm 1 Indicator: Icon to show Alarm 1 is active.
- Alarm 2 Indicator: Icon to show Alarm 2 is active.
- DST Indicator: Icon to show Daylight Saving Time is active.
- Snooze Indicator: Icon to show snooze is active (top center).
Rear Control Panel:

Image: The back of the alarm clock, highlighting the scroll wheels for volume and dimmer, and the central control buttons.
- Volume Scroll Wheel: Adjusts alarm volume (left side).
- Time Set Button: Enters time setting mode.
- Up Button: Increases values during setting.
- Down Button: Decreases values during setting.
- Alarm Set Button: Enters alarm setting mode.
- On/Off Button: Turns alarms on or off.
- Dimmer Scroll Wheel: Adjusts display brightness (right side).
- Reset Button: Resets the clock to factory defaults.
- USB Port: For charging external devices.
- DC Port: For power input.
- DST Button: Activates/deactivates Daylight Saving Time.
- Battery Compartment: For backup batteries (2x AAA, not included).
5. Setup
5.1 Power Connection
- Connect the USB charging cable to the DC port on the back of the alarm clock.
- Plug the power adapter into a standard electrical outlet.
- The display will light up, indicating the clock is powered.

Image: The alarm clock connected to a wall outlet via its power adapter, placed on a bedside table.
5.2 Battery Installation (Memory Function)
To retain time and alarm settings during a power outage, install two AAA batteries (not included) in the battery compartment.
- Open the battery compartment cover on the back of the clock.
- Insert two AAA batteries, ensuring correct polarity (+/-).
- Close the battery compartment cover.
Note: Batteries only support the memory function and do not power the display or alarm functions independently. The clock must be connected to mains power for full operation.

Image: A four-panel diagram illustrating the installation of AAA batteries into the alarm clock and demonstrating how the time setting is preserved even when the main power is disconnected and reconnected.
6. Operating Instructions
6.1 Setting the Time (12/24-Hour Format)
- Press and hold the Time Set button on the back of the clock. The hour digits will flash.
- Use the Up or Down buttons to adjust the hour.
- Press the Time Set button again to confirm the hour and move to minute setting. The minute digits will flash.
- Use the Up or Down buttons to adjust the minutes.
- Press the Time Set button a third time to confirm the minutes and exit time setting mode.
- To switch between 12-hour and 24-hour format, briefly press the Time Set button while the time is displayed (not in setting mode). The AM/PM indicator will appear for 12-hour format.
6.2 Setting Dual Alarms
The clock supports two independent alarms (Alarm 1 and Alarm 2).
- Press the Alarm Set button once to set Alarm 1. The Alarm 1 icon and hour digits will flash.
- Use the Up or Down buttons to adjust the alarm hour.
- Press Alarm Set again to confirm the hour and move to minute setting. The minute digits will flash.
- Use the Up or Down buttons to adjust the alarm minutes.
- Press Alarm Set a third time to confirm Alarm 1 settings.
- To set Alarm 2, press the Alarm Set button twice. Follow steps 1-5 for Alarm 2.
- To activate/deactivate an alarm, briefly press the On/Off button. The corresponding alarm icon (1 or 2) will appear/disappear on the display.

Image: Two separate scenarios illustrating the use of dual alarms, with one person waking at 8:20 and another at 14:30, highlighting the clock's ability to manage two distinct alarm times.
6.3 Snooze Function
When an alarm sounds, press the large Snooze button on the top of the clock to temporarily silence the alarm for 5 minutes. The alarm will sound again after 5 minutes. To turn off the alarm for the day, press any other button on the back of the clock.
Image: A person reaching to press the 'Snooze' button on the top of the alarm clock, which is placed on a bedside table.
6.4 Adjusting Display Brightness
The display brightness can be adjusted from 5% to 100% to suit your preference, ensuring readability day and night without disturbance.
- Locate the Dimmer Scroll Wheel on the right side of the back panel.
- Gently slide the wheel up or down to increase or decrease the display brightness.

Image: A graphic demonstrating the alarm clock's display brightness settings, showing the time '8:20' at 5%, 50%, and 100% illumination, with the clock itself shown below on a desk.
6.5 Adjusting Alarm Volume
The alarm volume can be adjusted from 90dB to 120dB.
- Locate the Volume Scroll Wheel on the left side of the back panel.
- Gently slide the wheel up or down to increase or decrease the alarm volume.
6.6 Selecting Alarm Sounds
The alarm clock offers 8 different alarm melodies to choose from.
- While in alarm setting mode (after setting the alarm time), press the Up or Down buttons to cycle through the available alarm sounds.
- Press the Alarm Set button to confirm your selection.
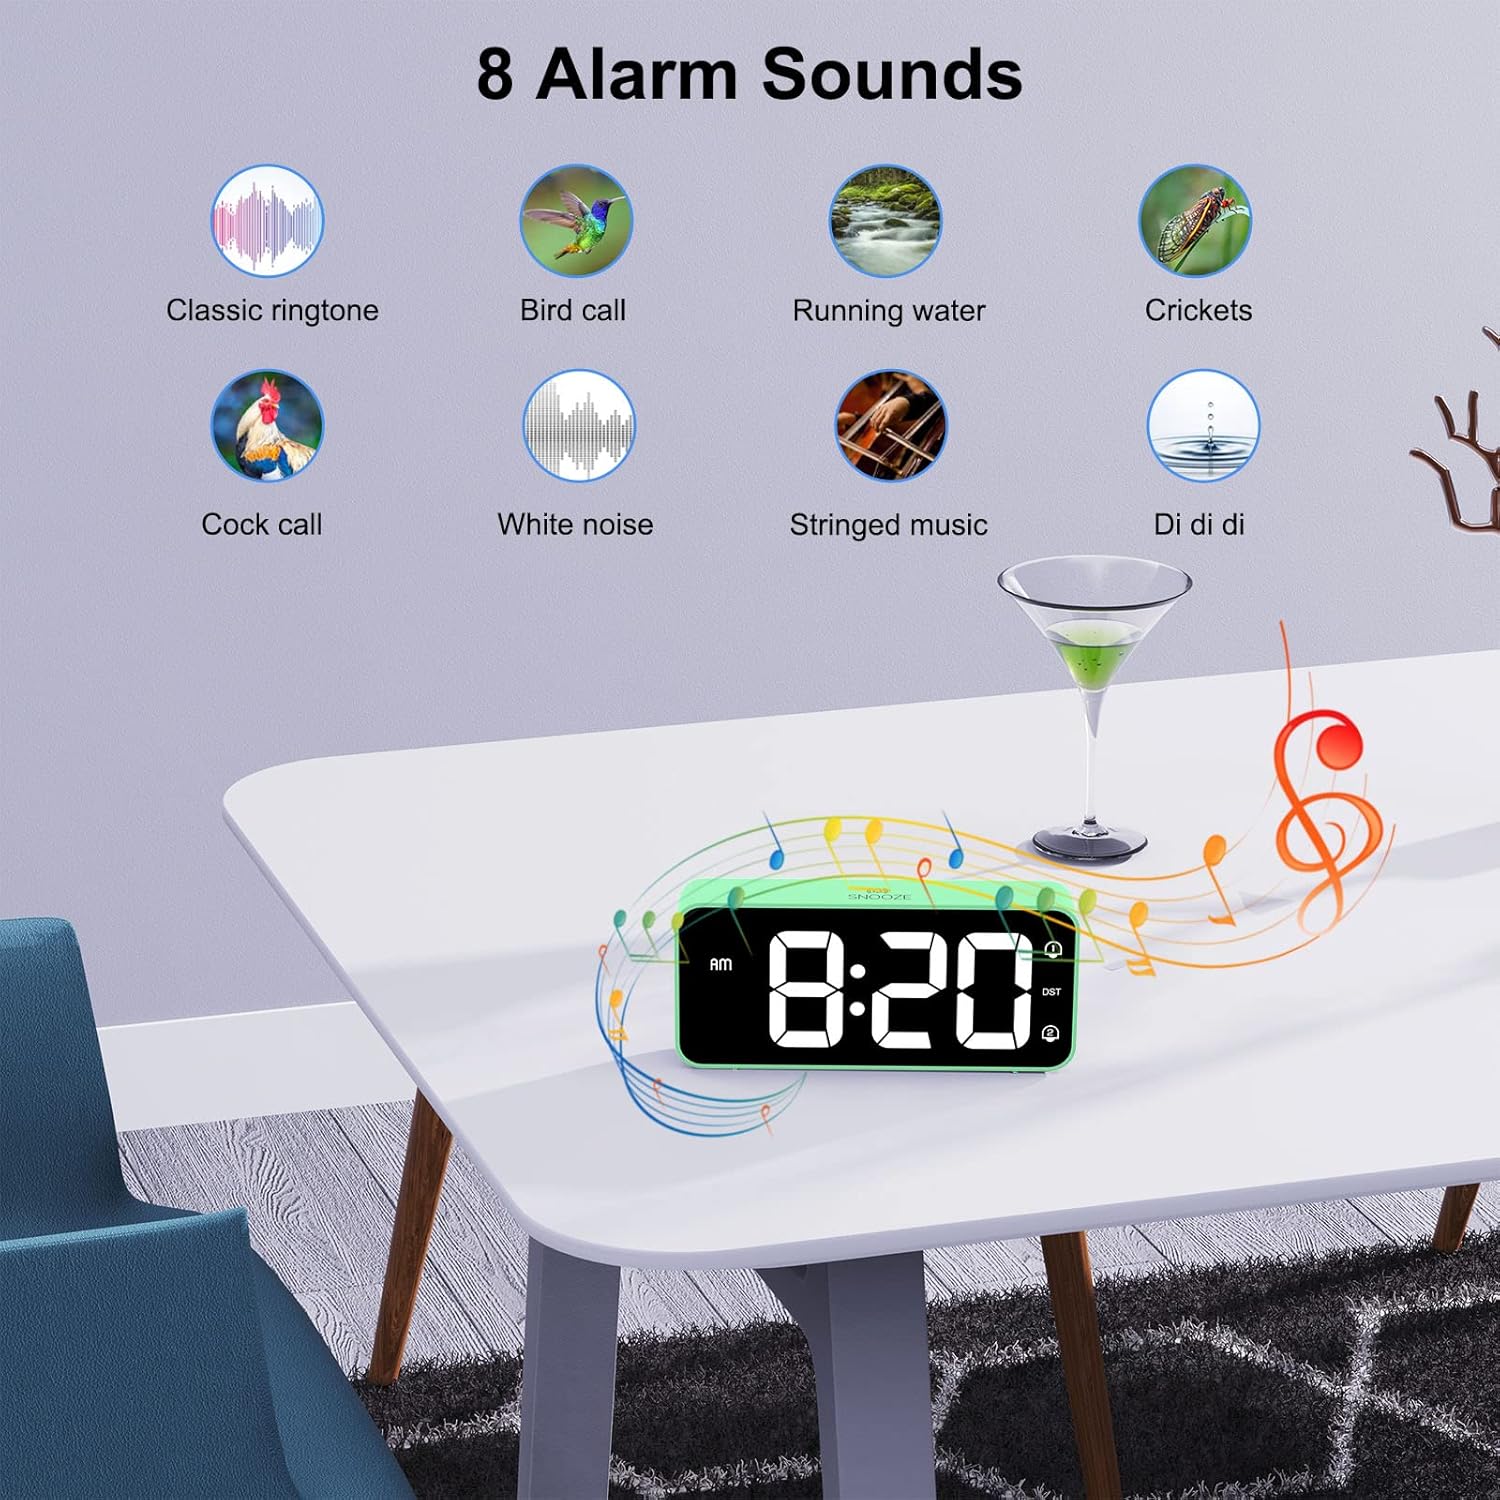
Image: A visual display of eight distinct alarm sound options, including classic ringtone, bird call, running water, crickets, cock call, white noise, stringed music, and a 'Di di di' sound, with the alarm clock shown on a table.
6.7 Daylight Saving Time (DST)
To activate or deactivate Daylight Saving Time:
- Locate the DST button on the back panel.
- Press the DST button once to toggle DST on or off. The DST icon will appear/disappear on the display.
6.8 USB Charging Port
The alarm clock includes a USB port on the back for charging mobile phones or other small electronic devices.
- Connect your device's USB charging cable to the USB port on the alarm clock.
- Ensure the alarm clock is connected to mains power for the USB charging function to work.
7. Maintenance
- Clean the clock's surface with a soft, dry cloth. Do not use abrasive cleaners or solvents.
- Ensure the ventilation openings are free from dust.
- If not in use for an extended period, disconnect the power adapter and remove the backup batteries.
8. Troubleshooting
| Problem | Possible Cause | Solution |
|---|---|---|
| Display is blank. | No power connection. | Ensure the power adapter is securely plugged into the clock and a working outlet. |
| Alarm does not sound. | Alarm is not activated or volume is too low. | Check if the alarm icon (1 or 2) is displayed. If not, activate it using the On/Off button. Adjust the volume using the Volume Scroll Wheel. |
| Time/settings reset after power outage. | Backup batteries not installed or depleted. | Install two fresh AAA batteries in the battery compartment. |
| USB charging not working. | Clock not connected to mains power. | Ensure the alarm clock is plugged into a wall outlet. |
| Display too bright/dim. | Brightness setting needs adjustment. | Use the Dimmer Scroll Wheel to adjust brightness. |
9. Specifications
- Model Number: 8813
- Brand: HOMVILLA
- Display Type: Large LED Mirror Display
- Display Size: 5.6 inches
- Product Dimensions: 14.4 cm (W) x 6.3 cm (H) x 3.81 cm (D) / 5.66 inches (W) x 2.48 inches (H) x 1.5 inches (D)
- Item Weight: 157 g
- Power Source: Mains powered (USB cable and adapter included)
- Backup Battery: 2 x AAA batteries (not included, for memory function only)
- Time Format: 12-hour / 24-hour selectable
- Alarms: Dual alarms
- Snooze Duration: 5 minutes
- Brightness Adjustment: 5% - 100% (via scroll wheel)
- Volume Adjustment: 90dB - 120dB (via scroll wheel)
- Alarm Sounds: 8 selectable melodies
- Additional Features: USB charging port, Daylight Saving Time (DST) mode
- Material: Acrylonitrile Butadiene Styrene (ABS)
- Room Type: Bedroom
- Mounting Type: Tabletop

Image: A graphic summarizing the key features of the alarm clock, including 5-100% dimmer, 90-120dB volume, snooze, dual alarms, 12/24H format, 8 available music options, memory function, USB charging port, DST, and large display.
10. Warranty and Support
HOMVILLA offers a lifetime warranty for this product. For any questions, technical support, or warranty claims, please contact HOMVILLA customer service through the retailer where you purchased the product or visit the official HOMVILLA website for contact information.